- Search Results
Android Nougat 7.1 ROM, LineageOS 14.1 for Galaxy TAB PRO 8.4 LTE has now arrived via an UNOFFICIAL build. If you want some more LineageOS ROMs or wanna taste the OFFICIAL LineageOS build then stay tuned to the LineageOS Nougat ROM page. This Galaxy TAB PRO 8.4 LTE LineageOS 14.1 is brought to you by developer promeo123.
DONATION TO DEVELOPER:
No donation link found for promeo123.
DISCLAIMER:
THIS IS AN INITIAL BUILD WHICH MAY HAVE MANY MORE BUGS THAN YOU CAN IMAGINE. HAVE A BACKUP BEFORE FLASHING THIS AND TRY AT YOUR OWN RISK. Installing a custom ROM on a Galaxy TAB PRO 8.4 LTE (mondrianlte, SM-T325) may require the bootloader to be unlocked, which may VOID your warranty and may delete all your data. Before proceeding further you may consider a complete backup. You are the only person making changes to your phone and I cannot be held responsible for the mistakes done by YOU.Status of LineageOS 14.1 for Galaxy TAB PRO 8.4 LTE (mondrianlte, SM-T325) Nougat 7.1 ROM:
WHAT’S WORKING:
– Not KnownKNOWN ISSUES:
– Not Known
REQUIRED LINKS AND FILES FOR LineageOS 14.1 for Galaxy TAB PRO 8.4 LTE NOUGAT 7.1 BASED CUSTOM ROM:
- Latest stock FW and baseband
- TWRP for TAB PRO 8.4 LTE
– Here is: how to install TWRP for TAB PRO 8.4 LTE (This guide is only for .tar or .tar.md5 TWRP file)
– To flash .img file you can follow this TWRP update guide using fastboot or you can use Flashify to update the .img TWRP. [YOUR DEVICE MIGHT NEED TO BE BOOTLOADER UNLOCKED IF YOU ARE FOLLOWING THIS] - TAB PRO 8.4 LTE LineageOS 14.1 ROM download link
- LineageOS Nougat GApps for Galaxy TAB PRO 8.4 LTE LineageOS 14.1 Nougat 7.1 ROM
Root binary is NOT inbuilt in LineageOS 14.1, so you may need a separate SuperSu package or LineageOS su binary to install to gain ROOT access. Here is how to root LineageOS
If there is no in-built ROOT or it does not work for some reason then you can try the SuperSU to gain ROOT access.HOW TO INSTALL/DOWNLOAD/FLASH/UPDATE Galaxy TAB PRO 8.4 LTE LineageOS 14.1 NOUGAT CUSTOM ROM:
Follow this if you are flashing LineageOS 14.1 for Galaxy TAB PRO 8.4 LTE (mondrianlte, SM-T325) for the first time, or coming from another ROM:
Points to NOTE:
– Try to avoid restoring apps backup using Titanium Backup. It may break things up.
– Don’t restore system data using Titanium Backup! It will definitely break the current installation.
– It is also discouraged to Restoring Apps + Data using Titanium Backup.- Download and Copy the GApps and LineageOS 14.1 for Galaxy TAB PRO 8.4 LTE ROM ZIP to your phone.
- Boot into Recovery. Make sure to have a Custom recovery like CWM or TWRP or any other custom recovery. If not then follow the Recovery Installation Guide for Samsung phones to flash a custom recovery on the Galaxy TAB PRO 8.4 LTE (mondrianlte, SM-T325). (it’s a generic guide which will work for TWRP as well as CWM recovery or any other recovery)
- Wipe data factory reset, Cache partition, Dalvik Cache and Format the System partition.
– Here is a guide explaining Erasing data using TWRP recovery.This will delete all your data on your phone. You may consider complete backup of your phone data or take a NANDROID backup of the current ROM
– How to backup all data on your Android Device
– how to take NANDROID backup using TWRP recovery - First flash the Galaxy TAB PRO 8.4 LTE LineageOS 14.1 ROM ZIP from device. Then flash the GApps zip from your device memory.
– Here is a post explaining how to install LineageOS. - DO NOT REBOOT yet. Then flash the LineageOS 14.1 GApps package.
– Here is a post explaining how to install LineageOS 14.1 GApps. - Reboot and Enjoy the Nougat 7.1 LineageOS 14.1 ROM for Galaxy TAB PRO 8.4 LTE (mondrianlte, SM-T325).
Upgrading from earlier version of Galaxy TAB PRO 8.4 LTE LineageOS 14.1 (mondrianlte, SM-T325):
- Copy the latest LineageOS 14.1 for Galaxy TAB PRO 8.4 LTE ROM ZIP file to your phone.
- Boot into Recovery.
- Flash the latest LineageOS ROM ZIP from your phone.
– Here is a post explaining how to update LineageOS. - Then flash the LineageOS 14.1 GApps package.
– Here is a post explaining how to flash GApps. - Reboot and Enjoy
Complete the initial setup and enjoy Android Nougat 7.1 with LineageOS 14.1 for Galaxy TAB PRO 8.4 LTE (mondrianlte, SM-T325). After the installation of Galaxy TAB PRO 8.4 LTE LineageOS 14.1 ROM (mondrianlte, SM-T325) you may want to enable ROOT access on your phone and here is how you can do that:
How to Enable ROOT on LineageOS 14.1.Stay tuned or Subscribe to the Galaxy TAB PRO 8.4 LTE (mondrianlte, SM-T325) forum For other Android Nougat ROMs, LineageOS 14.1 ROMs, other ROMs and all other device specific topics.You can now download and install LineageOS 16 for Moto E5 Plus. Here is how to install LineageOS 16 on Moto E5 Plus, with a step-by-step guide. This Moto E5 Plus LineageOS 16 build is brought to you by developer karthick111.
Follow the links to get other LineageOS 16 Download and Android Pie ROM builds.
DONATION TO DEVELOPER(S)/PROJECT:
If you like this ROM then do consider for a contribution to karthick111 and LineageOS project:
– Donate to karthick111
– Donate to LineageOS project
[su_note note_color=”#F9D9D9″ text_color=”#AA4343″ radius=”3″ class=”” id=””]DISCLAIMER:
THIS IS AN INITIAL BETA BUILD OF LineageOS 16 FOR Moto E5 Plus, WHICH HAS MANY BUGS.
MAKE SURE TO BACKUP ALL DATA OF YOUR PHONE AND FLASH AT YOUR OWN RISK.[/su_note][su_note note_color=”#FBF4DD” text_color=”#A38C68″ radius=”3″ class=”” id=””]Installing a custom ROM may require an unlock bootloader on Moto E5 Plus, which may VOID your warranty and may delete all your data. Before proceeding further you may consider backup all data on the phone.
You are the only person doing changes to your phone; neither the developer nor I can be held responsible for the mistakes done by you.[/su_note]Status of the Moto E5 Plus LineageOS 16 ROM:
WHAT’S WORKING:
– UnknownKNOWN ISSUES:
– UnknownREQUIRED GUIDES AND DOWNLOADS TO INSTALL LineageOS 16 ON Moto E5 Plus:
- ROM Download link for Moto E5 Plus LineageOS 16
- Moto E5 Plus TWRP Download (hannah) for this Moto E5 Plus LineageOS 16 ROM
- How to install TWRP recovery
- Moto E5 Plus unlock bootloader guide – required to install TWRP recovery
- MindTheGApps for LineageOS 16 or Open GApps for LineageOS 16
- How to Root LineageOS 16
HOW TO DOWNLOAD AND INSTALL LineageOS 16 ON Moto E5 Plus – Android 9 Pie CUSTOM ROM:
[su_note note_color=”#D7E3F4″ text_color=”#728095″ radius=”3″ class=”” id=””]
Following are the two sub-sections of this Moto E5 Plus LineageOS 16 guide:- First time installation of LineageOS 16 on Moto E5 Plus
- Upgrading LineageOS 16 on Moto E5 Plus from a previous build of LineageOS 16 ROM
[/su_note]
Flashing LineageOS 16 on Moto E5 Plus for the first time:
[su_note note_color=”#FBF4DD” text_color=”#A38C68″ radius=”3″ class=”” id=””]
Points to NOTE:- Try to avoid restoring apps backup using Titanium Backup. It may break things up.
- Don’t restore system data using Titanium Backup! It will definitely break the current installation.
- It is also discouraged to Restoring Apps + Data using Titanium Backup.
[/su_note]
- Download and Copy the LineageOS 16 Gapps and the Moto E5 Plus LineageOS 16 Android Pie ROM ZIP file to your phone.
- Boot into the TWRP custom Recovery to install this LineageOS 16 on Moto E5 Plus.
[su_note note_color=”#D7E3F4″ text_color=”#728095″ radius=”3″ class=”” id=””]- Make sure to have a Custom recovery like a TWRP recovery or any other custom recovery.
– If not then download the TWRP recovery from Downloads link and follow the Custom Recovery Installation Guide (it’s a generic guide which will work for TWRP as well as any other recovery)[/su_note] - Wipe the data partition (or do a factory reset), Cache partition, Dalvik Cache or ART cache and Format the System partition.
[su_note note_color=”#D7E3F4″ text_color=”#728095″ radius=”3″ class=”” id=””]- Here is a guide explaining how to wipe using TWRP recovery.[/su_note]
[su_note note_color=”#FBF4DD” text_color=”#A38C68″ radius=”3″ class=”” id=””]This will delete all your data on your phone. You may consider complete backup of your phone data or take a NANDROID backup of the current ROM
– How to backup all data on your Android Device
– how to take NANDROID backup using TWRP recovery[/su_note] - Install the Moto E5 Plus LineageOS 16 ROM file that you have copied into the phone.
[su_note note_color=”#D7E3F4″ text_color=”#728095″ radius=”3″ class=”” id=””]- Here is a post explaining how to install LineageOS[/su_note] - Then install the Android Pie MindTheGapps for LineageOS 16 package.
[su_note note_color=”#D7E3F4″ text_color=”#728095″ radius=”3″ class=”” id=””]- Here is a post explaining how to install GApps using TWRP recovery.[/su_note] - Reboot and Enjoy the Android 9 Pie LineageOS 16 on Moto E5 Plus.
Upgrading from earlier version of LineageOS 16 on Moto E5 Plus (hannah):
- Copy the latest ROM zip file of LineageOS 16 for Moto E5 Plus, LineageOS 16 GApps and/or Magisk ROOT package to the phone
- Boot into Recovery to flash the updated LineageOS 16 on Moto E5 Plus
- Format or wipe the system partition from the custom recovery menu.
- Install the LineageOS 16 for Moto E5 Plus.
[su_note note_color=”#D7E3F4″ text_color=”#728095″ radius=”3″ class=”” id=””]- Here is a post explaining how to install LineageOS[/su_note] - Reboot and see you have the GApps and ROOT access or NOT.
[su_note note_color=”#D8F1C6″ text_color=”#769958″ radius=”3″ class=”” id=””]- Gapps is built in such a way that it will sustain across ROM updates.[/su_note] - If you don’t have GApps after upgrading the LineageOS 16 on Moto E5 Plus, then flash the GApps.
[su_note note_color=”#D7E3F4″ text_color=”#728095″ radius=”3″ class=”” id=””]- Here is a post explaining how to flash GApps using TWRP recovery.[/su_note] - If you don’t have ROOT after upgrading the LineageOS 16 on Moto E5 Plus, then flash the SuperSU or Magisk or the Lineage SU binary.
[su_note note_color=”#D7E3F4″ text_color=”#728095″ radius=”3″ class=”” id=””]- Here is a post explaining How to Enable ROOT on LineageOS 16 ROM[/su_note] - Once everything is done, reboot and Enjoy the LineageOS 16 on Moto E5 Plus.
[su_note note_color=”#D8F1C6″ text_color=”#769958″ radius=”3″ class=”” id=””]Complete the initial setup and enjoy Android 9 Pie with LineageOS 16 on Moto E5 Plus.[/su_note]
After installing LineageOS 16 on Moto E5 Plus you may want to install Google Camera (GCam) or enable ROOT access on your phone and here is how you can do that:
– LineageOS 16 ROOT
– Google Camera for Android Pie[su_note note_color=”#D7E3F4″ text_color=”#728095″ radius=”3″ class=”” id=””]If there is no ROOT access for some reason even after installing the LineageOS SU binary, then you can try SuperSU rooting guide to enable ROOT access.[/su_note]
Stay tuned or Subscribe to the Moto E5 Plus (hannah) LineageOS forum For other Android Pie, Android Oreo ROMs, Nougat ROMs, or other ROMs and all other device specific topics.LineageOS 17 for LG G2 is now available to download and install from a developer build. This article explains how to install LG G2 LineageOS 17 ROM based on Android 10, with a step-by-step guide. This LG G2 LineageOS 17 build is brought to you by developer YoDevil.
Follow the links to get other Android 10 builds such as: LineageOS 17.1 / 17, and Android 10 Download for supported devices.
DONATION TO DEVELOPER(S)/PROJECT:
If you like this ROM then do consider for a contribution to YoDevil and LineageOS project:
– Donate to YoDevil
– Donate to LineageOS project[su_note note_color=”#F9D9D9″ text_color=”#AA4343″ radius=”3″ class=”” id=””]DISCLAIMER:
THIS IS AN INITIAL BUILD OF LineageOS 17 FOR LG G2, WHICH HAS HAVE MANY BUGS.
MAKE SURE TO BACKUP ALL DATA OF YOUR PHONE AND KEEP IT IN YOUR MIND THAT YOU ARE FLASHING AT YOUR OWN RISK.[/su_note][su_note note_color=”#FBF4DD” text_color=”#A38C68″ radius=”3″ class=”” id=””]Installing LineageOS 17 for LG G2 requires an unlock bootloader on LG G2, which may VOID your warranty and may delete all your data. Before proceeding further you may consider backup all data on the phone.
You are the only person making changes to your phone; neither the developer nor I can be held responsible for the mistakes done by you.[/su_note]
Status of the LG G2 LineageOS 17 Android 10 custom ROM:
WHAT’S WORKING:
– Audio
– Bluetooth
– Camera (* stock camera app incorrectly rotates and crops pictures taken in portrait mode)
– GPS
– Headphones
– NFC
– Network
– User storage
– Wi-FiKNOWN ISSUES:
– UnknownREQUIRED GUIDES AND DOWNLOADS OF LineageOS 17 FOR LG G2:
- ROM Download link of LG G2 LineageOS 17
- LG G2 TWRP Download (d802) for this LG G2 LineageOS 17 ROM
- How to install TWRP recovery (this is not an image file rather a zip file which can be flashed through another TWRP)
- LG G2 unlock bootloader guide – required to install TWRP recovery
- KitKat Bump bootloader for LG G2 (d802)
- Install stock lollipop firmware for LG G2
– Flash from kdz file for LG G2 - One Click Root APK Download
- Autorec Lollipop for LG G2 (d802)
- LineageOS 17 GApps
- How to Root LineageOS 17
- Download ADB to sideload the ROM
– 15 Seconds ADB Installer for Windows
– Minimal ADB and Fastboot for Windows
– ADB Fastboot for Linux and MAC
HOW TO DOWNLOAD AND INSTALL LG G2 LineageOS 17 Android 10 CUSTOM ROM:
[su_note note_color=”#D7E3F4″ text_color=”#728095″ radius=”3″ class=”” id=””]
Following are the two sub-sections of this LG G2 LineageOS 17 update guide:- First time installation of LineageOS 17 for LG G2
- Upgrading LineageOS 17 for LG G2 from a previous build of LineageOS 17 ROM
[/su_note]
Download and Install LineageOS 17 for LG G2 for the first time:
[su_note note_color=”#D8F1C6″ text_color=”#769958″ radius=”3″ class=”” id=””]There are many guides or utilities involved in this LG G2 LineageOS 17 update guide. All the relevant guides or utility downloads are listed on the above downloads section.[/su_note]
- Download the appropriate stock lollipop firmware for LG G2 from the above stock firmware download link.
- Install the firmware which is in kdz format using LGUP tool.
- Root the fresh stock firmware using One click root.
[su_note note_color=”#D7E3F4″ text_color=”#728095″ radius=”3″ class=”” id=””]- By now your phone must have an unlocked bootloader to proceed with other steps. If not, unlock the bootloader first and proceed ahead.[/su_note] - Install TWRP for LG G2 using AutoRec app.
- Once TWRP is installed by the AutoRec app, boot into the recovery and install the TWRP 3.3 listed in the above downloads section.
- Download and Copy the LineageOS 17 ROM for LG G2 and the GApps for LineageOS 17 to your phone.
- Boot into the TWRP Recovery again to install this LG G2 LineageOS 17 Android 10 custom ROM. Make sure to use the TWRP provided in above downloads section or any system-as-root configured TWRP for LG G2
- Wipe the data partition, Cache partition, and system partition.
[su_note note_color=”#D7E3F4″ text_color=”#728095″ radius=”3″ class=”” id=””]- Here is a guide explaining how to wipe using TWRP recovery.[/su_note]
[su_note note_color=”#FBF4DD” text_color=”#A38C68″ radius=”3″ class=”” id=””]This will delete all your data on your phone. You may consider taking a complete backup of your phone data or take a backup of all relevant partitions.
– How to backup data on Android
– how to take NANDROID backup using TWRP recovery[/su_note] - Install the LG G2 LineageOS 17 ROM file that you have copied into the phone.
[su_note note_color=”#D7E3F4″ text_color=”#728095″ radius=”3″ class=”” id=””]- Here is a post explaining how to install LineageOS[/su_note] - Reboot into the TWRP recovery again.
- Then install the LineageOS 17 GApps package.
[su_note note_color=”#D7E3F4″ text_color=”#728095″ radius=”3″ class=”” id=””]- Here is a post explaining how to install GApps using TWRP recovery.[/su_note] - Reboot and Enjoy the Android 10 based LineageOS 17 for LG G2.
Upgrading from earlier version of LineageOS 17 for LG G2 (d802):
- Copy the latest ROM zip file of LineageOS 17 for LG G2, LineageOS 17 GApps and/or Magisk ROOT package to the phone
- Boot into Recovery to flash the updated LineageOS 17 for LG G2
- Wipe the system partition from the TWRP recovery menu.
- Install the LG G2 LineageOS 17 update.
[su_note note_color=”#D7E3F4″ text_color=”#728095″ radius=”3″ class=”” id=””]- Here is a post explaining how to install LineageOS[/su_note] - Reboot and see you have the GApps and ROOT access or NOT.
[su_note note_color=”#D8F1C6″ text_color=”#769958″ radius=”3″ class=”” id=””]- Gapps is built in such a way that it will sustain across ROM updates.[/su_note] - If you don’t have GApps after upgrading the LineageOS 17 on LG G2, then flash the GApps.
[su_note note_color=”#D7E3F4″ text_color=”#728095″ radius=”3″ class=”” id=””]- Here is a post explaining how to flash GApps using TWRP recovery.[/su_note] - If you don’t have ROOT after upgrading the LineageOS 17 on LG G2, then flash the SuperSU or Magisk or the Lineage SU binary.
[su_note note_color=”#D7E3F4″ text_color=”#728095″ radius=”3″ class=”” id=””]- Here is a post explaining How to ROOT LineageOS 17[/su_note] - Once everything is done, reboot and Enjoy the LineageOS 17 on LG G2.
[su_note note_color=”#D8F1C6″ text_color=”#769958″ radius=”3″ class=”” id=””]Complete the initial setup and enjoy Android 10 with LineageOS 17 on LG G2.[/su_note]
Some Screenshots of LineageOS 17
[rl_gallery id=”103801″]
After installing LineageOS 17 on LG G2 you may want to install Google Camera (GCam) or enable ROOT access on your phone and here is how you can do that:
– LineageOS 17 Rooting guideWhere to Download Google Camera for LG G2 LineageOS 17?
GCam 7.2 and GCam 7.0 are compatible with LineageOS 17 or any Android 10 ROM in general.
In case you won’t get your device in the above lists, you can always look into the big list of Google Camera APK for Android 10 (this page contains a huge list of GCam for all available devices)[su_note note_color=”#D7E3F4″ text_color=”#728095″ radius=”3″ class=”” id=””]If there is no ROOT access for some reason even after installing the LineageOS SU binary, then you can try the SuperSU Zip to enable ROOT access.[/su_note]
Stay tuned or Subscribe to the LG G2 (d802) LineageOS forum For other Android 10, Android Oreo ROMs, Nougat ROMs, or other ROMs and all other device specific topics.If you are looking to install/update Android 8.1 Oreo based LineageOS 15.1 for LG G6 Qualcomm variant, then it’s now available via an unofficial build. Earlier we had the LineageOS 15 for LG G6 and this time we have the latest LineageOS 15.1.
Follow the links to get LineageOS 16 and Android Pie ROM builds.
This Android 8.1 Oreo based LineageOS 15.1 for LG G6 (h870) is brought to you by developer Tim Hallinger.
DONATION TO DEVELOPER(S):
If you like this ROM then do consider for a contribution to Tim Hallinger and LineageOS project:
– No donation link found for Tim Hallinger
– Donate to LineageOS projectFor other Android Oreo ROMs list you can check back the Android Oreo ROMs.
DISCLAIMER:
THIS IS AN INITIAL TEST BUILD WHICH MAY NOT BOOT AT ALL OR MAY HAVE MANY BUGS.
FLASH AT YOUR OWN RISK.
Installing a custom ROM may require an unlock bootloader on LG G6, which may VOID your warranty and may delete all your data. Before proceeding further you may consider backup all data on the phone. You are the only person doing changes to your phone; neither the developer nor I can be held responsible for the mistakes done by you.Status of LineageOS 15.1 for LG G6 – Android 8.1 Oreo ROM:
WHAT’S WORKING:
– UnknownKNOWN ISSUES:
– UnknownREQUIRED LINKS AND FILES FOR THIS LineageOS 15.1 for LG G6 ANDROID 8.1 OREO CUSTOM ROM:
- TWRP for LG G6 (h870)
This TWRP recovery guide may require an unlocked bootloader on the LG G6.
– Here is the LG G6 unlock bootloader guide - ROM Download link of LineageOS 15.1 for LG G6
- GApps for LineageOS 15.1
su Root binary is NOT inbuilt in LineageOS 15.1, so you may need to install a separate SuperSu package or LineageOS su binary to gain ROOT access. Here is LineageOS 15.1 Root guide
If there is no in-built ROOT or it does not work for some reason then you can try SuperSU rooting guide to enable ROOT access.
HOW TO UPDATE/INSTALL LineageOS 15.1 FOR LG G6; ANDROID 8.1 OREO CUSTOM ROM:
– Fresh LineageOS 15.1 installation guide
– LineageOS 15.1 update on top of previous LineageOS 15.1 ROMFollow this if you are flashing LineageOS 15.1 on LG G6 for the first time, or coming from another ROM:
Points to NOTE:– Try to avoid restoring apps backup using Titanium Backup. It may break things up.
– Don’t restore system data using Titanium Backup! It will definitely break the current installation.
– It is also discouraged to Restoring Apps + Data using Titanium Backup.- Download and Copy the GApps and LG G6 LineageOS 15.1 ROM ZIP files to your phone.
- Boot into the TWRP custom Recovery to install this LineageOS 15.1 for LG G6.
– Make sure to have a Custom recovery like a TWRP recovery or any other custom recovery.
If not then download the TWRP recovery from Downloads link and follow the Custom Recovery Installation Guide (it’s a generic guide which will work for TWRP as well as CWM recovery or any other recovery) - Wipe the data partition (or do a factory reset), Cache partition, Dalvik Cache or ART cache and Format the System partition.
– Here is a guide explaining how to wipe using TWRP recovery.This will delete all your data on your phone. You may consider complete backup of your phone data or take a NANDROID backup of the current ROM
- Install the LG G6 LineageOS 15.1 ROM file that you have copied into the phone.- Here is a post explaining how to install LineageOS
- Then reboot into recovery (don’t skip this) and install the Oreo Gapps for LineageOS 15.1 package.
– Here is a post explaining how to install GApps using TWRP recovery.
- Reboot and Enjoy the Android 8.1 Oreo LineageOS 15.1 on LG G6.
Upgrading from earlier version of LineageOS 15.1 on LG G6 (h870):
- Copy the latest LineageOS 15.1 for LG G6 ROM ZIP file, Oreo 8.1 GApps and/or supersu ROOT package to the phone
- Boot into Recovery.- Make sure you have a latest custom Recovery that should be able to flash the LineageOS 15.1 ROM update.
- Format or wipe the system partition from the custom recovery menu.
- Install the LineageOS 15.1 ROM for LG G6.- Here is a post explaining how to install LineageOS
- Reboot and see you have the GApps and ROOT access or NOT.- Gapps is built in such a way that it will sustain across ROM updates.
- If you don’t have GApps after upgrading the LineageOS 15.1 on LG G6, then flash the GApps.- Here is a post explaining how to flash GApps using TWRP recovery.
- If you don’t have ROOT after upgrading the LineageOS 15.1 on LG G6, then flash the SuperSU or Magisk or the Lineage SU binary.- Here is a post explaining How to Enable ROOT for LineageOS 15.1 ROM
- Once everything is done, reboot and Enjoy the LineageOS 15.1 for LG G6.
Complete the initial setup and enjoy Android 8.1 Oreo with LineageOS 15.1 on LG G6. After the installation of LineageOS 15.1 for LG G6 you may want to enable ROOT access on your phone and here is how you can do that:
– LineageOS 15.1 ROOT.Stay tuned or Subscribe to the LG G6 (h870) LineageOS forum For other Android Oreo, Nougat ROMs, LineageOS 15.1 ROMs, or other ROMs and all other device specific topics.A working build of TWRP for Mi 10 Lite Zoom (or Mi 10 Youth Edition) is now available to download. This is a step-by-step guide that explains how to install TWRP on Mi 10 Lite Zoom.
This Mi 10 Lite Zoom TWRP is brought to you by developer wzsx150.

DONATION TO DEVELOPER(S) AND TWRP PROJECT:
If you like the work of the developer(s) then do consider for a contribution to wzsx150 and TWRP project:
– No donation link found for wzsx150
– Donate to dees_troy TWRP’s Lead developer[su_note note_color=”#F9D9D9″ text_color=”#AA4343″ radius=”3″ class=”” id=””]DISCLAIMER:
Installing TWRP recovery on Mi 10 Lite Zoom requires an unlock bootloader, which may void the warranty and delete all data on your phone. Make sure you back up important data.You are the only person making changes to your phone and I cannot be held responsible for the mistakes done by you. So, flash at your own risk![/su_note]
[su_note note_color=”#D7E3F4″ text_color=”#728095″ radius=”3″ class=”” id=””]Mi 10 Lite Zoom and the Mi 10 Youth Edition are the same devices launched in different geographical regions. This guide of TWRP is primarily written for the Mi 10 Lite Zoom which is a global variant but it will also work on the Mi 10 Youth Edition (the Chinese variant?). [/su_note]
About this TWRP for Mi 10 Lite Zoom / Youth Edition
– TWRP version: 3.4.1b
– Device Codename: vangogh
– Supported Android Version: Android 10
– Build date: 7th May 2020
– Based on MIUI FW: v11.0.3.0.QJVCNXMWhere to download TWRP for Mi 10 Lite Zoom / Mi 10 Youth Edition?
[su_note note_color=”#D7E3F4″ text_color=”#728095″ radius=”3″ class=”” id=””]Below is a list of files or guides required to install or flash TWRP recovery on Mi 10 Lite Zoom. The next section has a step by step guide that explains when and how to use these files or guides in the process.[/su_note]
[su_note note_color=”#D8F1C6″ text_color=”#769958″ radius=”3″ class=”” id=””]
- Mi 10 Lite Zoom, USB cable and a Windows, or Linux or MAC with ADB and fastboot installed on it.
- TWRP Download (codename: vangogh)
- MiFlash Unlock Tool download
- ADB and Fastboot utility.- 15 Seconds ADB Installer for Windows
– Minimal ADB and Fastboot for Windows
– ADB Fastboot for Linux and MAC - Unlocked bootloader on Mi 10 Lite Zoom
[/su_note]
How to Install TWRP on Mi 10 Lite Zoom?
Installing TWRP on the phone requires an unlock bootloader. So, I have divided this whole guide into two parts as below:
- Bootloader Unlock
- Flashing the TWRP
Unlocking the Bootloader on Mi 10 Youth (or Mi 10 Lite Zoom)
The phone must have an unlocked bootloader in the first place to be able to install or replace the stock recovery with TWRP recovery on Mi 10 Lite Zoom.
Follow the below instructions to unlock the bootloader.- Enable developer options
- Enable OEM unlock and USB debugging inside Developer Options
- Then go to Mi Unlock Status (under Developer Options) and click on the Add account and device.
[su_note note_color=”#D7E3F4″ text_color=”#728095″ radius=”3″ class=”” id=””]Add your Mi 10 Lite Zoom to the Mi account registered on your phone.[/su_note] - Once done, reboot the phone into fastboot and unlock the phone with MiFlash Unlock Tool
[su_note note_color=”#FBF4DD” text_color=”#A38C68″ radius=”3″ class=”” id=””]Visit this Mi 10 Lite Zoom Bootloader Unlock page to get a detailed step-by-step guide with screenshots.[/su_note]
Flashing the TWRP on Mi 10 Lite Zoom (or Youth Edition)
- Download and extract the Mi 10 Lite Zoom TWRP zip file. There you will get recovery.img and misc.bin file.
- Download and Install the ADB and Fastboot utilities.
- Then connect the phone to the PC using a USB cable.
[su_note note_color=”#D7E3F4″ text_color=”#728095″ radius=”3″ class=”” id=””]- On your phone, if you see such as “Allow USB debugging” then just tap on OK to proceed.[/su_note] - On the computer, open a command prompt (on Windows) or terminal (on Linux or macOS) window, and execute the below command to restart your phone into fastboot mode or bootloader mode:
adb reboot bootloader[su_note note_color=”#D7E3F4″ text_color=”#728095″ radius=”3″ class=”” id=””]- You can also enter into fastboot or bootloader mode by turning off the phone and then pressing the Power button + Volume Down button.[/su_note]
- As this is an A-only device, the TWRP needs to be flashed on the recovery partition. So, execute the below commands to flash the twrp and the misc.bin file:
fastboot flash recovery twrp-3.4.x-xx.img

fastboot flash misc misc.bin
[su_note note_color=”#D7E3F4″ text_color=”#728095″ radius=”3″ class=”” id=””]While executing this command make sure to replace the twrp-3.4.x-xx.img with the actual filename of the TWRP.[/su_note]
- Wait for the fastboot command to finish installing the TWRP on Mi 10 Lite Zoom.
That’s all on installing TWRP on Mi 10 Lite Zoom. For some reason, if it fails, you can login and reply below so that I can try to help you troubleshoot the issue.
After installing TWRP on Mi 10 Lite Zoom
You can do many things after installing TWRP on Mi 10 Lite Zoom. Below are few such examples:
- You can enable Root on Mi 10 Lite Zoom
- You can install one of the custom ROMs available for Mi 10 Lite Zoom
- You can install some of the mods, magisk modules, etc.
Add-on links for Mi 10 Lite Zoom
Following are some extra resources for Mi 10 Lite Zoom which you may be interested in:
– LineageOS 17.1 for Mi 10 Lite Zoom
– GCam for Mi 10 Lite Zoom (Youth Edition)Visit the following to get other updates of Mi 10 Lite Zoom forum (codename: vangogh) on Android Custom ROMs, LineageOS ROMs, and all other device specific topics.This a very simple Beginner level Step By Step Guide explaining how to take Backup of all the Data on your Android Phone or Tablet such as: Apps, Contacts, Messages, Files etc. on Any Android phone or tablet. Yes, you read it right, this is the one guide which just works on any Android phone whether it be a Samsung, LG or Sony or any Android phone or tablet. No need to install a PC suite for LG, Samsung and Sony differently. This one guide will help you synchronize your data across devices.
If you are looking to have a complete backup of the current ROM which is called as a NANDROID BACKUP then definitely this is not the Backup Guide you are looking for. Below is the link for the same:
How to Take NANDROID BACKUP using TWRP recoveryIn our phone we have so many personal data, contacts, important files and many more. Sometimes you get updates for your device, or you may want to restore it to factory settings, or sometimes you may want to upgrade your device to a custom ROM like Cyanogenmod or something else then definitely you will not wish to lose your data at once right!!!
Introducing the MyPhoneExplorer Application which will help you to take backup of all the data on your Android device. Make sure you have at least half an hour of time to set it up and understand properly what it can do for you. This application works on Windows and Linux systems only as far as I know. Just follow the below steps to install the MyPhoneExplorer Windows Applicaiton and also the cient App from on your Android Device.
NOTE:
This data backup process is only meant for Android devices.
To take backup of your data you need to have a Windows or a Linux machine.You need to have connectivity to the computer in the either of the following mentioned ways:
– Wi-Fi
– Bluetooth
– USB data cableHow to install the MyphoneExplorer application:
Download the MyPhoneExplorer application for Windows OS from the link provided below:
MyPhoneExplorer application download linkAfter downloading the application please follow the below steps to install the application:
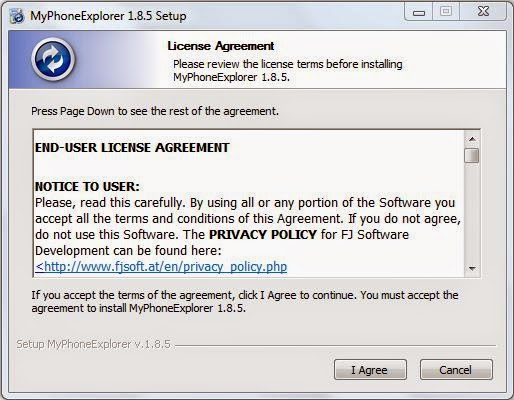
STEP 1:Double click on the downloaded file and agree to the license agreement. Click on I Agree to proceed.
 [Accept the license agrrement of the software]STEP 2:
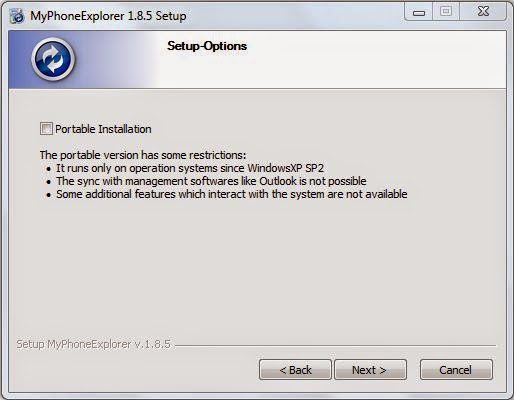
Click on Next and be informed that NOT TO click on the portable installation check box.
 [Click on Next]STEP 3:
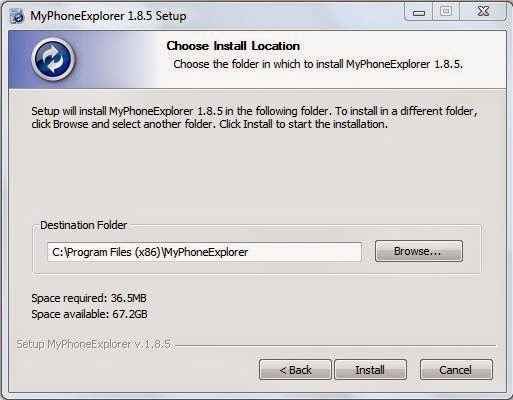
Select where you want to keep the application files. Better not to change anything and just click on Install.
 [Click on Install to start installation]
How to synchronise your phone with the PC:
Download and Install the MyPhoneExplorer Client application for your Android device from the link provided:
MyPhoneExplorer Client download link on Play StoreNOTE:
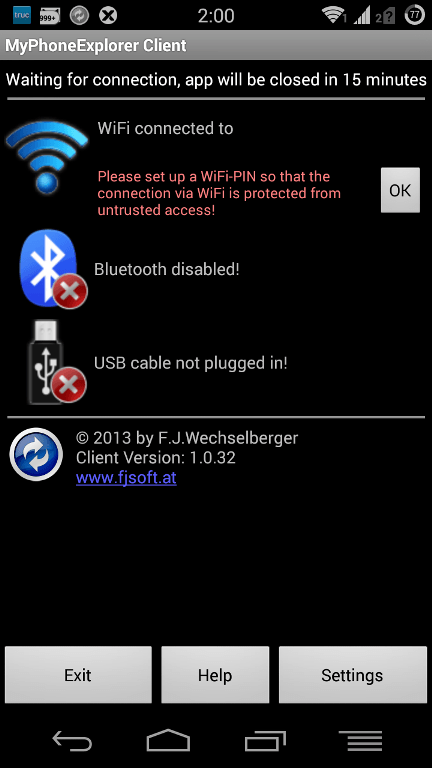
Make sure you run the Client application on your phone before you run the application on your PC and your phone is connected to your PC.
I have connected my device to my PC via Wi-Fi connection so It shows that it is “WiFi connected to”. [MyPhoneExplorer Client app on my Android phone]STEP 1:
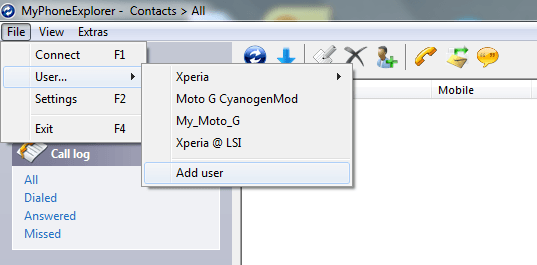
Open File > User > Add user.
 [Add a user on the application]STEP 2:
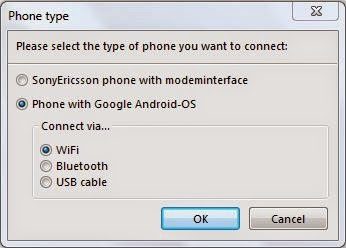
In the next dialog box that pops up select “Phone with Google Android-OS” and select the mode of communication for the “Connect via…” section.
As I am connecting my phone to my PC I am selecting WiFi. [Select the communication type between your PC and your phone]
Before connecting you have to do one more thing.
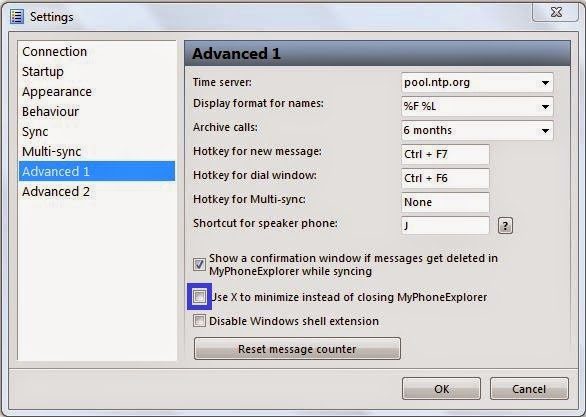
Go to File > Settings and then Go to the Advanced 1 TAB and select the “Use X to minimize instead of closing MyPhoneExplorer” check box.This will now close your application when you will click the close button on your right side.
Because if your application is closed then the connection to your device will also be lost. [Extra setup]STEP 3:
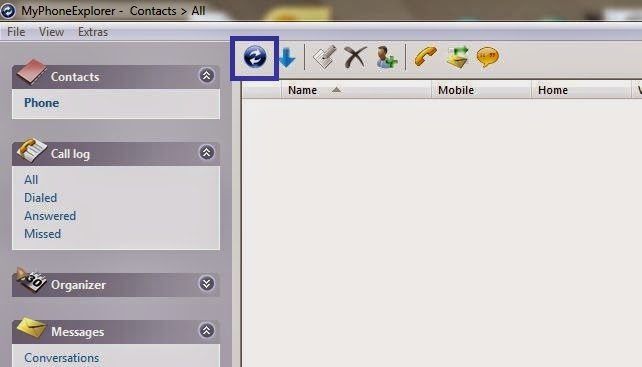
Click on the Synchronise button to start the connection.
 [Start synchronisation]
How to take backup of your Android phone data:
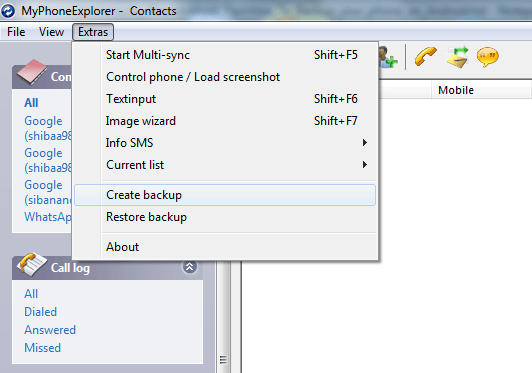
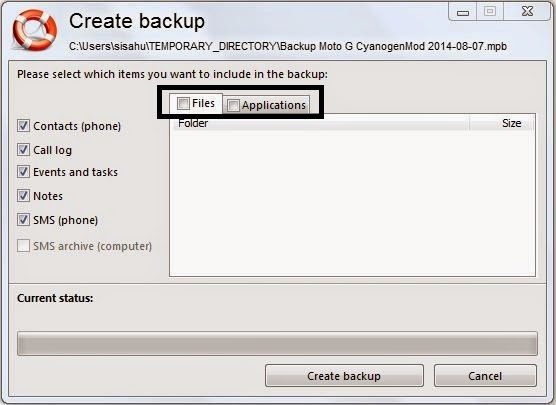
STEP 4:After synchronization has been completed you can now take a backup of all your contacts, calendar data, messages and your files and even the applications installed.
Go to the following path on the application as shown in the below image.
 [Backup your data]
You can select the Files and then select a folder where to keep the files on your local computer.
Similarly you can select applications and then select a folder on your local machine where you want to keep the Android application files. [Backup your files and application data]
Now you sit back relaxed till the application takes all the backup of all your phone data. If you want to have a complete backup of the current ROM then you can try the TWRP NANDROID Backup Guide.
LineageOS 16 for Redmi 6 Pro is now available to download and install, which is based on Android Pie 9.0 version. Here is how to install LineageOS 16 on Redmi 6 Pro, with a step-by-step guide.
Follow the links to get other LineageOS 16 and Android Pie ROM builds.
This LineageOS 16 build for Redmi 6 Pro is brought to you by developer RevanthTolety.
[h2]DONATION TO DEVELOPER(S)/PROJECT:[/h2]
If you like this ROM then do consider for a contribution to RevanthTolety and LineageOS project:
– Donate to RevanthTolety
– Donate to LineageOS project
[su_note note_color=”#F9D9D9″ text_color=”#AA4343″ radius=”3″ class=”” id=””]DISCLAIMER:
THIS IS AN INITIAL BETA BUILD OF LineageOS 16 FOR Redmi 6 Pro, WHICH MAY HAVE MANY BUGS.
MAKE SURE TO BACKUP ALL DATA OF YOUR PHONE AND MIND THAT YOU ARE FLASHING AT YOUR OWN RISK.[/su_note][su_note note_color=”#FBF4DD” text_color=”#A38C68″ radius=”3″ class=”” id=””]Installing a custom ROM may require an unlock bootloader on Redmi 6 Pro, which may VOID your warranty and may delete all your data. Before proceeding further you may consider backup all data on the phone.
You are the only person doing changes to your phone; neither the developer nor I can be held responsible for the mistakes done by you.[/su_note][h3]Status of the Redmi 6 Pro LineageOS 16 ROM:[/h3]
[color=blue]WHAT’S WORKING:
– Almost Everything
[/color][color=red]KNOWN ISSUES:
– Videos Doesn’t Play in Notch Area
[/color][h2]REQUIRED GUIDES AND DOWNLOADS TO INSTALL LineageOS 16 ON Redmi 6 Pro:[/h2]
- TWRP Download for this Redmi 6 Pro LineageOS 16 ROM
- How to install TWRP recovery
- Redmi 6 Pro unlock bootloader – required to install TWRP recovery
- ROM download link of LineageOS 16 for Redmi 6 Pro
- MindTheGApps for LineageOS 16 / GApps for LineageOS 16
- How to ROOT LineageOS 16
[h2]HOW TO DOWNLOAD AND INSTALL LineageOS 16 ON Redmi 6 Pro – Android 9.0 Pie CUSTOM ROM:[/h2]
[su_note note_color=”#D7E3F4″ text_color=”#728095″ radius=”3″ class=”” id=””]
Following are the two sub-sections of this Redmi 6 Pro LineageOS 16 guide:- First time installation of LineageOS 16 on Redmi 6 Pro
- Upgrading LineageOS 16 on Redmi 6 Pro from a previous build of LineageOS 16 ROM
[/su_note]
[h3]To Install LineageOS 16 on Redmi 6 Pro for the first time:[/h3]
[su_note note_color=”#FBF4DD” text_color=”#A38C68″ radius=”3″ class=”” id=””]
Points to NOTE:- Try to avoid restoring apps backup using Titanium Backup. It may break things up.
- Don’t restore system data using Titanium Backup! It will definitely break the current installation.
- It is also discouraged to Restoring Apps + Data using Titanium Backup.
[/su_note]
- Download and Copy the Redmi 6 Pro LineageOS 16 ROM and GApps ZIP file to your phone.
- Boot into the TWRP custom Recovery to install this LineageOS 16 on Redmi 6 Pro.
[su_note note_color=”#D7E3F4″ text_color=”#728095″ radius=”3″ class=”” id=””]- Make sure to have a Custom recovery like a TWRP recovery or any other custom recovery.
– If not then download the TWRP recovery from Downloads link and follow the how to install twrp Guide (it’s a generic guide which will work for TWRP as well as any other recovery)
– Installing TWRP recovery requires an unlocked bootloader on Redmi 6 Pro[/su_note] - Wipe the data partition (or do a factory reset), Cache partition, Dalvik Cache or ART cache and Format the System partition.
[su_note note_color=”#D7E3F4″ text_color=”#728095″ radius=”3″ class=”” id=””]- Here is a guide explaining how to wipe using TWRP recovery.[/su_note]
[su_note note_color=”#FBF4DD” text_color=”#A38C68″ radius=”3″ class=”” id=””]This will delete all your data on your phone. You may consider complete backup of your phone data or take a NANDROID backup of the current ROM
– How to backup data on Android phone
– how to take NANDROID backup using TWRP recovery[/su_note] - First flash the LineageOS 16 for Redmi 6 Pro
[su_note note_color=”#D7E3F4″ text_color=”#728095″ radius=”3″ class=”” id=””]- Here is a post explaining how to install recovery flashable zip file[/su_note] - Then install the MindTheGapps for LineageOS 16 package.
[su_note note_color=”#D7E3F4″ text_color=”#728095″ radius=”3″ class=”” id=””]- Here is a post explaining how to install GApps using TWRP recovery.[/su_note] - Reboot and Enjoy the Android 9.0 Pie LineageOS 16 on Redmi 6 Pro.
[h3]Upgrading from earlier version of LineageOS 16 on Redmi 6 Pro (sakura):[/h3]
- Copy the latest ROM zip file of LineageOS 16 for Redmi 6 Pro, LineageOS 16 GApps and/or Magisk ROOT package to the phone
- Boot into Recovery.- Make sure you have a latest custom Recovery that should be able to flash the LineageOS 16 ROM update.
- Format or wipe the system partition from the custom recovery menu.
- Install the LineageOS 16 for Redmi 6 Pro.
[su_note note_color=”#D7E3F4″ text_color=”#728095″ radius=”3″ class=”” id=””]- Here is a post explaining how to install LineageOS[/su_note] - Reboot and see you have the GApps and ROOT access or NOT.
[su_note note_color=”#D8F1C6″ text_color=”#769958″ radius=”3″ class=”” id=””]- Gapps is built in such a way that it will sustain across ROM updates.[/su_note] - If you don’t have GApps after upgrading the LineageOS 16 on Redmi 6 Pro, then flash the GApps.
[su_note note_color=”#D7E3F4″ text_color=”#728095″ radius=”3″ class=”” id=””]- Here is a post explaining how to flash GApps using TWRP recovery.[/su_note] - If you don’t have ROOT after upgrading the LineageOS 16 on Redmi 6 Pro, then flash the SuperSU or Magisk or the Lineage SU binary.
[su_note note_color=”#D7E3F4″ text_color=”#728095″ radius=”3″ class=”” id=””]- Here is a post explaining How to Enable ROOT on LineageOS 16 ROM[/su_note] - Once everything is done, reboot and Enjoy the LineageOS 16 on Redmi 6 Pro.
[su_note note_color=”#D8F1C6″ text_color=”#769958″ radius=”3″ class=”” id=””]Complete the initial setup and enjoy Android 9.0 Pie with LineageOS 16 on Redmi 6 Pro.[/su_note]
After installing LineageOS 16 on Redmi 6 Pro you may want to install Google Camera (GCam) or enable ROOT access on your phone and here is how you can do that:
– LineageOS 16 ROOT
– GCam APK for Android Pie (this page contains a huge list of GCam for all available devices)[su_note note_color=”#D7E3F4″ text_color=”#728095″ radius=”3″ class=”” id=””]If there is no ROOT access for some reason even after installing the LineageOS SU binary, then you can try SuperSU rooting guide to enable ROOT access.[/su_note]
Stay tuned or Subscribe to the Redmi 6 Pro (sakura) LineageOS forum For other Android Pie, Android Oreo ROMs, Nougat ROMs, or other ROMs and all other device specific topics.ZTE Nubia Z11 CM13 (CyanogenMod 13) Marshmallow Custom ROM is an UNOFFICIAL Android Marshmallow build for Nubia Z11. This Nubia Z11 CM13 (CyanogenMod 13) ROM is brought to you by developer XiNGRZ. Current status of this ROM is UNKNOWN. It is strongly recommended that you take either a NANDROID backup or take a complete sync of your phone data. This CM13 for Nubia Z11 (nx531j) is brought to you by developer XiNGRZ. XiNGRZ has also brought the ZTE Nubia Z11 CM14/CyanogenMod 14 Nougat 7.0 ROM. For more CM13 ROM updates and OFFICIAL update of Nubia Z11 CM13, you can have a look on the big CyanogenMod 13 devices list.
DISCLAIMER:
Installing custom ROM requires a custom recovery to be installed on your device, which in-turn may require the bootloader to be unlocked which may VOID your warranty and may delete all your data. Before proceeding further you may consider backup your all data. You are the only person making changes on your phone and neither we nor the developer can be held responsible for the mistakes done by YOU.WHAT’S WORKING:
– NOT KNOWNKNOWN ISSUES:
– NOT KNOWN
REQUIRED DOWNLOADS AND GUIDES FOR ZTE NUBIA Z11 CM13 ROM FLASHING:
- TWRP recovery for the ZTE Nubia Z11.
– To flash this TWRP you may follow the following: TWRP recovery installation guide for the ZTE Nubia Z11 [Bootloader must be unlocked before following this guide]
- ROM Download link of CyanogenMod 13/CM13 for ZTE Nubia Z11
- CM13 Marshmallow Google Apps download link for the ZTE Nubia Z11 CyanogenMod 13 ROM
The CyanogenMod 13 ROM for ZTE Nubia Z11 comes with inbuilt ROOT, so SuperSU zip file is not required. After this CM13 installation you may want to enable ROOT access on your phone and here is how you can do that:
How to Enable ROOT on CM13/CyanogenMod 13CYANOGENMOD 13 FOR ZTE NUBIA Z11 CM13 (CYANOGENMOD 13) MARSHMALLOW CUSTOM ROM INSTALLATION GUIDE:
Make sure that you have a custom recovery installed on the ZTE Nubia Z11. If not then download the recovery from above downloads section and you can follow this guide: How to install recovery on Android using fastboot guide.
Points to NOTE on Backup:
– Try to avoid restoring apps backup using Titanium Backup. It may break things up.
– Don’t restore system data using Titanium Backup! It will definitely break the current installation.
– It is also discouraged to Restoring Apps + Data using Titanium Backup.Follow this if you are flashing CyanogenMod 13 ROM for the first time to your ZTE Nubia Z11 phone, or coming from another ROM:
- Download and Copy the GApps and Nubia Z11 CyanogenMod 13 ROM ZIP to your phone.
- Boot into Recovery. Make sure to have a Custom recovery like CWM or TWRP or any other custom recovery.
- Wipe data factory reset, Cache partition, Dalvik Cache and Format the System partition.
– Here is a guide explaining how to wipe data using TWRP recovery.This will delete all your data on your phone. IGNORE IF YOU DON’T WANT TO OR IF YOU HAVE ALREADY DONE THIS. You may consider complete backup of your phone data or take a NANDROID backup of the current ROM.
– How to backup all data on your Android Device.
– how to take NANDROID backup using TWRP recovery. - First flash the CM13 ROM ZIP from device. Then flash the GApps zip from your device memory.
– Here is a post explaining how to flash a custom ROM using TWRP recovery. - Then flash the CM13 Marshmallow GApps package.
– Here is a post explaining how to flash GApps using TWRP recovery. - Reboot and Enjoy the CyanogenMod 13 Marshmallow ROM on your ZTE Nubia Z11.
Upgrading from earlier version of CyanogenMod 13 ROM on Nubia Z11:
- Copy the latest zip file of CyanogenMOd 13 for Nubia Z11 to your phone.
- Boot into Recovery.
- Flash the latest CM ROM ZIP from your phone.
– Here is a post explaining how to flash a custom ROM using TWRP recovery. - Then flash the CM13 Marshmallow GApps package.
– Here is a post explaining how to flash GApps using TWRP recovery. - Reboot and Enjoy
Complete the initial setup and enjoy Android Marshmallow 6.0 with CyanogenMod 13 for Nubia Z11. After this CyanogenMod 13 ROM installation you may want to enable ROOT access on your phone and here is how you can do that:
How to Enable ROOT Access on CM13/CyanogenMod 13Stay tuned or Subscribe to the ZTE Nubia Z11 forum For upcoming Android Nougat ROMs, CyanogenMod Custom ROMs, other ROMs and all other device specific topics.Gionee Elife E7 CM13 (CyanogenMod 13) Marshmallow Custom ROM is an UNOFFICIAL Android Marshmallow build for Elife E7. This Gionee Elife E7 CM13 (CyanogenMod 13) ROM is brought to you by developer frhatfrat. Current status of this ROM is UNKNOWN. It is strongly recommended that you take either a NANDROID backup or take a complete sync of your phone data. For more CM13 ROM updates and OFFICIAL update of Elife E7 CM13, you can have a look on the big CyanogenMod 13 devices list.
DISCLAIMER:
Installing custom ROM requires a custom recovery to be installed on your device, which in-turn may require the bootloader to be unlocked which may VOID your warranty and may delete all your data. Before proceeding further you may consider backup your all data. You are the only person making changes on your phone and neither we nor the developer can be held responsible for the mistakes done by YOU.WHAT’S WORKING:
– NOT KNOWNKNOWN ISSUES:
– NOT KNOWN
REQUIRED DOWNLOADS AND GUIDES FOR GIONEE ELIFE E7 CM13 ROM FLASHING:
- TWRP recovery for Elife E7.
– To flash this TWRP you may follow the following: TWRP recovery installation guide for the Elife E7 [Bootloader must be unlocked before following this guide]
- ROM Download link of Elife E7 CM13 Marshmallow ROM [CM13 FOR ELIFE E7 DOES NOT EXIST ANYMORE]
- CM13 GApps download link for the Elife E7 CyanogenMod 13 ROM
The CyanogenMod 13 for Elife E7 comes with inbuilt ROOT, so SuperSU zip file is not required. After this CM13 installation you may want to enable ROOT access on your phone and here is how you can do that:
How to Enable ROOT on CM13/CyanogenMod 13CYANOGENMOD 13 FOR ELIFE E7 CM13 (CYANOGENMOD 13) MARSHMALLOW CUSTOM ROM INSTALLATION GUIDE:
Make sure that you have a custom recovery installed on the Elife E7 (u2). If not then download the recovery from above downloads section and you can follow this guide: How to install recovery on Android using fastboot guide.
Points to NOTE on Backup:
– Try to avoid restoring apps backup using Titanium Backup. It may break things up.
– Don’t restore system data using Titanium Backup! It will definitely break the current installation.
– It is also discouraged to Restoring Apps + Data using Titanium Backup.Follow this if you are flashing CyanogenMod 13 ROM for the first time to your Elife E7 (u2), or coming from another ROM:
- Download and Copy the GApps and Elife E7 CM13 ROM ZIP to your phone.
- Boot into Recovery. Make sure to have a Custom recovery like CWM or TWRP or any other custom recovery.
- Wipe data factory reset, Cache partition, Dalvik Cache and Format the System partition.
– Here is a guide explaining how to wipe data using TWRP recovery.This will delete all your data on your phone. IGNORE IF YOU DON’T WANT TO OR IF YOU HAVE ALREADY DONE THIS. You may consider complete backup of your phone data or take a NANDROID backup of the current ROM.
– How to backup all data on your Android Device.
– how to take NANDROID backup using TWRP recovery. - First flash the CM13 ROM ZIP from device. Then flash the GApps zip from your device memory.
– Here is a post explaining how to flash a custom ROM using TWRP recovery. - Then flash the CM13 Marshmallow GApps package.
– Here is a post explaining how to flash GApps using TWRP recovery. - Reboot and Enjoy the CyanogenMod 13 Marshmallow ROM on your Elife E7.
Upgrading from earlier version of CyanogenMod 13 ROM for Elife E7 (u2):
- Copy the latest zip file of CyanogenMOd 13 for Elife E7 to your phone.
- Boot into Recovery.
- Flash the latest CM ROM ZIP from your phone.
– Here is a post explaining how to flash a custom ROM using TWRP recovery. - Then flash the CM13 Marshmallow GApps package.
– Here is a post explaining how to flash GApps using TWRP recovery. - Reboot and Enjoy
Complete the initial setup and enjoy Android Marshmallow 6.0 with CyanogenMod 13 for Elife E7 (u2). After this CyanogenMod 13 ROM installation you may want to enable ROOT access on your phone and here is how you can do that:
How to Enable ROOT Access on CM13/CyanogenMod 13Stay tuned or Subscribe to the Gionee Elife E7 forum For upcoming Android Nougat ROMs, CyanogenMod Custom ROMs, other ROMs and all other device specific topics.Android Nougat 7.1 ROM, LineageOS 14.1 for HTC One M8 has now arrived via an UNOFFICIAL build. Also, here is the LineageOS 15 for HTC One M8, which you can try. If you want some more Lineage ROMs or wanna taste the OFFICIAL Lineage build then stay tuned the LineageOS 14.1 ROM collection page. Before this there was the CM14.1 for HTC One M8. This LineageOS 14.1 for HTC One M8 (m8) is brought to you by developer compuguy. If you like compuguy’s work and want him to keep up this good work then you can consider a donation to him:
Donate to compuguyDISCLAIMER:
THIS IS AN INITIAL BUILD WHICH MAY NOT BOOT AT ALL. HAVE A BACKUP BEFORE FLASHING THIS AND TRY AT YOUR OWN RISK. Installing a custom ROM on a HTC One M8 (m8) requires the bootloader to be unlocked on the HTC One M8 (m8) phone, which may VOID your warranty and may delete all your data. Before proceeding further you may consider backup all data on the phone. You are the only person doing changes to your phone and I cannot be held responsible for the mistakes done by you.Status of LineageOS 14.1 for HTC One M8 Nougat 7.1 Custom ROM:
WHAT’S WORKING:
– Not KnownKNOWN ISSUES:
– Not Known
REQUIRED LINKS AND FILES FOR LineageOS 14.1 for HTC One M8 NOUGAT CUSTOM ROM:
- TWRP recovery link for HTC One M8 (m8)
– Here is theTWRP update guide for the HTC One M8 (m8). This TWRP recovery guide requires an unlocked bootloader on the HTC One M8 (m8).
- ROM Download link of UNOFFICIAL LineageOS 14.1 for HTC One M8 (m8)
- ROM Download link of OFFICIAL LineageOS 14.1 for HTC One M8 (m8)
– If you want to upgrade this LineageOS 14.1 on top of CM14.1 ROM without wiping data then you can refer this CyanogenMod to Lineage upgrade guide.
- LineageOS 14.1 Nougat GApps download link for HTC One M8 LineageOS 14.1 Nougat 7.1 ROM
Root binary is inbuilt in LineageOS 14.1, so you don’t need a separate SuperSu package to install to gain ROOT access. Here is How to Enable ROOT on LineageOS 14.1
If there is no in-built ROOT or it does not work for some reason then you can try flashing SuperSU zip using recovery to gain ROOT access.HOW TO INSTALL/DOWNLOAD/FLASH/UPDATE LineageOS 14.1 FOR HTC One M8 NOUGAT CUSTOM ROM:
Follow this if you are flashing LineageOS 14.1 for HTC One M8 (m8) for the first time, or coming from another ROM:
Points to NOTE:
– Try to avoid restoring apps backup using Titanium Backup. It may break things up.
– Don’t restore system data using Titanium Backup! It will definitely break the current installation.
– It is also discouraged to Restoring Apps + Data using Titanium Backup.- Download and Copy the GApps and LineageOS 14.1 for HTC One M8 ROM ZIP to your phone.
- Boot into Recovery. Make sure to have a Custom recovery like CWM or TWRP or any other custom recovery. If not then follow the Custom Recovery Installation Guide for HTC One M8 (m8) (it’s a generic guide which will work for TWRP as well as CWM recovery or any other recovery)
- Wipe data factory reset, Cache partition, Dalvik Cache and Format the System partition.
– Here is a guide explaining how to wipe data using TWRP recovery.This will delete all your data on your phone. You may consider complete backup of your phone data or take a NANDROID backup of the current ROM
– How to backup all data on your Android Device
– how to take NANDROID backup using TWRP recovery - First flash the LineageOS 14.1 for HTC One M8 ROM ZIP from device. Then flash the GApps zip from your device memory.
– Here is a post explaining how to install LineageOS - Then reboot into recovery (don’t skip this) and flash the LineageOS 14.1 Nougat GApps package.
– Here is a post explaining how to flash GApps using TWRP recovery. - Reboot and Enjoy the Nougat 7.1 LineageOS 14.1 ROM for HTC One M8 (m8).
Upgrading from earlier version of LineageOS 14.1 for HTC One M8 (m8):
- Copy the latest LineageOS 14.1 for HTC One M8 ROM ZIP file to your phone.
- Boot into Recovery.
- Flash the latest CM ROM ZIP from your phone.
– Here is a post explaining how to install LineageOS - Then flash the LineageOS 14.1 Nougat GApps package.
– Here is a post explaining how to flash GApps using TWRP recovery. - Reboot and Enjoy
Complete the initial setup and enjoy Android Nougat 7.1 with LineageOS 14.1 for HTC One M8 (m8). After the installation of LineageOS 14.1 for HTC One M8 (m8) you may want to enable ROOT access on your phone and here is how you can do that:
How to Enable ROOT on LineageOS 14.1.Stay tuned or Subscribe to the HTC One M8 (m8) forum For other Android Nougat ROMs, LineageOS 14.1 ROMs, other ROMs and all other device specific topics.


