GCam Port | Google Camera APK v9.6 (February 2025) › Forums › Forum for Common Topics (Generic Topics for all Devices) › TWRP – Team Win Recovery Guides › How to Take NANDROID Backup on TWRP Recovery
- This topic has 0 replies, 1 voice, and was last updated 2 years, 1 month ago by Linux User.
- AuthorPosts
- September 3, 2024 at 12:56 PM #3202Linux UserParticipant
If you are looking to take a NANDROID backup on your Android device using TWRP recovery then I will simplify your worries and tell you in simple step-by-step guide with screenshots how exactly you can do that. After finishing this I believe there is no need for you to come and do this again and again. Imagine how simple is this!
What is a NANDROID backup ???
When you are going to flash a custom ROM on your phone everywhere people are shouting take a NANDROID backup… take a NANDROID backup… what exactly is that? The name is there from the CWM days as far as I know. Basically the phone has an internal storage or even the microSD cards which are basically NAND flash storages. As we are dealing with Android, I guess some developer have named the storage backup process to NANDroid backup.
Basically a NANDROID backup means creating a backup of all the required partitions on your Android device. Android has a partitioned layout which has a boot partition, recovery partition, system partition, data partition, cache partition etc. When we take a NANDROID backup we are actually copying all the data in each partitions as a single file. you know what I mean to say… I mean the boot partition will be captured in a single file called boot.img, similarly the system partition in system.img and so on. This way the backup and even the restoration process gets much easier for the end user.
If you are looking to have a complete backup of your Files, Contacts, Messages so that they can be accessible and can be synchronized with other ROMs too then definitely this is not the Backup Guide you are looking for. Below is the link for the same:
How to Backup All of Your Data on Any Android deviceThis feature is mostly missing on stock Android devices and you will only get it on CWM, Philz, TWRP or Cyanogen recoveries.
What is the benefit of having a NANDROID backup ???
you can think of a NANDROID backup as a SNAPSHOT of your current phone’s state. Lets say you have installed many apps on your phone, have many messages, contacts, etc… everything will be there as it is. So, you have the state of your phone on a given point in the time line. Basically this is ONLY helpful if you are trying a new Custom ROM which is buggy but you want to fall back again to your old ROM whether it be stock or any custom ROM.
The reason being, you are keeping all the backup data as a single file which can only be read by the recovery and to restore only. You cannot extract any other data lying in those backup files.
CAUTION:
A nandroid backup will not be helpful if you are planning to migrate to a different ROM permanently. What I mean to say is, lets say you are flashing a Custom ROM which you already know that is stable and you can carry on using the new ROM then this nandroid backup will not be helpful. Instead you need to use Titanium Backup or Backup all data individually and then migrate all the data to the new ROM.How to take NANDROID backup from TWRP recovery:
Enough theory… I am impatient now. Show me how to take a NANDROID backup or whatever you call it, just show me how to do it. Here it goes:
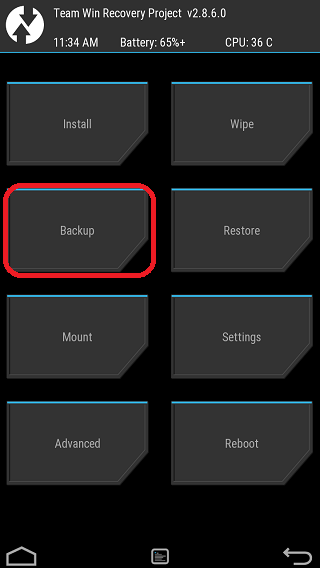
STEP 1:Go ahead and reboot your device to recovery mode. So, now you must be on the TWRP home screen.
Now, on the TWRP home screen click on the Backup touch button.Below is a screenshot of the TWRP home screen marked on the Backup button which you have to select to create a nandroid backup.
 STEP 2:
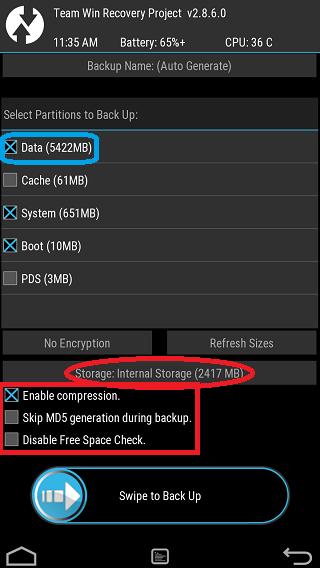
On the Backup screen, select all the partitions which you want to keep and then swipe the touch button at the bottom of the screen to take backup of the complete ROM with your data. But before that you should read all the things that I have mentioned because it is really worth the reading. Trust me, this is the place you need to be more careful and alert before you execute anything.
TIPS:
– The boot and system partitions are the basic backups needed to boot the system and hence are the must needs.
– Just to help you understand, A NANDROID backup is only helpful when you have the current Data partition which contains all the Applications, Messages, Contacts etc. Otherwise you can always flash the same Custom ROM from a zip file and go back to the initial stage but you will miss the current data.
– The Cache partition is just an add-on, without which there will be no impact and the system will re-generate the cache from the data that you have. If you have the cache partition the system will boot faster that’s it.
– The PDS partition basically keeps your IMEI, modem information and all which does not affected as part of a custom ROM flashing. But it is always a good idea to have this for the first time you backup.Here goes a screenshot with some extra areas selected by me:
Wohoo… there are many things you have marked on one screen which are just scaring. Don’t worry there are simple things which you must observe before taking a backup otherwise your backup may FAIL.
– First of all see the options covered under the red rectangular box. Make sure you have done the same thing before taking a backup.
– Enable compression option will save some space by compressing the data. Don’t panic… even after compressing your data does not change and the Restore algorithm knows how to uncompress and extract the data.
– Don’t check the Skip MD5 generation during backup option. This is useful when you will go for a restore. Basically the MD5 hash data will confirm the backup that you have is really valid and not corrupted in-between.
– Definitely don’t check the Disable Free Space check option. If you will check this option then the TWRP will not check how much size you are taking backup and how muxh space you have on your phone or microSD card. See the example below to understand more on this:– See the Storage: Internal Storage (2417) that I have marked on red with an oval box. Basically it says that I have 2417 MB of space left on my phone. If you see closely to the data partition that I am going to take a backup itself is of 5422 MB (marked on a blue box) which anyway is not going to fit in my phone’s storage. This is where you need to be careful and make some space before you take the backup. If you disable the Free Space Chcek option then you will face problem here.
Now if everything is OK then go ahead and take a backup. Move the backup from your phone or SD card to a PC or some cloud space. Now have fun and feel free to leave a reply if you are facing any problem.
If you want to know how to wipe data using a TWRP recovery then move on to the below link:
How to Clean/Wipe Data using TWRP on any Android Phone - AuthorPosts
- You must be logged in to reply to this topic.