- Search Results
Android 10 based Resurrection Remix Ten ROM for OnePlus 7 Pro is now available to download. This build of RR Ten for OnePlus 7 Pro is brought to you by official Resurrection Remix Team.
[su_note note_color=”#D8F1C6″ text_color=”#769958″ radius=”3″ class=”” id=””]Before going to update, you may be interested in the LineageOS 18 for OnePlus 7 Pro which is an Android 11 custom ROM. For other latest updates you can also visit this Android 11 download page.[/su_note]
Other Android 10 Downloads for OnePlus 7 Pro
Following are some of the other custom ROMs based on Android 10 for OnePlus 7 Pro:
– LineageOS 17.1 for supported devices
– Bliss ROM Android 10 for supported devices
– Android 10 download for all available devicesDONATION TO DEVELOPER(S)/PROJECT:
If you like this ROM then do consider for a contribution to official Resurrection Remix Team:
– Donation link not found for official Resurrection Remix Team
[su_note note_color=”#F9D9D9″ text_color=”#AA4343″ radius=”3″ class=”” id=””]This is a custom ROM for OnePlus 7 Pro which may have many bugs. This firmware has to be installed using a custom recovery such as TWRP, which requires an unlocked bootloader on the phone.
Make sure you BACKUP all the data and all the partitions of your phone before installing this RR Ten ROM.You are the only person making changes to your phone and I cannot be held responsible for anything wrong done by you.[/su_note]
About RR Ten v8.5.8 based on Android 10:
Resurrection Remix OS is an open-source custom ROM based on LineageOS which provides gesture control, customization, better battery life, regular security merges, OTA updates etc. This project founded and run by Altan KRK (westcrip) and many others in the team.
The Resurrection Remix (RR) Ten ROM version v8.x is based on the recently released LineageOS 17.1 and Android 10, which is the latest Android to date.
Status of this OnePlus 7 Pro RR Ten Android 10:
WHAT’S WORKING:
– Almost everythingKNOWN ISSUES:
– Nothing reported yetWhere to Download RR Ten Android 10 for OnePlus 7 Pro?
- RR Ten ROM Android 10 Download for OnePlus 7 Pro
- TWRP for OnePlus 7 Pro
- How to install TWRP recovery
- Bootloader unlock guide – required to install TWRP recovery
- Android 10 GApps
How to Install Resurrection Remix (RR) Ten on OnePlus 7 Pro?
[su_note note_color=”#D8F1C6″ text_color=”#769958″ radius=”3″ class=”” id=””]
Following are the two sub-sections of this OnePlus 7 Pro Android 10 update guide:- First time installation of RR Ten ROM
- Upgrading RR Ten build from a previous build
[/su_note]
Installing RR OS Ten for the first time:
[su_note note_color=”#D8F1C6″ text_color=”#769958″ radius=”3″ class=”” id=””]This upgrade process requires few guides to be followed and few files to be downloaded. Everything referred in the below guide is provided in the above downloads section.[/su_note]
- Download and Copy the RR ROM 8.x Android 10 zip file for OnePlus 7 Pro and the Android 10 Gapps zip file to your phone.
- Boot into the TWRP Recovery (with SAR support) to install RR ROM Android 10 on OnePlus 7 Pro.
[su_note note_color=”#D7E3F4″ text_color=”#728095″ radius=”3″ class=”” id=””]- Make sure to have a Custom recovery like a TWRP recovery or any other custom recovery.
– If not then download the TWRP recovery from Downloads link and follow the how to install TWRP recovery guide (it’s a generic guide which will work for TWRP as well as any other recovery)[/su_note] - Wipe system, data, and cache partition.
[su_note note_color=”#D7E3F4″ text_color=”#728095″ radius=”3″ class=”” id=””]- Here is a guide explaining how to wipe using TWRP recovery.[/su_note]
[su_note note_color=”#FBF4DD” text_color=”#A38C68″ radius=”3″ class=”” id=””]This will delete all your data on your phone. You may consider complete backup of your phone data or take a NANDROID backup of the current ROM
– Backup data on Android
– NANDROID backup on TWRP recovery[/su_note] - Install the RR Ten zip file that you have copied into the phone.
- Then flash the Android 10 Gapps zip file.
[su_note note_color=”#D7E3F4″ text_color=”#728095″ radius=”3″ class=”” id=””]- Here is a post explaining how to install GApps using TWRP recovery.[/su_note] - Reboot and Enjoy Android 10 with Resurrection Remix Ten ROM, on your OnePlus 7 Pro.
Upgrade RR Ten ROM Android 10 on OnePlus 7 Pro:
- Copy the latest RR ROM Android 10 zip file for your device
- Boot into TWRP recovery
- Wipe the system partition from the custom recovery menu.
- Install the latest RR ROM zip file.
- Reboot and see you have the GApps and ROOT access or NOT (if you installed previously).
[su_note note_color=”#D8F1C6″ text_color=”#769958″ radius=”3″ class=”” id=””]- Gapps is built in such a way that it will sustain across ROM updates.[/su_note] - If you don’t have GApps after upgrading the Android 10 on the phone, then flash the GApps again.
[su_note note_color=”#D7E3F4″ text_color=”#728095″ radius=”3″ class=”” id=””]- Here is a post explaining how to flash GApps using TWRP recovery.[/su_note] - If you don’t have ROOT after upgrading the Resurrection Remix ROM Android 10 on your phone, then flash the Magisk Installer zip file.
- Once everything is done, reboot and Enjoy the Android 10 RR ROM on OnePlus 7 Pro.
How to Get GCam for OnePlus 7 Pro RR Ten ROM?
You can visit the following link to get the GCam for OnePlus 7 Pro that may work on this RR Android 10 build.
If the above GCam does not work, you can always look into the big list of Google Camera APK download page.
Stay tuned or Subscribe to the OnePlus 7 Pro (guacamole) forum For other Android Pie, Android Oreo ROMs, Nougat ROMs, or other ROMs and all other device specific topics.Google camera enhances the photography experience on any phone it works. Today we have a working port(s) of Google Camera (or) GCam for LG Velvet. The compatible Google Camera port(s) are brought to you by Arnova8G2 and Urnyx05.
Available GCam versions for LG Velvet
Below are the available version(s) of Google Camera APK for LG Velvet
- GCam 7.3
The GCam 7.x versions(s) bring Astrophotography mode and better night sight mode to the LG Velvet along with other older features such as HDR+, Timelapse, portrait mode, etc. The available GCam port(s) are compatible on Android 10.

Status of this LG Velvet Google Camera
WHAT’S WORKING
– All basic featuresKNOWN ISSUES
– Nothing reported yetIf in case you have found any issue with the given Google Camera for LG Velvet which is not mentioned above, Help us by mentioning the issues in comments, Our Fix google camera issues post may help you to fix the issues on your own.
[/su_note][su_note note_color=”#D8F1C6″ text_color=”#769958″ radius=”3″ class=”” id=””]
Where to Download GCam for LG Velvet?
Below are the available download link to the compatible GCam APK files –
GCam 7.3 (Latest Version)
GCam 7.3 (Latest Version)
[/su_note]How to Install Google Camera APK on LG Velvet?
- Download any GCam APK file from the above download link(s).
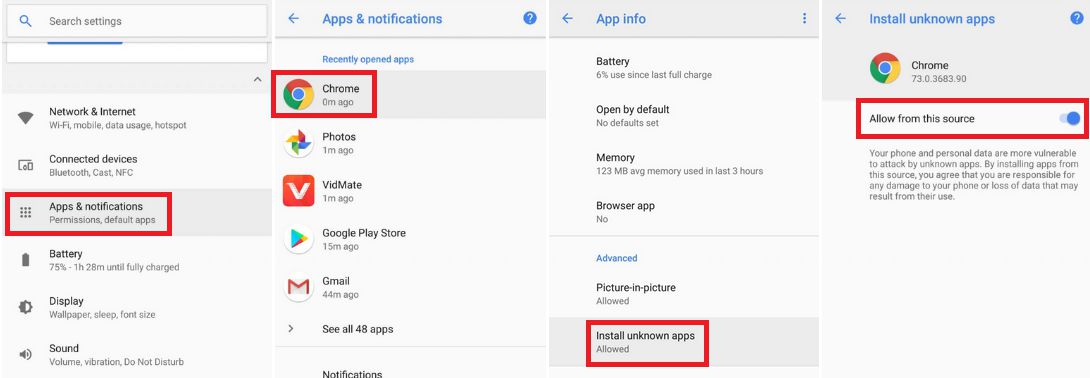
- To install apps from a third-party app other than Play Store you need to enable app installation from Unknown Sources on your Android device.
For Android 10 version, enable Install Unknown Apps from the app from which you are going to install the Google Camera APK. For example: if you have downloaded the Google Camera apk file on Google chrome or firefox browser on your phone. Or you have downloaded and copied the apk file to the file browser and you want to install it from there.
Go to Settings > Apps & notifications > Open the app (Chrome, Firefox or file manager app etc) > Install unknown apps and enable Allow from this source
See the below screenshots that enables to install unknown apps on Pie for Chrome app (you need to enable on the app from where you want to install the apk):

- Once enabled, click on the downloaded app to install.
- Once installed you can clear the app data and open the app and enjoy the feature packed Google Camera APK on LG Velvet.
How to shoot in astrophotography mode?
Google Camera version 7.0 and up comes with Astrophotography mode by default, but there are conditions that must be met to enable astrophotography mode. Usually, following conditions must be met to capture in Astrophotography mode if manually not force enabled:
- It can be enabled on Night Sight mode (only)
- The phone must be kept static (use a tripod or keep the phone somewhere to keep it static)
- There must be low light condition
- It may take few seconds for this mode to come up when the above conditions are met
[su_note note_color=”#FBF4DD” text_color=”#A38C68″ radius=”3″ class=”” id=””]- When the display shows something like “Astrophotography is on” or “Capturing cuttlefish” (or on some GCam ports nothing is shown at all) while capturing photo in Night Sight mode, then it is shooting in astrophotography mode otherwise not.
– If the GCam takes a lot of time usually more than 30 seconds then it is capturing in astro mode.
– When I kept the phone static in front of a good light source, the Astrophotography mode did not turn on.
So, make sure it is a low light environment.[/su_note]New features are keep coming on the Google Camera app and hence there could be many versions of these ported apps for LG Velvet. This page will always have all available working GCam APK for LG Velvet.
Visit the following link for LG Velvet updates on other Google Camera, Custom ROMs and all other device specific topics.Android 10 based crDroid 6.5 for Mi A3 download is now available. This build of crDroid 6.5 for Mi A3 is brought to you by Golbinex.
Other Android 10 Downloads for Mi A3
Following are some of the other Android 10 custom ROMs for Mi A3:
– LineageOS 17.1 download
– Android 10 download
– Bliss ROM Android 10 download
– RR Android 10 downloadDONATION TO DEVELOPER(S)/PROJECT:
If you like this ROM then consider for a donation to Golbinex:
– Donation link not found for Golbinex
[su_note note_color=”#F9D9D9″ text_color=”#AA4343″ radius=”3″ class=”” id=””]crDroid 6.5 is a custom ROM for Mi A3 which may have many bugs. This firmware has to be installed using a custom recovery such as TWRP, which requires an unlock bootloader on the phone.
Make sure you BACKUP all the data and all the partitions of your phone before installing this Android 10 ROM.You are the only person making changes to your phone and I cannot be held responsible for anything wrong done by you.[/su_note]
About crDroid 6.5 based on Android 10:
The crDroid ROM typically known as crDroid Android is a custom ROM that uses the LineageOS as its base. LineageOS base brings its own benefits, such as clean and secure code with regular security patch merges.
crDroid is like LineageOS on steroids. Yes, it provides many more features, customizations, etc. unlike the stock LineageOS which is kind of a clean installation without much customization.
This is an open-source project just like other custom ROMs which has 4 members namely: Neobuddy89, Firebird11, Gwiolf2u, Soubhik-Khan in the core team, and many devices maintainers.
The crDroid 6.5 is the latest version based on the recently released Android 10.
Status of this Mi A3 crDroid 6.5 Android 10:
WHAT’S WORKING:
– UnknownKNOWN ISSUES:
– UnknownWhere to Download crDroid 6.5 for Mi A3?
- crDroid 6.5 Download for Mi A3
- TWRP for Mi A3
- How to install TWRP recovery
- Xiaomi Bootloader unlock guide – required to install TWRP recovery
- Android 10 GApps
How to Install Android 10 crDroid 6.5 on Mi A3?
[su_note note_color=”#D8F1C6″ text_color=”#769958″ radius=”3″ class=”” id=””]
Following are the two sub-sections of this Mi A3 Android 10 update guide:- First-time installation of crDroid 6.5 ROM
- Upgrading from an older crDroid 6.5 build
[/su_note]
Installing crDroid 6.5 for the first time:
[su_note note_color=”#D8F1C6″ text_color=”#769958″ radius=”3″ class=”” id=””]This upgrade process requires few guides to be followed and few files to be downloaded. Everything referred to in the below guide is provided in the above downloads section.[/su_note]
- Download and keep the Mi A3 crDroid 6.5 zip file, the Android 10 Gapps zip file, and keep it in your PC or copy it to the phone.
- Boot into the TWRP Recovery (with SAR support) to install crDroid 6.5 on Mi A3.
[su_note note_color=”#D7E3F4″ text_color=”#728095″ radius=”3″ class=”” id=””]- Make sure to have a Custom recovery like a TWRP recovery or any other custom recovery.
– If not then unlock the bootloader and then download the TWRP recovery from Downloads link and follow the how to install TWRP recovery guide (it’s a generic guide which will work for TWRP as well as any other recovery)[/su_note] - Wipe system, data, and cache partition.
[su_note note_color=”#D7E3F4″ text_color=”#728095″ radius=”3″ class=”” id=””]- Here is a guide explaining how to wipe using TWRP recovery.[/su_note]
[su_note note_color=”#FBF4DD” text_color=”#A38C68″ radius=”3″ class=”” id=””]This will delete all your data on your phone. You may consider complete backup of your phone data or take a NANDROID backup of the current ROM
– Backup data on Android
– NANDROID backup on TWRP recovery[/su_note] - ADB sideload the crDroid 6.5 zip file
(or)
If ADB sideload is not working on recovery, just flash the zip using TWRP or any other recovery. - Then ADB Sideload the Android 10 Gapps zip file.
[su_note note_color=”#D7E3F4″ text_color=”#728095″ radius=”3″ class=”” id=””]- Here is a post explaining how to do ADB sideload using TWRP.[/su_note] - Once done, reboot and Enjoy Android 10 with Pixel Experience, on your Mi A3.
Upgrade crDroid 6.5 on Mi A3:
- Download and keep the latest crDroid 6.5 zip file built for Mi A3 and the Android 10 GApps on your PC or copy to the phone
- Boot into TWRP recovery
- Wipe the system partition from the custom recovery menu.
- ADB sideload the crDroid 6.5 zip file
(or)
If ADB sideload is not working on recovery, just flash the zip using TWRP or any other recovery. - Reboot and see if you have the GApps and ROOT access or NOT (if you installed previously).
[su_note note_color=”#D8F1C6″ text_color=”#769958″ radius=”3″ class=”” id=””]- Gapps is built in such a way that it will sustain across ROM updates.[/su_note] - If you don’t have GApps after upgrading the Android 10 on the phone, then flash or ADB sideload the GApps again.
[su_note note_color=”#D7E3F4″ text_color=”#728095″ radius=”3″ class=”” id=””]- Here is a post explaining how to flash GApps or how to ADB sideload using TWRP recovery.[/su_note] - If you want application-level rooting on crDroid 6.5 ROM, then flash the Magisk Installer zip file.
- Once everything is done, reboot and Enjoy the crDroid 6.5 updates on Mi A3.
How to Root Mi A3 on crDroid 6.5?
After installing crDroid 6.5 on Mi A3 you may want to enable ROOT access on your phone and here is how you can do that:
– crDroid Rooting guide (this is for LineageOS 17.1 but should work fine on crDroid 6.5 Android 10)
[su_note note_color=”#D7E3F4″ text_color=”#728095″ radius=”3″ class=”” id=””]If there is no ROOT access for some reason even after installing the Magisk, then you can try installing SuperSU Zip to enable ROOT access.[/su_note]How to Get GCam for crDroid 6.5?
GCam 7.0 and later versions are compatible with crDroid 6.5 or any Android 10 ROM in general.
You can always look into the big list of GCam APK download page to get a compatible GCam for your phone.Stay tuned or Subscribe to the Mi A3 (laurel_sprout) forum For other Android Pie, Android Oreo ROMs, Nougat ROMs, or other ROMs and all other device specific topics.Galaxy S3 LTE CM13 Marshmallow Custom ROM is brought to you by developer Winxuser and p.a.n. In addition to this ROM we also have the Lineage 14.1 for Galaxy S3 LTE (i9305) and we also have the Android Nougat 7.0 CyanogenMod 14/CM14 for Galaxy S3 LTE (i9305). If you want some more Lineage OS ROMs then stay tuned to the Lineage OS 14.1 ROM Devices list page. I have got another build which is brought to you by developer limjh16. These are the latest builds from all of the developers with lots of bug fixes and improved stability. Current status of both the ROMs are UNKNOWN and hence I always recommend to have a NANDROID backup using a recovery such as TWRP or any other of your lovely current ROM so that you can roll back if you are unsatisfied of this ROM. For more CM13 ROM updates and OFFICIAL update of Galaxy S3 LTE CM13, you can have a look on the big CyanogenMod 13 devices list.
DISCLAIMER:
Installing custom ROM requires a custom recovery to be installed on your device, which may VOID your warranty and may delete all your data. Before proceeding further you may consider backup your all data. You are the only person doing changes to your phone and I cannot be held responsible for the mistakes done by you. Neither the developer nor we will be held responsible for any disaster that happens to your device.KNOWN ISSUES:
– Not Known (Backup before flash)
Required links and downloads for the CM13 Galaxy S3 LTE (i9305) Custom ROM:
- Galaxy S3 LTE (i9305) TWRP recovery download link.
– Download the .img.tar extension TWRP file for YOUR DEVICE ONLY which can be flashed with ODIN. Follow this guide: How to Install TWRP on Samsung using Odin for the img.tar TWRP file.– If you already have an unlocked bootloader then you can download the .img file extension. Then follow this guide: How to flash TWRP using fastboot.
- ROM download link to p.a.n’s builds
- ROM download link to Winxuser’s builds
- ROM download link to limjh16’s builds
- CM13 Marshmallow Google Apps download link
We also have the MIUI 6 ROM for i9305, in case if you like:
Galaxy S3 LTE i9305 MIUI KitKat ROM
Flashing Galaxy S3 LTE CM13 (GT-i9305) CyanogenMod 13 Marshmallow Custom ROM:
Follow this if you are flashing CyanogenMod 13 for the first time to your S3 LTE i9305, or coming from another ROM:
This will delete all your data on your phone. You may consider backing up your phone data or take a nandroid backup. Here is how to take NANDROID backup using TWRP recovery.
Points to NOTE:
– Try to avoid restoring apps backup using Titanium Backup. It may break things up.
– Don’t restore system data using Titanium Backup! It will definitely break the current installation.
– It is also discouraged to Restoring Apps + Data using Titanium Backup.- Make sure you have a TWRP installed on your Galaxy S3 LTE.
If you don’t have a recovery then download it from the above link and see if the below guide works for you:
– How to Install TWRP on Samsung using Odin for the .tar TWRP file. - Download and Copy the GApps and CyanogenMod ROM ZIP to your device.
- Take a backup using a synchronization application or using Samsung Smart Switch or if you have TWRP installed then you can take a NANDROID backup using the TWRP itself.
- Boot into Recovery. Make sure to have already flashed a Custom recovery like CWM or TWRP on the phone.
- Wipe data factory reset, Cache partition, Dalvik Cache and Format the System partition.
– Here is a guide explaining how to wipe data using TWRP recovery. - First flash the CM ROM ZIP from device. Then flash the GApps zip from your device memory.
– Here is a post explaining how to flash a custom ROM using TWRP recovery.
Use the same guide to flash the GApps too. - Reboot and Enjoy the CyanogenMod 13 Marshmallow ROM on your Galaxy S3 LTE i9305.
- Make sure you have a TWRP installed on your Galaxy S3 LTE.
Upgrading from earlier version of CyanogenMod 13.0:
- Copy the CyanogenMod 13 ROM ZIP file to your phone.
- Boot into Recovery.
- Flash the latest CM ROM ZIP from your phone.
– Here is a post explaining how to flash a custom ROM using TWRP recovery. - Reboot and Enjoy
The first boot may take long time, so don’t panic and be sure that you have enough battery backup. Let the phone reboot and then enjoy the official CyanogenMod 13 Marshmallow ROM on Galaxy S3 LTE.
After this CM13 installation you may want to enable ROOT access on your phone and here is how you can do that:
How to Enable ROOT Access on CM13/CyanogenMod 13.Stay tuned or Subscribe to the Galaxy S3 LTE (i9305) forum For other Android Nougat ROMs, CyanogenMod 14 ROMs, other ROMs and all other device specific topics.ADB and Fastboot are the basic utilities if you want to ROOT, Unlock bootloader or install a custom Recovery like TWRP on any Android device. So, if you are a developer or you want to learn how you can get most out of your Android as a Developer or an advanced user then you must need ADB and Fastboot which are the basic building blocks for your Android.
Here is 15 Seconds ADB Installer or Minimal ADB and Fastboot for Windows if you are not comfortable with Linux or MAC.
Here I have brought you an Easy to Install ADB and Fasboot on Linux and MAC OS X. Just one command execution to install ADB and Fastboot on Linux and MAC. The scripts are provided in the DOWNLOADS section followed by the Step By Step ADB & Fastboot Installation Guide for Linux and MAC.

ADB & FASTBOOT INSTALLATION SCRIPTS DOWNLOAD LINK:
- Latest Linux platform tools (contains ADB and Fastboot binaries)
- ADB and Fastboot for MAC
- ADB and Fastboot for Linux and MAC [RECOMMENDED FOR BEGINNERS]
INSTALLING ADB & FASTBOOT UTILITIES ON LINUX AND MAC:
Step By Step Guide
How to Install ADB and Fastboot on Linux
- Download and extract the Android.zip to a directory.
- Go to the downloaded directory and then enter into Android directory where all the scripts are kept.
- Execute the following command on a console or Terminal with ROOT privilege on your Linux machine:
# sh ADB-Install-Linux.sh
Or enter the absoulute path to the script to execute:
# sh /path/to/install/script/ADB-Install-Linux.sh
NOTE: This command will move the ADB and Fastboot binaries to /usr/bin location and move the Android udev rules file to /etc/udev/rules.d/ location also this script will install JDK if it is not installed.
- Exit from the command console and the open a new command console to use ADB and fastboot.
How to Install ADB & Fastboot on MAC
- Download and extract the Android.zip to a directory.
- Go to the downloaded directory and then enter into Android directory where all the scripts are kept.
- Execute the following command on the Terminal with ROOT privilege on your MAC OS:
# sh ADB-Install-Mac.sh
Or enter the absoulute path to the script to execute:
# sh /path/to/install/script/ADB-Install-Mac.sh
- Exit from the command console and the open a new command console to use ADB and fastboot.
MAC supports drag-n-drop of the command script to execute the command and some Linux distros also support the same. So, to execute the script just drag the script from a file explorer window and then drop it on an Terminal Window.
ADB and Fastboot is now installed on your machine. If you have any concerns or doubt then login and leave a reply and you will be replied back instantly.
There is a good news, that you can now download and install LineageOS 16 for HTC One M9 Verizon. Here is how to install LineageOS 16 on HTC One M9 Verizon, with a step-by-step guide. This LineageOS 16 build is brought to you by developer Claymore1297.
Follow the links to get other LineageOS 16 and Android Pie ROM builds.
DONATION TO DEVELOPER(S)/PROJECT:
If you like this ROM then do consider for a contribution to Claymore1297 and LineageOS project:
– Donate to Claymore1297
– Donate to LineageOS project

[su_note note_color=”#F9D9D9″ text_color=”#AA4343″ radius=”3″ class=”” id=””]DISCLAIMER:
THIS IS AN INITIAL BUILD OF LineageOS 16 FOR HTC One M9 Verizon, WHICH MAY HAVE MANY BUGS.
MAKE SURE TO BACKUP ALL DATA OF YOUR PHONE.
FLASH AT YOUR OWN RISK.[/su_note][su_note note_color=”#FBF4DD” text_color=”#A38C68″ radius=”3″ class=”” id=””]Installing a custom ROM may require an unlock bootloader on HTC One M9 Verizon, which may VOID your warranty and may delete all your data. Before proceeding further you may consider backup all data on the phone.
You are the only person doing changes to your phone; neither the developer nor I can be held responsible for the mistakes done by you.[/su_note]Status of the HTC One M9 Verizon LineageOS 16 ROM:
WHAT’S WORKING:
– UnknownKNOWN ISSUES:
– UnknownREQUIRED GUIDES AND DOWNLOADS TO INSTALL LineageOS 16 ON HTC One M9 Verizon:
- TWRP for HTC One M9 Verizon (himawl) for this HTC One M9 Verizon LineageOS 16 ROM
- How to install TWRP recovery
- HTC One M9 Verizon bootloader unlock guide – required to install TWRP recovery
- ROM download link for HTC One M9 Verizon LineageOS 16
- MindTheGApps for LineageOS 16 / GApps for LineageOS 16
- How to root LineageOS 16
HOW TO DOWNLOAD AND INSTALL LineageOS 16 ON HTC One M9 Verizon – Android 9 Pie CUSTOM ROM:
[su_note note_color=”#D7E3F4″ text_color=”#728095″ radius=”3″ class=”” id=””]
Following are the two sub-sections of this HTC One M9 Verizon LineageOS 16 guide:- First time installation of LineageOS 16 on HTC One M9 Verizon
- Upgrading LineageOS 16 on HTC One M9 Verizon from a previous build of LineageOS 16 ROM
[/su_note]
Flashing LineageOS 16 on HTC One M9 Verizon for the first time:
[su_note note_color=”#FBF4DD” text_color=”#A38C68″ radius=”3″ class=”” id=””]
Points to NOTE:- Try to avoid restoring apps backup using Titanium Backup. It may break things up.
- Don’t restore system data using Titanium Backup! It will definitely break the current installation.
- It is also discouraged to Restoring Apps + Data using Titanium Backup.
[/su_note]
- Download and Copy the HTC One M9 Verizon LineageOS 16 ROM and GApps ZIP file to your phone.
- Boot into the TWRP custom Recovery to install this LineageOS 16 on HTC One M9 Verizon.
[su_note note_color=”#D7E3F4″ text_color=”#728095″ radius=”3″ class=”” id=””]- Make sure to have a Custom recovery like a TWRP recovery or any other custom recovery.
– If not then download the TWRP recovery from Downloads link and follow the how to install twrp Guide (it’s a generic guide which will work for TWRP as well as any other recovery)
– Installing TWRP recovery requires an unlocked bootloader on HTC One M9 Verizon[/su_note] - Wipe the data partition (or do a factory reset), Cache partition, Dalvik Cache or ART cache and Format the System partition.
[su_note note_color=”#D7E3F4″ text_color=”#728095″ radius=”3″ class=”” id=””]- Here is a guide explaining how to wipe using TWRP recovery.[/su_note]
[su_note note_color=”#FBF4DD” text_color=”#A38C68″ radius=”3″ class=”” id=””]This will delete all your data on your phone. You may consider complete backup of your phone data or take a NANDROID backup of the current ROM
– How to backup all data on your Android Device
– how to take NANDROID backup using TWRP recovery[/su_note] - First flash the LineageOS 16 for HTC One M9 Verizon
[su_note note_color=”#D7E3F4″ text_color=”#728095″ radius=”3″ class=”” id=””]- Here is a post explaining how to install recovery flashable zip file[/su_note] - Then install the MindTheGapps for LineageOS 16 package.
[su_note note_color=”#D7E3F4″ text_color=”#728095″ radius=”3″ class=”” id=””]- Here is a post explaining how to install GApps using TWRP recovery.[/su_note] - Reboot and Enjoy the Android 9 Pie LineageOS 16 on HTC One M9 Verizon.
Upgrading from earlier version of LineageOS 16 on HTC One M9 Verizon (himawl):
- Copy the latest ROM zip file of LineageOS 16 for HTC One M9 Verizon, LineageOS 16 GApps and/or Magisk ROOT package to the phone
- Boot into Recovery.- Make sure you have a latest custom Recovery that should be able to flash the LineageOS 16 ROM update.
- Format or wipe the system partition from the custom recovery menu.
- Install the LineageOS 16 for HTC One M9 Verizon.
[su_note note_color=”#D7E3F4″ text_color=”#728095″ radius=”3″ class=”” id=””]- Here is a post explaining how to install LineageOS[/su_note] - Reboot and see you have the GApps and ROOT access or NOT.
[su_note note_color=”#D8F1C6″ text_color=”#769958″ radius=”3″ class=”” id=””]- Gapps is built in such a way that it will sustain across ROM updates.[/su_note] - If you don’t have GApps after upgrading the LineageOS 16 on HTC One M9 Verizon, then flash the GApps.
[su_note note_color=”#D7E3F4″ text_color=”#728095″ radius=”3″ class=”” id=””]- Here is a post explaining how to flash GApps using TWRP recovery.[/su_note] - If you don’t have ROOT after upgrading the LineageOS 16 on HTC One M9 Verizon, then flash the SuperSU or Magisk or the Lineage SU binary.
[su_note note_color=”#D7E3F4″ text_color=”#728095″ radius=”3″ class=”” id=””]- Here is a post explaining How to Enable ROOT on LineageOS 16 ROM[/su_note] - Once everything is done, reboot and Enjoy the LineageOS 16 on HTC One M9 Verizon.
[su_note note_color=”#D8F1C6″ text_color=”#769958″ radius=”3″ class=”” id=””]Complete the initial setup and enjoy Android 9 Pie with LineageOS 16 on HTC One M9 Verizon.[/su_note]
After installing LineageOS 16 on HTC One M9 Verizon you may want to install Google Camera (GCam) or enable ROOT access on your phone and here is how you can do that:
– LineageOS 16 ROOT
– GCam for Android Pie (this page contains a huge list of GCam for all available devices)[su_note note_color=”#D7E3F4″ text_color=”#728095″ radius=”3″ class=”” id=””]If there is no ROOT access for some reason even after installing the LineageOS SU binary, then you can try SuperSU rooting guide to enable ROOT access.[/su_note]
Stay tuned or Subscribe to the HTC One M9 Verizon (himawl) LineageOS forum For other Android Pie, Android Oreo ROMs, Nougat ROMs, or other ROMs and all other device specific topics.Android Marshmallow ROM, LineageOS 13 for Xperia E1 has now arrived via an UNOFFICIAL build. If you want some more LineageOS ROMs or wanna taste the OFFICIAL LineageOS build then stay tuned to the LineageOS 13 Devices List page and LineageOS 14.1 ROM Device List. This Xperia E1 LineageOS 13 is brought to you by developer Caio99BR.
DISCLAIMER:
THIS IS AN INITIAL BUILD WHICH MAY HAVE MANY MORE BUGS THAN YOU CAN IMAGINE. HAVE A BACKUP BEFORE FLASHING THIS AND TRY AT YOUR OWN RISK. Installing a custom ROM may require the bootloader to be unlocked on Xperia E1, which may VOID your warranty and may delete all your data. Before proceeding further you may consider backup all data on the phone. You are the only person doing changes to your phone and I cannot be held responsible for the mistakes done by you.Status of LineageOS 13 for Xperia E1 (falconss) Marshmallow ROM:
WHAT’S WORKING:
– Not KnownKNOWN ISSUES:
– Not Known
REQUIRED LINKS AND FILES FOR LineageOS 13 for Xperia E1 MARSHMALLOW CUSTOM ROM:
- Latest stock FW and baseband
- TWRP download link for Xperia E1
– Here is: Custom Recovery Installation Guide for Xperia E1
– This TWRP recovery guide requires an unlocked bootloader on the Xperia E1 (falconss). - ROM Download Link of Xperia E1 LineageOS 13 ROM (falconss)
- LineageOS 13 GApps download link for Xperia E1 LineageOS 13 Marshmallow ROM
Root binary is NOT inbuilt in LineageOS 13, so you may need a separate SuperSu package or LineageOS su binary to install to gain ROOT access. Here is How to Enable ROOT on LineageOS 13
If there is no in-built ROOT or it does not work for some reason then you can try flashing SuperSU zip using recovery to gain ROOT access.HOW TO INSTALL/DOWNLOAD/FLASH/UPDATE Xperia E1 LineageOS 13 MARSHMALLOW CUSTOM ROM:
Follow this if you are flashing LineageOS 13 for Xperia E1 (falconss) for the first time, or coming from another ROM:
Points to NOTE:
– Try to avoid restoring apps backup using Titanium Backup. It may break things up.
– Don’t restore system data using Titanium Backup! It will definitely break the current installation.
– It is also discouraged to Restoring Apps + Data using Titanium Backup.- Download and Copy the GApps and LineageOS 13 for Xperia E1 ROM ZIP to your phone.
- Boot into Recovery. Make sure to have a Custom recovery like CWM or TWRP or any other custom recovery. If not then follow the Custom Recovery Installation Guide for Xperia E1 (falconss) (it’s a generic guide which will work for TWRP as well as CWM recovery or any other recovery)
- Wipe data factory reset, Cache partition, Dalvik Cache and Format the System partition.
– Here is a guide explaining how to wipe data using TWRP recovery.This will delete all your data on your phone. You may consider complete backup of your phone data or take a NANDROID backup of the current ROM
– How to backup all data on your Android Device
– how to take NANDROID backup using TWRP recovery - First flash the Xperia E1 LineageOS 13 ROM ZIP from device. Then flash the GApps zip from your device memory.
– Here is a post explaining how to install LineageOS. - DO NOT REBOOT yet. Then flash the LineageOS 13 GApps package.
– Here is a post explaining how to flash LineageOS 13 GApps using TWRP recovery. - Reboot and Enjoy the Marshmallow LineageOS 13 ROM for Xperia E1 (falconss).
Upgrading from earlier version of Xperia E1 LineageOS 13 (falconss):
- Copy the latest LineageOS 13 for Xperia E1 ROM ZIP file to your phone.
- Boot into Recovery.
- Flash the latest LineageOS ROM ZIP from your phone.
– Here is a post explaining how to install LineageOS. - Then flash the LineageOS 13 Marshmallow GApps package.
– Here is a post explaining how to flash GApps using TWRP recovery. - Reboot and Enjoy
Complete the initial setup and enjoy Android Marshmallow with LineageOS 13 for Xperia E1 (falconss). After the installation of Xperia E1 LineageOS 13 ROM (falconss) you may want to enable ROOT access on your phone and here is how you can do that:
How to Enable ROOT on LineageOS 13.Stay tuned or Subscribe to the Xperia E1 (falconss) forum For other Android Custom ROMs, LineageOS 13 ROMs, other ROMs and all other device specific topics.Android Oreo crDroid 4.0 ROM for LG G3 T-Mobile (d851) is now available via a development version. This guide provides the download to crDroid Oreo ROM for LG G3 T-Mobile and guides through the installation process of LG G3 T-Mobile crDroid Oreo ROM. This LG G3 T-Mobile crDroid Android Oreo ROM is brought to you by crdroidandroid.
DONATION TO DEVELOPER(s):
If you like this crDroid ROM, then do consider a contribution to crDroid Android project:
– Donate to crDroid Android projectIf you want Lineage OS ROM or some more Android Oreo ROMs then stay tuned to the LineageOS 15 devices list page or the AOSP Android Oreo ROMs devices list page.
DISCLAIMER:
THIS IS AN INTIAL BUILD OF ANDROID OREO, WHICH MAY HAVE FEW BUGS. BACKUP THE CURRENT ROM BEFORE INSTALLING THIS ONE. TRY AT YOUR OWN RISK.
Installing a custom ROM on a the LG G3 T-Mobile requires a custom recovery to be installed, which may VOID your warranty and may delete all your data. Before proceeding further you may consider backup all data on the phone. You are the only person making changes to your phone and I cannot be held responsible for the mistakes done by you.Content structure:
Status of LG G3 T-Mobile crDroid 4.0 Oreo 8 ROM:
WHAT’S WORKING:
– UnknownKNOWN ISSUES:
– Unknown
REQUIRED LINKS AND FILES FOR LG G3 T-Mobile crDroid 4.0 OREO ROM:
- TWRP recovery for LG G3 T-Mobile
- crDroid Oreo ROM Download link for LG G3 T-Mobile
- Oreo GApps Download for crDroid 4.0 Android Oreo ROM
Root binary is NOT inbuilt in Lineage OS ROM, so you may need a separate SuperSu package or LineageOS su (because crDroid ROM is based on LineageOS) binary to install to gain ROOT access. Here is Lineage OS Rooting guide
If there is no in-built ROOT or it does not work for some reason then you can try SuperSU rooting guide to enable ROOT access.HOW TO INSTALL/DOWNLOAD/INSTALL/UPDATE THE LG G3 T-Mobile TO THE crDroid 4.0 OREO ROM:
Follow this if you are installing crDroid 4.0 on the LG G3 T-Mobile for the first time, or coming from another ROM:
Points to NOTE:
– Try to avoid restoring apps backup using Titanium Backup. It may break things up.
– Don’t restore system data using Titanium Backup! It will definitely break the current installation.
– It is also discouraged to Restoring Apps + Data using Titanium Backup.- Boot into Recovery.
Make sure to have a Custom recovery like CWM or TWRP or any other custom recovery. If not then download the recovery for LG G3 T-Mobile from above link and follow the Custom Recovery Installation Guide (it’s a generic guide which will work for TWRP as well as CWM recovery or any other recovery) - Wipe data factory reset, Cache partition, Dalvik Cache and Format the System partition.
– Here is a guide explaining how to wipe data using TWRP recovery.This will delete all your data on your phone. You may consider complete backup of your phone data or take a NANDROID backup of the current ROM
– How to backup all data on your Android Device
– how to take NANDROID backup using TWRP recovery - Download and Copy the Oreo GApps and the crDroid 4.0 Oreo ROM ZIP to the phone.
- First install the LG G3 T-Mobile crDroid 4.0 Oreo ROM ZIP from device. Then install the GApps zip from your device memory.
– Here is a post explaining how to install crDroid 4.0 Oreo ROM - Then reboot into recovery (don’t skip this) and install the Gapps for crDroid 4.0 package.
– Here is a post explaining how to install GApps using TWRP recovery. - Reboot and Enjoy Android Oreo with crDroid 4.0 ROM on LG G3 T-Mobile.
Upgrading from earlier version of crDroid 4.0 for LG G3 T-Mobile (d851):
- Copy the latest crDroid 4.0 Oreo ROM ZIP file to the phone.
- Boot into Recovery.
- Install the crDroid Android Oreo ROM ZIP file that you copied.
– Here is a post explaining how to install crDroid 4.0 Oreo ROM - Then install the crDroid 4.0 Oreo GApps package.
– Here is a post explaining how to install GApps using TWRP recovery. - Reboot and Enjoy
Complete the initial setup and enjoy Android Oreo 8.1 with crDroid 4.0 on the LG G3 T-Mobile (d851). After the installing the crDroid 4.0 ROM, you may want to enable ROOT access on your phone and here is how you can do that:
How to Enable ROOT on crDroid 4.0 ROM.Stay tuned or Subscribe to the LG G3 T-Mobile crDroid forum For other Android Oreo ROMs, Android Nougat ROMs, LineageOS ROMs, other ROMs and all other device specific topics.Good news. You can now download and install LineageOS 16 for Moto Z. Here is how to install LineageOS 16 on Moto Z, with a step-by-step guide.
Follow the links to get other LineageOS 16 and Android Pie ROM builds.
This Moto Z LineageOS 16 build is brought to you by developer erfanoabdi.
DONATION TO DEVELOPER(S)/PROJECT:
If you like this ROM then do consider for a contribution to erfanoabdi and LineageOS project:
– Donate to LineageOS project
– no donation link found for erfanoabdi
[su_note note_color=”#F9D9D9″ text_color=”#AA4343″ radius=”3″ class=”” id=””]DISCLAIMER:
THIS IS AN INITIAL BUILD OF LineageOS 16 FOR Moto Z, WHICH MAY HAVE BUGS.
MAKE SURE TO BACKUP ALL DATA OF YOUR PHONE.
FLASH AT YOUR OWN RISK.[/su_note][su_note note_color=”#FBF4DD” text_color=”#A38C68″ radius=”3″ class=”” id=””]Installing a custom ROM may require an unlock bootloader on Moto Z, which may VOID your warranty and may delete all your data. Before proceeding further you may consider backup all data on the phone.
You are the only person doing changes to your phone; neither the developer nor I can be held responsible for the mistakes done by you.[/su_note]Status of the Moto Z LineageOS 16 ROM:
WHAT’S WORKING:
– UnknownKNOWN ISSUES:
– UnknownREQUIRED GUIDES AND DOWNLOADS TO INSTALL LineageOS 16 ON Moto Z:
- TWRP for Moto Z (griffin) for this Moto Z LineageOS 16 ROM
- How to install TWRP recovery
- Moto Z unlock bootloader guide – required to install TWRP recovery
- ROM Download link for Moto Z LineageOS 16
- MindTheGApps for LineageOS 16 or Open GApps for LineageOS 16
- How to Root LineageOS 16
HOW TO DOWNLOAD AND INSTALL LineageOS 16 ON Moto Z – Android 9 Pie CUSTOM ROM:
[su_note note_color=”#D7E3F4″ text_color=”#728095″ radius=”3″ class=”” id=””]
Following are the two sub-sections of this Moto Z LineageOS 16 guide:- First time installation of LineageOS 16 on Moto Z
- Upgrading LineageOS 16 on Moto Z from a previous build of LineageOS 16 ROM
[/su_note]
Flashing LineageOS 16 on Moto Z for the first time:
[su_note note_color=”#FBF4DD” text_color=”#A38C68″ radius=”3″ class=”” id=””]
Points to NOTE:- Try to avoid restoring apps backup using Titanium Backup. It may break things up.
- Don’t restore system data using Titanium Backup! It will definitely break the current installation.
- It is also discouraged to Restoring Apps + Data using Titanium Backup.
[/su_note]
- Download and Copy the LineageOS 16 Gapps and the Moto Z LineageOS 16 Android Pie ROM ZIP file to your phone.
- Boot into the TWRP custom Recovery to install this LineageOS 16 on Moto Z.
[su_note note_color=”#D7E3F4″ text_color=”#728095″ radius=”3″ class=”” id=””]- Make sure to have a Custom recovery like a TWRP recovery or any other custom recovery.
– If not then download the TWRP recovery from Downloads link and follow the Custom Recovery Installation Guide (it’s a generic guide which will work for TWRP as well as any other recovery)[/su_note] - Wipe the data partition (or do a factory reset), Cache partition, Dalvik Cache or ART cache and Format the System partition.
[su_note note_color=”#D7E3F4″ text_color=”#728095″ radius=”3″ class=”” id=””]- Here is a guide explaining how to wipe using TWRP recovery.[/su_note]
[su_note note_color=”#FBF4DD” text_color=”#A38C68″ radius=”3″ class=”” id=””]This will delete all your data on your phone. You may consider complete backup of your phone data or take a NANDROID backup of the current ROM
– How to backup all data on your Android Device
– how to take NANDROID backup using TWRP recovery[/su_note] - Install the Moto Z LineageOS 16 ROM file that you have copied into the phone.
[su_note note_color=”#D7E3F4″ text_color=”#728095″ radius=”3″ class=”” id=””]- Here is a post explaining how to install LineageOS[/su_note] - Then install the Android Pie MindTheGapps for LineageOS 16 package.
[su_note note_color=”#D7E3F4″ text_color=”#728095″ radius=”3″ class=”” id=””]- Here is a post explaining how to install GApps using TWRP recovery.[/su_note] - Reboot and Enjoy the Android 9 Pie LineageOS 16 on Moto Z.
Upgrading from earlier version of LineageOS 16 on Moto Z (griffin):
- Copy the latest ROM zip file of LineageOS 16 for Moto Z, LineageOS 16 GApps and/or Magisk ROOT package to the phone
- Boot into Recovery to flash the updated LineageOS 16 on Moto Z
- Format or wipe the system partition from the custom recovery menu.
- Install the LineageOS 16 for Moto Z.
[su_note note_color=”#D7E3F4″ text_color=”#728095″ radius=”3″ class=”” id=””]- Here is a post explaining how to install LineageOS[/su_note] - Reboot and see you have the GApps and ROOT access or NOT.
[su_note note_color=”#D8F1C6″ text_color=”#769958″ radius=”3″ class=”” id=””]- Gapps is built in such a way that it will sustain across ROM updates.[/su_note] - If you don’t have GApps after upgrading the LineageOS 16 on Moto Z, then flash the GApps.
[su_note note_color=”#D7E3F4″ text_color=”#728095″ radius=”3″ class=”” id=””]- Here is a post explaining how to flash GApps using TWRP recovery.[/su_note] - If you don’t have ROOT after upgrading the LineageOS 16 on Moto Z, then flash the SuperSU or Magisk or the Lineage SU binary.
[su_note note_color=”#D7E3F4″ text_color=”#728095″ radius=”3″ class=”” id=””]- Here is a post explaining How to Enable ROOT on LineageOS 16 ROM[/su_note] - Once everything is done, reboot and Enjoy the LineageOS 16 on Moto Z.
[su_note note_color=”#D8F1C6″ text_color=”#769958″ radius=”3″ class=”” id=””]Complete the initial setup and enjoy Android 9 Pie with LineageOS 16 on Moto Z.[/su_note]
After installing LineageOS 16 on Moto Z you may want to install Google Camera (GCam) or enable ROOT access on your phone and here is how you can do that:
– How to ROOT LineageOS 16
– GCam for Android Pie (this page contains a huge list of GCam for all available devices)[su_note note_color=”#D7E3F4″ text_color=”#728095″ radius=”3″ class=”” id=””]If there is no ROOT access for some reason even after installing the LineageOS SU binary, then you can try SuperSU rooting guide to enable ROOT access.[/su_note]
Stay tuned or Subscribe to the Moto Z (griffin) LineageOS forum For other Android Pie, Android Oreo ROMs, Nougat ROMs, or other ROMs and all other device specific topics.TWRP for Oukitel C11 Pro is now available from an unofficial build and this post guides you how to install TWRP for Oukitel C11 Pro and ROOT Oukitel C11 Pro (using TWRP recovery).
This TWRP download for Oukitel C11 Pro is brought to you by developer(s) andrey.medwe
[su_note note_color=”#F9D9D9″ text_color=”#AA4343″ radius=”3″ class=”” id=””]DISCLAIMER:
THIS IS AN UNOFFICIALLY BUILD TWRP FOR Oukitel C11 Pro. FLASH AT YOUR OWN RISK.
INSTALLING THE TWRP RECOVERY AND ROOT Oukitel C11 Pro NEEDS AN UNLOCK BOOTLOADER ON YOUR PHONE.
DURING THE BOOTLOADER UNLOCK PROCESS ALL THE PHONE DATA WILL BE ERASED.
ROOTING Oukitel C11 Pro MAY BRICK THE PHONE.
MAKE SURE YOU READ THE ADVANTAGES AND DISADVANTAGES OF ROOTING BEFORE YOU PROCEED FURTHER.
Before proceeding further you may consider backup all data on the phone.
You are the only person making changes to your phone and I cannot be held responsible for the mistakes done by you.
[/su_note]
![[TWRP & ROOT] TWRP for Oukitel C11 Pro and ROOT guide](data:image/svg+xml;base64,PHN2ZyB4bWxucz0iaHR0cDovL3d3dy53My5vcmcvMjAwMC9zdmciIHdpZHRoPSI0OTgiIGhlaWdodD0iMjUxIiB2aWV3Qm94PSIwIDAgNDk4IDI1MSI+PHJlY3Qgd2lkdGg9IjEwMCUiIGhlaWdodD0iMTAwJSIgc3R5bGU9ImZpbGw6I2NmZDRkYjtmaWxsLW9wYWNpdHk6IDAuMTsiLz48L3N2Zz4=)
Content structure:
- Required downloads to install TWRP recovery for Oukitel C11 Pro
- How to install TWRP recovery on Oukitel C11 Pro
- What you can do after installing TWRP on Oukitel C11 Pro
- Required downloads and guides for Oukitel C11 Pro ROOT
- Step-by-Step guide on Oukitel C11 Pro ROOTING guide
- How to check if Oukitel C11 Pro is ROOTED or NOT
DOWNLOAD LINK OF TWRP FOR Oukitel C11 Pro, OTHER DOWNLOADS AND REQUIRED GUIDES:
- Unlocked bootloader on Oukitel C11 Pro
- USB drivers for Mediatek
- 15 Seconds ADB Installer or Minimal ADB and Fastboot for Windows
- Latest MTK Droid Root and tools
- Latest MTK SP Flash Tool for Windows
- Install ADB and fastboot on Linux PC
- Latest MTK SP Flash Tool for Linux 64-bit
- Latest MTK SP Flash Tool for Linux 32-bit
- TWRP recovery download for Oukitel C11 Pro
REQUIRED DOWNLOADS IF YOU ARE USING A LINUX PC:
STEP BY STEP GUIDE OF HOW TO INSTALL TWRP FOR Oukitel C11 Pro:
Follow the below step by step guide to install the TWRP for Oukitel C11 Pro
Before installing TWRP you may require an unlocked bootloader on Oukitel C11 Pro.
Installing TWRP on Oukitel C11 Pro requires a scatter file to be created.
A scatter file of a Mediatek device is what tells about the presence of different partition and the start address of each partition.How to create scatter file for Oukitel C11 Pro:
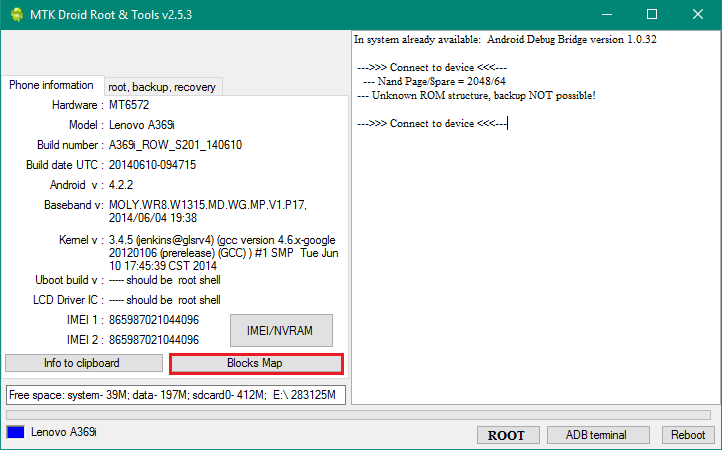
This guide need the Droid MTK Tool. With the help of Droid MTK Tool we will create the scatter file for Oukitel C11 Pro.
- Download the Droid MTK Tool from the above Downloads section.
- It’s in a zip file, so extract that file or open using WinRar or some application and then open the MTKDroidTools.exe file.

- Enable USB Debugging under Developer Options on the Oukitel C11 Pro; to make the device accessible via ADB.
– If you don’t know how to do this then here is How to Enable Developer Options and How to Enable USB Debugging and OEM unlock.
- Then connect the phone using the USB cable to the PC.
– When you connect the phone to the PC, MTKDroidTool will show all the information about your phone.

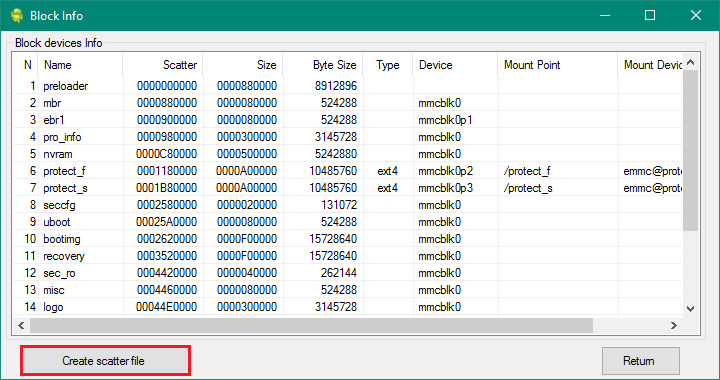
- On the below portion of the screen you will see a Blocks Map button. Click on the button
- On the next screen you have all the partition information and starting address of all the partitions of Oukitel C11 Pro.
On the bottom of the screen you see a Create scatter file button.– Click on the button to create scatter file for Oukitel C11 Pro.

- Save the scatter file for Oukitel C11 Pro in a location which you can remember and access easily.
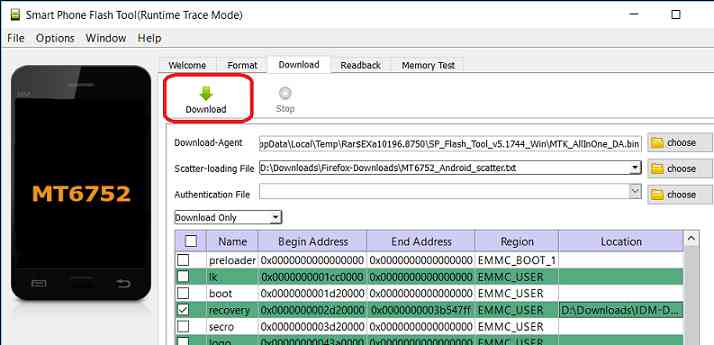
Now Install TWRP on Oukitel C11 Pro using SP Flash Tool:
TWRP recovery download to a Mediatek phone is done by SP Flash tool, which uses a scatter file to know which address the recovery partition starts.
Make sure you have downloaded the SP Flash tool and created the scatter file for Oukitel C11 Pro.Follow the below steps to install the TWRP on Oukitel C11 Pro using the scatter file.
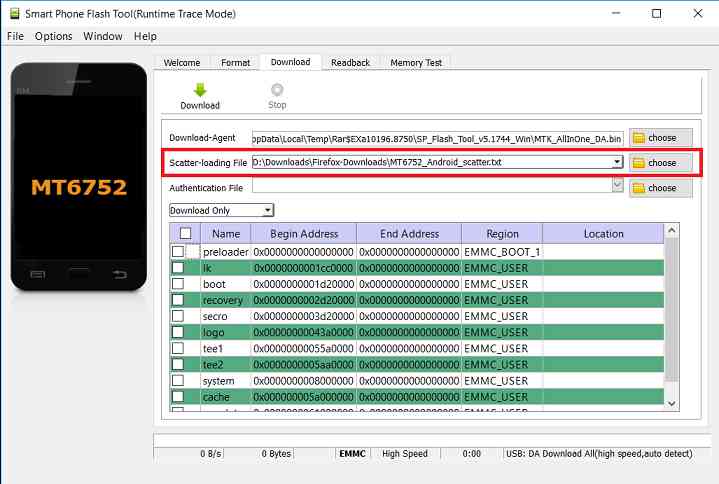
- Open the SP Flash tool zip file and then open the flash_tool.exe file.
- Click browse on the the scatter-loading file section and select the Oukitel C11 Pro scatter file you created earlier using the MTKDroid Tool.
After selecting the scatter file, the SP Flash tool application automatically find available partitions and other details.

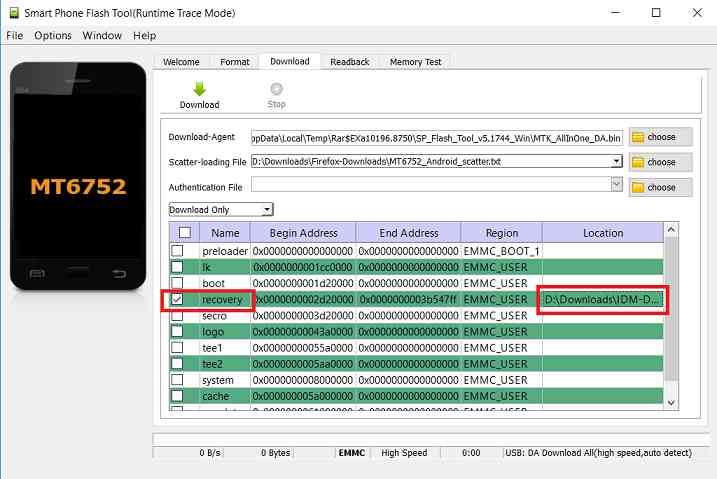
- Now select the location next to the Recovery partition and select the TWRP for Oukitel C11 Pro, which is in .img format.

- Then click on the Download button to start downloading/flashing of the TWRP recovery on Oukitel C11 Pro as shown in the picture.

- After clicking on the download button you will see a red bar on the bottom followed by a yellow bar.
When the TWRP is downloaded to Oukitel C11 Pro, the SP Flash tool will alert you saying Download is done.
That’s all.
What to do after you install TWRP for Oukitel C11 Pro:
- You can root the Oukitel C11 Pro
- You can install one of the custom ROMs available for Oukitel C11 Pro
- You can install some of the mods available on Oukitel C11 Pro
Well, this isn’t it. You can install customized themes, sound mods, Xposed modules etc. after installing the TWRP for Oukitel C11 Pro.
TWRP recovery is the gateway to many goodies for your phone.Now, if you want to ROOT Oukitel C11 Pro then below is a step-by-step by guide for the same.
REQUIRED DOWNLOADS OR GUIDES FOR Oukitel C11 Pro ROOTING:
- Make sure you have already unlocked the bootloader and installed TWRP for Oukitel C11 Pro
– Well, this is a very important aspect of this SuperSU ROOT process. The SuperSU zip file is developed in a way to be installed via a TWRP recovery or other custom recovery. Stock recovery may not be able install this SuperSU or Magisk ROOT zip file.
- Download the latest SuprSU ROOT for Oukitel C11 Pro or one of the following:
- Download link for Latest SuperSU zip file
- Download link for STABLE SuperSU zip file
- Download link for SuperSU BETA zip file
- Download link to SuperSU APK Free version
- Download link to SuperSU APK Pro version
- Download link to Magisk ROOT zip file
IMPORTANT NOTE:- Your phone will not be rooted just by installing the SuperSU APK file on your Android phone.
- SuperSU APK Free or Pro version is just a SuperSU ROOT management application.
- The SuperSU APK Free or Pro app will ONLY work if you have already ROOTED your Android Phone.
Step-by-Step guide on how to ROOT Oukitel C11 Pro using SuperSU or Magisk zip file:
- Download and copy the SuperSU or Magisk ROOT file to Oukitel C11 Pro. (I hope you have already downloaded the SuperSU zip file from the above downloads section)
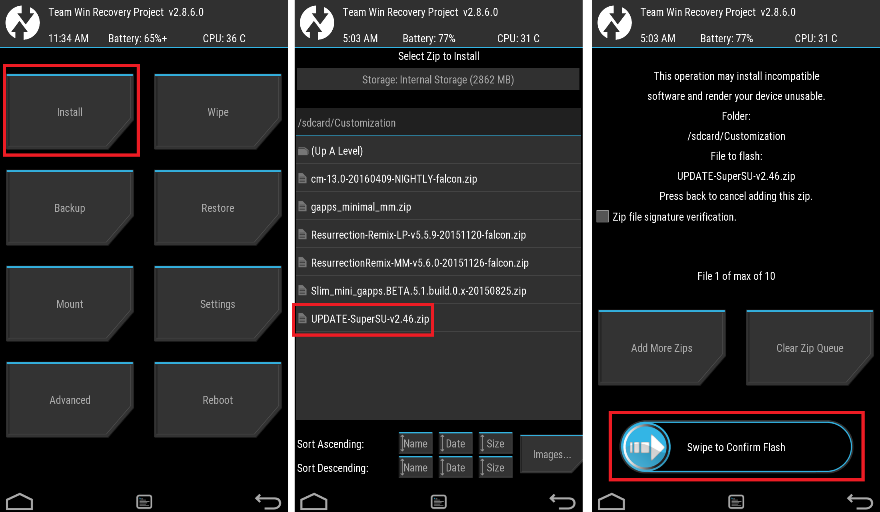
- Now restart the Oukitel C11 Pro to boot into TWRP recovery.
- Then, Select the Install from TWRP home screen, then select the SuperSU ROOT zip file from the file browser.
- Flash or install the SuperSU or Magisk for Oukitel C11 Pro, by Sliding the Swipe to Confirm Flash on TWRP screen.
- Wait for TWRP to flash the SuperSU or the Magisk. Once the flashing is done just reboot your device.
- Profit!!! You should now have a Oukitel C11 Pro ROOT enabled phone.
How to check if ROOT is enabled on Oukitel C11 Pro or NOT?
Install the ROOT checker app from the Play Store and verify if your phone is ROOTED or not.
Here is a screenshot how to flash the SuperSU ROOT binary via TWRP:

If you face any problems on this guide to install TWRP for Oukitel C11 Pro then, you can login and reply here. Either me or some other user on this forum will revert back to your query as soon as possible.
Stay tuned or Subscribe to the Oukitel C11 Pro forum For other Android Custom ROMs, LineageOS ROMs, and all other device specific topics.


![[TWRP & ROOT] TWRP for Oukitel C11 Pro and ROOT guide](https://cyanogenmods.org/wp-content/uploads/2018/11/oukitel-c11-pro-twrp-root.jpg)