- Search Results
Android Marshmallow ROM, LineageOS 13 for LG G3 has now arrived via an UNOFFICIAL build. Here is the LineageOS 14.1 for LG G3 (d855). If you want some more LineageOS ROMs or wanna taste the OFFICIAL LineageOS build then stay tuned to the LineageOS 13 Devices List page and LineageOS 14.1 ROM Device List. This LG G3 LineageOS 13 is brought to you by developer reepje123.
DISCLAIMER:
THIS IS AN INITIAL BUILD WHICH MAY HAVE MANY MORE BUGS THAN YOU CAN IMAGINE. HAVE A BACKUP BEFORE FLASHING THIS AND TRY AT YOUR OWN RISK. Installing a custom ROM may require the bootloader to be unlocked on LG G3, which may VOID your warranty and may delete all your data. Before proceeding further you may consider backup all data on the phone. You are the only person doing changes to your phone and I cannot be held responsible for the mistakes done by you.Status of LineageOS 13 for LG G3 (d855) Marshmallow ROM:
WHAT’S WORKING:
– Not KnownKNOWN ISSUES:
– Not Known
REQUIRED LINKS AND FILES FOR LineageOS 13 for LG G3 MARSHMALLOW CUSTOM ROM:
- Latest stock FW and baseband
- TWRP download link for LG G3
– Here is: Custom Recovery Installation Guide for LG G3
– This TWRP recovery guide requires an unlocked bootloader on the LG G3 (d855). - ROM Download Link of LG G3 LineageOS 13 ROM (d855)
- LineageOS 13 GApps download link for LG G3 LineageOS 13 Marshmallow ROM
Root binary is NOT inbuilt in LineageOS 13, so you may need a separate SuperSu package or LineageOS su binary to install to gain ROOT access. Here is How to Enable ROOT on LineageOS 13
If there is no in-built ROOT or it does not work for some reason then you can try flashing SuperSU zip using recovery to gain ROOT access.HOW TO INSTALL/DOWNLOAD/FLASH/UPDATE LG G3 LineageOS 13 MARSHMALLOW CUSTOM ROM:
Follow this if you are flashing LineageOS 13 for LG G3 (d855) for the first time, or coming from another ROM:
Points to NOTE:
– Try to avoid restoring apps backup using Titanium Backup. It may break things up.
– Don’t restore system data using Titanium Backup! It will definitely break the current installation.
– It is also discouraged to Restoring Apps + Data using Titanium Backup.- Download and Copy the GApps and LineageOS 13 for LG G3 ROM ZIP to your phone.
- Boot into Recovery. Make sure to have a Custom recovery like CWM or TWRP or any other custom recovery. If not then follow the Custom Recovery Installation Guide for LG G3 (d855) (it’s a generic guide which will work for TWRP as well as CWM recovery or any other recovery)
- Wipe data factory reset, Cache partition, Dalvik Cache and Format the System partition.
– Here is a guide explaining how to wipe data using TWRP recovery.This will delete all your data on your phone. You may consider complete backup of your phone data or take a NANDROID backup of the current ROM
– How to backup all data on your Android Device
– how to take NANDROID backup using TWRP recovery - First flash the LG G3 LineageOS 13 ROM ZIP from device. Then flash the GApps zip from your device memory.
– Here is a post explaining how to install LineageOS. - DO NOT REBOOT yet. Then flash the LineageOS 13 GApps package.
– Here is a post explaining how to flash LineageOS 13 GApps using TWRP recovery. - Reboot and Enjoy the Marshmallow LineageOS 13 ROM for LG G3 (d855).
Upgrading from earlier version of LG G3 LineageOS 13 (d855):
- Copy the latest LineageOS 13 for LG G3 ROM ZIP file to your phone.
- Boot into Recovery.
- Flash the latest LineageOS ROM ZIP from your phone.
– Here is a post explaining how to install LineageOS. - Then flash the LineageOS 13 Marshmallow GApps package.
– Here is a post explaining how to flash GApps using TWRP recovery. - Reboot and Enjoy
Complete the initial setup and enjoy Android Marshmallow with LineageOS 13 for LG G3 (d855). After the installation of LG G3 LineageOS 13 ROM (d855) you may want to enable ROOT access on your phone and here is how you can do that:
How to Enable ROOT on LineageOS 13.Stay tuned or Subscribe to the LG G3 (d855) forum For other Android Custom ROMs, LineageOS 13 ROMs, other ROMs and all other device specific topics.Resurrection Remix Oreo for Galaxy S4 Mini 3G is now available to download via a development version. This Resurrection Remix v6.0.0 Android Oreo 8.1 ROM for Galaxy S4 Mini 3G (serrano3gxx) is brought to you by developer Harvey_Spectar.
DONATION TO DEVELOPER(s):
If you like this ROM then do consider a small contribution to Harvey_Spectar:
– donation to Harvey_SpectarIf you want the OFFICIAL Resurrection Remix update or some more Android Oreo Custom ROMs then stay tuned to the Lineage OS 15 Download page or the AOSP Oreo ROMs Download devices list page.
DISCLAIMER:
THIS IS AN INITIAL BUILD OF RESURRECTION REMIX ANDROID OREO (8.1), WHICH MAY HAVE MINOR BUGS. BACKUP THE CURRENT ROM BEFORE FLASHING. TRY AT YOUR OWN RISK.
Installing a custom ROM on a the Galaxy S4 Mini 3G requires a custom recovery to be installed, which may VOID your warranty and may delete all your data. Before proceeding further you may consider backup all data on the phone. You are the only person making changes to your phone and I cannot be held responsible for the mistakes done by you.Content structure:
- Status of Resurrection Remix Android 8.1 Oreo ROM for Galaxy S4 Mini 3G
- Required Downloads of Resurrection Remix Android 8.1 Oreo ROM for Galaxy S4 Mini 3G
- How to Install Resurrection Remix Android 8.1 Oreo ROM on Galaxy S4 Mini 3G
- Rooting the Resurrection Remix Android 8.1 Oreo ROM on Galaxy S4 Mini 3G
Status of Galaxy S4 Mini 3G Resurrection Remix Oreo 6.0.0 Android 8.1 Oreo ROM Download:
WHAT’S WORKING:
– UnknownKNOWN ISSUES:
– Unknown
REQUIRED DOWNLOADS AND LINKS TO UPDATE Galaxy S4 Mini 3G RESURRECTION REMIX OREO ROM:
- TWRP recovery download link for Galaxy S4 Mini 3G Resurrection Remix Oreo ROM
– Follow this guide: Flash TWRP using Odin
- ROM Download link to Resurrection Remix Oreo 6.0.0 Android 8.1 Oreo ROM for Galaxy S4 Mini 3G
- Oreo GApps Download Link for Galaxy S4 Mini 3G Resurrection Remix Oreo ROM
- Rooting guide for RR Oreo
HOW TO INSTALL/FLASH/UPDATE RESURRECTION REMIX OREO ROM FOR Galaxy S4 Mini 3G (ANDROID OREO 8.1, RR v6.0.0 ROM):
Follow this to Install Resurrection Remix Android Oreo on Galaxy S4 Mini 3G for the first time or coming from another Android ROM:
Points to NOTE on BACKUP before updating:
– Try to avoid restoring apps backup using Titanium Backup. It may break things up.
– Don’t restore system data using Titanium Backup! It will definitely break the current installation.
– It is also discouraged to Restoring Apps + Data using Titanium Backup.- Boot into Recovery by one of the following method:
– Power off the phone and keep pressing key combinations while turning on your phone.
– If you have enabled USB debugging and you have ADB utility installed on your PC then you can execute the following command on a console or command prompt:adb reboot recovery
- Wipe data factory reset, Cache partition, Dalvik Cache and Format the System partition using the recovery.
– Here is a guide explaining how to wipe data using TWRP recovery.This will delete all your data on your phone. IGNORE IF YOU DON’T WANT TO OR IF YOU HAVE ALREADY DONE THIS. You may consider complete backup of your phone data or take a NANDROID backup of the current ROM.
– How to backup all data on your Android Device.
– how to take NANDROID backup using TWRP recovery. - Download the Galaxy S4 Mini 3G Android Oreo ROM zip file from the above download link and copy the files to phone.
- Flash the Galaxy S4 Mini 3G RR Oreo ROM zip from device.
– Here is a post explaining how to flash a ROM zip using TWRP.
Upgrading from earlier version of RR Android 8.1 Oreo ROM on Galaxy S4 Mini 3G:
- Copy the latest Resurrection Remix Oreo ROM ZIP file to your phone.
- Boot into Recovery.
- Flash the latest RR Oreo ROM ZIP from your phone and wait till it finishes flashing.
– Here is a post explaining how to flash a custom ROM using TWRP recovery. - Reboot and Enjoy
Reboot to system after flashing is done completely. Do the required initial setup and enjoy the Android Oreo ROM for Galaxy S4 Mini 3G. If you face any problem following this guide or post installation then just login and leave a comment to get an instant reply.
Rooting Resurrection Remix Android Oreo ROM on Galaxy S4 Mini 3G:
There is no inbuilt ROOT functionality available on this ROM.
Here is how to How to ROOT RR Oreo ROM, a step-by-step guide !!!The above link is for LineageOS 15.1 Rooting guide, because RR Oreo is based on LineageOS 15.1.
Stay tuned or Subscribe to the Galaxy S4 Mini 3G custom ROMs forum For other Android Oreo ROMs, Android Nougat ROMs, LineageOS ROMs, Resurrection Remix ROM, Omni ROM, AICP ROM, crDroid ROM, and all other device specific topics.If you have found any BUG or have any issue(s) on this ROM then here is the dev thread on xda where you can convey your concerns.
Android 10 based crDroid 6.5 for Redmi Note 5 Pro download is now available. This build of crDroid 6.5 for Redmi Note 5 Pro is brought to you by Ruturaj Kadam.
Other Android 11 or 10 Downloads for Redmi Note 5 Pro
Following are some of the other Android 10 custom ROMs for Redmi Note 5 Pro:
– Redmi Note 5 Pro Android 11 download
– LineageOS 17.1 download
– Android 10 download
– Bliss ROM Android 10 download
– RR Android 10 downloadDONATION TO DEVELOPER(S)/PROJECT:
If you like this ROM then consider for a donation to Ruturaj Kadam:
– Donate to Rutraj kadam
[su_note note_color=”#F9D9D9″ text_color=”#AA4343″ radius=”3″ class=”” id=””]crDroid 6.5 is a custom ROM for Redmi Note 5 Pro which may have many bugs. This firmware has to be installed using a custom recovery such as TWRP, which requires an unlock bootloader on the phone.
Make sure you BACKUP all the data and all the partitions of your phone before installing this Android 10 ROM.You are the only person making changes to your phone and I cannot be held responsible for anything wrong done by you.[/su_note]
About crDroid 6.5 based on Android 10:
The crDroid ROM typically known as crDroid Android is a custom ROM that uses the LineageOS as its base. LineageOS base brings its own benefits, such as clean and secure code with regular secutiy patch merges.
crDroid is like LineageOS on steroids. Yes, it provides many more features, customizations etc. unlike the stock LineageOS which is kind of a clean installation without much of customization.
This is an open source project just like other custom ROMs which has 4 members namely: Neobuddy89, Firebird11, Gwiolf2u, Soubhik-Khan in the core team and many device maintainers.
The crDroid 6.5 is the latest version which based on the recently released Android 10.
Status of this Redmi Note 5 Pro crDroid 6.5 Android 10:
WHAT’S WORKING:
– UnknownKNOWN ISSUES:
– UnknownWhere to Download crDroid 6.5 for Redmi Note 5 Pro?
- crDroid 6.5 Download for Redmi Note 5 Pro
- TWRP for Redmi Note 5 Pro
- How to install TWRP recovery
- Xiaomi Bootloader unlock guide – required to install TWRP recovery
- Android 10 GApps
How to Install Android 10 crDroid 6.5 on Redmi Note 5 Pro?
[su_note note_color=”#D8F1C6″ text_color=”#769958″ radius=”3″ class=”” id=””]
Following are the two sub-sections of this Redmi Note 5 Pro Android 10 update guide:- First time installation of crDroid 6.5 ROM
- Upgrading from an older crDroid 6.5 build
[/su_note]
Installing crDroid 6.5 for the first time:
[su_note note_color=”#D8F1C6″ text_color=”#769958″ radius=”3″ class=”” id=””]This upgrade process requires few guides to be followed and few files to be downloaded. Everything referred in the below guide is provided in the above downloads section.[/su_note]
- Download and keep the Redmi Note 5 Pro crDroid 6.5 zip file,the Android 10 Gapps zip file and keep it in your PC or copy it to the phone.
- Boot into the TWRP Recovery (with SAR support) to install crDroid 6.5 on Redmi Note 5 Pro.
[su_note note_color=”#D7E3F4″ text_color=”#728095″ radius=”3″ class=”” id=””]- Make sure to have a Custom recovery like a TWRP recovery or any other custom recovery.
– If not then unlock the bootloader and then download the TWRP recovery from Downloads link and follow the how to install TWRP recovery guide (it’s a generic guide which will work for TWRP as well as any other recovery)[/su_note] - Wipe system, data, and cache partition.
[su_note note_color=”#D7E3F4″ text_color=”#728095″ radius=”3″ class=”” id=””]- Here is a guide explaining how to wipe using TWRP recovery.[/su_note]
[su_note note_color=”#FBF4DD” text_color=”#A38C68″ radius=”3″ class=”” id=””]This will delete all your data on your phone. You may consider complete backup of your phone data or take a NANDROID backup of the current ROM
– Backup data on Android
– NANDROID backup on TWRP recovery[/su_note] - ADB sideload the crDroid 6.5 zip file
(or)
If ADB sideload is not working on recovery, just flash the zip using TWRP or any other recovery. - Then ADB Sideload the Android 10 Gapps zip file.
[su_note note_color=”#D7E3F4″ text_color=”#728095″ radius=”3″ class=”” id=””]- Here is a post explaining how to do ADB sideload using TWRP.[/su_note] - Once done, reboot and Enjoy Android 10 with Pixel Experience, on your Redmi Note 5 Pro.
Upgrade crDroid 6.5 on Redmi Note 5 Pro:
- Download and keep the latest crDroid 6.5 zip file built for Redmi Note 5 Pro and the Android 10 GApps on your PC or copy to the phone
- Boot into TWRP recovery
- Wipe the system partition from the custom recovery menu.
- ADB sideload the crDroid 6.5 zip file
(or)
If ADB sideload is not working on recovery, just flash the zip using TWRP or any other recovery. - Reboot and see if you have the GApps and ROOT access or NOT (if you installed previously).
[su_note note_color=”#D8F1C6″ text_color=”#769958″ radius=”3″ class=”” id=””]- Gapps is built in such a way that it will sustain across ROM updates.[/su_note] - If you don’t have GApps after upgrading the Android 10 on the phone, then flash or ADB sideload the GApps again.
[su_note note_color=”#D7E3F4″ text_color=”#728095″ radius=”3″ class=”” id=””]- Here is a post explaining how to flash GApps or how to ADB sideload using TWRP recovery.[/su_note] - If you want application level rooting on crDroid 6.5 ROM, then flash the Magisk Installer zip file.
- Once everything is done, reboot and Enjoy the crDroid 6.5 update on Redmi Note 5 Pro.
How to Root Redmi Note 5 Pro on crDroid 6.5?
After installing crDroid 6.5 on Redmi Note 5 Pro you may want to enable ROOT access on your phone and here is how you can do that:
– crDroid Rooting guide (this is for LineageOS 17.1 but should work fine on crDroid 6.5 Android 10)
[su_note note_color=”#D7E3F4″ text_color=”#728095″ radius=”3″ class=”” id=””]If there is no ROOT access for some reason even after installing the Magisk, then you can try installing SuperSU Zip to enable ROOT access.[/su_note]How to Get GCam for crDroid 6.5?
GCam 7.0 and later versions are compatible with crDroid 6.5 or any Android 10 ROM in general.
You can always look into the big list of GCam APK download page to get a compatible GCam for your phone.Stay tuned or Subscribe to the Redmi Note 5 Pro (Whyred) forum For other Android Pie, Android Oreo ROMs, Nougat ROMs, or other ROMs and all other device specific topics.TWRP for Moto X Force (kinzie) is now available to download from an unofficial build. This post guides how to install TWRP on Moto X Force and ROOT Moto X Force (using TWRP recovery).
The TWRP download for Moto X Force is brought to you by developer(s) techmizan

[su_note note_color=”#F9D9D9″ text_color=”#AA4343″ radius=”3″ class=”” id=””]DISCLAIMER:
THIS IS AN INITIAL UNOFFICIALLY BUILD TWRP FOR Moto X Force. MAKE SURE YOU BACKUP EVERYTHING.[/su_note]
[su_note note_color=”#FBF4DD” text_color=”#A38C68″ radius=”3″ class=”” id=””]INSTALLING TWRP RECOVERY REQUIRES AN UNLOCK BOOTLOADER ON Moto X Force.
DURING THE BOOTLOADER UNLOCK PROCESS ALL THE PHONE DATA WILL BE ERASED.[/su_note]
[su_note note_color=”#F9D9D9″ text_color=”#AA4343″ radius=”3″ class=”” id=””]ROOTING Moto X Force MAY BRICK THE PHONE.
MAKE SURE YOU READ THE ADVANTAGES AND DISADVANTAGES OF ROOTING BEFORE YOU PROCEED FURTHER.
Before proceeding further you may consider backup all data on the phone.You are the only person making changes to your phone and I cannot be held responsible for the mistakes done by you.[/su_note]
Content structure:
DOWNLOAD LINK OF TWRP FOR Moto X Force, OTHER DOWNLOADS AND REQUIRED GUIDES:
- Moto X Force Phone, USB cable and a Windows, or Linux or MAC PC with ADB and fastboot installed.
- ADB and Fastboot utility. below are the download links and guides to install:
– 15 Seconds ADB Installer for Windows
– Minimal ADB and Fastboot for Windows
– ADB and fastboot for Linux
– ADB and fastboot for MAC - Ulocked bootloader on the Moto X Force
– Here is how to unlock bootloader on Moto X Force
- Motorola USB drivers
- TWRP recovery Download for Moto X Force
STEP BY STEP GUIDE OF HOW TO INSTALL TWRP FOR Moto X Force:
- Connect the Moto X Force to the PC using the USB cable and install required USB driver
- Install 15 Seconds ADB Installer or Minimal ADB and Fastboot on Windows or Linux or MAC as per the PC you have
- Unlock bootloader of Moto X Force
- Download the Moto X Force TWRP recovery to an easily accessible folder.
- Then, on your PC, go to the folder where you have downloaded the TWRP for Moto X Force and then open the command console or a terminal on this directory on your PC.
[su_note note_color=”#D7E3F4″ text_color=”#728095″ radius=”3″ class=”” id=””]- To open a command window on Windows OS in the current directory, press shift + Right Click anywhere on Windows explorer, or some folder.
– Then on the menu opened, just press the “w” key on the keyboard or select “Open command window here” to open a command window.[/su_note] - Now connect your phone to the PC using a USB cable, if not connected yet.
- Start the phone in bootloader mode.
[su_note note_color=”#D7E3F4″ text_color=”#728095″ radius=”3″ class=”” id=””]- Enter the following command on the opened command window:
adb reboot bootloader
to put your phone into bootloader mode where you can flash/install TWRP for Moto X Force.
– If your phone asks for permission; such as “Allow USB debugging” then just tap on OK to proceed.[/su_note] - Now when your phone is on the bootloader mode just execute the following command on the console:
fastboot flash recovery twrp-3.2.x.x-xxx.img
[su_note note_color=”#D7E3F4″ text_color=”#728095″ radius=”3″ class=”” id=””]- While executing this command make sure to replace the twrp-3.2.x.x-xxx.img with the actual filename of the TWRP for Moto X Force[/su_note]
- Wait for the fastboot command to install the TWRP for Moto X Force.
Once it is done, execute the below command:fastboot reboot recovery
on the command console to start the phone in TWRP recovery mode.
[su_note note_color=”#D8F1C6″ text_color=”#769958″ radius=”3″ class=”” id=””]That’s all. You should now have installed the TWRP recovery on Moto X Force.[/su_note]
You may now want to ROOT Moto X Force or may want to install some custom ROM or want to explore what else can you do with this TWRP? Head over to the following section to know more.
What to do after you install TWRP on Moto X Force:
- You can enable How to root Moto X Force
- You can install one of the custom ROMs available for Moto X Force
- You can install some of the mods available for Moto X Force
Well, this isn’t it. You can install customized themes, sound mods, Xposed modules etc. after installing the TWRP for Moto X Force.
TWRP recovery is the gateway to many goodies for your phone.Now, if you want to ROOT Moto X Force then below is a step-by-step by guide for the same.
REQUIRED DOWNLOADS OR LINKS FOR ROOTING Moto X Force:
[su_note note_color=”#D7E3F4″ text_color=”#728095″ radius=”3″ class=”” id=””]Make sure you have already installed TWRP on Moto X Force and hence I believe unlocked the bootloader.
– Well, this is a very important aspect to enable ROOT access on Moto X Force.
– The SuperSU zip file is developed in a way to be installed via a TWRP recovery or other custom recovery. Stock recovery may not be able install this SuperSU or Magisk ROOT on Moto X Force.
[/su_note]
- Download the latest SuprSU ROOT for Moto X Force or one of the following:
- Download link for Latest SuperSU zip file
- Download link for STABLE SuperSU zip file
- Download link for SuperSU BETA zip file
- Download link to SuperSU APK Free version
- Download link to SuperSU APK Pro version
- Download link to Magisk ROOT zip file
IMPORTANT NOTE:- The Moto X Force will not be rooted just by installing the SuperSU APK file on your Android phone.
- SuperSU APK Free or Pro version is just a SuperSU ROOT management application.
- The SuperSU APK Free or Pro app will ONLY work if you have already ROOTED your Android Phone.
Step-by-Step guide on how to ROOT Moto X Force using SuperSU or Magisk zip file:
- Download and copy the SuperSU or Magisk ROOT zip file to Moto X Force.
[su_note note_color=”#D7E3F4″ text_color=”#728095″ radius=”3″ class=”” id=””]The required files can be downloaded from the above downloads section[/su_note]
- Next restart the Moto X Force to boot into TWRP recovery.
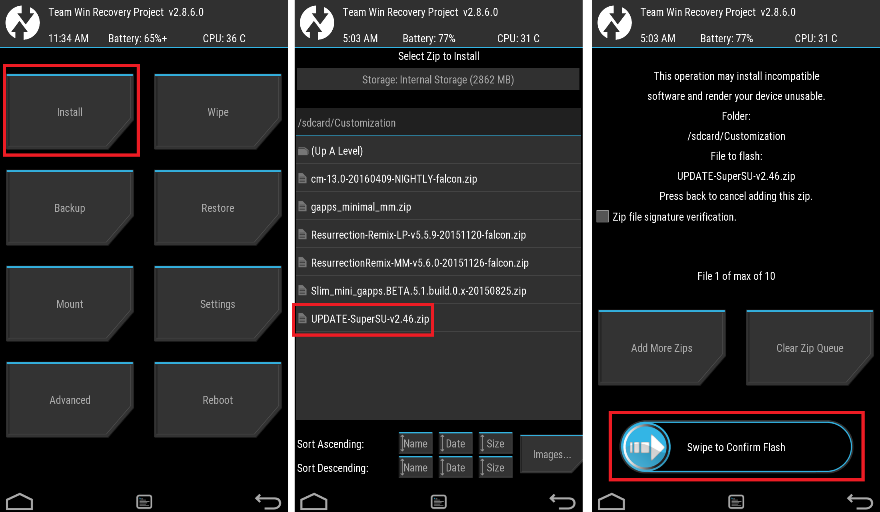
- Then, Select the Install from TWRP home screen, then select the Magisk zip file or select the SuperSU ROOT zip file from the file browser.
- Flash or install the SuperSU or Magisk zip file, by Sliding the Swipe to Confirm Flash on TWRP screen.
- Wait for TWRP to flash the SuperSU or the Magisk. Once the flashing is done just reboot your device.
- Profit!!! You should now have a Moto X Force ROOT enabled phone.
How to check if ROOT is enabled on Moto X Force or NOT?
Install the ROOT checker app from the Play Store and verify if your phone is ROOTED or not.
Here is a screenshot how to flash the SuperSU ROOT for Moto X Force via TWRP:

If you face any problems on this guide to install TWRP for Moto X Force or to following the Moto X Force rooting guide then, you can login and reply here. Either me or some other user on this forum will rkinzie back to your query as soon as possible.
Stay tuned or Subscribe to the Moto X Force (kinzie) forum For other Android Custom ROMs, Lineage OS ROMs, and all other device specific topics.This is Symphony Roar A50 (Android One) Nougat ROM flashing guide. Since the Android Nougat Source code release, till now we have many Android Nougat ROMs available for various devices. And now this time the Nougat ROM (build number: NRD90M) has arrived to Symphony Roar A50 which is brought to you by developer Nazmul hasan. Symphony Roar A50 Users must be thankful to the developers for their priceless efforts and lightning fast development.
THIS IS JUST AN ALPHA ROM AND CANNOT BE USED AS A DAILY DRIVER SOFTWARE. CHECK THE WORKING AND NON-WORKING LIST BEFORE FLASHING AND PROCEED AT YOUR OWN RISK.
DISCLAIMER:
Installing a custom ROM on a the Symphony Roar A50 requires the bootloader to be unlocked, which may VOID your warranty and may delete all your data. Before proceeding further you may consider backup all data on the phone. You are the only person doing changes to your phone and I cannot be held responsible for the mistakes done by you.Status of Nazmul Hasan’s Symphony Roar A50 (Android One) Nougat ROM:
WHAT’S WORKING:
– Not knownKNOWN ISSUES:
– Not known
REQUIRED DOWNLOADS AND LINKS FOR SYMPHONY ROAR A50 (ANDROID ONE) NOUGAT 7.0 ROM:
- Unlocked bootloader on Roar A50
- TWRP recovery download link for Roar A50.
Follow the guide to flash the recovery: How to install recovery on a Mediatek device
- ROM Download link of Symphony Roar A50 Nougat ROM by Nazmul hasan
- Google Apps download link for the Nougat Symphony Roar A50 ROM
- Enable ROOT on Symphony Roar A50 Nougat ROM
Make sure you have a Linux/Windows PC or a MAC installed with Fastboot and adb binaries. If not then you can follow one of the following guides based on your PC OS:
– 15 Seconds ADB Installer for Windows
– Minimal ADB and Fastboot for Windows
– ADB Fastboot Installation guide for Linux or MACINSTALL/FLASH SYMPHONY ROAR A50 NOUGAT ROM (ANDROID 7.0 AOSP ROM):
- Download the Symphony Roar A50 Nougat ROM zip file and a suitable Nougat Gapps zip file from the above download link and copy both the files to phone.
- Boot into Recovery by one of the following method:
– Power off the phone and keep pressing key combinations while turning on your phone.
– If you have enabled USB debugging and you have ADB utility installed on your PC then you can execute the following command on a console or command prompt:adb reboot recovery
- Wipe data factory reset, Cache partition, Dalvik Cache and Format the System partition using the recovery.
– Here is a guide explaining how to wipe data using TWRP recovery.This will delete all your data on your phone. IGNORE IF YOU DON’T WANT TO OR IF YOU HAVE ALREADY DONE THIS. You may consider complete backup of your phone data or take a NANDROID backup of the current ROM.
– How to backup all data on your Android Device.
– how to take NANDROID backup using TWRP recovery. - First flash the Symphony Roar A50 Nougat ROM ZIP from device.
– Here is a post explaining how to flash a custom ROM using TWRP recovery. - Now flash the Google Apps package.
– Here is a post explaining how to flash GApps using TWRP recovery.
NOTE:
Reboot the phone when the flashing is done. Do the initial setup and enjoy the Nougat taste on Roar A50.Stay tuned or Subscribe to the Symphony Roar A50 forum For other Android Nougat ROMs, CyanogenMod 14 ROMs, other ROMs and all other device specific topics.Android Nougat 7.1 ROM, Lenovo K3 NOTE CM14/14.1 (CyanogenMod 14/14.1) has now arrived via an UNOFFICIAL build. In addition to this CM14.1 we also have the Lineage 14.1 for K3 NOTE. For latest updates, stay tuned to the Lineage OS device list page. We have all available OFFICIAL CM14 (Cyanogenmod 14) ROMs, we have update many Android NOUGAT AOSP ROMs and also we have update a big list of available CM14/14.1 (CyanogenMod 14/14.1) Nougat 7.1 ROMs. This CM14/14.1 for Lenovo K3 NOTE is brought to you by developer daniel_hk. If you like this ROM and want the developer to keep up this good work then please consider donating daniel_hk via PayPal.
DISCLAIMER:
THIS IS AN INITIAL BUILD. THIS MAY NOT BOOT AT ALL OR IF IT BOOTS IT MAY HAVE MANY MORE BUGS THAN YOU CAN IMAGINE. TRY AT YOUR OWN RISK. Installing a custom ROM on a Lenovo K3 NOTE requires the bootloader to be unlocked on the K3 NOTE phone, which may VOID your warranty and may delete all your data. Before proceeding further you may consider backup all data on the phone. You are the only person doing changes to your phone and I cannot be held responsible for the mistakes done by you.Status of CM14/14.1 for Lenovo K3 NOTE CM14/14.1 (CyanogenMod 14/14.1) Nougat 7.1 ROM:
WHAT’S WORKING:
– Not knownKNOWN ISSUES:
– Not known
REQUIRED LINKS AND FILES FOR K3 NOTE CM14/14.1 (CYANOGENMOD 14/14.1, NOUGAT) CUSTOM ROM:
- TWRP update guide for the Lenovo K3 NOTE
- ROM Download link of CyanogenMod 14/14.1 (CM14/14.1) for Lenovo K3 NOTE
- Nougat GApps download link for K3 NOTE CM14/14.1 (CyanogenMod 14/14.1) Nougat 7.1 ROM
Root binary is inbuilt since CyanogenMod 12, so you don’t need a separate SuperSu package to install to gain ROOT access. Here is How to Enable ROOT on CM14/14.1 (CyanogenMod 14/14.1)
If there is no in-built ROOT or it does not work for some reason then you can try flashing SuperSU zip using recovery to gain ROOT access.HOW TO INSTALL/DOWNLOAD/FLASH/UPDATE CM14/14.1 FOR LENOVO K3 NOTE (CYANOGENMOD 14/14.1) NOUGAT CUSTOM ROM:
Follow this if you are flashing CyanogenMod 14/14.1 (CM14/14.) for K3 NOTE for the first time, or coming from another ROM:
Points to NOTE:
– Try to avoid restoring apps backup using Titanium Backup. It may break things up.
– Don’t restore system data using Titanium Backup! It will definitely break the current installation.
– It is also discouraged to Restoring Apps + Data using Titanium Backup.- Download and Copy the GApps and K3 NOTE CM14/14.1 (CyanogenMod 14/14.1) ROM ZIP to your phone.
- Boot into Recovery. Make sure to have a Custom recovery like CWM or TWRP or any other custom recovery. If not then follow the Custom Recovery Installation Guide for K3 NOTE (it’s a generic guide which will work for TWRP as well as CWM recovery or any other recovery)
- Wipe data factory reset, Cache partition, Dalvik Cache and Format the System partition.
– Here is a guide explaining how to wipe data using TWRP recovery.This will delete all your data on your phone. You may consider complete backup of your phone data or take a NANDROID backup of the current ROM
– How to backup all data on your Android Device
– how to take NANDROID backup using TWRP recovery - First flash the K3 NOTE CM14/14.1 ROM ZIP from device. Then flash the GApps zip from your device memory.
– Here is a post explaining how to flash a custom ROM using TWRP recovery. - Then reboot into recovery (don’t skip this) and flash the CyanogenMod 14/14.1 (CM14/14.1) Nougat GApps package.
– Here is a post explaining how to flash GApps using TWRP recovery. - Reboot and Enjoy the Nougat 7.1 ROM CyanogenMod 14/14.1 (CM14/14.1) for K3 NOTE.
Upgrading from earlier version of CyanogenMod 14/14.1 (CM14/14.1) for K3 NOTE:
- Copy the latest K3 NOTE CM14/14.1 ROM ZIP file to your phone.
- Boot into Recovery.
- Flash the latest CM ROM ZIP from your phone.
– Here is a post explaining how to flash a custom ROM using TWRP recovery. - Then flash the CM14/14.1 Nougat GApps package.
– Here is a post explaining how to flash GApps using TWRP recovery. - Reboot and Enjoy
Complete the initial setup and enjoy Android Nougat 7.1 with CM14/14.1 for K3 NOTE. After the installation of CM14/14.1 for Lenovo K3 NOTE you may want to enable ROOT access on your phone and here is how you can do that:
How to Enable ROOT on CM14/14.1 (CyanogenMod 14/14.1).Stay tuned or Subscribe to the Lenovo K3 NOTE forum For other Android Nougat ROMs, CyanogenMod 14/14.1 ROMs, other ROMs and all other device specific topics.TWRP Recovery for OnePlus 7 Pro (guacamole) is now available to download. This post guides how to download and install TWRP on OnePlus 7 Pro and also guides how to ROOT OnePlus 7 Pro (using TWRP recovery).
After installing TWRP recovery you can install many android mods such as GCam APK, enable navigation gesture, enable face unlock, viper4android etc. and many more.
The TWRP recovery for OnePlus 7 Pro is brought to you by developer(s) Mauronofrio.
DONATION TO DEVELOPER(S) AND PROJECT:
If you like this ROM then do consider for a contribution to Mauronofrio and TWRP project:
– Donate to Mauronofrio
– Donate to TWRP’s Lead developer
[su_note note_color=”#F9D9D9″ text_color=”#AA4343″ radius=”3″ class=”” id=””]DISCLAIMER:
THIS IS AN INITIAL UNOFFICIAL TWRP FOR OnePlus 7 Pro. FLASH AT YOUR OWN RISK[/su_note][su_note note_color=”#FBF4DD” text_color=”#A38C68″ radius=”3″ class=”” id=””]INSTALLING THE TWRP FOR OnePlus 7 Pro NEEDS AN UNLOCK BOOTLOADER ON OnePlus 7 Pro.
DURING THE BOOTLOADER UNLOCK PROCESS ALL THE PHONE DATA WILL BE ERASED.[/su_note][su_note note_color=”#F9D9D9″ text_color=”#AA4343″ radius=”3″ class=”” id=””]
You are the only person making changes to your phone and I cannot be held responsible for the mistakes done by you.
[/su_note]
Content structure:
INFORMATION OF THIS TWRP FOR OnePlus 7 Pro:
– TWRP version: 3.x.x
– Supported Android Version: Android Pie
– Built from – OmniROM AOSP source
– Custom ROM supported: AOSP or AOSP based Android Pie 9.0 ROMDOWNLOAD LINK OF TWRP FOR OnePlus 7 Pro, OTHER DOWNLOADS AND REQUIRED GUIDES:
- OnePlus 7 Pro Phone, USB cable and a Windows, or Linux or MAC PC with ADB and fastboot installed on it.
- TWRP download for OnePlus 7 Pro
- Force Encryption disabler download
- ADB and Fastboot utility.
Below are the download links and guides to install:
– 15 Seconds ADB Installer for Windows
– Minimal ADB and Fastboot for Windows
– How to install ADB and fastboot on Linux
– How to install ADB and fastboot on MAC - Ulocked bootloader on the OnePlus 7 Pro
STEP BY STEP GUIDE OF HOW TO DOWNLOAD AND INSTALL TWRP FOR OnePlus 7 Pro:
- Connect the OnePlus 7 Pro to the PC using the USB cable and install required USB driver
- Install 15 Seconds ADB Installer or Minimal ADB and Fastboot for Windows or Linux or MAC as per the PC you have
- Reboot the OnePlus 7 Pro into bootloader mode and Unlock bootloader of OnePlus 7 Pro
- Then, on your PC, go to the directory where you have downloaded the TWRP for OnePlus 7 Pro and then open the command console or terminal on this directory on your PC.
[su_note note_color=”#D7E3F4″ text_color=”#728095″ radius=”3″ class=”” id=””]- To open a command window on Windows OS in the current directory, press shift + Right Click anywhere on Windows explorer, or some folder.
– Then on the menu opened, just press the “w” key on the keyboard or select “Open command window here” to open a command window.[/su_note] - Now connect your phone to the PC using a USB cable, if not connected yet.
- Enter the following command on the opened command window:
adb reboot bootloader
to put your phone into bootloader mode where you can flash/install TWRP for OnePlus 7 Pro.
[su_note note_color=”#D7E3F4″ text_color=”#728095″ radius=”3″ class=”” id=””]If your phone asks for permission; such as “Allow USB debugging” then just tap on OK to proceed.[/su_note] - Now when your phone is on the bootloader mode just execute the following command on the console:
fastboot flash recovery twrp-3.3.x.x-xxx.img
[su_note note_color=”#D7E3F4″ text_color=”#728095″ radius=”3″ class=”” id=””]While executing this command make sure to replace the twrp-3.3.x.x-xxx.img with the actual filename of the TWRP for OnePlus 7 Pro[/su_note]
- Wait for the fastboot command to install the TWRP for OnePlus 7 Pro.
oncee it is done, execute the below command:fastboot reboot
when the phone is booting press and hold the volume + button to enter into TWRP recovery.
[su_note note_color=”#FBF4DD” text_color=”#A38C68″ radius=”3″ class=”” id=””]IT IS IMPORTANT THAT YOU REBOOT INTO RECOVERY AND DISABLE FORCE ENCRYPTION BEFORE BOOTING INTO SYSTEM OR STARTING THE PHONE. IF NOT DONE THE TWRP WILL BE REPLACED BY STOCK RECOVERY.[/su_note]
- From TWRP, disable encryption and flash the Disable Force Encryption zip file
[su_note note_color=”#D7E3F4″ text_color=”#728095″ radius=”3″ class=”” id=””]- Format data partition from TWRP to disable Encryption to be able to use the data partition.
– Then you flash the Disable Force Encryption zip file so that the system will not encrypt it again.[/su_note]
[su_note note_color=”#D8F1C6″ text_color=”#769958″ radius=”3″ class=”” id=””]That’s all. You should have the TWRP installed on your OnePlus 7 Pro.[/su_note]
You may now want to ROOT OnePlus 7 Pro or may want to install some custom ROM or want to explore what else can you do with this TWRP? Head over to the following section to know more.
What to do after you install TWRP for OnePlus 7 Pro:
- You can enable OnePlus 7 Pro ROOT access
- You can install one of the custom ROMs available for OnePlus 7 Pro
- You can install some of the mods available for OnePlus 7 Pro
Well, this isn’t it. You can install customized themes, sound mods, Xposed modules etc. after installing the TWRP for OnePlus 7 Pro.
TWRP recovery is the gateway to many goodies for your phone.Now, if you want to ROOT OnePlus 7 Pro then below is a step-by-step by guide for the same.
[su_note note_color=”#F9D9D9″ text_color=”#AA4343″ radius=”3″ class=”” id=””]ROOTING OnePlus 7 Pro MAY BRICK THE PHONE.
MAKE SURE YOU READ THE ADVANTAGES AND DISADVANTAGES OF ANDROID ROOT BEFORE YOU PROCEED FURTHER.
Before proceeding further you may consider backup all data on the phone.[/su_note]REQUIRED DOWNLOADS OR LINKS FOR OnePlus 7 Pro ROOT GUIDE:
[su_note note_color=”#D7E3F4″ text_color=”#728095″ radius=”3″ class=”” id=””]Make sure you have already unlocked the bootloader and installed TWRP for OnePlus 7 Pro
– Well, this is a very important aspect to enable ROOT for OnePlus 7 Pro. The SuperSU zip file is developed in a way to be installed via a TWRP recovery or other custom recovery. Stock recovery may not be able install this SuperSU or Magisk ROOT on OnePlus 7 Pro.[/su_note]
-
Download the latest SuprSU or Magisk ROOT for OnePlus 7 Pro or one of the following:
- SuperSU download link:
- Download link for Latest SuperSU zip file
- Download link for STABLE SuperSU zip file
- Download link for SuperSU BETA zip file
- Download link to SuperSU APK Free version
- Download link to SuperSU APK Pro version
- Download link to Magisk ROOT zip file RECOMMENDED
- DM Verity disabler download
IMPORTANT NOTE:- The OnePlus 7 Pro will not be rooted just by installing the SuperSU APK file on your Android phone.
- SuperSU APK Free or Pro version is just a SuperSU ROOT management application.
- The SuperSU APK Free or Pro app will ONLY work if you have already ROOTED your Android Phone.
Step-by-Step guide on how to ROOT OnePlus 7 Pro using SuperSU or Magisk zip file:
- Download and copy the SuperSU or Magisk ROOT file and the no verity encrypt file to OnePlus 7 Pro. (I hope you have already downloaded the SuperSU zip file from the above downloads section)
- Now restart the OnePlus 7 Pro to boot into TWRP recovery.
- Then, Select the Install from TWRP home screen, then select the SuperSU ROOT zip file from the file browser.
- Flash or install the SuperSU or Magisk zip file for OnePlus 7 Pro, by Sliding the Swipe to Confirm Flash on TWRP screen.
Here is a screenshot how to flash the SuperSU ROOT for OnePlus 7 Pro via TWRP:
- Wait for TWRP to flash the SuperSU or the Magisk. guacamolee the flashing is done just reboot your device.
- Then flash the no verity encrypt zip file.
- Profit!!! You should now have a OnePlus 7 Pro ROOT enabled phone.
How to check if ROOT is enabled on OnePlus 7 Pro or NOT?
Install the ROOT checker app from the Play Store and verify if your phone is ROOTED or not.
If you face any problems on this guide to install TWRP for OnePlus 7 Pro or to following the OnePlus 7 Pro root guide then, you can login and reply here. Either me or some other user on this forum will reply back to your query as soon as possible.
Stay tuned or Subscribe to the OnePlus 7 Pro (guacamole) forum For other Android Custom ROMs, Lineage OS ROMs, and all other device specific topics.LineageOS 14.1 for Mi NOTE (virgo) has come via an unofficial build. If you want the OFFICIAL update or some more Lineage ROMs then stay tuned to the LineageOS 14.1 page or the latest LineageOS 15 Android O devices list page. This Mi NOTE LineageOS 14.1 (virgo) is brought to you by GuaiYiHu.
DONATION TO DEVELOPER(S):
No donation link found for GuaiYiHu.
DISCLAIMER:
THIS IS AN INITIAL BUILD WHICH MAY NOT BOOT AT ALL OR EVEN IF IT BOOTS IT MAY HAVE MANY BUGS. HAVE A BACKUP OF THE CURRENT ROM BEFORE FLASHING THIS ROM AND TRY AT YOUR OWN RISK. Installing a custom ROM on a Mi NOTE (virgo) requires the bootloader to be unlocked on the Mi NOTE (virgo) phone, which may VOID your warranty and may delete all your data. Before proceeding further you may consider backup all data on the phone. You are the only person doing changes to your phone and I cannot be held responsible for the mistakes done by you.Status of LineageOS 14.1 for Xiaomi Mi NOTE (virgo), Nougat 7.1 ROM:
WHAT’S WORKING:
– Not KnownKNOWN ISSUES:
– Not Known
REQUIRED LINKS AND FILES FOR LineageOS 14.1 for Mi NOTE NOUGAT CUSTOM ROM:
- TWRP for Mi NOTE (virgo)
– Here is theTWRP update guide for the Mi NOTE (virgo). This TWRP recovery guide requires an unlocked bootloader on the Mi NOTE (virgo)
- ROM Download link of Mi NOTE LineageOS 14.1 (virgo)
- LineageOS Nougat GApps download link for Mi NOTE LineageOS 14.1 Nougat 7.1 ROM
Root binary is NOT inbuilt in LineageOS 14.1, so you may need a separate SuperSu package or LineageOS su binary to install to gain ROOT access. Here is LineageOS Rooting guide
If there is no in-built ROOT or it does not work for some reason then you can try SuperSU rooting guide to enable ROOT access.HOW TO INSTALL/DOWNLOAD/FLASH/UPDATE Mi NOTE LineageOS 14.1 NOUGAT CUSTOM ROM:
Follow this if you are flashing LineageOS 14.1 for Mi NOTE (virgo) for the first time, or coming from another ROM:
Points to NOTE:
– Try to avoid restoring apps backup using Titanium Backup. It may break things up.
– Don’t restore system data using Titanium Backup! It will definitely break the current installation.
– It is also discouraged to Restoring Apps + Data using Titanium Backup.- Download and Copy the GApps and LineageOS 14.1 for Mi NOTE ROM ZIP to your phone.
- Boot into Recovery. Make sure to have a Custom recovery like CWM or TWRP or any other custom recovery. If not then follow the Custom Recovery Installation Guide for Mi NOTE (virgo) (it’s a generic guide which will work for TWRP as well as CWM recovery or any other recovery)
- Wipe data factory reset, Cache partition, Dalvik Cache and Format the System partition.
– Here is a guide explaining how to wipe data using TWRP.This will delete all your data on your phone. You may consider complete backup of your phone data or take a NANDROID backup of the current ROM
– backup all data on your Android phone
– Take NANDROID backup using TWRP recovery - First flash the Mi NOTE LineageOS 14.1 ROM ZIP from device.
– Here is a post explaining how to flash a custom ROM using TWRP recovery. - DO NOT REBOOT YET. Now flash the LineageOS 14.1 GApps package.
– Here is a post explaining how to flash GApps using TWRP recovery. - Reboot and Enjoy the Nougat 7.1 LineageOS 14.1 ROM for Mi NOTE (virgo).
Upgrading from earlier version of LineageOS 14.1 for Mi NOTE (virgo):
- Copy the latest LineageOS 14.1 for Mi NOTE ROM ZIP file to your phone.
- Boot into Recovery.
- Flash the latest LineageOS ROM ZIP from your phone.
– Here is a post explaining how to flash a custom ROM using TWRP recovery. - Then flash the Android Nougat GApps package.
– Here is a post explaining how to flash GApps using TWRP. - Reboot and Enjoy
Complete the initial setup and enjoy Android Nougat 7.1 with LineageOS 14.1 for Mi NOTE (virgo). After the installation of Mi NOTE LineageOS 14.1 (virgo) you may want to enable ROOT access on your phone and here is how you can do that:
How to ROOT LineageOS 14.1.Stay tuned or Subscribe to the Mi NOTE (virgo) LineageOS forum For other Android Nougat ROMs, LineageOS 14.1 ROMs, other ROMs and all other device specific topics.Android Oreo 8.0 ROM, LineageOS 15 for A6000/Plus has now arrived via a DEVELOPMENT build. If you want the OFFICIAL LineageOS 15 for A6000/Plus (a6000) or some more Android Oreo ROMs for A6000/Plus then stay tuned to the Lineage 15 Android Oreo ROMs page or the AOSP Android Oreo devices list page. This Lineage 15 for A6000/Plus is brought to you by developer Dev_Harsh1998.
DONATION TO DEVELOPER(S):
– No donation link found for Dev_Harsh1998.
DISCLAIMER:
THIS IS AN INITIAL BUILD WHICH MAY NOT BOOT AT ALL. HAVE A BACKUP BEFORE FLASHING THIS AND TRY AT YOUR OWN RISK. Installing a custom ROM on a A6000/Plus (a6000) requires an unlocked bootloader on A6000/Plus (a6000), which may VOID your warranty and may delete all your data. Before proceeding further you may consider backup all data on the phone. You are the only person doing changes to your phone and I cannot be held responsible for the mistakes done by you.Content structure:
Status of Lineage OS 15 for A6000/Plus Oreo ROM:
WHAT’S WORKING:
– UnknownKNOWN ISSUES:
– Unknown
REQUIRED LINKS AND FILES FOR LineageOS 15 for Lenovo A6000/Plus OREO CUSTOM ROM:
- TWRP recovery download for A6000/Plus (a6000) (by sevenmaxs)
– Here is theTWRP update guide for the A6000/Plus. This TWRP recovery guide requires an unlocked bootloader on the A6000/Plus.
- ROM Download link of Lineage OS 15 for A6000/Plus
- Android Oreo GApps Download Link for LineageOS 15 for Lenovo A6000/Plus Oreo 8.0 ROM
Root binary is NOT inbuilt in Lineage OS 15, so you may need a separate SuperSu package or LineageOS su binary to install to gain ROOT access. Here is Lineage OS Rooting guide
If there is no in-built ROOT or it does not work for some reason then you can try SuperSU rooting guide to enable ROOT access.HOW TO INSTALL/DOWNLOAD/FLASH/UPDATE Lineage OS 15 FOR A6000/Plus OREO CUSTOM ROM:
Follow this if you are flashing LineageOS 15 for A6000/Plus for the first time, or coming from another ROM:
Points to NOTE:
– Try to avoid restoring apps backup using Titanium Backup. It may break things up.
– Don’t restore system data using Titanium Backup! It will definitely break the current installation.
– It is also discouraged to Restoring Apps + Data using Titanium Backup.- Boot into Recovery. Make sure to have a Custom recovery like CWM or TWRP or any other custom recovery. If not then follow the Custom Recovery Guide for A6000/Plus (it’s a generic guide which will work for TWRP as well as CWM recovery or any other recovery)
- Wipe data factory reset, Cache partition, Dalvik Cache and Format the System partition.
– Here is a guide explaining how to wipe data using TWRP recovery.This will delete all your data on your phone. You may consider complete backup of your phone data or take a NANDROID backup of the current ROM
– How to backup all data on your Android Device
– how to take NANDROID backup using TWRP recovery - Download and Copy the Oreo GApps, LineageOS 15 for A6000/Plus Oreo ROM ZIP and the Patch to your phone.
- First flash the A6000/Plus Lineage OS 15 ROM ZIP from device. Then flash the Patch and then the GApps zip from your device memory.
– Here is a post explaining how to install Lineage OS - Then reboot into recovery (don’t skip this) and flash the Gapps for LineageOS 15 package.
– Here is a post explaining how to flash GApps using TWRP recovery. - Reboot and Enjoy the Oreo 8.0 LineageOS 15 ROM for A6000/Plus.
Upgrading from earlier version of Lineage OS 15 for A6000/Plus (a6000):
- Copy the latest A6000/Plus Lineage 15 ROM ZIP file to your phone.
- Boot into Recovery.
- Flash the latest Android Oreo LineageOS 15 ROM ZIP from your phone.
– Here is a post explaining how to install LineageOS - Then flash the Lineage 15 Oreo GApps package.
– Here is a post explaining how to flash GApps using TWRP recovery. - Reboot and Enjoy
Complete the initial setup and enjoy Android Oreo 8.0 with Lineage OS 15 for A6000/Plus. After the installation of LineageOS 15 for A6000/Plus you may want to enable ROOT access on your phone and here is how you can do that:
How to Enable ROOT on LineageOS 15.Stay tuned or Subscribe to the A6000/Plus (a6000) forum For other Android Oreo, Nougat ROMs, LineageOS 15 ROMs, other ROMs and all other device specific topics.Android Oreo 8.0 ROM for LineageOS 15 for Zenfone 5 has now arrived via an EXPERIMENTAL development build. This post provides the download link to LineageOS 15 ROM for Zenfone 5 and guides through the installation process of the same. If you want the OFFICIAL Lineage OS 15 update or some more Android Oreo ROMs then stay tuned to the Lineage OS 15 ROMs page or the AOSP Android Oreo ROMs devices list page. This Lineage OS 15 for Zenfone 5 is brought to you by developer nguyenhung9x.
DONATION TO DEVELOPER(s):
If you like this ROM then do consider a donation towards the hard work for the developer:
– Donate to nguyenhung9xDISCLAIMER:
THIS IS AN INITIAL DEVELOPMENT BUILD OF LINEAGEOS 15, WHICH IS BOOTING BUT IT HAS MANY BUGS AND CANNOT BE USED AS A DAILY DRIVER. BACKUP THE CURRENT ROM BEFORE FLASHING. TRY AT YOUR OWN RISK.
Installing a custom ROM on a the Zenfone 5 requires a custom recovery to be installed, which may VOID your warranty and may delete all your data. Before proceeding further you may consider backup all data on the phone. You are the only person making changes to your phone and I cannot be held responsible for the mistakes done by you.Content structure:
Status of LineageOS 15 for Zenfone 5 ROM:
WHAT’S WORKING:
– Boots
– Calls, SMS, Data
– Wifi
– Bluetooth
– Audio ( Record and Playback )
– Media
– SensorsKNOWN ISSUES:
– Camera
– Many other things untested
REQUIRED DOWNLOADS AND LINKS TO UPDATE ZENFONE 5 TO LINEAGEOS 15 ROM:
- Unlocked bootloader might be required
- A Windows/Linux/MAC PC installed with fastboot.
You may follow the appropriate guide if you don’t have one:
– 15 Seconds ADB Installer for Windows
– Minimal ADB and Fastboot for Windows
– fastboot installation guide for Lineux/MAC - boot.img Download link to LineageOS 15 for Zenfone 5 (this file is in img extension and has to be flashed through fastboot)
- system.img Download link to LineageOS 15 for Zenfone 5 (this file is in img extension and has to be flashed through fastboot)
- GApps for LineageOS 15 ROM
- ROOT for Zenfone 5 LineageOS 15 ROM
HOW TO INSTALL/FLASH/UPDATE LINEAGEOS 15 FOR Zenfone 5 (ANDROID OREO 8 ROM):
Follow this to update LineageOS 15 on Zenfone 5 for the first time or coming from another ROM:
Points to NOTE on BACKUP before updating:
– Try to avoid restoring apps backup using Titanium Backup. It may break things up.
– Don’t restore system data using Titanium Backup! It will definitely break the current installation.
– It is also discouraged to Restoring Apps + Data using Titanium Backup.- Boot into fastboot mode by one of the following method:
– Power off the phone and keep pressing key combinations while turning on your phone to enter into fastboot mode.
– If you have enabled USB debugging and you have ADB utility installed on your PC then you can execute the following command on a console or command prompt:adb reboot bootloader
- Wipe data factory reset, Cache partition, Dalvik Cache and Format the System partition using the recovery.
– Here is a guide explaining how to wipe data using TWRP recovery.This will delete all your data on your phone. IGNORE IF YOU DON’T WANT TO OR IF YOU HAVE ALREADY DONE THIS. You may consider complete backup of your phone data or take a NANDROID backup of the current ROM.
– How to backup all data on your Android Device.
– how to take NANDROID backup using TWRP recovery. - Download the LineageOS 15 for Zenfone 5 system and boot image file and a suitable Oreo Gapps zip file from the above download link and copy the files to phone.
– You have to unzip the system-o-280817.zip file to get the system.img which can be flashed through fastboot - First flash the LineageOS 15 for Zenfone 5 ROM image files using fastboot
– Use the following command(s) to flash the images:
fastboot flash boot boot.img
fastboot flash system system.img - Now flash the Android Oreo Google Apps package. [OPTIONAL FOR NOW]
– Here is a post explaining how to flash Oreo GApps using TWRP recovery.
- Boot into fastboot mode by one of the following method:
Upgrading from earlier version of LineageOS 15 LineageOS 15 for Zenfone 5:
- If the files are in .img extension then repeat the same process as above.
Reboot to system after flashing is done completely. Do the required initial setup and enjoy the LineageOS 15 for Zenfone 5. If you face any problem following this guide or post installation then just login and leave a comment to get an instant reply.
To root this LineageOS 15 for Zenfone 5 ROM, install the LineageOS 15.1 su addon package and then Profit !!!Stay tuned or Subscribe to the Zenfone 5 forum For other LineageOS 15s, Android Nougat ROMs, LineageOS ROMs, other ROMs and all other device specific topics.If you have found any problem or BUG in this ROM, you can reach out the developer at XDA and here is the development thread for ASUS LineageOS 15 for Zenfone 5 ROM.