- Search Results
Android Nougat 7.1 ROM, LineageOS 14.1 for Canvas Doodle 3 has now arrived via a development build. This post provides the download link to LineageOS 14.1 ROM for Canvas Doodle 3 (A102) and guides through the installation process of the same. This LineageOS 14.1 Nougat ROM for Canvas Doodle 3 is brought to you by developer Aditya766 and the TWRP recovery is brought to you by Teja.
DONATION TO DEVELOPER(s):
No donation link found for Aditya766 and Teja.
If you want the OFFICIAL LineageOS 14.1 update for Canvas Doodle 3 or Android Nougat ROMs for other devices then stay tuned to the LineageOS 14.1 ROMs list. For Android OREO based ROMs, stay tuned to the LineageOS 15 ROMs page or the AOSP Android Oreo ROMs devices list page.
DISCLAIMER:
THIS IS AN INITIAL BUILD WHICH MAY NOT BOOT AT ALL. HAVE A BACKUP BEFORE FLASHING THIS AND TRY AT YOUR OWN RISK. Installing a custom ROM on a Canvas Doodle 3 requires an unlocked bootloader on Canvas Doodle 3 Mediatek, which may VOID your warranty and may delete all your data. Before proceeding further you may consider backup all data on the phone. You are the only person doing changes to your phone and I cannot be held responsible for the mistakes done by you.Status of LineageOS 14.1 for Canvas Doodle 3 Nougat ROM:
WHAT’S WORKING:
– UnknownKNOWN ISSUES:
– Unknown
REQUIRED LINKS AND FILES FOR THIS LineageOS 14.1 for Canvas Doodle 3 ANDROID NOUGAT CUSTOM ROM INSTALLATION:
- TWRP download for Canvas Doodle 3 by Teja
– Here is theTWRP update guide for the Canvas Doodle 3. This TWRP recovery guide requires an unlock bootloader on Canvas Doodle 3 Mediatek
- LineageOS 14.1 Download link for Canvas Doodle 3
- Nougat GApps Download Link for this ROM
Root binary is NOT inbuilt in LineageOS ROM, so you may need a separate SuperSu package or LineageOS su binary to install to gain ROOT access. Here is LineageOS 14.1 Rooting guide
If there is no in-built ROOT or it does not work for some reason then you can try SuperSU rooting guide to enable ROOT access.HOW TO INSTALL/DOWNLOAD/FLASH/UPDATE THE Canvas Doodle 3 TO THE LineageOS 14.1 BASED ANDROID NOUGAT ROM:
Follow this if you are flashing LineageOS 14.1 on the Canvas Doodle 3 (A102) for the first time, or coming from another ROM:
Points to NOTE:
– Try to avoid restoring apps backup using Titanium Backup. It may break things up.
– Don’t restore system data using Titanium Backup! It will definitely break the current installation.
– It is also discouraged to Restoring Apps + Data using Titanium Backup.- Download and Copy the GApps and the LineageOS 14.1 for Canvas Doodle 3 Nougat ROM ZIP to your phone.
- Boot into Recovery.
Make sure to have a Custom recovery like CWM or TWRP or any other custom recovery. If not then download the recovery for Canvas Doodle 3 from above link and follow the Mediatek TWRP recovery installation Guide (it’s a generic guide which will work for TWRP as well as CWM recovery or any other recovery) - Wipe data factory reset, Cache partition, Dalvik Cache and Format the System partition.
– Here is a guide explaining how to wipe data using TWRP recovery.This will delete all your data on your phone. You may consider complete backup of your phone data or take a NANDROID backup of the current ROM
– How to backup all data on your Android Device
– how to take NANDROID backup using TWRP recovery - First flash the LineageOS 14.1 for Canvas Doodle 3 Nougat ROM ZIP from device. Then flash the GApps zip from your device memory.
– Here is a post explaining how to install LineageOS - Then reboot into recovery (don’t skip this) and flash the Gapps for LineageOS 14.1 package.
– Here is a post explaining how to flash GApps using TWRP recovery. - Reboot and Enjoy Android Nougat with LineageOS 14.1 ROM on Canvas Doodle 3.
Upgrading from earlier version of LineageOS 14.1 for Canvas Doodle 3:
- Copy the latest Canvas Doodle 3 Lineage 14.1 ROM ZIP file to your phone.
- Boot into Recovery.
- Flash the LineageOS ROM ZIP from your phone.
– Here is a post explaining how to install LineageOS - Then flash the LineageOS 14.1 Nougat GApps package.
– Here is a post explaining how to flash GApps using TWRP recovery. - Reboot and Enjoy
Complete the initial setup and enjoy Android Nougat 7.1 with LineageOS on the Canvas Doodle 3. After the installing LineageOS 14.1 for Canvas Doodle 3, you may want to enable ROOT access on your phone and here is how you can do that:
How to Enable ROOT on LineageOS 14.1.Stay tuned or Subscribe to the Micromax Canvas Doodle 3 (A102) forum For other Android Oreo, Nougat ROMs, LineageOS 14.1 ROMs, other custom ROMs and all other device specific topics.LineageOS 14.1 for Vernee Mars based on Android Nougat 7.1.2, is now available to update via an unofficial build. If you want the OFFICIAL LineageOS update or some more Lineage ROMs for other devices then stay tuned to the LineageOS page. This Vernee Mars LineageOS 14.1 (K553V, k11tc_a) is brought to you by The Marionette
DONATION TO DEVELOPER(S):
If you like this ROM then consider a donation to The Marionette.
DISCLAIMER:
THIS IS AN INITIAL BUILD AND HAS MANY BUGS. HAVE A BACKUP OF THE CURRENT ROM BEFORE FLASHING THIS ROM AND TRY AT YOUR OWN RISK. Installing a custom ROM on a Vernee Mars (K553V, k11tc_a) may require to unlock the bootloader, which may VOID your warranty and may delete all your data. Before proceeding further you may consider backup all data. You are the only person making changes to your phone and I cannot be held responsible for the mistakes done by YOU.Status of LineageOS 14.1 for Vernee Mars (K553V, k11tc_a), Nougat 7.1 ROM:
WHAT’S WORKING:
– EverythingKNOWN ISSUES:
– Video recording
– HDR
– Fingerprint
REQUIRED LINKS AND FILES FOR LineageOS 14.1 for Vernee Mars NOUGAT CUSTOM ROM:
- Vernee Mars TWRP download link
Scatter file for MT6755 based Vernee Mars recovery installation– Here is how to Install TWRP on Mediatek chipset phones (This recovery installation guide may require an Unlocked bootloader on Vernee Mars)
- Vernee Mars LineageOS 14.1 ROM
- LineageOS 14.1 Nougat Gapps for Vernee Mars LineageOS 14.1 Nougat 7.1 ROM
Root binary is NOT inbuilt in LineageOS 14.1, so you may need a separate SuperSu package or LineageOS su binary to install to gain ROOT access. Here is LineageOS ROOT
If there is no in-built ROOT or it does not work for some reason then you can try SuperSU ROOT update guide to enable ROOT access.HOW TO INSTALL/DOWNLOAD/FLASH/UPDATE Vernee Mars LineageOS 14.1 NOUGAT CUSTOM ROM:
Follow this if you are flashing LineageOS 14.1 for Vernee Mars (K553V, k11tc_a) for the first time, or coming from another ROM:
Points to NOTE:
– Try to avoid restoring apps backup using Titanium Backup. It may break things up.
– Don’t restore system data using Titanium Backup! It will definitely break the current installation.
– It is also discouraged to Restoring Apps + Data using Titanium Backup.- Download and Copy the GApps and LineageOS 14.1 for Vernee Mars ROM ZIP to your phone.
- Boot into Recovery. Make sure to have a Custom recovery like CWM or TWRP or any other custom recovery. If not then follow the Mediatek Recovery Guide for Vernee Mars (K553V, k11tc_a). (it’s a generic guide which will work for TWRP as well as CWM recovery or any other recovery)
- Wipe data factory reset, Cache partition, Dalvik Cache and Format the System partition.
– Here is a guide explaining how to clean/wipe data.This will delete all your data on your phone. You may consider complete backup of your phone data or take a NANDROID backup of the current ROM
– Data backup on Android
– Complete ROM backup - First flash the LineageOS 14.1 ROM ZIP from device for Vernee Mars. Then flash the GApps zip from your device memory.
- DO NOT REBOOT YET. Now flash the LineageOS GApps package.
– Here is a post that explains How to install Nougat GApps. - Reboot and Enjoy the Nougat 7.1 LineageOS 14.1 ROM for Vernee Mars (K553V, k11tc_a).
Upgrading from earlier version of LineageOS 14.1 for Vernee Mars (K553V, k11tc_a):
- Copy the latest LineageOS 14.1 for Vernee Mars ROM ZIP file to your phone.
- Boot into Recovery.
- Flash the latest LineageOS ROM ZIP from your phone.
– Here is a post explains how to update LineageOS. - Then flash the GApps for LineageOS package.
– Here is a post explains how to install Nougat GApps. - Reboot and Enjoy
Complete the initial setup and enjoy Android Nougat 7.1 with LineageOS 14.1 for Vernee Mars (K553V, k11tc_a). After the installation of Vernee Mars LineageOS 14.1 (K553V, k11tc_a) you may want to enable ROOT access on your phone and here is how you can do that:
How to Enable ROOT on LineageOS 14.1.Stay tuned or Subscribe to the Vernee Mars (K553V, k11tc_a) LineageOS forum For other Android Nougat ROMs, LineageOS 14.1 ROMs, other ROMs and all other device specific topics.If you have any concerns on this ROM or if you find any bug then here is the Development thread on XDA for the Vernee Mars LineageOS 14.1 by The Marionette.
Xiaomi phones have better hardware at the cheapest price which makes it attractive for development as well. But over the years, Xiaomi has locked bootloader, added Anti rollback and many more security checks on its phones. If not handled properly, your phone will be hard bricked and the phone will only boot into EDL mode and nothing else.
Well, the story just does not end there. To be able to flash a stock MIUI firmware through the EDL mode you need MiFlash tool which requires an Authorized Mi Account and god only knows who has those authorized Mi accounts!
Not even Mi service center guys know about it. I’m not saying that, there is evidence:
I should also add in the fact that many service centers can't even differentiate a MTK Hard Brick and a dead motherboard. This guy bricked his device but had his motherboard replaced under warranty. In the long run, this is gonna hurt @Xiaomi in after-sales support. pic.twitter.com/bvw64YV1hK
— Kshitij Gupta (@Agent_Fabulous) December 18, 2019

So, What is an Authorized Mi Account?
Basically a Mi account that is authorized or allowed to flash a MIUI stock firmware using the MiFlash tool. A specific computer is bind with a Mi account to allow flashing of any stock MIUI firmware on any Xiaomi device.
Which is not available for any user at any circumstance. At least till now I have not found a way how Xiaomi is allowing to have an authorized account. There is no proper official documentation about this.
[su_note note_color=”#D7E3F4″ text_color=”#728095″ radius=”3″ class=”” id=””]If anyone happen to know of some official way of asking Authorization on a user account, please lt the whole world know about it.[/su_note]
But for now I have found a MiFlash Pro tool (which is an all-in-one tool for Xiaomi phones that has built in MiFlash tool, SP Flash tool, etc.) that allows any user to have an Authorized Mi Account to flash stock firmware. Yes, you read it right, any user.
[su_note note_color=”#F9D9D9″ text_color=”#AA4343″ radius=”3″ class=”” id=””]DISCLAIMER:
I have only verified that the software gives an Authorized Mi account permission to any user account. But I have not verified by flashing any stock MIUI ROM to any device.I have not modified anything in the MiFlash Pro software, but at the same time, I don’t know what is the source of origin.
Try at your own risk.[/su_note]I have verified the software by signing in with three of my Mi accounts using phone number as well as my e-mail id and to my surprise all of the accounts had the authorization to flash, which otherwise reported as Failed in usual MiFlash Tool.
You can see the below images that tells the truth.
[rl_gallery id=”110762″][su_note note_color=”#D8F1C6″ text_color=”#769958″ radius=”3″ class=”” id=””]
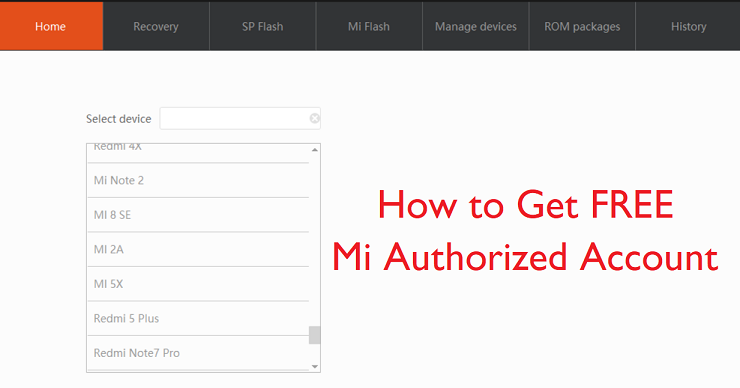
Where to Download MiFlash Pro with Free Mi Authorized Account?
Below is the download link to the MiFlash Pro that Authorizes any account to allow flashing of Xiaomi phone.
MiFlash Pro Download for Windows
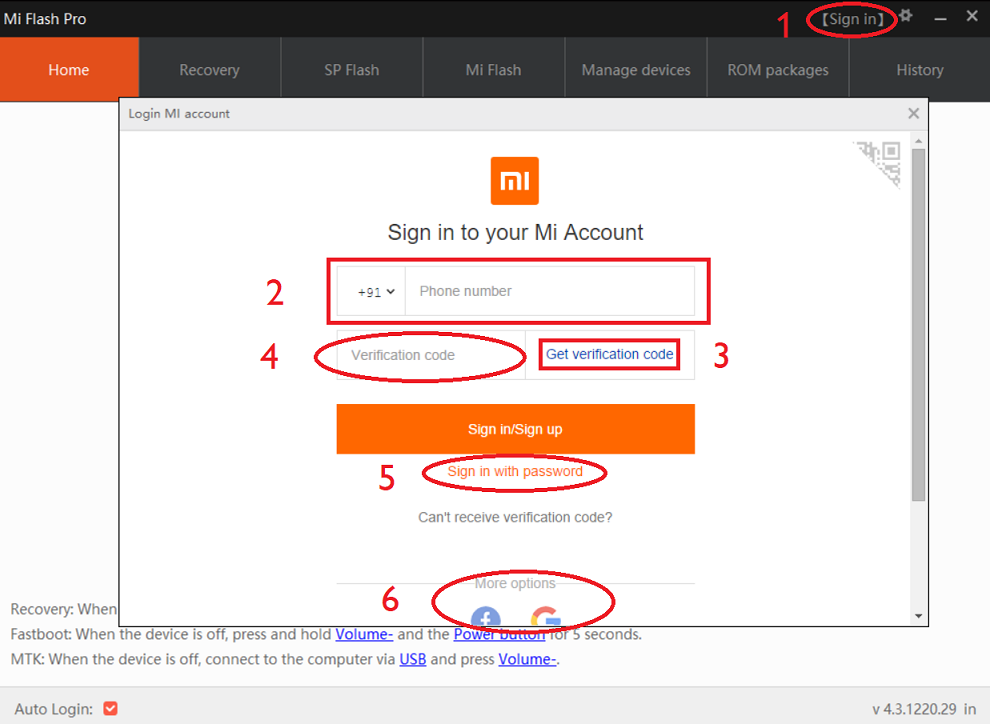
[/su_note]How to Sign-in to your Mi Account
- Install the MiFlash Pro tool on your Windows PC.
- Once installed successfully, Open the App and click on the Sign in which is on the top right corner (see the image below).
- Use phone number login (#2), or e-mail login (#5, requires an existing registered account on mi.com) or Gmail or FB login (#6)
- If you are login using your mobile number then first select the country code, enter your phone number (#2), click on the Get verification code (#3), and enter the code in the Verification code box (#4) that you have received as an SMS
[su_note note_color=”#FBF4DD” text_color=”#A38C68″ radius=”3″ class=”” id=””]If you are Signing-in using a phone number then you have only 3 attempts to try in 24 hours.[/su_note]
[su_note note_color=”#D7E3F4″ text_color=”#728095″ radius=”3″ class=”” id=””]You can start off with a new number. I have tried this as well and I was given a new account and I was able to use the app.[/su_note]
- Click on the Sign in/Sign up button to login.
- Wait patiently. Once signed-in, you are done and ready to flash MIUI ROM on your phone.

[su_note note_color=”#D7E3F4″ text_color=”#728095″ radius=”3″ class=”” id=””]I logged in directly using the account_auth.exe file available under the installation path C:\Program Files (x86)\MiFlashPro\XiaoMiFlash\mi. Hence the above images show in Chinese and not in English, that my computer was bound with the Mi account and authorized to flash.[/su_note]
How to flash stock MIUI ROM?
Getting an authorized Mi account is not enough. You must be able to flash the stock firmware to bring back or unbrick your phone.
Once logged-in, you can follow this MiFlash Fastboot method of flashing a stock MIUI Fastboot ROM on your Xiaomi phone with Snapdragon chipset.
If you have a Mediatek based chipset such as the Redmi Note 8 Pro, then you have to use the SP Flash tool to flash respective images. Here is a step-by-step guide that explains how to unbrick Redmi Note 8 pro using the MiFlash Pro tool and SP Flash Tool.
This guide is only for Fastboot MIUI firmware which you can get it here.
I hope this article is useful for all those bricked Xiaomi phone users waiting patiently to get an Authorized Mi Account and flash their phones manually. Needless to say, if you face any issue you can just login and leave a reply.
Stock ROM or stock Firmware for DEXP Ixion M750 is now available to download. Here is how to flash stock firmware on DEXP Ixion M750 using Mediatek SP Flash Tool.
Although I will make a very clean beginner’s step by step guide, but it is also advisable for you to go through all the steps in detail, so that you understand what are you doing.

[su_note note_color=”#F9D9D9″ text_color=”#AA4343″ radius=”3″ class=”” id=””]
DISCLAIMER:
THIS STOCK ROM FLASHING IS ONLY FOR DEXP Ixion M750 WHICH IS MEDIATEK MT6580 CHIPSET BASED DEVICE.
DON’T TRY TO FLASH ON OTHER MT6580 BASED DEVICES OR ANY OTHER DEVICE TYPE.
[/su_note][su_note note_color=”#FBF4DD” text_color=”#A38C68″ radius=”3″ class=”” id=””]FLASHING A STOCK ROM ON DEXP Ixion M750 WILL DELETE ALL DATA.
– IT ALWAYS A GOOD IDEA TO KEEP A BACKUP OF ALL DATA SUCH AS: SMS, PHONE CALL, CONTACT, MUSIC, IMAGES, etc.
– ALSO BACKUP THE IMEI AND NVRAM DATA OF YOUR PHONE.
[/su_note]Required Guides and Downloads to Install Stock ROM/Firmware on DEXP Ixion M750:
- Mediatek VCOM Driver
- SP Flash Tool
- ROM Download link of stock firmware for DEXP Ixion M750
- Install stock ROM using SP Flash Tool
Why to flash Stock Firmware/ROM on DEXP Ixion M750:
There could be various reasons why you may want to flash a stock firmware on DEXP Ixion M750 to make it a new like phone. Following are some of the key benefits you get by flashing a stock firmware on DEXP Ixion M750:
- Flashing a stock ROM on DEXP Ixion M750 will make the phone new like at least from software point of view.
- If your phone has become too slow or lagging in performance after a prolonged period of usage, then installing a stock ROM/firmware may bring back the speed.
- If you have rooted your Android phone, then flashing a stock ROM will help you to restore your phone software to original state.
[su_note note_color=”#D7E3F4″ text_color=”#728095″ radius=”3″ class=”” id=””]Sometimes software factory reset from Android settings does not help you get rid of ROOT.
In that case, you must flash a stock Firmware to bring back the phone to original state.[/su_note] - Phone warranty will be VOID if you have ROOT on Android phone or have a custom ROM on Android phone. Flashing a stock Firmware/ROM will bring back the software to original state and will restore your warranty.
How to Flash Stock Fimrware / ROM on DEXP Ixion M750 using Mediatek SP Flash Tool:
- Download and extract the DEXP Ixion M750 stock firmware files.
- Download and install the VCOM driver on your PC.
[su_note note_color=”#D7E3F4″ text_color=”#728095″ radius=”3″ class=”” id=””]VCOM driver is required for the SP Flash Tool to recognize your DEXP Ixion M750 Phone to be able to download stock Fimrmware.[/su_note]
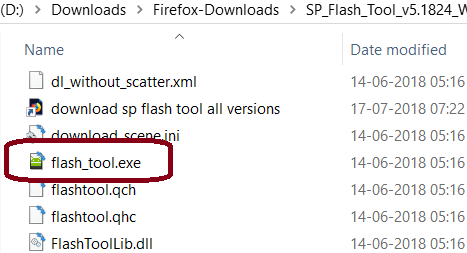
- Download and extract the Mediatek SP Flash Tool zip file.
- Go to the extracted SP Flash Tool folder and open the flash_tool.exe file, which is the actual SP Flash Tool application.
See the below screenshot:

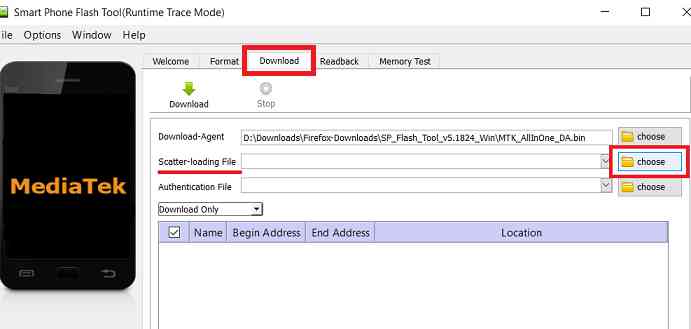
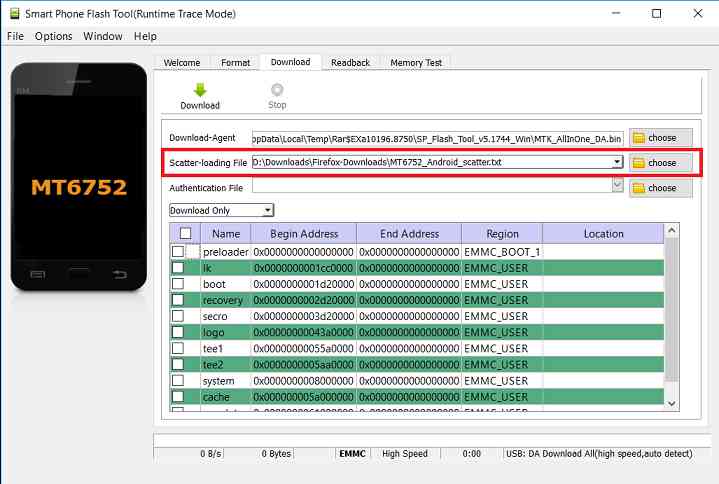
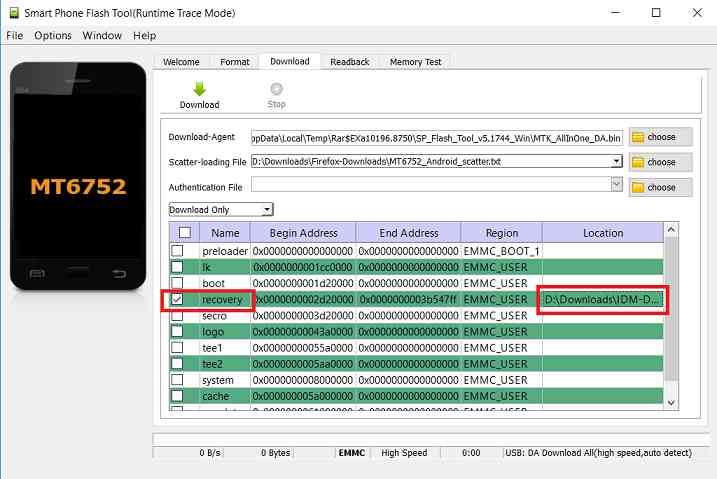
- By default the SP Flash Tool would have opened with the Download Tab open. If not then click on the Download Tab and then click on the choose button to load the DEXP Ixion M750 stock ROM scatter file.
[su_note note_color=”#D7E3F4″ text_color=”#728095″ radius=”3″ class=”” id=””]- You will find a scatter file with a name of somewhat MT6580_Android_scatter.txt in the DEXP Ixion M750 stock firmware package.
– This scatter file contains all the partition information of DEXP Ixion M750 Mediatek phone and which binary file to flash on a which partition and address.[/su_note]See the screenshot below:

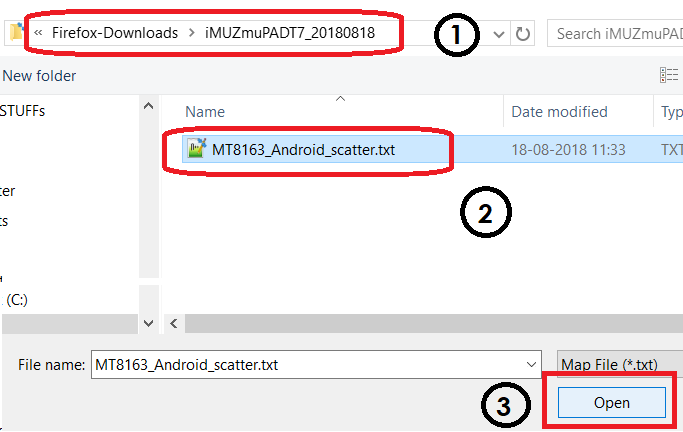
- After that a file browser will be opened to find and select the DEXP Ixion M750 stock ROM scatter file.
Go to the DEXP Ixion M750 stock firmware folder where you have extracted, select the Scatter file (somewhat MT6580_Android_scatter.txt) from there and click on Open.See the screenshot below:

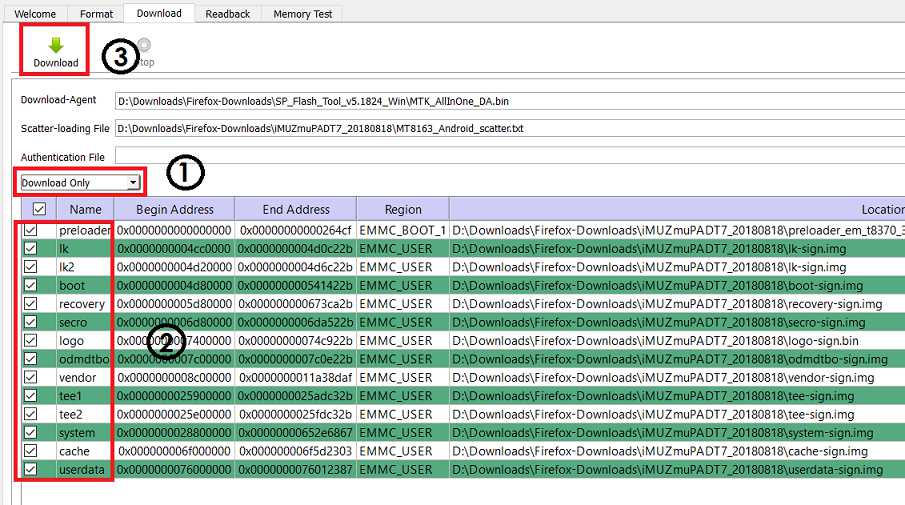
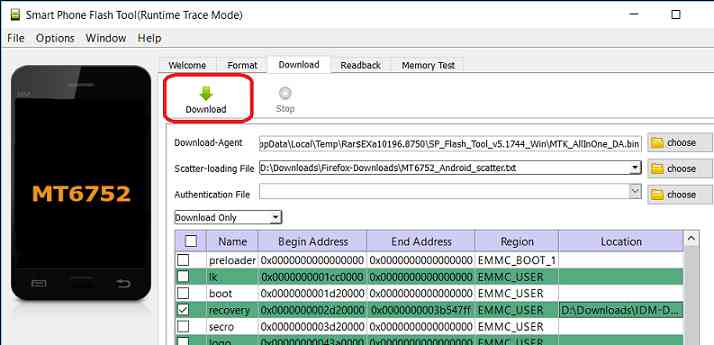
- After loading the scatter file, click on the Download button to start downloading the stock firmware to DEXP Ixion M750.
[su_note note_color=”#FBF4DD” text_color=”#A38C68″ radius=”3″ class=”” id=””]Firmware download does not start just by clicking the Download button. You need to connect the phone in download mode, which we will be doing that in the later step.[/su_note]
[su_note note_color=”#D7E3F4″ text_color=”#728095″ radius=”3″ class=”” id=””]- SP Flash Tool automatically takes all the information and will show you the details of partition and binary file information. Verify all the details before start flashing the stock ROM or the stock firmware on your Mediatek phone.
– Verify the download mode before flashing (marked by number 1 in the screenshot).
– Verify which all partitions are being flashed (marked by number 2 in the screenshot). MAKE SURE THERE IS NO NVRAM OR IMEI PARTITION SELECTED HERE.[/su_note]See the screenshot below:

- Now turn off your Mediatek Phone and wait for few seconds.
Then you hold both the volume up and Volume Down button and connect the phone PC using a USB cable.– You see in the SP Flash tool, it will start downloading the firmware to the Mediatek Phone automatically.
- After the stock ROM is flashed successfully on DEXP Ixion M750, you will see a Download OK confirmation on SP Flash Tool.
See the screenshot below:

After being successfully install stock firmware or the stock ROM on DEXP Ixion M750, you can disconnect the phone and restart if it does not restart automatically.
If you face any problem installing the stock firmware on DEXP Ixion M750 using SP Flash Tool, then leave a reply on this thread. I will reply back as early as possible.
[su_note note_color=”#D7E3F4″ text_color=”#728095″ radius=”3″ class=”” id=””]Stay tuned or Subscribe to the DEXP Ixion M750 forum for recovery, rooting, custom ROM guides etc. and all other device specific topics.[/su_note]
LineageOS 14.1 for Primo GH6 (ht16) is now available to download via an EXPERIMENTAL development build. This post provides the download link to the Android Nougat based LineageOS 14.1 for Primo GH6 (ht16) and guides through the installation process of the same. This LineageOS 14.1 for Primo GH6 is brought to you by developer ABiD
DONATION TO DEVELOPER(S):
No donation link found for ABiD.
If you want the OFFICIAL LineageOS 14.1 update or some more Android Nougat ROMs then stay tuned to the LineageOS 14.1 ROMs devices list, LineageOS 15 ROMs page or the AOSP Oreo ROMs devices list page.
DISCLAIMER:
THIS IS AN INITIAL TEST BUILD WHICH MAY NOT BOOT AT ALL. HAVE A BACKUP BEFORE FLASHING THIS AND TRY AT YOUR OWN RISK. Installing a custom ROM requires an unlock bootloader for Primo GH6 Mediatek Phone, which may VOID your warranty and may delete all your data. Before proceeding further you may consider backup all data on the phone. Understand that you are the only person making changes to your phone and I cannot be held responsible for the mistakes done by you.Content structure:
Status of LineageOS 14.1 for Walton Primo GH6 Nougat 7.1 ROM:
WHAT’S WORKING:
– UnknownKNOWN ISSUES:
– Unknown
REQUIRED LINKS AND FILES FOR LineageOS 14.1 for Primo GH6 Nougat ROM:
- TWRP recovery for Primo GH6
– Here is the TWRP update guide for Primo GH6. This recovery guide requires an unlock bootloader for Primo GH6 Mediatek phone
- LineageOS 14.1 Download link for Primo GH6 (ht16)
- GApps download for LineageOS 14.1 Nougat ROM
Root binary is NOT inbuilt in LineageOS ROM, so you may need a separate SuperSu package or LineageOS su binary to install to gain ROOT access. Here is LineageOS 14.1 Rooting guide
If there is no in-built ROOT or it does not work for some reason then you can try SuperSU rooting guide to enable ROOT access.HOW TO INSTALL/DOWNLOAD/FLASH/UPDATE THE LineageOS 14.1 for Primo GH6:
Follow this if you are flashing LineageOS 14.1 for Primo GH6 for the first time, or coming from another ROM:
Points to NOTE:
– Try to avoid restoring apps backup using Titanium Backup. It may break things up.
– Don’t restore system data using Titanium Backup! It will definitely break the current installation.
– It is also discouraged to Restoring Apps + Data using Titanium Backup.- Boot into Recovery.
Make sure to have a Custom recovery like CWM or TWRP or any other custom recovery. If not then download the recovery for Primo GH6 from above link and follow the Custom Recovery Installation Guide (it’s a generic guide which will work for TWRP as well as CWM recovery or any other recovery) - Wipe data factory reset, Cache partition, Dalvik Cache and Format the System partition.
– Here is a guide explaining how to wipe data using TWRP recovery.This will delete all your data on your phone. You may consider complete backup of your phone data or take a NANDROID backup of the current ROM
– How to backup all data on your Android Device
– how to take NANDROID backup using TWRP recovery - Download and Copy the Nougat GApps and the LineageOS 14.1 Nougat ROM ZIP file built for Primo GH6, to the phone memory or SD card (if available).
- First flash the LineageOS 14.1 Nougat ROM ZIP file from device. Then flash the GApps zip from your device memory.
– Here is a post explaining how to install LineageOS - Then reboot into recovery (don’t skip this) and flash the Gapps for LineageOS 14.1 package.
– Here is a post explaining how to flash GApps using TWRP recovery. - Reboot and Enjoy Android Nougat with LineageOS 14.1 for Primo GH6.
Upgrading from earlier version of LineageOS 14.1 for Primo GH6 (ht16):
- Copy the latest LineageOS 14.1 for Primo GH6 Nougat ROM ZIP file to the phone.
- Boot into Recovery.
- Flash the ROM ZIP that you copied.
– Here is a post explaining how to install LineageOS - Then flash the LineageOS 14.1 GApps package.
– Here is a post explaining how to flash GApps using TWRP recovery. - Reboot and Enjoy
Complete the initial setup and enjoy Android Nougat 8.0 with LineageOS 14.1 for Primo GH6. After the installing the LineageOS 14.1 ROM, you may want to enable ROOT access on your phone and here is how you can do that:
How to Enable ROOT on LineageOS 14.1 ROM.Stay tuned or Subscribe to the Walton Primo GH6 (ht16) forum For other Android Oreo, Nougat ROMs, LineageOS 15 ROMs, other custom ROMs and all other device specific topics.Android Nougat 7.1 ROM, LineageOS 14.1 for Pixi 3 has now arrived via a development build. This post provides the download link to LineageOS 14.1 ROM for Pixi 3 (4009a) and guides through the installation process of the same. This LineageOS 14.1 Nougat ROM for Pixi 3 is brought to you by developer KirBeats and the TWRP recovery is brought to you by kirito9.
DONATION TO DEVELOPER(s):
No donation link found for KirBeats and kirito9.
If you want the OFFICIAL LineageOS 14.1 update for Pixi 3 or Android Nougat ROMs for other devices then stay tuned to the LineageOS 14.1 ROMs list. For Android OREO based ROMs, stay tuned to the LineageOS 15 ROMs page or the AOSP Android Oreo ROMs devices list page.
DISCLAIMER:
THIS IS AN INITIAL BUILD WHICH MAY NOT BOOT AT ALL. HAVE A BACKUP BEFORE FLASHING THIS AND TRY AT YOUR OWN RISK. Installing a custom ROM on a Pixi 3 requires an unlock bootloader for Pixi 3 Mediatek device, which may VOID your warranty and may delete all your data. Before proceeding further you may consider backup all data on the phone. You are the only person doing changes to your phone and I cannot be held responsible for the mistakes done by you.Status of LineageOS 14.1 for Pixi 3 Nougat ROM:
WHAT’S WORKING:
– UnknownKNOWN ISSUES:
– Unknown
REQUIRED LINKS AND FILES FOR THIS LineageOS 14.1 for Pixi 3 ANDROID NOUGAT CUSTOM ROM INSTALLATION:
- TWRP download for Pixi 3 by kirito9
– Here is theTWRP update guide for the Pixi 3. This TWRP recovery guide requires an unlock bootloader for Pixi 3 Mediatek Phone.
- LineageOS 14.1 Download link for Pixi 3
- Nougat GApps Download Link for this ROM
Root binary is NOT inbuilt in LineageOS ROM, so you may need a separate SuperSu package or LineageOS su binary to install to gain ROOT access. Here is LineageOS 14.1 Rooting guide
If there is no in-built ROOT or it does not work for some reason then you can try SuperSU rooting guide to enable ROOT access.HOW TO INSTALL/DOWNLOAD/FLASH/UPDATE THE Pixi 3 TO THE LineageOS 14.1 BASED ANDROID NOUGAT ROM:
Follow this if you are flashing LineageOS 14.1 on the Pixi 3 (4009a) for the first time, or coming from another ROM:
Points to NOTE:
– Try to avoid restoring apps backup using Titanium Backup. It may break things up.
– Don’t restore system data using Titanium Backup! It will definitely break the current installation.
– It is also discouraged to Restoring Apps + Data using Titanium Backup.- Download and Copy the GApps and the LineageOS 14.1 for Pixi 3 Nougat ROM ZIP to your phone.
- Boot into Recovery.
Make sure to have a Custom recovery like CWM or TWRP or any other custom recovery. If not then download the recovery for Pixi 3 from above link and follow the Mediatek TWRP recovery installation Guide (it’s a generic guide which will work for TWRP as well as CWM recovery or any other recovery) - Wipe data factory reset, Cache partition, Dalvik Cache and Format the System partition.
– Here is a guide explaining how to wipe data using TWRP recovery.This will delete all your data on your phone. You may consider complete backup of your phone data or take a NANDROID backup of the current ROM
– How to backup all data on your Android Device
– how to take NANDROID backup using TWRP recovery - First flash the LineageOS 14.1 for Pixi 3 Nougat ROM ZIP from device. Then flash the GApps zip from your device memory.
– Here is a post explaining how to install LineageOS - Then reboot into recovery (don’t skip this) and flash the Gapps for LineageOS 14.1 package.
– Here is a post explaining how to flash GApps using TWRP recovery. - Reboot and Enjoy Android Nougat with LineageOS 14.1 ROM on Pixi 3.
Upgrading from earlier version of LineageOS 14.1 for Pixi 3:
- Copy the latest Pixi 3 Lineage 14.1 ROM ZIP file to your phone.
- Boot into Recovery.
- Flash the LineageOS ROM ZIP from your phone.
– Here is a post explaining how to install LineageOS - Then flash the LineageOS 14.1 Nougat GApps package.
– Here is a post explaining how to flash GApps using TWRP recovery. - Reboot and Enjoy
Complete the initial setup and enjoy Android Nougat 7.1 with LineageOS on the Pixi 3. After the installing LineageOS 14.1 for Pixi 3, you may want to enable ROOT access on your phone and here is how you can do that:
How to Enable ROOT on LineageOS 14.1.Stay tuned or Subscribe to the Alcatel Pixi 3 (4009a) forum For other Android Oreo, Nougat ROMs, LineageOS 14.1 ROMs, other custom ROMs and all other device specific topics.Android Nougat 7.0 ROM, Huawei Honor Holly CM14/CyanogenMod 14 has now arrived via an UNOFFICIAL build. Here we also have got the LineageOS for Honor Holly. For other Lineage OS ROMs, stay tuned to the Lineage OS device list page. This Nougat 7.0 has come for Honor Holly CM14/CyanogenMod 14 ROM. Since Google released Android Nougat Source code, we have update many Android NOUGAT AOSP ROMs and also we have update a big list of available CM14/CyanogenMod 14 Nougat 7.0 ROMs. This CM14 for Honor Holly (Hol-U19) is brought to you by developer AKabhishek.
DISCLAIMER:
THIS IS AN INITIAL BUILD. THIS MAY NOT BOOT AT ALL OR IF IT BOOTS IT MAY HAVE MANY MORE BUGS THAN YOU CAN IMAGINE. TRY AT YOUR OWN RISK. Installing a custom ROM on a Honor Holly requires the bootloader to be unlocked on the Honor Holly phone, which may VOID your warranty and may delete all your data. Before proceeding further you may consider backup all data on the phone. You are the only person doing changes to your phone and I cannot be held responsible for the mistakes done by you.Status of CM14 for Huawei Honor Holly CM14 (CyanogenMod 14) Nougat 7.0 ROM:
WHAT’S WORKING:
– Not knownKNOWN ISSUES:
– Not known
REQUIRED LINKS AND FILES FOR HUAWEI HONOR HOLLY CM14 (CYANOGENMOD 14, NOUGAT) CUSTOM ROM:
- TWRP 3.0.1.0 | TWRP 2.8.2.0 | CWM recovery for the Huawei Honor Holly (Hol-U19).
– You may use Flashify to install recovery on Honor Holly or Follow this guide to flash TWRP: Install TWRP on Honor Holly (This recovery installation guide is for a Mediatek device and this may require an Unlocked bootloader on Honor Holly)
- ROM Download link of CyanogenMod 14/CM14 for Honor Holly (Hol-U19) Nougat 7.0
- Nougat GApps download link for Honor Holly CM14/CyanogenMod 14 Nougat 7.0 ROM
Root binary is inbuilt since CyanogenMod 12, so you don’t need a separate SuperSu package to install to gain ROOT access. Here is How to Enable ROOT on CM14/CyanogenMod 14
HOW TO INSTALL/DOWNLOAD/FLASH/UPDATE CM14 FOR HUAWEI HONOR HOLLY (CYANOGENMOD 14) NOUGAT CUSTOM ROM:
Follow this if you are flashing CyanogenMod 14/CM14 for Honor Holly for the first time, or coming from another ROM:
Points to NOTE:
– Try to avoid restoring apps backup using Titanium Backup. It may break things up.
– Don’t restore system data using Titanium Backup! It will definitely break the current installation.
– It is also discouraged to Restoring Apps + Data using Titanium Backup.- Download and Copy the GApps and Honor Holly CM14/CyanogenMod 14 ROM ZIP to your phone.
- Boot into Recovery. Make sure to have a Custom recovery like CWM or TWRP or any other custom recovery. If not then follow the Custom Recovery Installation Guide for Huawei Honor Holly (it’s a generic guide which will work for TWRP as well as CWM recovery or any other recovery)
- Wipe data factory reset, Cache partition, Dalvik Cache and Format the System partition.
– Here is a guide explaining how to wipe data using TWRP recovery.This will delete all your data on your phone. You may consider complete backup of your phone data or take a NANDROID backup of the current ROM
– How to backup all data on your Android Device
– how to take NANDROID backup using TWRP recovery - First flash the Honor Holly CM14 ROM ZIP from device. Then flash the GApps zip from your device memory.
– Here is a post explaining how to flash a custom ROM using TWRP recovery. - Then reboot into recovery (don’t skip this) and flash the CyanogenMod 14/CM14 Nougat GApps package.
– Here is a post explaining how to flash GApps using TWRP recovery. - Reboot and Enjoy the Nougat 7.0 ROM CyanogenMod 14/CM14 for Honor Holly.
Upgrading from earlier version of CyanogenMod 14/CM14 for Honor Holly:
- Copy the latest Honor Holly CM14 ROM ZIP file to your phone.
- Boot into Recovery.
- Flash the latest CM ROM ZIP from your phone.
– Here is a post explaining how to flash a custom ROM using TWRP recovery. - Then flash the CM14 Nougat GApps package.
– Here is a post explaining how to flash GApps using TWRP recovery. - Reboot and Enjoy
Complete the initial setup and enjoy Android Nougat 7.0.0 with CM14 for Honor Holly. After the installation of CM14 for Honor Holly you may want to enable ROOT access on your phone and here is how you can do that:
How to Enable ROOT on CM14/CyanogenMod 14.Stay tuned or Subscribe to the Huawei Honor Holly (Hol-U19) forum For other Android Nougat ROMs, CyanogenMod 14 ROMs, other ROMs and all other device specific topics.This post guides you on how to create a scatter file of a Mediatek Phone. This Mediatek scatter create guide is newbie friendly, of course, that’s the way I write every post.
Before going to follow anything on this post you may want to spare few minutes to understand what is a Mediatek Scatter file, where this scatter file is used or required or why do you need to create a scatter file on your Mediatek phone and of course, how to create a scatter file of your Mediatek device.
If you already know everything, then you can skip intro sections and move to create Mediatek Scatter file.
In the later part I will provide all the download links to the required software and/or other relevant guides.
DISCLAIMER:
This guide is ONLY meant for Mediatek devices.
I take no responsibility if you do something wrong on your part while following this guide to create a Scatter file for Mediatek Phone.
REQUIRED DOWNLOADS AND GUIDES TO CREATE SCATTER FILE ON MEDIATEK PHONE:
- USB drivers for all MTK devices
- 15 Seconds ADB Installer or Minimal ADB and Fastboot for Windows
- Latest MTK Droid Root and tools
- A Mediatek phone, PC and a USB cable
- A smart brain and patience. (Well, this is not mandatory though. :P)
We don’t really require everything to know before operating or using a phone.
But if you do understand or willing to understand how software and hardware works on a device, for our case it is a Mediatek device, that will help you play with the device for good (or sometimes break the device).
What is a scatter file on a Mediatek Phone:
It is important to understand about Android because this scatter file creation of a Mediatek phone or any other Mediatek device is more or less is in context with Android OS.
Android is an Operating System software that controls the hardware and provides interface for the user to interact with the device.
Android OS has different partitions such as system partition, data partition, boot partition, recovery partition, bootloader partition etc.
Different software is written into different partitions and is accessed at different time. Such as recovery partition is accessed when the phone enters into recovery mode, bootloader partition is accessed when the phone enters into bootloader mode, etc.
A Mediatek Scatter file is a file that keeps all the information of these partitions’ start address, end address, size of the partition, which storage device it belongs to, etc.
This information is required before you flash let’s say a TWRP recovery into recovery partition or a modified boot image into the boot partition or a new custom ROM that will go into the system partition etc.
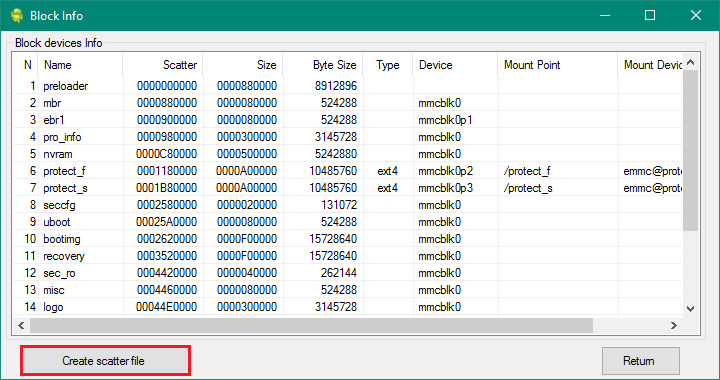
Following is a screenshot from Droid MTK Tool software that shows different partition information of a Mediatek Phone.

Now you know what is a scatter file on a Mediatke phone and what information it contains.
I believe you have also understood that the Mediatek scatter file creation is important to flash a TWRP recovery or any custom ROM such as LineageOS ROM, Resurrection Remix ROM, Dirty Unicorns ROM, OmniROM etc.
How to Create a Scatter File for Mediatek Phone:
This guide need the Droid MTK Tool for which I have already provided a download link in the downloads section above.
With the help of Droid MTK Tool we will create the scatter file of your Mediatek phone.- Download the Droid MTK Tool from the above Downloads section.
- It’s in a zip file, so extract that file or open using WinRar or some application and then open the MTKDroidTools.exe file.

- Enable USB Debugging under Developer Options, to make the device accessible via ADB.
– If you don’t know how to do this then here is How to Enable Developer Options and How to Enable USB Debugging and OEM unlock.
- Then connect the phone using the USB cable to the PC.
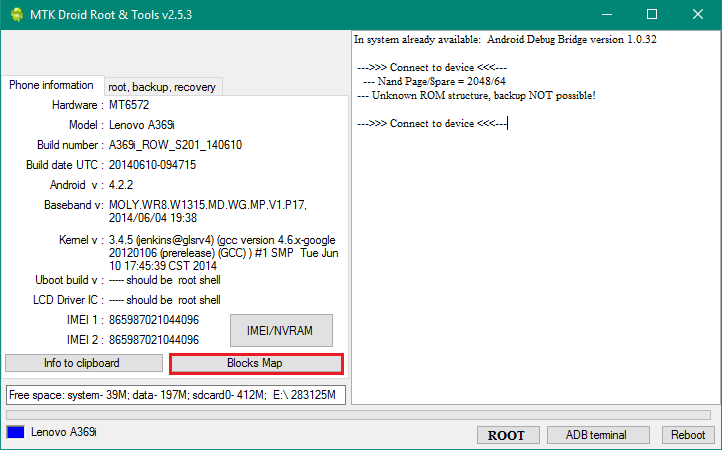
– When you connect the phone to the PC, MTKDroidTool will show all the information about your phone.

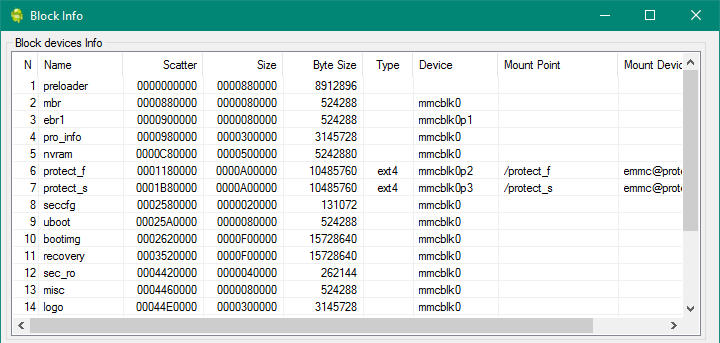
- On the below portion of the screen you will see an Blocks Map button. Click on the button
- On the next screen you have all the partition information and starting address of all the partitions.
On the bottom of the screen you see a Create scatter file button.– Click on the button to create scatter file for your Mediatek phone.

- Save the file in a location which you can remember and access easily.
If you have followed each step, I believe you would have the scatter file for your Mediatek Phone.
If you have any problem even after following this guide then do leave a reply. Either me, or some other user of this forum will get back to you.
Further, stay tuned to the Mediatek Development forum for more information on any Mediatek specific hacking, unlocking or development guides etc.Stock ROM or stock Firmware for Oppo F7 Youth is now available to download. Here is how to flash stock firmware on Oppo F7 Youth using Mediatek SP Flash Tool.
Although I will make a very clean beginner’s step by step guide, but it is also advisable for you to go through all the steps in detail, so that you understand what are you doing.

[su_note note_color=”#F9D9D9″ text_color=”#AA4343″ radius=”3″ class=”” id=””]
DISCLAIMER:
THIS STOCK ROM FLASHING IS ONLY FOR Oppo F7 Youth WHICH IS MEDIATEK MT6771 CHIPSET BASED DEVICE.
DON’T TRY TO FLASH ON OTHER MT6771 BASED DEVICES OR ANY OTHER DEVICE TYPE.
[/su_note][su_note note_color=”#FBF4DD” text_color=”#A38C68″ radius=”3″ class=”” id=””]FLASHING A STOCK ROM ON Oppo F7 Youth WILL DELETE ALL DATA.
– IT ALWAYS A GOOD IDEA TO KEEP A BACKUP OF ALL DATA SUCH AS: SMS, PHONE CALL, CONTACT, MUSIC, IMAGES, etc.
– ALSO BACKUP THE IMEI AND NVRAM DATA OF YOUR PHONE.
[/su_note]Required Guides and Downloads to Install Stock ROM/Firmware on Oppo F7 Youth:
- Mediatek VCOM Driver
- SP Flash Tool
- ROM Download link of stock firmware for Oppo F7 Youth
- Install stock ROM using SP Flash Tool
Why to flash Stock Firmware/ROM on Oppo F7 Youth:
There could be various reasons why you may want to flash a stock firmware on Oppo F7 Youth to make it a new like phone. Following are some of the key benefits you get by flashing a stock firmware on Oppo F7 Youth:
- Flashing a stock ROM on Oppo F7 Youth will make the phone new like at least from software point of view.
- If your phone has become too slow or lagging in performance after a prolonged period of usage, then installing a stock ROM/firmware may bring back the speed.
- If you have rooted your Android phone, then flashing a stock ROM will help you to restore your phone software to original state.
[su_note note_color=”#D7E3F4″ text_color=”#728095″ radius=”3″ class=”” id=””]Sometimes software factory reset from Android settings does not help you get rid of ROOT.
In that case, you must flash a stock Firmware to bring back the phone to original state.[/su_note] - Phone warranty will be VOID if you have ROOT on Android phone or have a custom ROM on Android phone. Flashing a stock Firmware/ROM will bring back the software to original state and will restore your warranty.
How to Flash Stock Fimrware / ROM on Oppo F7 Youth using Mediatek SP Flash Tool:
- Download and extract the Oppo F7 Youth stock firmware files.
- Download and install the VCOM driver on your PC.
[su_note note_color=”#D7E3F4″ text_color=”#728095″ radius=”3″ class=”” id=””]VCOM driver is required for the SP Flash Tool to recognize your Oppo F7 Youth Phone to be able to download stock Fimrmware.[/su_note]
- Download and extract the Mediatek SP Flash Tool zip file.
- Go to the extracted SP Flash Tool folder and open the flash_tool.exe file, which is the actual SP Flash Tool application.
See the below screenshot:
- By default the SP Flash Tool would have opened with the Download Tab open. If not then click on the Download Tab and then click on the choose button to load the Oppo F7 Youth stock ROM scatter file.
[su_note note_color=”#D7E3F4″ text_color=”#728095″ radius=”3″ class=”” id=””]- You will find a scatter file with a name of somewhat MT6771_Android_scatter.txt in the Oppo F7 Youth stock firmware package.
– This scatter file contains all the partition information of Oppo F7 Youth Mediatek phone and which binary file to flash on a which partition and address.[/su_note]See the screenshot below:
- After that a file browser will be opened to find and select the Oppo F7 Youth stock ROM scatter file.
Go to the Oppo F7 Youth stock firmware folder where you have extracted, select the Scatter file (somewhat MT6771_Android_scatter.txt) from there and click on Open.See the screenshot below:
- After loading the scatter file, click on the Download button to start downloading the stock firmware to Oppo F7 Youth.
[su_note note_color=”#FBF4DD” text_color=”#A38C68″ radius=”3″ class=”” id=””]Firmware download does not start just by clicking the Download button. You need to connect the phone in download mode, which we will be doing that in the later step.[/su_note]
[su_note note_color=”#D7E3F4″ text_color=”#728095″ radius=”3″ class=”” id=””]- SP Flash Tool automatically takes all the information and will show you the details of partition and binary file information. Verify all the details before start flashing the stock ROM or the stock firmware on your Mediatek phone.
– Verify the download mode before flashing (marked by number 1 in the screenshot).
– Verify which all partitions are being flashed (marked by number 2 in the screenshot). MAKE SURE THERE IS NO NVRAM OR IMEI PARTITION SELECTED HERE.[/su_note]See the screenshot below:
- Now turn off your Mediatek Phone and wait for few seconds.
Then you hold both the volume up and Volume Down button and connect the phone PC using a USB cable.– You see in the SP Flash tool, it will start downloading the firmware to the Mediatek Phone automatically.
- After the stock ROM is flashed successfully on Oppo F7 Youth, you will see a Download OK confirmation on SP Flash Tool.
See the screenshot below:
After being successfully install stock firmware or the stock ROM on Oppo F7 Youth, you can disconnect the phone and restart if it does not restart automatically.
If you face any problem installing the stock firmware on Oppo F7 Youth using SP Flash Tool, then leave a reply on this thread. I will reply back as early as possible.
[su_note note_color=”#D7E3F4″ text_color=”#728095″ radius=”3″ class=”” id=””]Stay tuned or Subscribe to the Oppo F7 Youth forum for recovery, rooting, custom ROM guides etc. and all other device specific topics.[/su_note]
TWRP for Leagoo Power 2 Pro is now available from an unofficial build and this post guides you how to install TWRP for Leagoo Power 2 Pro and ROOT Leagoo Power 2 Pro (using TWRP recovery).
After installing TWRP recovery on Leagoo Power 2 Pro you can install many android mods such as google camera (gcam) APK, enable navigation gesture, enable face unlock, viper4android audio enhancement etc. and many more.
[su_note note_color=”#F9D9D9″ text_color=”#AA4343″ radius=”3″ class=”” id=””]DISCLAIMER:
THIS IS AN UNOFFICIALLY BUILD TWRP FOR Leagoo Power 2 Pro. FLASH AT YOUR OWN RISK.
INSTALLING THE TWRP RECOVERY AND ROOT Leagoo Power 2 Pro NEEDS AN UNLOCK BOOTLOADER ON YOUR PHONE.
DURING THE BOOTLOADER UNLOCK PROCESS ALL THE PHONE DATA WILL BE ERASED. MAKE SURE TO BACKUP EVERYTHING.
[/su_note]

Content structure:
- Required downloads to install TWRP recovery for Leagoo Power 2 Pro
- How to install TWRP recovery on Leagoo Power 2 Pro
- What you can do after installing TWRP on Leagoo Power 2 Pro
- Required downloads and guides for Leagoo Power 2 Pro ROOT
- Step-by-Step guide on Leagoo Power 2 Pro ROOTING guide
- How to check if Leagoo Power 2 Pro is ROOTED or NOT
DOWNLOAD LINK OF TWRP FOR Leagoo Power 2 Pro, OTHER DOWNLOADS AND REQUIRED GUIDES:
- Unlocked bootloader on Leagoo Power 2 Pro
- USB drivers for Mediatek
- ADB and fastboot download
– 15 Seconds ADB Installer for Windows
– Minimal ADB and Fastboot for Windows - Latest MTK Droid Root and tools
- Latest MTK SP Flash Tool for Windows
- Install ADB and fastboot on Linux PC
- Latest MTK SP Flash Tool for Linux 64-bit
- Latest MTK SP Flash Tool for Linux 32-bit
- TWRP recovery download for Leagoo Power 2 Pro
REQUIRED DOWNLOADS IF YOU ARE USING A LINUX PC:
STEP BY STEP GUIDE OF HOW TO INSTALL TWRP FOR Leagoo Power 2 Pro:
Follow the below step by step guide to install the TWRP for Leagoo Power 2 Pro
Before installing TWRP you may require an unlocked bootloader on Leagoo Power 2 Pro.
Installing TWRP on Leagoo Power 2 Pro requires a scatter file to be created.
A scatter file of a Mediatek device is what tells about the presence of different partition and the start address of each partition.How to create scatter file for Leagoo Power 2 Pro:
This guide need the Droid MTK Tool. With the help of Droid MTK Tool we will create the scatter file for Leagoo Power 2 Pro.
- Download the Droid MTK Tool from the above Downloads section.
- It’s in a zip file, so extract that file or open using WinRar or some application and then open the MTKDroidTools.exe file.
- Enable USB Debugging under Developer Options on the Leagoo Power 2 Pro; to make the device accessible via ADB.
– If you don’t know how to do this then here is How to Enable Developer Options and How to Enable USB Debugging and OEM unlock.
- Then connect the phone using the USB cable to the PC.
– When you connect the phone to the PC, MTKDroidTool will show all the information about your phone.
- On the below portion of the screen you will see a Blocks Map button. Click on the button
- On the next screen you have all the partition information and starting address of all the partitions of Leagoo Power 2 Pro.
On the bottom of the screen you see a Create scatter file button.– Click on the button to create scatter file for Leagoo Power 2 Pro.
- Save the scatter file for Leagoo Power 2 Pro in a location which you can remember and access easily.
Now Install TWRP on Leagoo Power 2 Pro using SP Flash Tool:
TWRP recovery download to a Mediatek phone is done by SP Flash tool, which uses a scatter file to know which address the recovery partition starts.
Make sure you have downloaded the SP Flash tool and created the scatter file for Leagoo Power 2 Pro.Follow the below steps to install the TWRP on Leagoo Power 2 Pro using the scatter file.
- Open the SP Flash tool zip file and then open the flash_tool.exe file.
- Click browse on the the scatter-loading file section and select the Leagoo Power 2 Pro scatter file you created earlier using the MTKDroid Tool.
After selecting the scatter file, the SP Flash tool application automatically find available partitions and other details.

- Now select the location next to the Recovery partition and select the TWRP for Leagoo Power 2 Pro, which is in .img format.

- Then click on the Download button to start downloading/flashing of the TWRP recovery on Leagoo Power 2 Pro as shown in the picture.

- After clicking on the download button you will see a red bar on the bottom followed by a yellow bar.
When the TWRP is downloaded to Leagoo Power 2 Pro, the SP Flash tool will alert you saying Download is done.
That’s all.
What to do after you install TWRP for Leagoo Power 2 Pro:
- You can root the Leagoo Power 2 Pro
- You can install one of the custom ROMs available for Leagoo Power 2 Pro
- You can install some of the mods available on Leagoo Power 2 Pro
Well, this isn’t it. You can install customized themes, sound mods, Xposed modules etc. after installing the TWRP for Leagoo Power 2 Pro.
TWRP recovery is the gateway to many goodies for your phone.Now, if you want to ROOT Leagoo Power 2 Pro then below is a step-by-step by guide for the same.
[su_note note_color=”#F9D9D9″ text_color=”#AA4343″ radius=”3″ class=”” id=””]
ROOTING Leagoo Power 2 Pro MAY BRICK THE PHONE.
MAKE SURE YOU READ THE ADVANTAGES AND DISADVANTAGES OF ROOTING BEFORE YOU PROCEED FURTHER.
Before proceeding further you may consider backup all data on the phone.
You are the only person making changes to your phone and I cannot be held responsible for the mistakes done by you.
[/su_note]REQUIRED DOWNLOADS OR GUIDES FOR Leagoo Power 2 Pro ROOTING:
- Make sure you have already unlocked the bootloader and installed TWRP for Leagoo Power 2 Pro
– Well, this is a very important aspect of this SuperSU ROOT process. The SuperSU zip file is developed in a way to be installed via a TWRP recovery or other custom recovery. Stock recovery may not be able install this SuperSU or Magisk ROOT zip file.
- Download the latest SuprSU ROOT for Leagoo Power 2 Pro or one of the following:
- Download link for Latest SuperSU zip file
- Download link for STABLE SuperSU zip file
- Download link for SuperSU BETA zip file
- Download link to SuperSU APK Free version
- Download link to SuperSU APK Pro version
- Download link to Magisk ROOT zip file
IMPORTANT NOTE:- Your phone will not be rooted just by installing the SuperSU APK file on your Android phone.
- SuperSU APK Free or Pro version is just a SuperSU ROOT management application.
- The SuperSU APK Free or Pro app will ONLY work if you have already ROOTED your Android Phone.
Step-by-Step guide on how to ROOT Leagoo Power 2 Pro using SuperSU or Magisk zip file:
- Download and copy the SuperSU or Magisk ROOT file to Leagoo Power 2 Pro. (I hope you have already downloaded the SuperSU zip file from the above downloads section)
- Now restart the Leagoo Power 2 Pro to boot into TWRP recovery.
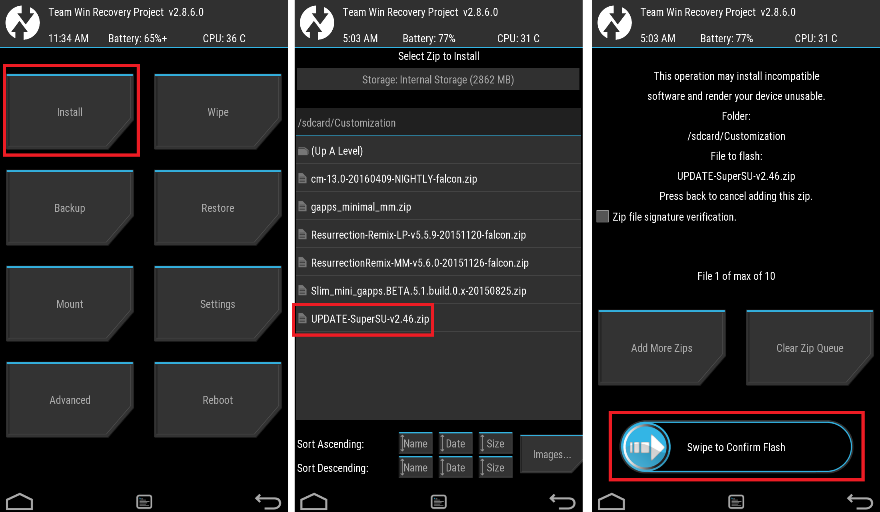
- Then, Select the Install from TWRP home screen, then select the SuperSU ROOT zip file from the file browser.
- Flash or install the SuperSU or Magisk for Leagoo Power 2 Pro, by Sliding the Swipe to Confirm Flash on TWRP screen.
- Wait for TWRP to flash the SuperSU or the Magisk. Once the flashing is done just reboot your device.
- Profit!!! You should now have a Leagoo Power 2 Pro ROOT enabled phone.
How to check if ROOT is enabled on Leagoo Power 2 Pro or NOT?
Install the ROOT checker app from the Play Store and verify if your phone is ROOTED or not.
Here is a screenshot how to flash the SuperSU ROOT binary via TWRP:

If you face any problems on this guide to install TWRP for Leagoo Power 2 Pro then, you can login and reply here. Either me or some other user on this forum will revert back to your query as soon as possible.
Stay tuned or Subscribe to the Leagoo Power 2 Pro forum For other Android Custom ROMs, LineageOS ROMs, and all other device specific topics.- TWRP download for Canvas Doodle 3 by Teja