- Search Results
Looking to install OmniROM Oreo for OnePlus 3 (oneplus3)? Well, this post provides you the download links and explains how to update OmniROM Oreo for OnePlus 3.
This OmniROM Oreo for OnePlus 3 (oneplus3) is brought to you by developer ebolo.
DONATION TO DEVELOPER(s):
If you like this ROM then do consider a small contribution to ebolo and the OmniROM project:
– No donation link found for ebolo
– Donate to OmniROM projectIf you want some more Android Oreo ROM for OnePlus 3, then stay tuned to one of the following list:
– RR Oreo Download list
– LineageOS 15 Downloads list
– OFFICIAL LineageOS 15.1 Download list
– AOSP Oreo ROMs Download listDISCLAIMER:
THIS IS AN INITIAL BUILD OF OmniROM ANDROID OREO (8.1), WHICH MAY HAVE MANY BUGS OR MAY NOT BOOT AT ALL. BACKUP THE CURRENT ROM BEFORE FLASHING AND TRY AT YOUR OWN RISK.
Installing a custom ROM on a the OnePlus 3 requires a custom recovery to be installed, which may delete all your data. Before proceeding further you may consider backup all data on the phone. You are the only person making changes to your phone and I cannot be held responsible for the mistakes done by you.Content structure:
Status of OmniROM Oreo for OnePlus 3:
WHAT’S WORKING:
– UnknownKNOWN ISSUES:
– Unknown
REQUIRED DOWNLOADS AND LINKS TO UPDATE OmniROM OREO ON OnePlus 3:
- TWRP recovery download link for OnePlus 3
– Follow this guide: How to Install TWRP on OnePlus 3 using Fastboot (This requires an unlocked bootloader)
– Here is How to unlock bootloader using fastboot - OmniROM Oreo Download link for OnePlus 3
- Oreo 8.1 GApps Download for OnePlus 3 OmniROM Oreo ROM
- How to ROOT OmniROM Oreo
HOW TO INSTALL/UPDATE OmniROM OREO FOR OnePlus 3 (ANDROID 8.1):
Follow this guide to Install OmniROM Oreo ROM on OnePlus 3 for the first time or coming from another Android version:
Points to NOTE on BACKUP before updating:
– Try to avoid restoring apps backup using Titanium Backup. It may break things up.
– Don’t restore system data using Titanium Backup! It will definitely break the current installation.
– It is also discouraged to Restoring Apps + Data using Titanium Backup.- Boot into Recovery by one of the following method:
– Power off the phone and keep pressing key combinations while turning on your phone.
– If you have enabled USB debugging and you have ADB utility installed on your PC then you can execute the following command on a console or command prompt:adb reboot recovery
- Wipe data partition (or do factory reset), Cache partition, Dalvik Cache and Format the System partition using the recovery.
– Here is a guide explaining how to wipe data using TWRP recovery.This will delete all your data on your phone. You may consider complete backup of your phone data or take a NANDROID backup of the current ROM.
IGNORE IF YOU DON’T WANT TO OR IF YOU HAVE ALREADY DONE THIS.
– How to backup all data on your Android Device.
– how to take NANDROID backup using TWRP recovery. - Download the OnePlus 3 OmniROM Oreo ROM zip file, Oreo GApps file and copy the files to phone.
- Install the OnePlus 3 OmniROM Oreo ROM zip file that you have copied.
– Here is a post explaining how to Install custom ROM using TWRP. - Then flash the Android 8.1 Gapps package.
– Here is a post explaining how to install GApps using TWRP.
Upgrading from earlier version of OmniROM Oreo for OnePlus 3:
- Copy the latest OmniROM Oreo ROM file to OnePlus 3.
- Boot into Recovery.
- Install the latest OmniROM Oreo ROM from your phone and wait till it finishes.
– Here is a post explaining how to install custom ROM using TWRP recovery.
- Then Install the Android 8.1 Oreo GApps package.
– Here is: how to install GApps using TWRP recovery.
- Reboot and Enjoy
Reboot to system after installing is done completely. Do the required initial setup and enjoy the Android Oreo ROM for OnePlus 3 with OmniROM ROM. If you face any problem following this guide or post installation then just login and leave a comment to get an instant reply.
Rooting OmniROM Oreo ROM on OnePlus 3:
There is no inbuilt ROOT functionality available on this ROM.
Here is how to ROOT OmniROM Oreo ROM, a step-by-step guide !!!Stay tuned or Subscribe to the OnePlus 3 custom ROMs forum For other LineageOS ROM, Resurrection Remix ROM, OmniROM ROM, AICP ROM, crDroid ROM, and all other device specific topics.You can now download and install LineageOS 16 for OnePlus 5T. Here is how to install LineageOS 16 on OnePlus 5T, with a step-by-step guide. This LineageOS 16 build is brought to you by developer codeworkx.
Follow the links to get other LineageOS 16 and Android Pie ROM builds.
DONATION TO DEVELOPER(S)/PROJECT:
If you like this ROM then do consider for a contribution to codeworkx and LineageOS project:
– Donate to codeworkx
– Donate to LineageOS project

[su_note note_color=”#F9D9D9″ text_color=”#AA4343″ radius=”3″ class=”” id=””]DISCLAIMER:
THIS IS AN INITIAL BUILD OF LineageOS 16 FOR OnePlus 5T, WHICH MAY HAVE MANY BUGS.
MAKE SURE TO BACKUP ALL DATA OF YOUR PHONE.
FLASH AT YOUR OWN RISK.[/su_note][su_note note_color=”#FBF4DD” text_color=”#A38C68″ radius=”3″ class=”” id=””]Installing a custom ROM may require an unlock bootloader on OnePlus 5T, which may VOID your warranty and may delete all your data. Before proceeding further you may consider backup all data on the phone.
You are the only person doing changes to your phone; neither the developer nor I can be held responsible for the mistakes done by you.[/su_note]Status of the OnePlus 5T LineageOS 16 ROM:
WHAT’S WORKING:
– EverythingKNOWN ISSUES:
– SELinux is in permissive modeREQUIRED GUIDES AND DOWNLOADS TO INSTALL LineageOS 16 ON OnePlus 5T:
- TWRP for OnePlus 5T (dumpling) for this OnePlus 5T LineageOS 16 ROM
- How to install TWRP recovery
- OnePlus 5T unlock bootloader guide – required to install TWRP recovery
- ROM download link for OnePlus 5T LineageOS 16
- MindTheGApps for LineageOS 16 / GApps for LineageOS 16
- How to Root LineageOS 16
HOW TO DOWNLOAD AND INSTALL LineageOS 16 ON OnePlus 5T – Android 9 Pie CUSTOM ROM:
[su_note note_color=”#D7E3F4″ text_color=”#728095″ radius=”3″ class=”” id=””]
Following are the two sub-sections of this OnePlus 5T LineageOS 16 guide:- First time installation of LineageOS 16 on OnePlus 5T
- Upgrading LineageOS 16 on OnePlus 5T from a previous build of LineageOS 16 ROM
[/su_note]
To Install LineageOS 16 on OnePlus 5T for the first time:
[su_note note_color=”#FBF4DD” text_color=”#A38C68″ radius=”3″ class=”” id=””]
Points to NOTE:- Try to avoid restoring apps backup using Titanium Backup. It may break things up.
- Don’t restore system data using Titanium Backup! It will definitely break the current installation.
- It is also discouraged to Restoring Apps + Data using Titanium Backup.
[/su_note]
[su_note note_color=”#F9D9D9″ text_color=”#AA4343″ radius=”3″ class=”” id=””]
– Make sure your phone has ever run on OxygenOS 5.1 and is currently on latest firmware
– Remove custom encryption pins/passwords else decryption will fail!
[/su_note]- Download and Copy the OnePlus 5T LineageOS 16 ROM and GApps ZIP file to your phone.
- Boot into the TWRP custom Recovery to install this LineageOS 16 on OnePlus 5T.
[su_note note_color=”#D7E3F4″ text_color=”#728095″ radius=”3″ class=”” id=””]- Make sure to have a Custom recovery like a TWRP recovery or any other custom recovery.
– If not then download the TWRP recovery from Downloads link and follow the how to install twrp Guide (it’s a generic guide which will work for TWRP as well as any other recovery)
– Installing TWRP recovery requires an unlocked bootloader on OnePlus 5T[/su_note] - Wipe the data partition (or do a factory reset), Cache partition, Dalvik Cache or ART cache and Format the System partition.
[su_note note_color=”#D7E3F4″ text_color=”#728095″ radius=”3″ class=”” id=””]- Here is a guide explaining how to wipe using TWRP recovery.[/su_note]
[su_note note_color=”#FBF4DD” text_color=”#A38C68″ radius=”3″ class=”” id=””]This will delete all your data on your phone. You may consider complete backup of your phone data or take a NANDROID backup of the current ROM
– How to backup data on Android phone
– how to take NANDROID backup using TWRP recovery[/su_note] - First flash the LineageOS 16 for OnePlus 5T
[su_note note_color=”#D7E3F4″ text_color=”#728095″ radius=”3″ class=”” id=””]- Here is a post explaining how to install recovery flashable zip file[/su_note] - Then install the MindTheGapps for LineageOS 16 package.
[su_note note_color=”#D7E3F4″ text_color=”#728095″ radius=”3″ class=”” id=””]- Here is a post explaining how to install GApps using TWRP recovery.[/su_note] - Reboot and Enjoy the Android 9 Pie LineageOS 16 on OnePlus 5T.
Upgrading from earlier version of LineageOS 16 on OnePlus 5T (dumpling):
- Copy the latest ROM zip file of LineageOS 16 for OnePlus 5T, LineageOS 16 GApps and/or Magisk ROOT package to the phone
- Boot into Recovery.- Make sure you have a latest custom Recovery that should be able to flash the LineageOS 16 ROM update.
- Format or wipe the system partition from the custom recovery menu.
- Install the LineageOS 16 for OnePlus 5T.
[su_note note_color=”#D7E3F4″ text_color=”#728095″ radius=”3″ class=”” id=””]- Here is a post explaining how to install LineageOS[/su_note] - Reboot and see you have the GApps and ROOT access or NOT.
[su_note note_color=”#D8F1C6″ text_color=”#769958″ radius=”3″ class=”” id=””]- Gapps is built in such a way that it will sustain across ROM updates.[/su_note] - If you don’t have GApps after upgrading the LineageOS 16 on OnePlus 5T, then flash the GApps.
[su_note note_color=”#D7E3F4″ text_color=”#728095″ radius=”3″ class=”” id=””]- Here is a post explaining how to flash GApps using TWRP recovery.[/su_note] - If you don’t have ROOT after upgrading the LineageOS 16 on OnePlus 5T, then flash the SuperSU or Magisk or the Lineage SU binary.
[su_note note_color=”#D7E3F4″ text_color=”#728095″ radius=”3″ class=”” id=””]- Here is a post explaining How to Enable ROOT on LineageOS 16 ROM[/su_note] - Once everything is done, reboot and Enjoy the LineageOS 16 on OnePlus 5T.
[su_note note_color=”#D8F1C6″ text_color=”#769958″ radius=”3″ class=”” id=””]Complete the initial setup and enjoy Android 9 Pie with LineageOS 16 on OnePlus 5T.[/su_note]
After installing LineageOS 16 on OnePlus 5T you may want to install Google Camera (GCam) or enable ROOT access on your phone and here is how you can do that:
– How to ROOT LineageOS 16
– GCam APK for Android Pie (this page contains a huge list of GCam for all available devices)[su_note note_color=”#D7E3F4″ text_color=”#728095″ radius=”3″ class=”” id=””]If there is no ROOT access for some reason even after installing the LineageOS SU binary, then you can try SuperSU rooting guide to enable ROOT access.[/su_note]
Stay tuned or Subscribe to the OnePlus 5T (dumpling) LineageOS forum For other Android Pie, Android Oreo ROMs, Nougat ROMs, or other ROMs and all other device specific topics.LineageOS 15 for OnePlus One (based on Android Oreo) has also arrived. You might be interested in !!
This is a discussion thread created forOnePlus One (Codename: Bacon) Official AOKP Marshmallow ROM.
If you have any BUGs to report or your device shows some problem after flashing this ROM then use this thread to discuss on those topics. Please use this thread for the OnePlus One AOKP ROM discussion only.
If you have anything else to convey then search the forum and if not found then create a new topic under appropriate forum.
Android Oreo 8.1 ROM, LineageOS 15.1 for Zuk Z2/Lenovo Z2 Plus has now arrived via an UNOFFICIAL build. This post provides the download link to LineageOS 15.1 ROM for Zuk Z2/Lenovo Z2 Plus and guides through the installation process of the same. This LineageOS 15.1 Oreo ROM for Zuk Z2/Lenovo Z2 Plus (z2_plus) is brought to you by developer DD3Boh.
DONATION TO DEVELOPER(s):
If you like this ROM, then do consider a small contribution to DD3Boh and/or to the LineageOS project:
– donate to DD3Boh
– Donate to LineageOS project[su_note note_color=”#D8F1C6″ text_color=”#769958″ radius=”3″ class=”” id=””]LineageOS 17 for Lenovo Zuk Z2 (plus) is also now available to install. To get other Android 10 based LineageOS ROM, visit the LineageOS 17 download page.[/su_note]
If you want the OFFICIAL LineageOS update or some more Android Oreo ROMs then stay tuned to the LineageOS 15 page or the AOSP Android Oreo devices list page.
DISCLAIMER:
THIS IS AN INITIAL BUILD WHICH MAY NOT BOOT AT ALL. EVEN IF IT BOOTS, IT MAY HAVE MANY MORE BUGS THAN YOU CAN IMAGINE. HAVE A BACKUP BEFORE FLASHING THIS AND TRY AT YOUR OWN RISK. Installing a custom ROM on a Zuk Z2/Lenovo Z2 Plus (z2) requires the bootloader to be unlocked on the Zuk Z2/Lenovo Z2 Plus (z2) phone, which may VOID your warranty and may delete all your data. Before proceeding further you may consider backup all data on the phone. You are the only person doing changes to your phone and I cannot be held responsible for the mistakes done by you.Status of LineageOS 15.1 for Zuk Z2/Lenovo Z2 Plus Oreo 8.1 Custom ROM:
WHAT’S WORKING:
– Not KnownKNOWN ISSUES:
– Not Known
REQUIRED LINKS AND FILES FOR LineageOS 15.1 for Zuk Z2/Lenovo Z2 Plus OREO CUSTOM ROM:
- TWRP recovery for Zuk Z2/Lenovo Z2 Plus– Here is theTWRP update guide for the Zuk Z2/Lenovo Z2 Plus. This TWRP recovery guide requires an unlocked bootloader on the Zuk Z2/Lenovo Z2 Plus.
- ROM Download link of LineageOS 15.1 for Zuk Z2/Lenovo Z2 Plus by DD3Boh
- ROM Download link of LineageOS 15.1 for Zuk Z2/Lenovo Z2 Plus
- GApps for LineageOS 15.1 Oreo ROM for LineageOS 15.1 for Zuk Z2/Lenovo Z2 Plus Oreo 8.1 ROM
Root binary is NOT inbuilt in LineageOS 15.1, so you may need a separate SuperSu package or LineageOS su binary to install to gain ROOT access. Here is LineageOS Rooting guide
If there is no in-built ROOT or it does not work for some reason then you can try SuperSU rooting guide to enable ROOT access.HOW TO INSTALL/DOWNLOAD/FLASH/UPDATE LineageOS 15.1 FOR Zuk Z2/Lenovo Z2 Plus OREO CUSTOM ROM:
Follow this if you are flashing LineageOS 15.1 for Zuk Z2/Lenovo Z2 Plus for the first time, or coming from another ROM:
Points to NOTE:
– Try to avoid restoring apps backup using Titanium Backup. It may break things up.
– Don’t restore system data using Titanium Backup! It will definitely break the current installation.
– It is also discouraged to Restoring Apps + Data using Titanium Backup.- Download and Copy the GApps and LineageOS 15.1 for Zuk Z2/Lenovo Z2 Plus Oreo ROM ZIP to your phone.
- Boot into Recovery. Make sure to have a Custom recovery like CWM or TWRP or any other custom recovery. If not then follow the Custom Recovery Installation Guide for Zuk Z2/Lenovo Z2 Plus (it’s a generic guide which will work for TWRP as well as CWM recovery or any other recovery)
- Wipe data factory reset, Cache partition, Dalvik Cache and Format the System partition.
– Here is a guide explaining how to wipe data using TWRP recovery.This will delete all your data on your phone. You may consider complete backup of your phone data or take a NANDROID backup of the current ROM
– How to backup all data on your Android Device
– how to take NANDROID backup using TWRP recovery - First flash the LineageOS 15.1 for Zuk Z2/Lenovo Z2 Plus Oreo ROM ZIP from device. Then flash the GApps zip from your device memory.
– Here is a post explaining how to install LineageOS - Then reboot into recovery (don’t skip this) and flash the Gapps for LineageOS 15.1 package.
– Here is a post explaining how to flash GApps using TWRP recovery. - Reboot and Enjoy the Oreo 8.1 LineageOS 15.1 ROM for Zuk Z2/Lenovo Z2 Plus.
Upgrading from earlier version of LineageOS 15.1 for Zuk Z2/Lenovo Z2 Plus (z2):
- Copy the latest Zuk Z2/Lenovo Z2 Plus Lineage 15 ROM ZIP file to your phone.
- Boot into Recovery.
- Flash the latest CM ROM ZIP from your phone.
– Here is a post explaining how to install LineageOS - Then flash the Lineage 15 Oreo GApps package.
– Here is a post explaining how to flash GApps using TWRP recovery. - Reboot and Enjoy
Complete the initial setup and enjoy Android Oreo 8.1 with LineageOS 15.1 for Zuk Z2/Lenovo Z2 Plus. After the installation of LineageOS 15.1 for Zuk Z2/Lenovo Z2 Plus you may want to enable ROOT access on your phone and here is how you can do that:
How to Enable ROOT on LineageOS 15.1.Stay tuned or Subscribe to the Zuk Z2/Lenovo Z2 Plus (z2) forum For other Android Oreo, Nougat ROMs, LineageOS 15.1 ROMs, other ROMs and all other device specific topics.Android Nougat 7.1 ROM, LineageOS 14.1 for LG G4 has now arrived via an UNOFFICIAL and also the OFFICIAL build. If you want some more Lineage ROMs for other device(s) then stay tuned the LineageOS 14.1 ROM collection page. Before this there was the CM14.1 for LG G4. This LineageOS 14.1 for LG G4 (h815) is brought to you by developer J0SH1X.
DISCLAIMER:
THIS IS AN INITIAL BUILD WHICH MAY NOT BOOT AT ALL. HAVE A BACKUP BEFORE FLASHING THIS AND TRY AT YOUR OWN RISK. Installing a custom ROM on a LG G4 (h815) requires the bootloader to be unlocked on the LG G4 (h815) phone, which may VOID your warranty and may delete all your data. Before proceeding further you may consider backup all data on the phone. You are the only person doing changes to your phone and I cannot be held responsible for the mistakes done by you.Status of LineageOS 14.1 for LG G4 Nougat 7.1 Custom ROM:
WHAT’S WORKING:
– Not KnownKNOWN ISSUES:
– Not Known
REQUIRED LINKS AND FILES FOR LineageOS 14.1 for LG G4 NOUGAT CUSTOM ROM:
- TWRP recovery link for LG G4 (h815)
– Here is theTWRP update guide for the LG G4 (h815). This TWRP recovery guide requires an unlocked bootloader on the LG G4 (h815).
- Official LG G4 (h815) LOS 14.1 Download link
- ROM Download link of LineageOS 14.1 for LG G4 (h815)
- Lineage Nougat GApps download link for LG G4 LineageOS 14.1 Nougat 7.1 ROM
Root binary is inbuilt in LineageOS 14.1, so you don’t need a separate SuperSu package to install to gain ROOT access. Here is How to Enable ROOT on LineageOS 14.1
If there is no in-built ROOT or it does not work for some reason then you can try flashing SuperSU zip using recovery to gain ROOT access.HOW TO INSTALL/DOWNLOAD/FLASH/UPDATE LineageOS 14.1 FOR LG G4 NOUGAT CUSTOM ROM:
Follow this if you are flashing LineageOS 14.1 for LG G4 (h815) for the first time, or coming from another ROM:
Points to NOTE:
– Try to avoid restoring apps backup using Titanium Backup. It may break things up.
– Don’t restore system data using Titanium Backup! It will definitely break the current installation.
– It is also discouraged to Restoring Apps + Data using Titanium Backup.- Download and Copy the GApps and LineageOS 14.1 for LG G4 ROM ZIP to your phone.
- Boot into Recovery. Make sure to have a Custom recovery like CWM or TWRP or any other custom recovery. If not then follow the Custom Recovery Installation Guide for LG G4 (h815) (it’s a generic guide which will work for TWRP as well as CWM recovery or any other recovery)
- Wipe data factory reset, Cache partition, Dalvik Cache and Format the System partition.
– Here is a guide explaining how to wipe data using TWRP recovery.This will delete all your data on your phone. You may consider complete backup of your phone data or take a NANDROID backup of the current ROM
– How to backup all data on your Android Device
– how to take NANDROID backup using TWRP recovery - First flash the LineageOS 14.1 for LG G4 ROM ZIP from device. Then flash the GApps zip from your device memory.
– Here is a post explaining how to install LineageOS - Then reboot into recovery (don’t skip this) and flash the LineageOS 14.1 Nougat GApps package.
– Here is a post explaining how to flash GApps using TWRP recovery. - Reboot and Enjoy the Nougat 7.1 LineageOS 14.1 ROM for LG G4 (h815).
Upgrading from earlier version of LineageOS 14.1 for LG G4 (h815):
- Copy the latest LineageOS 14.1 for LG G4 ROM ZIP file to your phone.
- Boot into Recovery.
- Flash the latest CM ROM ZIP from your phone.
– Here is a post explaining how to install LineageOS - Then flash the LineageOS 14.1 Nougat GApps package.
– Here is a post explaining how to flash GApps using TWRP recovery. - Reboot and Enjoy
Complete the initial setup and enjoy Android Nougat 7.1 with LineageOS 14.1 for LG G4 (h815). After the installation of LineageOS 14.1 for LG G4 (h815) you may want to enable ROOT access on your phone and here is how you can do that:
How to Enable ROOT on LineageOS 14.1.Stay tuned or Subscribe to the LG G4 (h815) forum For other Android Nougat ROMs, LineageOS 14.1 ROMs, other ROMs and all other device specific topics.AOSP based Omni Oreo for OnePlus 5t is now available via a development version. This Android Oreo ROM for OnePlus 5t (dumpling) is brought to you by darkobas.
DONATION TO DEVELOPER(S):
If you like this ROM then do consider for a contribution to darkobas:
– Donate to darkobasIf you want the OFFICIAL update or some more Android Oreo ROMs then stay tuned to the Lineage OS 15 ROMs page or the AOSP Oreo ROMs devices list page.
DISCLAIMER:
THIS IS AN INITIAL BETA BUILD OF ANDROID OREO (Android 8.0), WHICH MAY HAVE MINOR BUGS. BACKUP THE CURRENT ROM BEFORE FLASHING. TRY AT YOUR OWN RISK.
Installing a custom ROM on a the OnePlus 5t requires a custom recovery to be installed, which may VOID your warranty and may delete all your data. Before proceeding further you may consider backup all data on the phone. You are the only person making changes to your phone and I cannot be held responsible for the mistakes done by you.Content structure:
Status of OnePlus 5t Omni Oreo 8.0 ROM:
WHAT’S WORKING:
– Almost everythingKNOWN ISSUES:
– speakerphone volume can’t be changed
– galileo
– HFR/HSR camcorder recording doesn’t work
REQUIRED DOWNLOADS AND LINKS TO UPDATE OnePlus 5t OREO ROM:
- TWRP recovery download link for OnePlus 5t Oreo ROM
– Follow this guide: How to Install TWRP on OnePlus 5t using Fastboot (This requires an unlocked bootloader)
- ROM Download link of Omni Oreo ROM for OnePlus 5t
- Oreo GApps Download Link for OnePlus 5t Oreo ROM
- Enable ROOT on OnePlus 5t Oreo ROM
HOW TO INSTALL/FLASH/UPDATE ANDROID OREO FOR OnePlus 5t (ANDROID OREO 8.0, Omni ROM):
Follow this to update Android Oreo on OnePlus 5t for the first time or coming from another ROM:
Points to NOTE on BACKUP before updating:
– Try to avoid restoring apps backup using Titanium Backup. It may break things up.
– Don’t restore system data using Titanium Backup! It will definitely break the current installation.
– It is also discouraged to Restoring Apps + Data using Titanium Backup.- Boot into Recovery by one of the following method:
– Power off the phone and keep pressing key combinations while turning on your phone.
– If you have enabled USB debugging and you have ADB utility installed on your PC then you can execute the following command on a console or command prompt:adb reboot recovery
- Wipe data factory reset, Cache partition, Dalvik Cache and Format the System partition using the recovery.
– Here is a guide explaining how to wipe data using TWRP recovery.This will delete all your data on your phone. IGNORE IF YOU DON’T WANT TO OR IF YOU HAVE ALREADY DONE THIS. You may consider complete backup of your phone data or take a NANDROID backup of the current ROM.
– How to backup all data on your Android Device.
– how to take NANDROID backup using TWRP recovery. - Download the OnePlus 5t Android Oreo ROM zip file from the above download link and copy the files to phone.
- Flash the OnePlus 5t Oreo Omni ROM zip from device.
– Here is a post explaining how to flash a ROM zip using TWRP.
Upgrading from earlier version of Omni Android Oreo ROM for OnePlus 5t:
- Copy the latest OnePlus 5t Oreo ROM ZIP file to your phone.
- Boot into Recovery.
- Flash the latest Android Oreo Omni ROM ZIP from your phone and wait till it finishes flashing.
– Here is a post explaining how to flash a custom ROM using TWRP recovery. - Reboot and Enjoy
Reboot to system after flashing is done completely. Do the required initial setup and enjoy the Android Oreo ROM for OnePlus 5t. If you face any problem following this guide or post installation then just login and leave a comment to get an instant reply.
There is no inbuilt ROOT functionality available on this ROM.
To root this OnePlus 5t Oreo Omni ROM, flash the SuperSU and then Profit !!!Stay tuned or Subscribe to the OnePlus 5t (dumpling) forum For other Android Oreo ROMs, Android Nougat ROMs, LineageOS ROMs, other ROMs and all other device specific topics.If you have any BUGs or issue to report then here is the dev thread for this ROM.
Rooting on Android is a process of gaining read/write access to the system which is otherwise restricted. One must unlock bootloader and install a rooting script such as Magisk zip or a SuperSU zip file using a custom recovery like TWRP, to gain ROOT access on an Android phone.
In this post I am going to present a very easy to use step-by-step guide on how to root an Android phone by installing Magisk zip package, with basic explanations.

Well, before going into the details I would like to bring other Magisk features and some history in the development of Magisk which is presented in the next section.
What is Magisk?
Magisk stands for “Magic Mask”. Basically, Magisk is a suite of open source tools for customizing Android which supports devices running higher than Android 4.2. It covers fundamental parts of Android customization: rooting, boot scripts, SELinux patches, AVB2.0 / dm-verity / forceencrypt removals etc.
Magisk has three fundamental tasks listed as below:
- MagiskSU: that provides root access.
- Magisk Modules: Modify read-only partitions by installing modules
- MagiskHide: Hide Magisk from root detections / system integrity checks
In this post, I am going to cover the MagiskSU part that enables ROOT access on an Android phone. Once you are done with the basics of Magisk, let’s prepare and install Magisk to ROOT your Android phone.
[su_note note_color=”#F9D9D9″ text_color=”#AA4343″ radius=”3″ class=”” id=””]Magisk is installed in the core of Android which requires an unlocked bootloader on a phone, which may void the warranty and delete all data on your phone. Make sure you take precautionary measures before you follow this guide.
I won’t be responsible for any damage to your phone.[/su_note]
Understanding How Magisk is Installed
Magisk can be installed from the Magisk installer zip file using a TWRP recovery or it can be installed by patching either a boot image or a recovery image. In this section I am explaining how Magisk is installed on different types of devices.
It is important to understand how Magisk is installed based on the way Android deals with underlying boot process and partitioning.
A/B partitions (or A-only) and SAR or System As Root are the two primary things that needs to be understood before installing Magisk.[su_note note_color=”#FBF4DD” text_color=”#A38C68″ radius=”3″ class=”” id=””]Understanding this thing will basically help you avoid making any mistakes while installing Magisk or to recover if you have done one. I would strongly recommend to read this section before you install Magisk on your phone.[/su_note]
How Magisk works with A/B partitions?
Android phones with A/B partition does not have a recovery partition. So, the Magisk is installed on the ramdisk in the boot partition. If you have a phone with A/B partition system the Magisk is installed on the boot partition.
If you have a device with A/B partitions then you can use boot image patching to install Magisk.How to verify if you have a A/B partition device? execute the below command to know:
getprop ro.build.ab_update
If the result is true, then your device is using A/B partitions.
For example Google Pixel, OnePlus 6 uses A/B partition and Poco F1 and many other phones use A-only partition.[su_note note_color=”#F9D9D9″ text_color=”#AA4343″ radius=”3″ class=”” id=””]But there is an exception.
Despite having A/B partitions on Samsung or Huawei phones, Magisk cannot be installed on the boot partition as it does not have a ramdisk. Instead Magisk is installed in the recovery partition. A separate post will follow on how to install Magisk on Samsung phone, or on Huawei phone later sometime.[/su_note]How Magisk Deals with SAR (System As Root)?
SAR is not of much importance for a user’s point of view but the A/B or A-only partitioning that is associated with SAR is. SAR was made mandatory for devices launching with Android Pie.
On Android Pie SAR, the boot partition of an A-only device no longer contained the ramdisk, hence the Magisk had to be installed on recovery partition.Similarly, on Android 10, all devices must have SAR but devices launching with Android 10 will have a 2 stage init, which is different than that is seen on Android Pie. At the time of Android 10 update, this 2 stage init was not easy to implement as noted by John Wu, the developer of Magisk but as of now it fully supports the same.
The current state of Magisk: it supports non-SAR (good old initramfs), LSAR (both A/B and A-only), and 2SI for A/B (currently Pixel 3 is the only one using this AFAIC). 2SI for A-only will come with the next release.
P.S. 2SI is a NIGHTMARE to work with, so yeah….
— John Wu (@topjohnwu) September 18, 2019
It is important to know if your phone has SAR support or not, based on which you have to install a TWRP if you are going to flash the Magisk installer zip file. execute the below command to know SAR support:
getprop ro.build.system_root_image
Once done with the basics, you can follow one of the below guide to install Magisk on your Android phone.
[su_note note_color=”#D8F1C6″ text_color=”#769958″ radius=”3″ class=”” id=””]
Required Downloads for Magisk Rooting Process
You will need one or all of the below mentioned downloads or guides to root your Android phone with Magisk. Make sure you download the same.
- Magisk Installer zip file
- TWRP recovery for your specific device
- The phone must have an Unlocked bootloader
[/su_note]
How to Install Magisk to Root Android?
[su_note note_color=”#F9D9D9″ text_color=”#AA4343″ radius=”3″ class=”” id=””]Before going to flash Magisk, you need to understand the risks involved in rooting an Android phone. You can always refer to this Magisk troubleshooting guide to find a fix for your problem.[/su_note]
Basically, magisk can be installed on an Android phone in one of the following ways mentioned:
- By installing the Magisk installer zip file using a TWRP recovery
- By patching a boot image with Magisk and installing it on boot partition (for A/B devices except Samsung and Huawei)
- or by patching a recovery image with Magisk and installing it on recovery partition (for Samsung and Huawei running on Android 9 or later)
Out of the above, I am going to cover the recovery and boot image patching method which is applicable for most of the Android phones.
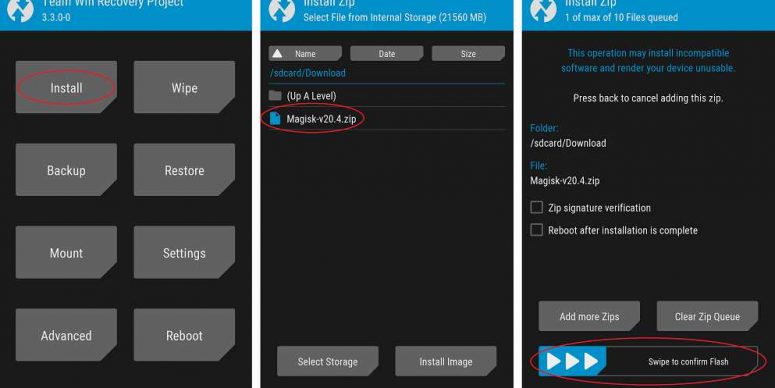
How to Install Magisk Installer using TWRP?
[su_note note_color=”#D7E3F4″ text_color=”#728095″ radius=”3″ class=”” id=””]This guide is only applicable if you have a working TWRP recovery available for your phone. If not, you can follow the below guide.[/su_note]
- Download the Magisk Installer zip file on your phone
- Reboot the phone into a custom recovery such as TWRP
- If you have any PIN lock set on the phone then enter the same PIN on the TWRP (if it is asked) to decrypt the phone’s internal storage
- Click Install > Select the Magisk Installer zip file > Swipe to confirm flash

- Once done reboot to system and you are done.
As a part of Magisk installation the Magisk Manager app should have been installed. If not installed for some reason, you can manually install the Magisk Manager APK manually.
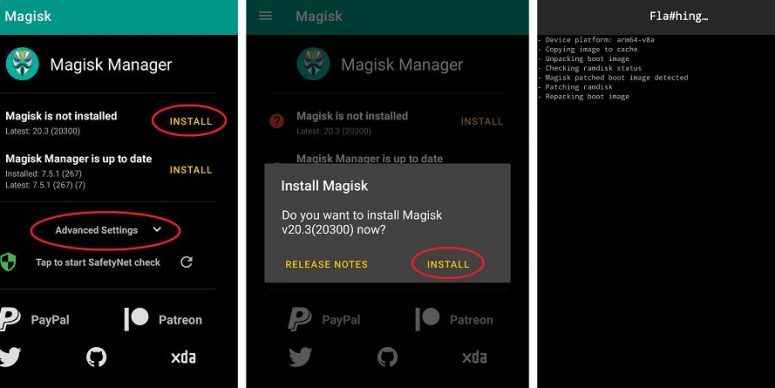
How to Install Magisk patched boot image?
[su_note note_color=”#D7E3F4″ text_color=”#728095″ radius=”3″ class=”” id=””]This method is ideal if your phone does not have a working TWRP recovery.[/su_note]
If you are on a stock firmware then you can extract the boot.img from the actual firmware package or you can ask someone here or on XDA or on internet to provide the same. Once you have the boot image, you can follow the below guide.
- Copy the boot image to your phone
- Download and install the latest Magisk Manager APK on your phone
- Click on Install > Install > Select and Patch a File and select your stock boot image file that you copied in your phone in the earlier step
- Magisk Manager will patch the image, and store it in phone’s internal storage in the following directory /Download/magisk_patched.img
- Copy the patched image from your device to your PC.
[su_note note_color=”#D7E3F4″ text_color=”#728095″ radius=”3″ class=”” id=””]You can manually copy or you can pull the file with ADB using the following command:
adb pull /sdcard/Download/magisk_patched.img
[/su_note] - Flash the patched boot image to your device and reboot.
[su_note note_color=”#D7E3F4″ text_color=”#728095″ radius=”3″ class=”” id=””]You can flash it using fastboot:
fastboot flash boot /path/to/magisk_patched.img
[/su_note]
Once installed Magisk you can see Magisk is up to date with a green tick icon on left. Also, if you want to uninstall magisk you can see the Uninstall button bellow.
That’s all on how to root Android using Magisk. Leave a comment if you face any problem after installing Magisk or unable to install at all.
LineageOS 17.1 for OnePlus 6 is now available to download and install from a developer build. This article explains how to install OnePlus 6 LineageOS 17.1 ROM based on Android 10, with a step-by-step guide.
This OnePlus 6 LineageOS 17.1 build is brought to you by developer LuK1337. For other Android 10 based custom ROM builds you can always visit this Android 10 Download page for supported devices.
DONATION TO DEVELOPER(S)/PROJECT:
If you like this ROM then do consider for a contribution to LuK1337 and LineageOS project:
– Donate to LuK1337
– Donate to LineageOS project
[su_note note_color=”#F9D9D9″ text_color=”#AA4343″ radius=”3″ class=”” id=””]DISCLAIMER:
THIS IS AN INITIAL ALPHA BUILD OF LineageOS 17 FOR OnePlus 6, WHICH MAY HAVE MANY BUGS.
MAKE SURE TO BACKUP ALL DATA OF YOUR PHONE AND KEEP IT IN YOUR MIND THAT YOU ARE FLASHING AT YOUR OWN RISK.[/su_note][su_note note_color=”#FBF4DD” text_color=”#A38C68″ radius=”3″ class=”” id=””]Installing LineageOS 17 for OnePlus 6 requires an unlock bootloader on OnePlus 6, which may VOID your warranty and may delete all your data. Before proceeding further you may consider backup all data on the phone.
You are the only person making changes to your phone; neither the developer nor I can be held responsible for the mistakes done by you.[/su_note]
Status of the OnePlus 6 LineageOS 17 Android 10 custom ROM:
WHAT’S WORKING:
– Almost everythingKNOWN ISSUES:
– Nothing reportedWhere to Download Lineage OS 17.1 for OnePlus 6?
- ROM Download link Lineage OS 17.1
- ROM Download link | Mirror Download Link Lineage OS 17
- OnePlus 6 TWRP Download (enchilada) for this OnePlus 6 LineageOS 17 ROM
- How to install TWRP recovery
- OnePlus 6 unlock bootloader guide – required to install TWRP recovery
- LineageOS 17 GApps
- How to Root LineageOS 17
- Download ADB to sideload the ROM
– 15 Seconds ADB Installer for Windows
– Minimal ADB and Fastboot for Windows
– ADB Fastboot for Linux and MAC
How to Install Lineage OS 17.1 on OnePlus 6?
[su_note note_color=”#D7E3F4″ text_color=”#728095″ radius=”3″ class=”” id=””]
Following are the two sub-sections of this OnePlus 6 LineageOS 17 update guide:- First time installation of LineageOS 17 for OnePlus 6
- Upgrading LineageOS 17 for OnePlus 6 from a previous build of LineageOS 17 ROM
[/su_note]
Flashing LineageOS 17 for OnePlus 6 for the first time:
- Download and Copy the ROM zip file of LineageOS 17 for OnePlus 6 and the LineageOS 17 GApps to your phone.
- Boot into the TWRP custom Recovery to install this OnePlus 6 LineageOS 17 Android 10 custom ROM. Make sure to use the TWRP provided in above downloads section or any system-as-root TWRP for OnePlus 6
[su_note note_color=”#D7E3F4″ text_color=”#728095″ radius=”3″ class=”” id=””]- By now your phone must have an unlocked bootloader to proceed with other steps. If not, unlock the bootloader first and proceed ahead.[/su_note] - Wipe the data partition and Cache partition from TWRP recovery.
[su_note note_color=”#D7E3F4″ text_color=”#728095″ radius=”3″ class=”” id=””]- Here is a guide explaining how to wipe using TWRP recovery.[/su_note]
[su_note note_color=”#FBF4DD” text_color=”#A38C68″ radius=”3″ class=”” id=””]This will delete all your data on your phone. You may consider complete backup of your phone data or take a NANDROID backup of the current ROM
– How to backup all data on your Android Device
– how to take NANDROID backup using TWRP recovery[/su_note] - Install the OnePlus 6 LineageOS 17 ROM zip file that you have copied into the phone.
[su_note note_color=”#D7E3F4″ text_color=”#728095″ radius=”3″ class=”” id=””]- Here is a post explaining how to install LineageOS[/su_note] - Reboot into the TWRP recovery again.
- Then install the LineageOS 17 GApps package.
[su_note note_color=”#D7E3F4″ text_color=”#728095″ radius=”3″ class=”” id=””]- Here is a post explaining how to install GApps using TWRP recovery.[/su_note] - Reboot and Enjoy the Android 10 based LineageOS 17 for OnePlus 6.
Upgrading from earlier version of LineageOS 17 for OnePlus 6 (enchilada):
- Copy the latest ROM zip file of LineageOS 17 for OnePlus 6, LineageOS 17 GApps and/or Magisk ROOT package to the phone
- Boot into Recovery to flash the updated LineageOS 17 for OnePlus 6
- Wipe the system partition from the TWRP recovery menu.
- Install the OnePlus 6 LineageOS 17 update.
[su_note note_color=”#D7E3F4″ text_color=”#728095″ radius=”3″ class=”” id=””]- Here is a post explaining how to install LineageOS[/su_note] - Reboot and see you have the GApps available or not.
[su_note note_color=”#D8F1C6″ text_color=”#769958″ radius=”3″ class=”” id=””]- Gapps is built in such a way that it will sustain across ROM updates.[/su_note] - If you don’t have GApps after upgrading the LineageOS 17 on OnePlus 6, then flash the GApps.
[su_note note_color=”#D7E3F4″ text_color=”#728095″ radius=”3″ class=”” id=””]- Here is a post explaining how to flash GApps using TWRP recovery.[/su_note] - Similarly, verify for the presence of root. If you don’t have ROOT after upgrading the LineageOS 17 on OnePlus 6, then flash the SuperSU or Magisk or the Lineage SU binary.
[su_note note_color=”#D7E3F4″ text_color=”#728095″ radius=”3″ class=”” id=””]- Here is a post explaining How Root LineageOS 17[/su_note] - Once everything is done, reboot and Enjoy the LineageOS 17 on OnePlus 6.
[su_note note_color=”#D8F1C6″ text_color=”#769958″ radius=”3″ class=”” id=””]Complete the initial setup and enjoy Android 10 with LineageOS 17 on OnePlus 6.[/su_note]
How to Root OnePlus 6 on Lineage OS 17.1?
After installing LineageOS 17.1 on OnePlus 6 you may want to enable ROOT on your phone and here is how you can do that:
– LineageOS 17.1 Root[su_note note_color=”#D7E3F4″ text_color=”#728095″ radius=”3″ class=”” id=””]If there is no ROOT access for some reason even after installing the LineageOS SU binary, then you can try SuperSU Zip to enable ROOT access.[/su_note]
Where to Download Google Camera for OnePlus 6 LineageOS 17?
Visit this link to download GCam for OnePlus 6
GCam 7.0 and later versions are compatible with LineageOS 17.1 or any Android 10 ROM in general.
You can always look into the big list of GCam APK download for supported devicesStay tuned or Subscribe to the OnePlus 6 (enchilada) LineageOS forum For other Android 10, Android Oreo ROMs, Nougat ROMs, or other ROMs and all other device specific topics.LineageOS for OnePlus One has now arrived via an UNOFFICIAL build. Also LineageOS 15 for OnePlus One and the OFFICIAL LineageOS OnePlus ONE 14.1 Nougat 7.1 ROM is available to download from LineageOS official website. Check the downloads section for the download link and update procedure. If you want some more LineageOS ROMs then stay tuned the LineageOS 14.1 ROM collection page. Before this there was the CM14.1 for OnePlus One. This LineageOS for OnePlus One (bacon) is brought to you by developer Okeys. If you like this ROM then do consider a donation to Okeys.
DISCLAIMER:
THIS LINEAGE OS FOR ONEPLUS ONE IS AN INITIAL BUILD WHICH MAY NOT BOOT AT ALL. HAVE A BACKUP BEFORE FLASHING THIS AND TRY AT YOUR OWN RISK. Installing LineageOS for OnePlus One (bacon) requires the bootloader to be unlocked on the OnePlus One (bacon) phone, which may VOID your warranty and may delete all your data. Before proceeding further you may consider backup all data on the phone. You are the only person doing changes to your phone and I cannot be held responsible for the mistakes done by you.Status of LineageOS for OnePlus One Nougat 7.1 Custom ROM:
WHAT’S WORKING:
– Not KnownKNOWN ISSUES:
– Not Known
REQUIRED LINKS AND FILES FOR ONEPLUS ONE LineageOS 14.1 NOUGAT 7.1 CUSTOM ROM:
- TWRP recovery link for OnePlus One (bacon)
– Here is theTWRP update guide for the OnePlus One (bacon). This TWRP recovery guide requires an unlocked bootloader on the OnePlus One (bacon).
- ROM Download link (OFFICIAL) of Oneplus one LineageOS 14.1 ROM (bacon)
If you want to upgrade this OFFICIAL LineageOS 14.1 on top of CM14.1 ROM without wiping data then you can refer this CyanogenMod to LineageOS upgrade guide.
- ROM Download link (UNOFFICIAL) of LineageOS for OnePlus One (bacon)
- LineageOS Nougat GApps download link for LineageOS 14.1 for OnePlus One Nougat 7.1 ROM
Root binary is inbuilt in LineageOS 14.1, so you don’t need a separate SuperSu package to install to gain ROOT access. Here is How to Enable ROOT on LineageOS 14.1
If there is no in-built ROOT or it does not work for some reason then you can try flashing SuperSU zip using recovery to gain ROOT access.HOW TO INSTALL/DOWNLOAD/FLASH/UPDATE LINEAGE OS FOR ONEPLUS ONE 14.1 NOUGAT CUSTOM ROM:
Follow this if you are flashing LineageOS 14.1 for OnePlus One (bacon) for the first time, or coming from another ROM:
Points to NOTE:
– Try to avoid restoring apps backup using Titanium Backup. It may break things up.
– Don’t restore system data using Titanium Backup! It will definitely break the current installation.
– It is also discouraged to Restoring Apps + Data using Titanium Backup.- Download and Copy the GApps and LineageOS for OnePlus One ROM ZIP to your phone.
- Boot into Recovery. Make sure to have a Custom recovery like CWM or TWRP or any other custom recovery. If not then follow the Custom Recovery Installation Guide for OnePlus One (bacon) (it’s a generic guide which will work for TWRP as well as CWM recovery or any other recovery)
- Wipe data factory reset, Cache partition, Dalvik Cache and Format the System partition.
– Here is a guide explaining how to wipe data using TWRP recovery.This will delete all your data on your phone. You may consider complete backup of your phone data or take a NANDROID backup of the current ROM
– How to backup all data on your Android Device
– how to take NANDROID backup using TWRP recovery - First flash the LineageOS for OnePlus One ROM ZIP from device. Then flash the GApps zip from your device memory.
– Here is a post explaining how to install LineageOS. - Then reboot into recovery (don’t skip this) and flash the LineageOS 14.1 Nougat GApps package.
– Here is a post explaining how to flash GApps using TWRP recovery. - Reboot and Enjoy the Nougat 7.1 LineageOS 14.1 ROM for OnePlus One (bacon).
Upgrading from earlier version of LineageOS for OnePlus One (bacon):
- Copy the latest LineageOS for OnePlus One ROM ZIP file to your phone.
- Boot into Recovery.
- Flash the latest CM ROM ZIP from your phone.
– Here is a post explaining how to install LineageOS. - Then flash the LineageOS 14.1 Nougat GApps package.
– Here is a post explaining how to flash GApps using TWRP recovery. - Reboot and Enjoy
Complete the initial setup and enjoy Android Nougat 7.1 with LineageOS for OnePlus One (bacon). After the installation of LineageOS for OnePlus One (bacon) you may want to enable ROOT access on your phone and here is how you can do that:
How to Enable ROOT on LineageOS 14.1.Stay tuned or Subscribe to the OnePlus One (bacon) forum For other Android Nougat ROMs, LineageOS 14.1 ROMs, other ROMs and all other device specific topics.Lineage OS 17.1 for OnePlus 6T is now available to download and install from a developer build. This article explains how to install OnePlus 6T Lineage OS 17.1 ROM based on Android 10, with a step-by-step guide.
This OnePlus 6T LineageOS 17.1 build is brought to you by developer LuK1337. For other Android 10 based custom ROM builds you can always visit this Android 10 Download page for supported devices.
DONATION TO DEVELOPER(S)/PROJECT:
If you like this ROM then do consider for a contribution to LuK1337 and LineageOS project:
– Donate to LuK1337
– Donate to LineageOS project
[su_note note_color=”#F9D9D9″ text_color=”#AA4343″ radius=”3″ class=”” id=””]DISCLAIMER:
THIS IS AN INITIAL ALPHA BUILD OF LineageOS 17 FOR OnePlus 6T, WHICH MAY HAVE MANY BUGS.
MAKE SURE TO BACKUP ALL DATA OF YOUR PHONE AND KEEP IT IN YOUR MIND THAT YOU ARE FLASHING AT YOUR OWN RISK.[/su_note][su_note note_color=”#FBF4DD” text_color=”#A38C68″ radius=”3″ class=”” id=””]Installing LineageOS 17 for OnePlus 6T requires an unlock bootloader on OnePlus 6T, which may VOID your warranty and may delete all your data. Before proceeding further you may consider backup all data on the phone.
You are the only person making changes to your phone; neither the developer nor I can be held responsible for the mistakes done by you.[/su_note]
Status of the OnePlus 6T LineageOS 17 Android 10 custom ROM:
WHAT’S WORKING:
– Almost everythingKNOWN ISSUES:
– Nothing reportedWhere to Download LineageOS 17.1 for OnePlus 6T?
- ROM Download link Lineage OS 17.1
- ROM Download link | Mirror Download Link Lineage OS 17
- OnePlus 6T TWRP Download (fajita) for this OnePlus 6T LineageOS 17 ROM
- How to install TWRP recovery
- OnePlus 6T unlock bootloader guide – required to install TWRP recovery
- LineageOS 17 GApps
- How to Root LineageOS 17
- Download ADB to sideload the ROM
– 15 Seconds ADB Installer for Windows
– Minimal ADB and Fastboot for Windows
– ADB Fastboot for Linux and MAC
HOW TO DOWNLOAD AND INSTALL OnePlus 6T LineageOS 17 Android 10 CUSTOM ROM:
[su_note note_color=”#D7E3F4″ text_color=”#728095″ radius=”3″ class=”” id=””]
Following are the two sub-sections of this OnePlus 6T LineageOS 17 update guide:- First time installation of LineageOS 17 for OnePlus 6T
- Upgrading LineageOS 17 for OnePlus 6T from a previous build of LineageOS 17 ROM
[/su_note]
Flashing LineageOS 17 for OnePlus 6T for the first time:
- Download and Copy the ROM zip file of LineageOS 17 for OnePlus 6T and the LineageOS 17 GApps to your phone.
- Boot into the TWRP custom Recovery to install this OnePlus 6T LineageOS 17 Android 10 custom ROM. Make sure to use the TWRP provided in above downloads section or any system-as-root TWRP for OnePlus 6T
[su_note note_color=”#D7E3F4″ text_color=”#728095″ radius=”3″ class=”” id=””]- By now your phone must have an unlocked bootloader to proceed with other steps. If not, unlock the bootloader first and proceed ahead.[/su_note] - Wipe the data partition and Cache partition from TWRP recovery.
[su_note note_color=”#D7E3F4″ text_color=”#728095″ radius=”3″ class=”” id=””]- Here is a guide explaining how to wipe using TWRP recovery.[/su_note]
[su_note note_color=”#FBF4DD” text_color=”#A38C68″ radius=”3″ class=”” id=””]This will delete all your data on your phone. You may consider complete backup of your phone data or take a NANDROID backup of the current ROM
– How to backup all data on your Android Device
– how to take NANDROID backup using TWRP recovery[/su_note] - Install the OnePlus 6T LineageOS 17 ROM zip file that you have copied into the phone.
[su_note note_color=”#D7E3F4″ text_color=”#728095″ radius=”3″ class=”” id=””]- Here is a post explaining how to install LineageOS[/su_note] - Reboot into the TWRP recovery again.
- Then install the LineageOS 17 GApps package.
[su_note note_color=”#D7E3F4″ text_color=”#728095″ radius=”3″ class=”” id=””]- Here is a post explaining how to install GApps using TWRP recovery.[/su_note] - Reboot and Enjoy the Android 10 based LineageOS 17 for OnePlus 6T.
Upgrading from earlier version of LineageOS 17 for OnePlus 6T (fajita):
- Copy the latest ROM zip file of LineageOS 17 for OnePlus 6T, LineageOS 17 GApps and/or Magisk ROOT package to the phone
- Boot into Recovery to flash the updated LineageOS 17 for OnePlus 6T
- Wipe the system partition from the TWRP recovery menu.
- Install the OnePlus 6T LineageOS 17 update.
[su_note note_color=”#D7E3F4″ text_color=”#728095″ radius=”3″ class=”” id=””]- Here is a post explaining how to install LineageOS[/su_note] - Reboot and see you have the GApps available or not.
[su_note note_color=”#D8F1C6″ text_color=”#769958″ radius=”3″ class=”” id=””]- Gapps is built in such a way that it will sustain across ROM updates.[/su_note] - If you don’t have GApps after upgrading the LineageOS 17 on OnePlus 6T, then flash the GApps.
[su_note note_color=”#D7E3F4″ text_color=”#728095″ radius=”3″ class=”” id=””]- Here is a post explaining how to flash GApps using TWRP recovery.[/su_note] - Similarly, verify for the presence of root. If you don’t have ROOT after upgrading the LineageOS 17 on OnePlus 6T, then flash the SuperSU or Magisk or the Lineage SU binary.
[su_note note_color=”#D7E3F4″ text_color=”#728095″ radius=”3″ class=”” id=””]- Here is a post explaining How Root LineageOS 17[/su_note] - Once everything is done, reboot and Enjoy the LineageOS 17 on OnePlus 6T.
[su_note note_color=”#D8F1C6″ text_color=”#769958″ radius=”3″ class=”” id=””]Complete the initial setup and enjoy Android 10 with LineageOS 17.1 on OnePlus 6T.[/su_note]
How to Root OnePlus 6T on Lineage OS 17.1?
After installing LineageOS 17 on OnePlus 6T you may want to enable ROOT access on your phone and here is how you can do that:
– How Root LineageOS 17[su_note note_color=”#D7E3F4″ text_color=”#728095″ radius=”3″ class=”” id=””]If there is no ROOT access for some reason even after installing the LineageOS SU binary, then you can try SuperSU Zip to enable ROOT access.[/su_note]
Where to Download Google Camera for OnePlus 6T Lineage OS 17.1?
You can visit this link to get GCam for OnePlus 6T.
GCam 7.0 and later versions are compatible with Lineage OS 17.1 or any Android 10 ROM in general.
You can always look into the big list of Google Camera APK download for supported phones.Stay tuned or Subscribe to the OnePlus 6T (fajita) LineageOS forum For other Android 10, Android Oreo ROMs, Nougat ROMs, or other ROMs and all other device specific topics.- TWRP recovery download link for OnePlus 3