-
Search Results
-
Android Marshmallow ROM, LineageOS 13 for Grand DUOS has now arrived via an UNOFFICIAL and OFFICIAL build. If you want some more LineageOS ROM builds then stay tuned to the LineageOS 13 ROM page and LineageOS 14.1 ROM. This LineageOS 13 based on Marshmallow for Grand DUOS is brought to you by osas514.
DONATION TO DEVELOPER:
No donation link found for Osas.
DISCLAIMER:
THIS IS AN INITIAL BUILD WHICH MAY HAVE MANY MORE BUGS THAN YOU CAN IMAGINE. HAVE A BACKUP BEFORE FLASHING THIS AND TRY AT YOUR OWN RISK. Installing a custom ROM on a Galaxy Grand DUOS may require the bootloader to be unlocked, which may VOID your warranty and may delete all your data. Before proceeding further you may consider backup all data on the phone. You are the only person doing changes to your phone and I cannot be held responsible for the mistakes done by you.Status of LineageOS 13 for Galaxy Grand DUOS (i9082) Marshmallow ROM:
WHAT’S WORKING:
– Not KnownKNOWN ISSUES:
– Not known
REQUIRED LINKS AND FILES FOR LineageOS 13 for Grand DUOS MARSHMALLOW CUSTOM ROM:
- TWRP for Grand DUOS (i9082)
– Here is: TWRP update Guide for Samsung Galaxy Grand DUOS (This guide is only for .tar or tar.md5 TWRP filetypes)
– To flash .img file you can follow this recovery guide for .img files or you can use Flashify to update the .img TWRP. - Galaxy Grand DUOS LineageOS 13 ROM (i9082) [UNOFFICIAL ROM LINK]
- Marshmallow GApps for Galaxy Grand DUOS LineageOS 13 Marshmallow ROM
Root binary is NOT inbuilt in LineageOS 13, so you may need a separate SuperSu package or LineageOS su binary to install to gain ROOT access. Here is How to Enable ROOT on LineageOS 13
If there is no in-built ROOT or it does not work for some reason then you can try SuperSU ROOT to gain ROOT access.HOW TO INSTALL/DOWNLOAD/FLASH/UPDATE Galaxy Grand DUOS LineageOS 13 MARSHMALLOW CUSTOM ROM:
-
Follow this if you are flashing LineageOS 13 for Galaxy Grand DUOS for the first time, or coming from another ROM:
Points to NOTE:
– Try to avoid restoring apps backup using Titanium Backup. It may break things up.
– Don’t restore system data using Titanium Backup! It will definitely break the current installation.
– It is also discouraged to Restoring Apps + Data using Titanium Backup.- Then, download and Copy the GApps and LineageOS 13 for Galaxy Grand DUOS ROM ZIP to your phone.
- Boot into Recovery. Make sure to have a Custom recovery like CWM or TWRP or any other custom recovery. If not then follow the Samsung recovery update guide (it’s a generic guide which will work for TWRP as well as CWM recovery or any other recovery)
- Wipe data factory reset, Cache partition, Dalvik Cache and Format the System partition.
– Here is a guide explaining How to clear data using TWRP.This will delete all your data on your phone. You may consider complete backup of your phone data or take a NANDROID backup of the current ROM
– Take backup of data
– Take a ROM backup - First flash the Galaxy Grand DUOS LineageOS 13 ROM ZIP from device. Then flash the GApps zip from your device memory.
– Here is a post explaining how to install LineageOS. - DO NOT REBOOT yet. Then flash the LineageOS 13 GApps package.
– Here is a post explaining flashing Marshmallow GApps. - Reboot and Enjoy the Marshmallow LineageOS 13 ROM for Galaxy Grand DUOS.
-
Upgrading from earlier version of Galaxy Grand DUOS LineageOS 13:
- Copy the latest LineageOS 13 for Galaxy Grand DUOS ROM ZIP file to your phone.
- Boot into Recovery.
- Flash the latest LineageOS ROM ZIP from your phone.
– Here is a post explaining LineageOS installation precodeure. - Then flash the LineageOS Marshmallow GApps package.
– Here is a post explaining Install GApps using recovery. - Reboot and Enjoy
Complete the initial setup and enjoy Android Marshmallow with LineageOS 13 for Galaxy Grand DUOS. After the installation of Galaxy Grand DUOS LineageOS 13 ROM you may want to enable ROOT access on your phone and here is how you can do that:
How to ROOT LineageOS 13.Stay tuned or Subscribe to the Galaxy Grand DUOS (i9082) forum For other Android Custom ROMs, LineageOS 13 ROMs, other ROMs and all other device specific topics.Android Nougat 7.1 ROM, Galaxy Grand DUOS LineageOS 14.1 has now arrived via an UNOFFICIAL build. If you want some more LineageOS ROMs or wanna taste the OFFICIAL LineageOS build then stay tuned the LineageOS 14.1 ROM collection page. Here we also have the CM14 for Galaxy Grand DUOS. As always this LineageOS 14.1 for Galaxy Grand DUOS (i9082) is brought to you by developer osas514.
DISCLAIMER:
THIS IS AN INITIAL BUILD WHICH MAY NOT BOOT AT ALL. HAVE A BACKUP BEFORE FLASHING THIS AND TRY AT YOUR OWN RISK. Installing a custom ROM on a Galaxy Grand DUOS (i9082) may require the bootloader to be unlocked on the Galaxy Grand DUOS (i9082) phone, which may VOID your warranty and may delete all your data. Before proceeding further you may consider backup all data on the phone. You are the only person doing changes to your phone and I cannot be held responsible for the mistakes done by you.Status of Galaxy Grand DUOS LineageOS 14.1 Nougat 7.1 Custom ROM:
WHAT’S WORKING:
– Not KnownKNOWN ISSUES:
– Not Known
REQUIRED LINKS AND FILES FOR GALAXY Grand DUOS LINEAGE OS 14.1 NOUGAT CUSTOM ROM:
- TWRP recovery download link for Galaxy Grand DUOS (i9082)
– Here is theTWRP update guide for the Galaxy Grand DUOS (i9082). This TWRP recovery guide may require an unlocked bootloader on the Galaxy Grand DUOS (i9082).
- ROM Download link of LineageOS 14.1 for Galaxy Grand DUOS (i9082)
- LineageOS Nougat GApps download link for Galaxy Grand DUOS LineageOS 14.1 Nougat 7.1 ROM
Root binary is inbuilt in LineageOS 14.1, so you don’t need a separate SuperSu package to install to gain ROOT access. Here is How to Enable ROOT on LineageOS 14.1
If there is no in-built ROOT or it does not work for some reason then you can try flashing SuperSU zip using recovery to gain root access.HOW TO INSTALL/DOWNLOAD/FLASH/UPDATE LineageOS 14.1 FOR Galaxy Grand DUOS NOUGAT CUSTOM ROM:
-
Follow this if you are flashing LineageOS 14.1 for Galaxy Grand DUOS (i9082) for the first time, or coming from another ROM:
Points to NOTE:
– Try to avoid restoring apps backup using Titanium Backup. It may break things up.
– Don’t restore system data using Titanium Backup! It will definitely break the current installation.
– It is also discouraged to Restoring Apps + Data using Titanium Backup.- Download and Copy the GApps and Galaxy Grand DUOS LineageOS 14.1 ROM ZIP to your phone.
- Boot into Recovery. Make sure to have a Custom recovery like CWM or TWRP or any other custom recovery. If not then follow the Custom Recovery Installation Guide for Galaxy Grand DUOS (i9082) (it’s a generic guide which will work for TWRP as well as CWM recovery or any other recovery)
- Wipe data factory reset, Cache partition, Dalvik Cache and Format the System partition.
– Here is a guide explaining how to wipe data using TWRP recovery.This will delete all your data on your phone. You may consider complete backup of your phone data or take a NANDROID backup of the current ROM
– How to backup all data on your Android Device
– how to take NANDROID backup using TWRP recovery - First flash the Galaxy Grand DUOS LineageOS 14.1 ROM ZIP from device. Then flash the GApps zip from your device memory.
– Here is a post explaining how to install LineageOS. - Then reboot into recovery (don’t skip this) and flash the LineageOS 14.1 Nougat GApps package.
– Here is a post explaining how to flash GApps using TWRP recovery. - Reboot and Enjoy the Nougat 7.1 LineageOS 14.1 ROM for Galaxy Grand DUOS (i9082).
-
Upgrading from earlier version of LineageOS 14.1 for Galaxy Grand DUOS (i9082):
- Copy the latest Galaxy Grand DUOS LineageOS 14.1 ROM ZIP file to your phone.
- Boot into Recovery.
- Flash the latest CM ROM ZIP from your phone.
– Here is a post explaining how to install LineageOS.g - Then flash the LineageOS 14.1 Nougat GApps package.
– Here is a post explaining how to flash GApps using TWRP recovery. - Reboot and Enjoy
Complete the initial setup and enjoy Android Nougat 7.1 with LineageOS 14.1 for Galaxy Grand DUOS (i9082). After the installation of LineageOS 14.1 for Galaxy Grand DUOS (i9082) you may want to enable ROOT access on your phone and here is how you can do that:
How to Enable ROOT on LineageOS 14.1.Stay tuned or Subscribe to the Galaxy Grand DUOS (i9082) forum For other Android Nougat ROMs, LineageOS 14.1 ROMs, other ROMs and all other device specific topics.LineageOS 16 for Redmi 7 is now available to download and install, which is based on Android Pie 9.0 version. Here is how to install LineageOS 16 on Redmi 7, with a step-by-step guide.
Follow the links to get other LineageOS 16 and Android Pie ROM builds.
DONATION TO DEVELOPER(S)/PROJECT:
If you like this ROM then do consider for a contribution to LineageOS project:
– Donate to LineageOS project
[su_note note_color=”#F9D9D9″ text_color=”#AA4343″ radius=”3″ class=”” id=””]DISCLAIMER:
THIS IS AN INITIAL BUILD OF LineageOS 16 FOR Redmi 7, WHICH MAY NOT BOOT AT ALL OR MAY HAVE MANY BUGS IF IT BOOTS.
MAKE SURE TO BACKUP ALL DATA OF YOUR PHONE AND MIND THAT YOU ARE FLASHING AT YOUR OWN RISK.[/su_note][su_note note_color=”#FBF4DD” text_color=”#A38C68″ radius=”3″ class=”” id=””]Installing a custom ROM may require an unlock bootloader on Redmi 7, which may VOID your warranty and may delete all your data. Before proceeding further you may consider backup all data on the phone.
You are the only person doing changes to your phone; neither the developer nor I can be held responsible for the mistakes done by you.[/su_note]Status of the Redmi 7 LineageOS 16 ROM:
WHAT’S WORKING:
– UnknownKNOWN ISSUES:
– UnknownREQUIRED GUIDES AND DOWNLOADS TO INSTALL LineageOS 16 ON Redmi 7:
- ROM download link of LineageOS 16 for Redmi 7
- TWRP Download for Redmi 7 to install this LineageOS 16 ROM
- Redmi 7 unlock bootloader – required to install TWRP recovery
- MindTheGApps for LineageOS 16 / GApps for LineageOS 16
- How to ROOT LineageOS 16
HOW TO DOWNLOAD AND INSTALL LineageOS 16 ON Redmi 7 – Android 9.0 Pie CUSTOM ROM:
[su_note note_color=”#D7E3F4″ text_color=”#728095″ radius=”3″ class=”” id=””]
Following are the two sub-sections of this Redmi 7 LineageOS 16 guide:- First time installation of LineageOS 16 on Redmi 7
- Upgrading LineageOS 16 on Redmi 7 from a previous build of LineageOS 16 ROM
[/su_note]
To Install LineageOS 16 on Redmi 7 for the first time:
[su_note note_color=”#FBF4DD” text_color=”#A38C68″ radius=”3″ class=”” id=””]
Points to NOTE:- Try to avoid restoring apps backup using Titanium Backup. It may break things up.
- Don’t restore system data using Titanium Backup! It will definitely break the current installation.
- It is also discouraged to Restoring Apps + Data using Titanium Backup.
[/su_note]
- Download and Copy the Redmi 7 LineageOS 16 ROM and GApps ZIP file to your phone.
- Boot into the TWRP custom Recovery to install this LineageOS 16 on Redmi 7.
[su_note note_color=”#D7E3F4″ text_color=”#728095″ radius=”3″ class=”” id=””]- Make sure to have a Custom recovery like a TWRP recovery or any other custom recovery.
– If not then download the TWRP recovery from Downloads link and follow the how to install twrp Guide (it’s a generic guide which will work for TWRP as well as any other recovery)
– Installing TWRP recovery requires an unlocked bootloader on Redmi 7[/su_note] - Wipe the data partition (or do a factory reset), Cache partition, Dalvik Cache or ART cache and Format the System partition.
[su_note note_color=”#D7E3F4″ text_color=”#728095″ radius=”3″ class=”” id=””]- Here is a guide explaining how to wipe using TWRP recovery.[/su_note]
[su_note note_color=”#FBF4DD” text_color=”#A38C68″ radius=”3″ class=”” id=””]This will delete all your data on your phone. You may consider complete backup of your phone data or take a NANDROID backup of the current ROM
– How to backup data on Android phone
– how to take NANDROID backup using TWRP recovery[/su_note] - First flash the LineageOS 16 for Redmi 7
[su_note note_color=”#D7E3F4″ text_color=”#728095″ radius=”3″ class=”” id=””]- Here is a post explaining how to install recovery flashable zip file[/su_note] - Then install the MindTheGapps for LineageOS 16 package.
[su_note note_color=”#D7E3F4″ text_color=”#728095″ radius=”3″ class=”” id=””]- Here is a post explaining how to install GApps using TWRP recovery.[/su_note] - Reboot and Enjoy the Android 9.0 Pie LineageOS 16 on Redmi 7.
Upgrading from earlier version of LineageOS 16 on Redmi 7 (onc):
- Copy the latest ROM zip file of LineageOS 16 for Redmi 7, LineageOS 16 GApps and/or Magisk ROOT package to the phone
- Boot into Recovery.- Make sure you have a latest custom Recovery that should be able to flash the LineageOS 16 ROM update.
- Format or wipe the system partition from the custom recovery menu.
- Install the LineageOS 16 for Redmi 7.
[su_note note_color=”#D7E3F4″ text_color=”#728095″ radius=”3″ class=”” id=””]- Here is a post explaining how to install LineageOS[/su_note] - Reboot and see you have the GApps and ROOT access or NOT.
[su_note note_color=”#D8F1C6″ text_color=”#769958″ radius=”3″ class=”” id=””]- Gapps is built in such a way that it will sustain across ROM updates.[/su_note] - If you don’t have GApps after upgrading the LineageOS 16 on Redmi 7, then flash the GApps.
[su_note note_color=”#D7E3F4″ text_color=”#728095″ radius=”3″ class=”” id=””]- Here is a post explaining how to flash GApps using TWRP recovery.[/su_note] - If you don’t have ROOT after upgrading the LineageOS 16 on Redmi 7, then flash the SuperSU or Magisk or the Lineage SU binary.
[su_note note_color=”#D7E3F4″ text_color=”#728095″ radius=”3″ class=”” id=””]- Here is a post explaining How to Enable ROOT on LineageOS 16 ROM[/su_note] - Once everything is done, reboot and Enjoy the LineageOS 16 on Redmi 7.
[su_note note_color=”#D8F1C6″ text_color=”#769958″ radius=”3″ class=”” id=””]Complete the initial setup and enjoy Android 9.0 Pie with LineageOS 16 on Redmi 7.[/su_note]
After installing LineageOS 16 on Redmi 7 you may want to install Gcam or enable ROOT access on your phone and here is how you can do that:
– LineageOS 16 ROOT
– GCam APK for Android Pie (this page contains a huge list of GCam for all available devices)[su_note note_color=”#D7E3F4″ text_color=”#728095″ radius=”3″ class=”” id=””]If there is no ROOT access for some reason even after installing the LineageOS SU binary, then you can try SuperSU rooting guide to enable ROOT access.[/su_note]
Stay tuned or Subscribe to the Redmi 7 (onc) LineageOS forum For other Android Pie, Android Oreo ROMs, Nougat ROMs, or other ROMs and all other device specific topics.Lenovo Vibe P1 CM13 (CyanogenMod 13) Marshmallow Custom ROM is an UNOFFICIAL Android Marshmallow build for Lenovo Vibe P1. This Lenovo Vibe P1 CM13 (CyanogenMod 13) ROM is brought to you by developer _kyo_. Current status of this ROM is UNKNOWN. Another build is from FireLord. It is strongly recommended that you take either a NANDROID backup or take a complete sync of your phone data. For more CM13 ROM updates and OFFICIAL update of Vibe P1 CM13, you can have a look on the big CyanogenMod 13 devices list.
DISCLAIMER:
Installing custom ROM requires a custom recovery to be installed on your device, which in-turn may require the bootloader to be unlocked which may VOID your warranty and may delete all your data. Before proceeding further you may consider backup your all data. You are the only person making changes on your phone and neither we nor the developer can be held responsible for the mistakes done by YOU.WHAT’S WORKING:
– NOT KNOWNKNOWN ISSUES:
– NOT KNOWN
REQUIRED DOWNLOADS AND GUIDES FOR LENOVO VIBE P1 CM13 ROM FLASHING:
- TWRP recovery for the Vibe P1.
– To flash this TWRP you may follow the following: TWRP recovery installation guide for the Vibe P1 [Bootloader must be unlocked before following this guide]
- ROM Download link of Vibe P1 CM13 Marshmallow ROM by _kyo_
- ROM Download link of Vibe P1 CM13 Marshmallow ROM by FireLord
- CM13 Marshmallow Google Apps download link
The CyanogenMod 13 for Vibe P1 comes with inbuilt ROOT, so SuperSU zip file is not required. After this CM13 installation you may want to enable ROOT access on your phone and here is how you can do that:
How to Enable ROOT on CM13/CyanogenMod 13CYANOGENMOD 13 FOR VIBE P1 CM13 (CYANOGENMOD 13) MARSHMALLOW CUSTOM ROM INSTALLATION GUIDE:
Make sure that you have a custom recovery installed on the Vibe P1 (passion_row). If not then download the recovery from above downloads section and you can follow this guide: How to install recovery on Android using fastboot guide.
Points to NOTE on Backup:
– Try to avoid restoring apps backup using Titanium Backup. It may break things up.
– Don’t restore system data using Titanium Backup! It will definitely break the current installation.
– It is also discouraged to Restoring Apps + Data using Titanium Backup.-
Follow this if you are flashing CyanogenMod 13 ROM for the first time to your Vibe P1 (passion_row), or coming from another ROM:
- Download and Copy the GApps and Vibe P1 CM13 ROM ZIP to your phone.
- Boot into Recovery. Make sure to have a Custom recovery like CWM or TWRP or any other custom recovery.
- Wipe data factory reset, Cache partition, Dalvik Cache and Format the System partition.
– Here is a guide explaining how to wipe data using TWRP recovery.This will delete all your data on your phone. IGNORE IF YOU DON’T WANT TO OR IF YOU HAVE ALREADY DONE THIS. You may consider complete backup of your phone data or take a NANDROID backup of the current ROM.
– How to backup all data on your Android Device.
– how to take NANDROID backup using TWRP recovery. - First flash the CM13 ROM ZIP from device. Then flash the GApps zip from your device memory.
– Here is a post explaining how to flash a custom ROM using TWRP recovery. - Then flash the CM13 Marshmallow GApps package.
– Here is a post explaining how to flash GApps using TWRP recovery. - Reboot and Enjoy the CyanogenMod 13 Marshmallow ROM on your Vibe P1.
-
Upgrading from earlier version of CyanogenMod 13 ROM for Vibe P1 (passion_row):
- Copy the latest zip file of CyanogenMOd 13 for Vibe P1 to your phone.
- Boot into Recovery.
- Flash the latest CM ROM ZIP from your phone.
– Here is a post explaining how to flash a custom ROM using TWRP recovery. - Then flash the CM13 Marshmallow GApps package.
– Here is a post explaining how to flash GApps using TWRP recovery. - Reboot and Enjoy
Complete the initial setup and enjoy Android Marshmallow 6.0 with CyanogenMod 13 for Vibe P1 (passion_row). After this CyanogenMod 13 ROM installation you may want to enable ROOT access on your phone and here is how you can do that:
How to Enable ROOT Access on CM13/CyanogenMod 13Stay tuned or Subscribe to the Lenovo Vibe P1 forum For upcoming Android Nougat ROMs, CyanogenMod Custom ROMs, other ROMs and all other device specific topics.Mi 10 Lite was released recently and now we have a working port of GCam for Mi 10 Lite available to download. The compatible Google Camera port(s) are brought to you by Urnyx05.
Available GCam versions for Mi 10 Lite
Below are the available version(s) of GCam APK for Mi 10 Lite
- GCam 7.3
- GCam 7.2
The GCam 7.x versions(s) bring Astrophotography mode and better night sight pictures to the Mi 10 Lite along with other older features such as HDR+, Time lapse, portrait mode etc. The available GCam ports are compatible on Android 10.

Status of this Mi 10 Lite Google Camera
WHAT’S WORKING
– All basic featuresKNOWN ISSUES
– Nothing reported yetIf in case you have found any issue with the given Google Camera for Mi 10 Lite which is not mentioned above, Help us by mentioning the issues in comments, Our Fix google camera issues post may help you to fix the issues on your own.
[/su_note][su_note note_color=”#D8F1C6″ text_color=”#769958″ radius=”3″ class=”” id=””]
Where to Download GCam for Mi 10 Lite?
Below are the available download link to the compatible GCam APK files –
GCam 7.3 (Latest Version) (Any version of the GCam port should work)
GCam 7.2 Download
[/su_note]How to Install Google Camera APK on Mi 10 Lite?
- Download any GCam APK file from the above download link(s).
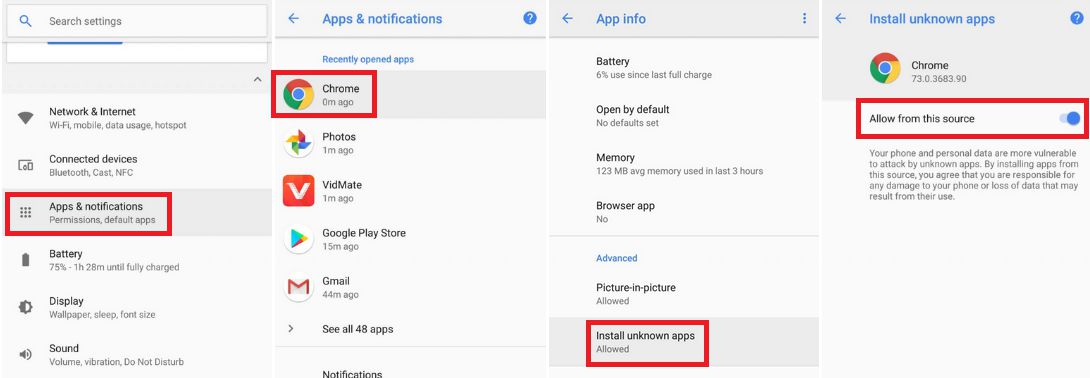
- To install apps from a third party app other than Play Store you need to enable app install from Unknown Sources on your Android device.
For Android 10 version, enable Install Unknown Apps from the app from which you are going to install the Google Camera APK.
For example: if you have downloaded the Google Camera apk file on Google chrome or firefox browser on your phone. Or you have downloaded and copied the apk file to the file browser and you want to install it from there.
Go to Settings > Apps & notifications > Open the app (Chrome, Firefox or file manager app etc) > Install unknown apps and enable Allow from this source
See the below screenshots that enables to install unknown apps on Pie for Chrome app (you need to enable on the app from where you want to install the apk):
- Once enabled, click on the downloaded app to install.
- Once installed you can clear the app data and open the app and enjoy the feature packed Google Camera APK on Mi 10 Lite.
How to shoot in astrophotography mode?
Google Camera version 7.0 and up comes with Astrophotography mode by default, but there are conditions that must be met to enable astrophotography mode. Usually, following conditions must be met to capture in Astrophotography mode if manually not force enabled:
- It can be enabled on Night Sight mode (only)
- The phone must be kept static (use a tripod or keep the phone somewhere to keep it static)
- There must be low light condition
- It may take few seconds for this mode to come up when the above conditions are met
[su_note note_color=”#FBF4DD” text_color=”#A38C68″ radius=”3″ class=”” id=””]- When the display shows something like “Astrophotography is on” or “Capturing cuttlefish” (or on some GCam ports nothing is shown at all) while capturing photo in Night Sight mode, then it is shooting in astrophotography mode otherwise not.
– If the GCam takes a lot of time usually more than 30 seconds then it is capturing in astro mode.
– When I kept the phone static in front of a good light source, the Astrophotography mode did not turn on.
So, make sure it is a low light environment.[/su_note]New features are keep on coming on the Google Camera app and hence there could be many versions of these ported apps for Mi 10 Lite. This page will always have all available working Google Camera for Mi 10 Lite.
Visit the following link for Mi 10 Lite updates on other Google Camera, Custom ROMs and all other device specific topics.Android Oreo 8.0 ROM, LineageOS 15 for Zenfone 2 Laser has now arrived via an UNOFFICIAL build. If you want the OFFICIAL update or some more Android Oreo ROMs then stay tuned to the Lineage OS 15 ROMs page or the AOSP Android Oreo devices list page. This LineageOS 15 for Zenfone 2 Laser (720p, 1080p) is brought to you by developer LuK1337 and luca020400.
DONATION TO DEVELOPER:
If you like this ROM then do consider a contribution to LuK1337 and luca020400 for their efforts:
Donate to LuK1337
Donate to luca020400DISCLAIMER:
THIS IS AN INITIAL ALPHA BUILD WHICH HAS MANY BUGS. HAVE A BACKUP BEFORE FLASHING THIS AND TRY AT YOUR OWN RISK. Installing a custom ROM on a Zenfone 2 Laser (720p, Z00L, ZE550KL) requires the bootloader to be unlocked on the Zenfone 2 Laser (720p, Z00L, ZE550KL) phone, which may VOID your warranty and may delete all your data. Before proceeding further you may consider backup all data on the phone. You are the only person doing changes to your phone and I cannot be held responsible for the mistakes done by you..content_layout_width { width: 270px; }
@media(min-width: 800px) { .content_layout_width { width: 500px; } }Content structure:
Status of ASUS Lineage OS 15 for Zenfone 2 Laser Oreo 8.0 ROM:
WHAT’S WORKING:
– RIL (Calls, SMS, Data)
– Wifi
– Bluetooth
– Video Playback
– Audio ( Record and Playback )
– Sensors
– Flash
– LED
– GPSKNOWN ISSUES:
– Camera
– Speakers don’t work on ZE600KL model
– SELinux is permissive
Devices supported by this package :
Asus Zenfone Laser ZE550KL ( Z00L / Z00LD )
Asus Zenfone Laser ZE550KG ( Z00W / Z00WD )
Asus Zenfone Laser ZE600KL ( Z00M / Z00MD / Z00MDD )REQUIRED LINKS AND FILES FOR LineageOS 15 for Zenfone 2 Laser OREO CUSTOM ROM:
- TWRP recovery link for Zenfone 2 Laser (720p, Z00L, ZE550KL) [Official TWRP does not work for this ROM]
– Here is theTWRP update guide for the Zenfone 2 Laser. This TWRP recovery guide requires an unlocked bootloader on the Zenfone 2 Laser.
- ROM Download link of Lineage OS 15 for Zenfone 2 Laser
- LineageOS 15 GApps download link for Zenfone 2 Laser (720p, Z00L, ZE550KL) LineageOS 15 Oreo 8.0 ROM
Root binary is NOT inbuilt in Lineage OS 15, so you may need a separate SuperSu package or LineageOS su binary to install to gain ROOT access. Here is Lineage OS 15 Rooting guide
If there is no in-built ROOT or it does not work for some reason then you can try SuperSU rooting guide to enable ROOT access.
HOW TO INSTALL/DOWNLOAD/FLASH/UPDATE Lineage OS 15 FOR Zenfone 2 Laser OREO CUSTOM ROM:
-
Follow this if you are flashing LineageOS 15 for Zenfone 2 Laser (720p, Z00L, ZE550KL) for the first time, or coming from another ROM:
Points to NOTE:
– Try to avoid restoring apps backup using Titanium Backup. It may break things up.
– Don’t restore system data using Titanium Backup! It will definitely break the current installation.
– It is also discouraged to Restoring Apps + Data using Titanium Backup.- Download and Copy the GApps and Zenfone 2 Laser (720p, Z00L) LineageOS 15 ROM ZIP to your phone.
- Boot into Recovery. Make sure to have a Custom recovery like CWM or TWRP or any other custom recovery. If not then follow the Custom Recovery Installation Guide for Zenfone 2 Laser (it’s a generic guide which will work for TWRP as well as CWM recovery or any other recovery)
- Wipe data factory reset, Cache partition, Dalvik Cache and Format the System partition.
– Here is a guide explaining how to wipe data using TWRP recovery.This will delete all your data on your phone. You may consider complete backup of your phone data or take a NANDROID backup of the current ROM
– How to backup all data on your Android Device
– how to take NANDROID backup using TWRP recovery - First flash the Lineage OS 15 for Zenfone 2 Laser ROM ZIP from device. Then flash the GApps zip from your device memory.
– Here is a post explaining how to install Lineage OS - Then reboot into recovery (don’t skip this) and flash the Gapps for LineageOS 15 package.
– Here is a post explaining how to flash GApps using TWRP recovery. - Reboot and Enjoy the Oreo 8.0 LineageOS 15 ROM for Zenfone 2 Laser.
-
Upgrading from earlier version of Lineage OS 15 for Zenfone 2 Laser (720p, Z00L, ZE550KL):
- Copy the latest Zenfone 2 Laser Lineage 15 ROM ZIP file to your phone.
- Boot into Recovery.
- Flash the latest CM ROM ZIP from your phone.
– Here is a post explaining how to install LineageOS - Then flash the Lineage 15 Oreo GApps package.
– Here is a post explaining how to flash GApps using TWRP recovery. - Reboot and Enjoy
Complete the initial setup and enjoy Android Oreo 8.0 with Lineage OS 15 for Zenfone 2 Laser. After the installation of LineageOS 15 for Zenfone 2 Laser you may want to enable ROOT access on your phone and here is how you can do that:
How to ROOT for LineageOS 15.Stay tuned or Subscribe to the Zenfone 2 Laser (720p, Z00L, ZE550KL) forum For other Android Oreo, Nougat ROMs, LineageOS 15 ROMs, other ROMs and all other device specific topics.If you have found any BUGs or have any issues with this ROM then here is the dev thread for this ROM.
Xiaomi sub brand Black Shark has recently unveiled the Black Shark 3 Pro which is its own gaming line up series. Today I have brought you the bootloader unlock guide for Black Shark 3 Pro.
If you wan to install TWRP or LineageOS or root your Black Shark 3 Pro, you need to unlock the bootloader of your phone. More on bootloader unlocking in the later section.

What is a Bootloader and why is it locked on Black Shark 3 Pro?
If you are a new user on this website or a new Android user then you might not know what bootloader unlock is and why do you need to unlock the same.
In computing, the startup process of a device is called as boot-up. During this boot-up process, the device is unusable by the user until it boots-up completely.
A boot-loader is a piece of software that loads other software(s) during the boot-up process. In Android, this bootloader is locked to make sure no-one can alter what is being loaded by this bootloader.
Usually, a user can install software only after the boot process is complete, and when the device is ready to use. So, basically the bootloader software is not something that is meant for the user but to run the device. If not secured, the user may alter the boot-up process leaving the device unusable.
Locking the bootloader ensures that the software integrity of the phone is trusted, meaning it has not been modified from the stock and hence used to provide or discard warranty, etc.
[su_note note_color=”#F9D9D9″ text_color=”#AA4343″ radius=”3″ class=”” id=””]DISCLAIMER:
Unlocking the bootloader may void the warranty of your device and erase all user data. So, make sure that you are out of the warranty period or you are sure about what you are doing with your device. Also, make sure to backup all important data out of the phone.
[/su_note]Requirements for this Black Shark 3 Pro Bootloader Unlock Process
Once you understand what is the bootloader and want to unlock it on your Black Shark 3 Pro then below are the few things that you need to do or download first.
[su_note note_color=”#D8F1C6″ text_color=”#769958″ radius=”3″ class=”” id=””]- 30% or more battery charge (just to be on the safe side)
- USB Drivers to be installed on your PC
- Install ADB and Fastboot
– 15 Seconds ADB Installer for Windows
– Minimal ADB and Fastboot for Windows
– ADB Fastboot for Linux and MAC
[/su_note]
How to Unlock Bootloader on Black Shark 3 Pro?
- Download and install the USB drivers and then install the ADB and Fastboot binaries using the above installer download link for Windows or Linux or MAC.
- Enable USB Debugging under Developer Options.
[su_note note_color=”#D7E3F4″ text_color=”#728095″ radius=”3″ class=”” id=””]If you don’t know how to do this then here is:
– How to Enable Developer Options
– How to Enable USB Debugging and OEM Unlock[/su_note] - Now connect the Black Shark 3 Pro to the PC using a USB cable.
- On the computer, open a command prompt (on Windows) or terminal (on Linux or macOS) window, and type the following command to restart your phone into fastboot mode or bootloader mode:
adb reboot bootloader[su_note note_color=”#FBF4DD” text_color=”#A38C68″ radius=”3″ class=”” id=””]- If your Android Phone asks permission such as ‘Allow USB debugging‘ then just tap on OK to proceed.[/su_note]
[su_note note_color=”#D7E3F4″ text_color=”#728095″ radius=”3″ class=”” id=””]- You can also enter into fastboot or bootloader mode by pressing Power Button and Volume Down button key combinations.[/su_note] - Now when your Black Shark 3 Pro is on the bootloader / fastboot mode just execute one of the below command on the command line:
fastboot oem bs_unlock[su_note note_color=”#FBF4DD” text_color=”#A38C68″ radius=”3″ class=”” id=””]This will Unlock the bootloader and delete all user data present on the phone. Here is a Step by step guide to take full backup of your phone data[/su_note]
Other useful links for Black Shark 3 Pro
TWRP for Black Shark 3 Pro
Black Shark 3 Pro GCamWell, that’s all on this Black Shark 3 Pro bootloader unlock guide. If you face any kind of issue while following this guide, then just leave a comment here to get a response back.
Like it? You can always visit the Black Shark 3 Pro (klein) page to get more device specific topics.Android Marshmallow ROM, LineageOS 13 for Andromax A has now arrived via an UNOFFICIAL build. If you want some more LineageOS ROMs or wanna taste the OFFICIAL LineageOS build then stay tuned to the LineageOS 13 ROM page and LineageOS 14.1 ROMs List. This Andromax A LineageOS 13 is brought to you by developer Phoenix_290401
DONATION TO DEVELOPER(S):
No donation link found for Phoenix_290401.
DISCLAIMER:
THIS IS AN INITIAL TEST BUILD WHICH MAY NOT BOOT AT ALL AND EVEN IF IT BOOTS IT MAY HAVE MANY MORE BUGS THAN YOU CAN IMAGINE. HAVE A BACKUP BEFORE FLASHING THIS AND TRY AT YOUR OWN RISK. Installing a custom ROM may require the bootloader to be unlocked on Andromax A, which may VOID your warranty and may delete all your data. Before proceeding further you may consider backup all data on the phone. You are the only person doing changes to your phone and I cannot be held responsible for the mistakes done by you.Status of LineageOS 13 for Andromax A Marshmallow ROM download:
WHAT’S WORKING:
– UnknownKNOWN ISSUES:
– Unknown
REQUIRED LINKS AND FILES FOR LineageOS 13 for Andromax A MARSHMALLOW CUSTOM ROM:
- TWRP link for Andromax A
– Here is: How to install Custom Recovery: Installation Guide for Andromax A
– This TWRP recovery guide requires an unlocked bootloader on the Andromax A - ROM Download Link of Andromax A LineageOS 13 ROM (A16C3H)
- LineageOS 13 GApps download for Andromax A LineageOS 13 Marshmallow ROM
Root binary is NOT inbuilt in LineageOS 13, so you may need a separate SuperSu package or LineageOS su binary to install to gain ROOT access. Here is How to Enable ROOT on LineageOS 13
If there is no in-built ROOT or it does not work for some reason then you can try flashing SuperSU zip using recovery to gain ROOT access.HOW TO INSTALL/DOWNLOAD/FLASH/UPDATE Andromax A LineageOS 13 MARSHMALLOW CUSTOM ROM:
-
Follow this if you are flashing LineageOS 13 for Andromax A for the first time, or coming from another ROM:
Points to NOTE:
– Try to avoid restoring apps backup using Titanium Backup. It may break things up.
– Don’t restore system data using Titanium Backup! It will definitely break the current installation.
– It is also discouraged to Restoring Apps + Data using Titanium Backup.- Download and Copy the GApps and LineageOS 13 for Andromax A ROM ZIP to your phone.
- Boot into Recovery. Make sure to have a Custom recovery like CWM or TWRP or any other custom recovery. If not then follow the Custom Recovery Installation Guide for Andromax A (A16C3H) (it’s a generic guide which will work for TWRP as well as CWM recovery or any other recovery)
- Wipe data factory reset, Cache partition, Dalvik Cache and Format the System partition.
– Here is a guide explaining how to wipe data using TWRP recovery.This will delete all your data on your phone. You may consider complete backup of your phone data or take a NANDROID backup of the current ROM
– How to backup all data on your Android Device
– how to take NANDROID backup using TWRP recovery - First flash the Andromax A LineageOS 13 ROM ZIP from device. Then flash the GApps zip from your device memory.
– Here is a post explaining how to install LineageOS. - DO NOT REBOOT yet. Then flash the LineageOS 13 GApps package.
– Here is a post explaining how to flash LineageOS 13 GApps using TWRP recovery. - Reboot and Enjoy the Marshmallow LineageOS 13 ROM for Andromax A (A16C3H).
-
Upgrading from earlier version of Andromax A LineageOS 13:
- Copy the latest LineageOS 13 for Andromax A ROM ZIP file to your phone.
- Boot into Recovery.
- Flash the latest LineageOS ROM ZIP from your phone.
– Here is a post explaining how to install LineageOS. - Then flash the LineageOS 13 Marshmallow GApps package.
– Here is a post explaining how to flash GApps using TWRP recovery. - Reboot and Enjoy
Complete the initial setup and enjoy Android Marshmallow with LineageOS 13 for Andromax A (A16C3H). After the installation of Andromax A LineageOS 13 ROM you may want to enable ROOT access on your phone and here is how you can do that:
How to Enable ROOT on LineageOS 13.Stay tuned or Subscribe to the Smartfren Andromax A (A16C3H) forum For other Android Custom ROMs, LineageOS 13 ROMs, other ROMs and all other device specific topics. - TWRP for Grand DUOS (i9082)


