-
Search Results
-
There is good news that the Redmi K30 5G has received MIUI 12 beta update. This guide provides a direct download link and a step-by-step guide on how to install MIUI 12 on Redmi K30 5G.
This latest MIUI 12 download is announced lately for Redmi K30 5G including many other Xiaomi phones. This page will be updated with the other future updates of MIUI 12 for the device.
[su_note note_color=”#F9D9D9″ text_color=”#AA4343″ radius=”3″ class=”” id=””]Currently this is just a Beta release of the new MIUI which may not be stable enough to be used as a daily driver. So, make sure that you keep a copy of the stable MIUI for your phone.
This update requires an unlocked bootloader, so you should consider keeping a backup of all the data on your phone.[/su_note]
MIUI 12 Features
The latest MIUI 12 has loads of features that are unmatched with any other custom ROM available out there.
Below are some the noteworthy key features from MIUI 12:- Dynamic weather that changes the screen based on realtime climate on your place
- New icon animations and visually appealing graphics
- Certified Privacy protection features
- Application behavior is reported to the user to take more control on what to allow and what to restrict
- High-risk behaviors are directly stopped without the intervention of the user
- Picture-in-Picture (PIP) application window
- The system-wide dark theme that supports thousands of Apps
- Huawei Health now provides Automatic health recording statistics at a very minimal power consumption
- Many more teeny tiny features like Game acceleration, Upcoming: a built-in task organizer and reminder, Smart travel for travel reminders, a minimalistic mode for elders, etc.
Redmi K30 5G MIUI 12 Beta Update Information
This is the latest MIUI 12 beta version for the phone and below the details of the current released update file:
- Build date: 27th April 2020
- Security patch: April 2020
- Build version: 20.4.27
- Android version: Android 10
- File size: 2.7 GB
[su_note note_color=”#D8F1C6″ text_color=”#769958″ radius=”3″ class=”” id=””]
Where to Download MIUI 12 for Redmi K30 5G?
Below is a direct link to download the recovery flashable OTA zip file:
- MIUI 12 Download for Redmi K30 5G:
[CMDM-download id=111991] - TWRP for Redmi K30 5G to install MIUI 12
- How to install TWRP
- Xiaomi Bootloader unlock guide – required to install TWRP on Redmi K30 5G
[/su_note]
How To Install MIUI 12 on Redmi K30 5G?
[su_note note_color=”#F9D9D9″ text_color=”#AA4343″ radius=”3″ class=”” id=””]MIUI 12 is in beta, which may have many bugs. If you don’t know what you are doing, STOP right here!. If you still proceed, don’t blame me for any consequences.[/su_note]
Installing MIUI 12 Using TWRP (if you have not registered for beta testing)
[su_note note_color=”#FBF4DD” text_color=”#A38C68″ radius=”3″ class=”” id=””]If you have not registered for MIUI 12 BETA testing then this is the method you have to follow.[/su_note]
- Download the Redmi K30 5G MIUI 12 zip file and keep it in your PC (for ADB Sideload method) or copy it to the thone.
- Boot into the TWRP Recovery (with SAR support) to install MIUI 12 on Redmi K30 5G.
[su_note note_color=”#D7E3F4″ text_color=”#728095″ radius=”3″ class=”” id=””]- Make sure to have a Custom recovery like a TWRP recovery or any other custom recovery.
– If not then unlock the bootloader and then download the TWRP recovery from Downloads link and follow the guide to install TWRP (it’s a generic guide which will work for TWRP as well as any other recovery)[/su_note] - Wipe system, data, and cache partition.
[su_note note_color=”#D7E3F4″ text_color=”#728095″ radius=”3″ class=”” id=””]- Here is a guide explaining how to wipe using TWRP recovery.[/su_note]
[su_note note_color=”#F9D9D9″ text_color=”#AA4343″ radius=”3″ class=”” id=””]This will delete all your data on your phone. You may consider complete backup of your phone data or take a NANDROID backup of the current ROM
– Backup data on Android
– NANDROID backup on TWRP recovery[/su_note] - ADB sideload the MIUI 12 zip file
(or)
If ADB sideload is not working on recovery, just flash the zip using TWRP or the recovery you are using. - Once installed, reboot the phone and enjoy MIUI 12 update on Redmi K30 5G.
Installing MIUI 12 for Registered Beta testers
[su_note note_color=”#FBF4DD” text_color=”#A38C68″ radius=”3″ class=”” id=””]If you have registered for MIUI 12 BETA testing then this is the method you should follow.[/su_note]
- Download the MIUI 12 beta zip file from the above download link.
- Create a folder in the name of “downloaded_rom” (if it is not present already) and then copy the above-downloaded zip file inside that folder.
[su_note note_color=”#D7E3F4″ text_color=”#728095″ radius=”3″ class=”” id=””]It is mandatory to create the directory on your phone.[/su_note] - Now, go to Settings > About Phone > System update
- Then click the three dots (menu) at the top right corner of the screen and select the Choose update package.
- Browse and select the MIUI 12 beta update file that you have copied inside the downloaded_rom folder
The Update process will start automatically. Once the installation is completed the phone will restart automatically.
In case you face any problem installing this MIUI 12 update on Redmi K30 5G, you can log in and leave a reply with your concern to get a reply.
Stay tuned or Subscribe to the Redmi K30 5G (picasso) forum For other Android Pie, Android Oreo ROMs, Nougat ROMs, or other ROMs and all other device specific topics.This Marshmallow ROM, Android M for Nexus 4 is brought to you by Dmitry Grinberg. Google is not supporting Android 6.0 Marshmallow for Nexus 4 and hence this is an unofficial build.
 DICLAIMER:
Installing custom ROM requires a custom recovery to be installed on your device, which may VOID your warranty and may delete all your data. Before proceeding further you may consider backup your all data. Understand that YOU are the only person making changes to your phone. Neither we nor the developer can be held responsible for the disaster that may happen to your device after following this guide.
Recommended files for Android M for Nexus 4 ROM installation:
TWRP recovery guide for Nexus 4
ROM download link
Android M Google Apps download link
SuperSu download link [OPTIONAL]Nexus 4 AOSP Marshmallow ROM flashing guide:
STEP 1:Copy the ROM zip and the GApps zip file to your internal memory (By using a USB cable or via adb push command).
STEP 2:Reboot into recovery by pressing key combination or type the following command if you are on a PC:
$ adb reboot recovery
STEP 3:Initiate a clean flash.
Wipe Data/Factory Reset.
Format /system and then Format Cache partitionNOTE:
This step may delete all your data.
Consider backup your data out of your phone.
Data Backup guideSTEP 4:Select the Install Zip from SDcard option.
Select the ROM zip file where you have kept in the SD card and do the same for GApps also.OnePlus 3 Resurrection Remix Marshmallow Custom ROM is based on Android Marshmallow 6.0.1. Current status of this build is not known at this moment. It is strongly recommended that you take a backup before flashing this ROM.
DISCLAIMER:
Installing Resurrection Remix Custom ROM on OnePlus 3 requires a custom recovery to be installed on OnePlus 3 which in-turn requires the Bootloader to be unlocked, which may VOID the warranty and may delete all data on your phone. Before proceeding further you may consider backup your all data. Understand that YOU are the only person making changes to your phone. Neither we nor the developer can be held responsible for the disaster that may happen to your device after following this guide.
 [OnePlus 3 Resurrection Remix Marshmallow ROM]
REQUIRED DOWNLOADS AND LINKS FOR ONEPLUS 3 RESURRECTION REMIX ROM FLASHING:
– Unlocked bootloader on OnePlus 3
– TWRP recovery for One Plus 3
– ROM Download link (Download the latest file as per the build date)
– Marshmallow GApps download link for OnePlus 3 Resurrection Remix ROM– For more Custom ROMs, TWRP Recovery Installation guide, Rooting Guide you can have a look at the OnePlus 3 forum and also you can subscribe to stay updated for this device specific topics.
– Android Nougat is already released and you are wondering when OnePlus 3 will get it then here is a OnePlus 3 CyanogenMod 14 Nougat 7.0 ROM update guide.HOW TO INSTALL ONEPLUS 3 RESURRECTION REMIX MARSHMALLOW CUSTOM ROM:
-
Follow this if you are flashing Resurrection Remix ROM for the first time to your OnePlus 3 (codename: rain), or coming from another ROMs or Stock ROM:
- Install the TWRP recovery on the OnePlus 3 (codename: rain). (Bootloader has to be unlocked before flashing a recovery). Here is a simple guide for How to unlock Bootloader on OnePlus 3 and TWRP recovery installation on OnePlus 3 Device.
– If you have the bootloader unlocked but you don’t have a recovery then download it from the above link and follow the below guide to flash:
How to Install TWRP on Android using Fastboot. - Then download and Copy the GApps and Resurrection Remix ROM ZIP to OnePlus 3.
- Now, boot into TWRP Recovery.
- Take a backup using a synchronization application or if you have TWRP installed then you can take a NANDROID backup using the TWRP itself.
- Wipe data factory reset, Cache partition, Dalvik Cache and Format the System partition. Here is a guide explaining how to wipe data using TWRP recovery.
- First flash the OnePlus 3 Resurrection Remix ROM ZIP from phone. Then flash the GApps zip from your device memory.
– Here is a post explaining how to flash a custom ROM using TWRP recovery.
Use the same guide to flash the GApps too. - Reboot and Enjoy the Resurrection Remix Marshmallow ROM on your OnePlus 3 (codename: rain).
- Install the TWRP recovery on the OnePlus 3 (codename: rain). (Bootloader has to be unlocked before flashing a recovery). Here is a simple guide for How to unlock Bootloader on OnePlus 3 and TWRP recovery installation on OnePlus 3 Device.
-
Upgrading OnePlus 3 from earlier version of Resurrection Remix ROM:
- Copy the Resurrection Remix ROM ZIP file to OnePlus 3 phone.
- Boot into Custom Recovery.
- Flash the latest RR ROM ZIP from your phone.
– Here is a post explaining how to flash a custom ROM using TWRP recovery. - Reboot and Enjoy
Points to NOTE:
– Try to avoid restoring apps backup using Titanium Backup. It may break things up.
– Don’t restore system data using Titanium Backup! It will definitely break the current installation.
– It is also discouraged to Restoring Apps + Data using Titanium Backup.The first boot may take long time, so don’t panic and be sure that you have enough battery backup. Let the phone reboot and then enjoy the official Resurrection Remix Marshmallow Custom ROM on OnePlus 3 (codename: rain).
That’s all guys. This is a beta build and an unofficial build. If you have some concerns regarding this ROM then just login and reply to get instant help.After this Resurrection Remix ROM installation you may want to enable ROOT access on your phone and here is how you can do that:
How to Enable ROOT Access on CM13/CyanogenMod 13 or any CyanogenMod based ROMs.The above ROOT guide is for CyanogenMod ROM but it should work just fine for the Resurrection Remix ROM too because the Resurrection Remix is built on CyanogenMod ROM.
Google camera enhances the photography experience on any phone it works. Today we have working port(s) of Google Camera (or) GCam for Oppo Reno Ace 2. The compatible Google Camera port(s) are brought to you by Arnova8G2 and Urnyx05.
Available GCam versions for Oppo Reno Ace 2
Below are the available version(s) of Google Camera APK for Oppo Reno Ace 2
- GCam 7.3
The GCam 7.x versions(s) bring Astrophotography mode and better night sight mode to the Oppo Reno Ace 2 along with other older features such as HDR+, Timelapse, portrait mode, etc. The available GCam port(s) are compatible on Android 10.

Status of this Oppo Reno Ace 2 Google Camera
WHAT’S WORKING
– All basic featuresKNOWN ISSUES
– Nothing reported yetIf in case you have found any issue with the given Google Camera for Oppo Reno Ace 2 which is not mentioned above, Help us by mentioning the issues in comments, Our Fix google camera issues post may help you to fix the issues on your own.
[/su_note][su_note note_color=”#D8F1C6″ text_color=”#769958″ radius=”3″ class=”” id=””]
Where to Download GCam for Oppo Reno Ace 2?
Below are the available download link to the compatible GCam APK files –
GCam 7.3 (Latest Version)
GCam 7.3 (Latest Version)
[/su_note]How to Install Google Camera APK on Oppo Reno Ace 2?
- Download any GCam APK file from the above download link(s).
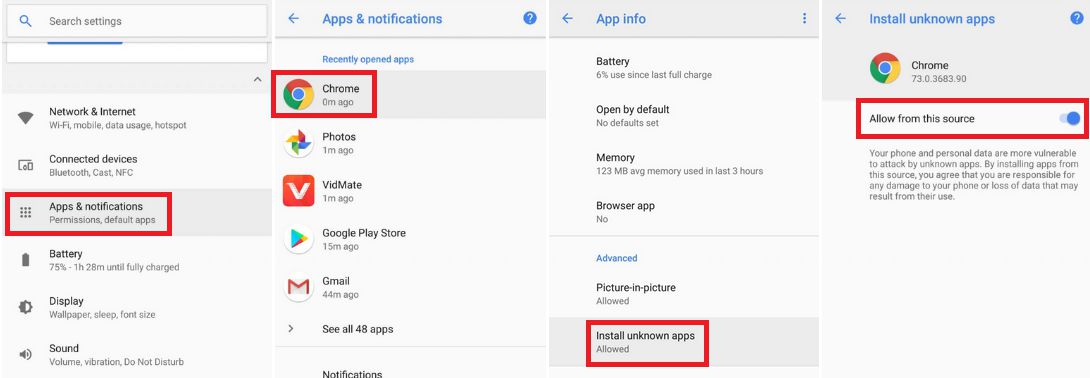
- To install apps from a third-party app other than Play Store you need to enable app installation from Unknown Sources on your Android device.
For Android 10 version, enable Install Unknown Apps from the app from which you are going to install the Google Camera APK. For example: if you have downloaded the Google Camera apk file on Google chrome or firefox browser on your phone. Or you have downloaded and copied the apk file to the file browser and you want to install it from there.
Go to Settings > Apps & notifications > Open the app (Chrome, Firefox or file manager app etc) > Install unknown apps and enable Allow from this source
See the below screenshots that enables to install unknown apps on Pie for Chrome app (you need to enable on the app from where you want to install the apk):
- Once enabled, click on the downloaded app to install.
- Once installed you can clear the app data and open the app and enjoy the feature packed Google Camera APK on Oppo Reno Ace 2.
How to shoot in astrophotography mode?
Google Camera version 7.0 and up comes with Astrophotography mode by default, but there are conditions that must be met to enable astrophotography mode. Usually, following conditions must be met to capture in Astrophotography mode if manually not force enabled:
- It can be enabled on Night Sight mode (only)
- The phone must be kept static (use a tripod or keep the phone somewhere to keep it static)
- There must be low light condition
- It may take few seconds for this mode to come up when the above conditions are met
[su_note note_color=”#FBF4DD” text_color=”#A38C68″ radius=”3″ class=”” id=””]- When the display shows something like “Astrophotography is on” or “Capturing cuttlefish” (or on some GCam ports nothing is shown at all) while capturing photo in Night Sight mode, then it is shooting in astrophotography mode otherwise not.
– If the GCam takes a lot of time usually more than 30 seconds then it is capturing in astro mode.
– When I kept the phone static in front of a good light source, the Astrophotography mode did not turn on.
So, make sure it is a low light environment.[/su_note]New features are keep coming on the Google Camera app and hence there could be many versions of these ported apps for Oppo Reno Ace 2. This page will always have all available working Google Camera for Oppo Reno Ace 2.
Visit the following link for Oppo Reno Ace 2 updates on other Google Camera, Custom ROMs and all other device specific topics.