- Search Results
Good news. You can now download and install LineageOS 16 for Huawei P20 Pro. Here is how to install LineageOS 16 on Huawei P20 Pro, with a step-by-step guide. This LineageOS 16 build is brought to you by developer LuK1337.
Follow the links to get other LineageOS 16 and Android Pie ROM builds.
DONATION TO DEVELOPER(S)/PROJECT:
If you like this ROM then do consider for a contribution to LuK1337 and LineageOS project:
– Donate to LuK1337
– Donate to LineageOS project

[su_note note_color=”#F9D9D9″ text_color=”#AA4343″ radius=”3″ class=”” id=””]DISCLAIMER:
THIS IS AN INITIAL BUILD OF LineageOS 16 FOR Huawei P20 Pro, WHICH MAY HAVE MANY BUGS.
MAKE SURE TO BACKUP ALL DATA OF YOUR PHONE.
FLASH AT YOUR OWN RISK.[/su_note][su_note note_color=”#FBF4DD” text_color=”#A38C68″ radius=”3″ class=”” id=””]Installing a custom ROM requires an unlock bootloader on Huawei P20 Pro, which has been abandoned now by Huawei.
Because of the above said fact, devices with already unlocked bootloader can only flash this LineageOS 16 for Huawei P20 Pro.
You are the only person doing changes to your phone; neither the developer nor I can be held responsible for the mistakes done by you.[/su_note]Status of the Huawei P20 Pro LineageOS 16 ROM:
WHAT’S WORKING:
– Almost EverythingKNOWN ISSUES:
– IMS
– Type-C audio (partially broken)REQUIRED GUIDES AND DOWNLOADS TO INSTALL LineageOS 16 ON Huawei P20 Pro:
- TWRP for Huawei P20 Pro (charlotte) for this Huawei P20 Pro LineageOS 16 ROM
- How to install TWRP recovery
- Huawei P20 Pro unlock bootloader – required to install TWRP recovery
- ROM download link for Huawei P20 Pro LineageOS 16
- MindTheGApps for LineageOS 16 / GApps for LineageOS 16
- How to root LineageOS 16
HOW TO DOWNLOAD AND INSTALL LineageOS 16 ON Huawei P20 Pro – Android 9 Pie CUSTOM ROM:
[su_note note_color=”#D7E3F4″ text_color=”#728095″ radius=”3″ class=”” id=””]
Following are the two sub-sections of this Huawei P20 Pro LineageOS 16 guide:- First time installation of LineageOS 16 on Huawei P20 Pro
- Upgrading LineageOS 16 on Huawei P20 Pro from a previous build of LineageOS 16 ROM
[/su_note]
Flashing LineageOS 16 on Huawei P20 Pro for the first time:
[su_note note_color=”#FBF4DD” text_color=”#A38C68″ radius=”3″ class=”” id=””]
Points to NOTE:- Try to avoid restoring apps backup using Titanium Backup. It may break things up.
- Don’t restore system data using Titanium Backup! It will definitely break the current installation.
- It is also discouraged to Restoring Apps + Data using Titanium Backup.
[/su_note]
- Download and Copy the Huawei P20 Pro LineageOS 16 ROM and GApps ZIP file to your phone.
- Boot into the TWRP custom Recovery to install this LineageOS 16 on Huawei P20 Pro.
[su_note note_color=”#D7E3F4″ text_color=”#728095″ radius=”3″ class=”” id=””]- Make sure to have a Custom recovery like a TWRP recovery or any other custom recovery.
– If not then download the TWRP recovery from Downloads link and follow the Custom Recovery Installation Guide (it’s a generic guide which will work for TWRP as well as any other recovery)
– Installing TWRP recovery requires an unlocked bootloader on Huawei P20 Pro[/su_note] - Wipe the data partition (or do a factory reset), Cache partition, Dalvik Cache or ART cache and Format the System partition.
[su_note note_color=”#D7E3F4″ text_color=”#728095″ radius=”3″ class=”” id=””]- Here is a guide explaining how to wipe using TWRP recovery.[/su_note]
[su_note note_color=”#FBF4DD” text_color=”#A38C68″ radius=”3″ class=”” id=””]This will delete all your data on your phone. You may consider complete backup of your phone data or take a NANDROID backup of the current ROM
– How to backup all data on your Android Device
– how to take NANDROID backup using TWRP recovery[/su_note] - First flash the LineageOS 16 for Huawei P20 Pro
[su_note note_color=”#D7E3F4″ text_color=”#728095″ radius=”3″ class=”” id=””]- Here is a post explaining how to install recovery flashable zip file[/su_note] - Then install the MindTheGapps for LineageOS 16 package.
[su_note note_color=”#D7E3F4″ text_color=”#728095″ radius=”3″ class=”” id=””]- Here is a post explaining how to install GApps using TWRP recovery.[/su_note] - Reboot and Enjoy the Android 9 Pie LineageOS 16 on Huawei P20 Pro.
Upgrading from earlier version of LineageOS 16 on Huawei P20 Pro (charlotte):
- Copy the latest ROM zip file of LineageOS 16 for Huawei P20 Pro, LineageOS 16 GApps and/or Magisk ROOT package to the phone
- Boot into Recovery.- Make sure you have a latest custom Recovery that should be able to flash the LineageOS 16 ROM update.
- Format or wipe the system partition from the custom recovery menu.
- Install the LineageOS 16 for Huawei P20 Pro.
[su_note note_color=”#D7E3F4″ text_color=”#728095″ radius=”3″ class=”” id=””]- Here is a post explaining how to install LineageOS[/su_note] - Reboot and see you have the GApps and ROOT access or NOT.
[su_note note_color=”#D8F1C6″ text_color=”#769958″ radius=”3″ class=”” id=””]- Gapps is built in such a way that it will sustain across ROM updates.[/su_note] - If you don’t have GApps after upgrading the LineageOS 16 on Huawei P20 Pro, then flash the GApps.
[su_note note_color=”#D7E3F4″ text_color=”#728095″ radius=”3″ class=”” id=””]- Here is a post explaining how to flash GApps using TWRP recovery.[/su_note] - If you don’t have ROOT after upgrading the LineageOS 16 on Huawei P20 Pro, then flash the SuperSU or Magisk or the Lineage SU binary.
[su_note note_color=”#D7E3F4″ text_color=”#728095″ radius=”3″ class=”” id=””]- Here is a post explaining How to Enable ROOT on LineageOS 16 ROM[/su_note] - Once everything is done, reboot and Enjoy the LineageOS 16 on Huawei P20 Pro.
[su_note note_color=”#D8F1C6″ text_color=”#769958″ radius=”3″ class=”” id=””]Complete the initial setup and enjoy Android 9 Pie with LineageOS 16 on Huawei P20 Pro.[/su_note]
After installing LineageOS 16 on Huawei P20 Pro you may want to enable ROOT access on your phone and here is how you can do that:
– LineageOS 16 ROOT.
– GCam for Android Pie (this page contains a huge list of GCam for all available devices)[su_note note_color=”#D7E3F4″ text_color=”#728095″ radius=”3″ class=”” id=””]If there is no ROOT access for some reason even after installing the LineageOS SU binary, then you can try SuperSU rooting guide to enable ROOT access.[/su_note]
Stay tuned or Subscribe to the Huawei P20 Pro (charlotte) LineageOS forum For other Android Pie, Android Oreo ROMs, Nougat ROMs, or other ROMs and all other device specific topics.Great NEWS For Micromax A116/IQ451/A919i/wikocink5/QmobleA600 phone users. Developer sai3811 brings the Samsung Galaxy S5 ROM for Micromax A116 Canvas HD users based on Android Jelly Bean that gives you the feel of Samsung Galaxy S5 on your Canvas HD.
 [Samsung Galaxy S5 ROM for Micromax Canvas HD A116]DISCLAIMER:
Installing custom ROM requires a custom recovery to be installed on your device, which may VOID your warranty and may delete all your data.
Before proceeding further you may consider backup your all data. Understand that YOU are the only person making changes to your phone. Neither we nor the developer can be held responsible for the disaster that may happen to your device after following this guide.Features :
– Samsung Galaxy NOTE S-Pen, S-NOTE, S-Planner and S-Memo feature
Air command and Air gesture
– MULTI WINDOW
– Working GPS and USB OTG
– And many more featuresWARNING:
Installing custom ROMs require custom recovery to be installed on your device which may lead to VOID your warranty and erase your data.
Understand the fact that I am not at all responsibility for the disasters going to happen because of your mistakes.
Consider backing up your data to avoid data loss.Pre-requisites for this ROM installation:
– ROM download link
– Custom recoveryInstalling Galaxy S5 ROM for Micromax A116 Canvas HD:
– Before starting the actual installation be sure to backup all your data.
– Copy all your application data and settings using Titanium backup or any other application.
– Perform a nandroid backup using CWM or TWRP custom recovery.
– Now copy all your internal phone data to a PC.
– After completing the above things head on to the following installation guide.STEP 1:Copy the ROM package on your phone’s SD card.
And then boot into recovery.STEP 2:Wipe data and do a factory reset.
Wipe Dalvik Cache and Cache
Then wipe System Data.STEP 3:Flash the ROM zip package using the custom recovery
STEP 4:Reboot your phone and check out the Galaxy S5 ROM
Please visit the ROM thread on xda to see how to activate Air command, Air gesture, Multi window and GPS Fix.
Below is the link for the Galaxy S5 development thread by sai3811.
SourceHTC 10 AOKP (Codename: pme) Marshmallow Custom ROM is an UNOFFICIAL Android Marshmallow build for HTC 10. This HTC 10 AOKP ROM is brought to you by developer STELIX PippoX3. Current status of this ROM is UNKNOWN. It is strongly recommended that you take either a NANDROID backup or take a complete sync of your phone data.
DISCLAIMER:
Installing custom ROM requires a custom recovery to be installed on the HTC 10, which in-turn may require the bootloader to be unlocked on HTC 10 which may VOID your warranty and may delete all the data on the phone. Before proceeding further you may consider backup your all data. You are the only person making changes on your phone and neither we nor the developer can be held responsible for the mistakes done by YOU.
REQUIRED DOWNLOADS AND LINKS FOR HTC 10 2016 AOKP ROM FLASHING:
- Unlocked bootloader on HTC 10
- TWRP recovery for the HTC 10 (codename: pme)
– TWRP recovery installation guide for the HTC 10 - ROM Download link for HTC 10 AOKP
- Google Apps download link for HTC 10 AOKP ROM
- Download link to STABLE SuperSU for rooting
If you want then you can have a look on the HTC 10 Resurrection Remix Marshmallow ROM installation guide and the HTC 10 CyanogenMod 13 Marshmallow ROM installation guide.
HTC 10 AOKP MARSHMALLOW CUSTOM ROM INSTALLATION GUIDE:
Before flashing CyanogenMod 13 on HTC 10, make sure that you have a custom recovery installed on your HTC 10. If not then download the recovery from above downloads section and you can follow this TWRP recovery installation guide on HTC 10.
Points to NOTE on Backup:
– Try to avoid restoring apps backup using Titanium Backup. It may break things up.
– Don’t restore system data using Titanium Backup! It will definitely break the current installation.
– It is also discouraged to Restoring Apps + Data using Titanium Backup.Follow this if you are flashing AOKP ROM for the first time to your HTC 10 phone, or coming from another ROM:
- Download and Copy the GApps and HTC 10 AOKP ROM ZIP to your phone.
- Take a backup using a synchronization application or if you have TWRP installed then boot into TWRP recovery and take a NANDROID backup using the TWRP itself.
- Boot into Recovery. Make sure to have a Custom recovery like CWM or TWRP or any other custom recovery.
- Wipe data factory reset, Cache partition, Dalvik Cache and Format the System partition.
– Here is a guide explaining how to wipe data using TWRP recovery.This will delete all your data on your phone. IGNORE IF YOU DON’T WANT TO OR IF YOU HAVE ALREADY DONE THIS. You may consider complete backup of your phone data or take a NANDROID backup of the current ROM.
– How to backup all data on your Android Device.
– how to take NANDROID backup using TWRP recovery. - First flash the AOKP ROM ZIP from device. Then flash the GApps zip from your device memory.
– Here is a post explaining how to flash a custom ROM using TWRP recovery.
– Use the same guide to flash the GApps too. - Reboot and Enjoy the AOKP Marshmallow ROM on your HTC 10 phone.
Upgrading from earlier version of AOKP ROM on HTC 10:
- Copy the latest HTC 10 AOKP ROM ZIP file to your phone.
- Boot into Recovery.
- Flash the latest CM ROM ZIP from your phone.
– Here is a post explaining how to flash a custom ROM using TWRP recovery.
– Use the same guide to flash the GApps too. - Reboot and Enjoy
Stay tuned or Subscribe to the HTC 10 forum For upcoming Android Nougat ROMs, CyanogenMod Custom ROMs, other ROMs and all other device specific topics.Android Nougat 7.0 ROM for Galaxy S3 LTE CM14/CyanogenMod 14 has now arrived. In addition to this ROM we also have the Lineage 14.1 for Galaxy S3 LTE (i9305). For latest updates, stay tuned to the Lineage OS 14.1 device list page. This Nougat 7.0 has come for Galaxy S3 LTE CM14/CyanogenMod 14 ROM. Since Google released Android Nougat Source code, we have update many Android NOUGAT AOSP ROMs and we also have a big list of Available CM14/CyanogenMod 14 Nougat 7.0 ROMs. This CM14 for Galaxy S3 LTE is brought to you by p.a.n.
DISCLAIMER:
THIS IS AN EARLY BUILD. THIS MAY NOT BOOT AT ALL OR IF IT BOOTS IT WILL HAVE MANY BUGS THAN YOU CAN EXPECT. TRY AT YOUR OWN RISK. Installing custom ROM requires a custom recovery to be installed on your device, which may VOID your warranty and may delete all your data. Before proceeding further you may consider backup your all data. You are the only person doing changes to your phone and neither the developer(s) nor we can be held responsible for the mistakes done by you.Status of Galaxy S3 LTE CM14/CyanogenMod 14 Nougat 7.0 ROM:
WHAT’S WORKING:
– Not knownKNOWN ISSUES:
– Not Known
REQUIRED LINKS AND FILES FOR GALAXY S3 LTE CM14 (CYANOGENMOD 14, NOUGAT) CUSTOM ROM:
- TWRP recovery link Galaxy S3 LTE (i9305)
– Here is How to Install TWRP on Samsung using Odin for the .tar or tar.md5 TWRP file.
- Download link for Galaxy S3 LTE CM14/CyanogenMod 14 Nougat 7.0 ROM (i9305)
- Nougat GApps download link for Galaxy S3 LTE CM14/CyanogenMod 14 Nougat 7.0 ROM
Root binary is inbuilt since CyanogenMod 12, so you don’t need a separate SuperSu package to install to gain ROOT access. Here is How to Enable ROOT on CM14/CyanogenMod 14
HOW TO INSTALL/DOWNLOAD/FLASH/UPDATE GALAXY S3 LTE CM14/CYANOGENMOD 14 NOUGAT 7.0 CUSTOM ROM:
Follow this if you are flashing CyanogenMod 14/CM14 for Galaxy S3 LTE (i9305) for the first time, or coming from another ROM:
This will delete all your data on your phone. You may consider backing up your phone data or take a nandroid backup. Here is how to take NANDROID backup using TWRP recovery.
Points to NOTE:
– Try to avoid restoring apps backup using Titanium Backup. It may break things up.
– Don’t restore system data using Titanium Backup! It will definitely break the current installation.
– It is also discouraged to Restoring Apps + Data using Titanium Backup.- Download and Copy the GApps and Galaxy S3 LTE CM14/CyanogenMod 14 ROM ZIP to your phone.
- Boot into Recovery. Make sure to have a Custom recovery like CWM or TWRP or any other custom recovery. If not then follow the Custom Recovery Installation Guide for Samsung Galaxy S3 LTE (i9305) (it’s a generic guide which will work for TWRP as well as CWM recovery)
- Wipe data factory reset, Cache partition, Dalvik Cache and Format the System partition.
– Here is a guide explaining how to wipe data using TWRP recovery.This will delete all your data on your phone. You may consider complete backup of your phone data or take a NANDROID backup of the current ROM
– How to backup all data on your Android Device
– how to take NANDROID backup using TWRP recovery - First flash the CM14 ROM ZIP from device. Then flash the GApps zip from your device memory.
– Here is a post explaining how to flash a custom ROM using TWRP recovery. - Then reboot into recovery (don’t skip this) and flash the CyanogenMod 14 Nougat GApps package.
– Here is a post explaining how to flash GApps using TWRP recovery. - Reboot and Enjoy the Nougat 7.0 CyanogenMod 14/CM14 for Galaxy S3 LTE (i9305).
Upgrading from earlier version of CyanogenMod 14/CM14 for S3 LTE (i9305):
- Copy the latest Galaxy S3 LTE CM14/CyanogenMod 14 ROM ZIP file to your phone.
- Boot into Recovery.
- Flash the latest CM ROM ZIP from your phone.
– Here is a post explaining how to flash a custom ROM using TWRP recovery. - Then flash the CM14 Nougat GApps package.
– Here is a post explaining how to flash GApps using TWRP recovery. - Reboot and Enjoy
Complete the initial setup and enjoy Android Nougat 7.0.0 with CyanogenMod 14/CM14 for S3 LTE. After this Galaxy S3 LTE CM14 installation you may want to enable ROOT access on your phone and here is how you can do that:
How to Enable ROOT on CM14/CyanogenMod 14.Stay tuned or Subscribe to the Galaxy S3 LTE (i9305) forum For other Android Nougat ROMs, CyanogenMod 14 ROMs, other ROMs and all other device specific topics.Android Nougat 7.1 ROM, OnePlus X LineageOS 14.1 has now arrived via an UNOFFICIAL build and also the OFFICIAL build. Also, here comes the LineageOS 15 for OnePlus X. If you want some more Lineage ROMs then stay tuned the LineageOS 14.1 ROM collection page. Before this there was the CM14.1 for OnePlus X. This LineageOS 14.1 for OnePlus X (onyx) is brought to you by developer NeroD and I think the official LINEAGE OS build is brought to you by developer ashwin007.
DINATION TO DEVELOPER(S):
If you like this ROM then do consider a donation to ashwin007.
DISCLAIMER:
THIS IS AN INITIAL BUILD WHICH MAY NOT BOOT AT ALL. HAVE A BACKUP BEFORE FLASHING THIS AND TRY AT YOUR OWN RISK. Installing a custom ROM on a OnePlus X (onyx) requires the bootloader to be unlocked on the OnePlus X (onyx) phone, which may VOID your warranty and may delete all your data. Before proceeding further you may consider backup all data on the phone. You are the only person doing changes to your phone and I cannot be held responsible for the mistakes done by you.Status of OnePlus X LineageOS 14.1 Nougat 7.1 Custom ROM:
WHAT’S WORKING:
– Not KnownKNOWN ISSUES:
– Not Known
REQUIRED LINKS AND FILES FOR OnePlus X LINEAGE OS 14.1 NOUGAT CUSTOM ROM:
- TWRP recovery link for OnePlus X (onyx)
– Here is theTWRP update guide for the OnePlus X (onyx). This TWRP recovery guide requires an unlocked bootloader on the OnePlus X (onyx).
- ROM Download link of LineageOS 14.1 for OnePlus X (onyx) [OFFICIAL]
- ROM Download link of LineageOS 14.1 for OnePlus X (onyx) [UNOFFICIAL]
- Lineage Nougat GApps download link for OnePlus X LineageOS 14.1 Nougat 7.1 ROM
Root binary is inbuilt in LineageOS 14.1, so you don’t need a separate SuperSu package to install to gain ROOT access. Here is How to Enable ROOT on LineageOS 14.1
If there is no in-built ROOT or it does not work for some reason then you can try flashing SuperSU zip using recovery to gain ROOT access.HOW TO INSTALL/DOWNLOAD/FLASH/UPDATE LineageOS 14.1 FOR OnePlus X NOUGAT CUSTOM ROM:
Follow this if you are flashing LineageOS 14.1 for OnePlus X (onyx) for the first time, or coming from another ROM:
Points to NOTE:
– Try to avoid restoring apps backup using Titanium Backup. It may break things up.
– Don’t restore system data using Titanium Backup! It will definitely break the current installation.
– It is also discouraged to Restoring Apps + Data using Titanium Backup.- Download and Copy the GApps and OnePlus X LineageOS 14.1 ROM ZIP to your phone.
- Boot into Recovery. Make sure to have a Custom recovery like CWM or TWRP or any other custom recovery. If not then follow the Custom Recovery Installation Guide for OnePlus X (onyx) (it’s a generic guide which will work for TWRP as well as CWM recovery or any other recovery)
- Wipe data factory reset, Cache partition, Dalvik Cache and Format the System partition.
– Here is a guide explaining how to wipe data using TWRP recovery.This will delete all your data on your phone. You may consider complete backup of your phone data or take a NANDROID backup of the current ROM
– How to backup all data on your Android Device
– how to take NANDROID backup using TWRP recovery - First flash the OnePlus X LineageOS 14.1 ROM ZIP from device. Then flash the GApps zip from your device memory.
– Here is a post explaining how to install LineageOS. - Then reboot into recovery (don’t skip this) and flash the LineageOS 14.1 Nougat GApps package.
– Here is a post explaining how to flash GApps using TWRP recovery. - Reboot and Enjoy the Nougat 7.1 LineageOS 14.1 ROM for OnePlus X (onyx).
Upgrading from earlier version of LineageOS 14.1 for OnePlus X (onyx):
- Copy the latest OnePlus X LineageOS 14.1 ROM ZIP file to your phone.
- Boot into Recovery.
- Flash the latest CM ROM ZIP from your phone.
– Here is a post explaining how to install LineageOS. - Then flash the LineageOS 14.1 Nougat GApps package.
– Here is a post explaining how to flash GApps using TWRP recovery. - Reboot and Enjoy
Complete the initial setup and enjoy Android Nougat 7.1 with LineageOS 14.1 for OnePlus X (onyx). After the installation of LineageOS 14.1 for OnePlus X (onyx) you may want to enable ROOT access on your phone and here is how you can do that:
How to Enable ROOT on LineageOS 14.1.Stay tuned or Subscribe to the OnePlus X (onyx) forum For other Android Nougat ROMs, LineageOS 14.1 ROMs, other ROMs and all other device specific topics.OFFICIAL LineageOS 15.1 for Moto Z (griffin) is now available to download on the OFFICIAL LineageOS website. This is a step by step guide that explains how to install Official Lineageos 15.1 on Moto Z.
Follow the links to get LineageOS 16 and Android Pie ROM builds.
This OFFICIAL LineageOS 15.1 for Moto Z is maintained by erfanoabdi, shr3ps, stargo and vache.
Starting from LineageOS 15.1, LineageOS team has made stringent device support norms, which ensures that almost every important piece of hardware present on a phone MUST be in a working state on an OFFICIAL LineageOS 15.1 build. Which clearly means that users will enjoy a stock like upgrade experience on OFFICIAL LineageOS 15.1 updates.
Well, making a standard guideline to support LineageOS 15.1 foar a specific device will undoubtedly increase the reliability on LineageOS custom Android ROM and subsequent ROMs derived from LineageOS such as: Resurrection Remix OS, crDroid ROM etc.
DONATION TO PROJECT/DEVELOPER(s):
If you like this ROM then do consider for a small contribution to erfanoabdi, shr3ps, stargo, vache and LineageOS project:
– Donate to erfanoabdi
– Donate to shr3ps
– Donate to vache
– Donate to LineageOS project
– No donation link found for stargoDISCLAIMER:
THIS IS AN INITIAL OFFICIAL LINEAGEOS 15.1 BUILD WHICH MAY HAVE MINOR BUGS. HAVE A BACKUP BEFORE FLASHING THIS AND TRY AT YOUR OWN RISK.
Installing a custom ROM may require an unlocked bootloader on Moto Z, which may VOID your warranty and may delete all your data. Before proceeding further you may consider backup all data on the phone. You are the only person making changes to your phone and I cannot be held responsible for the mistakes done by you.Content structure:

REQUIRED LINKS AND FILES FOR OFFICIAL LineageOS 15.1 for Moto Z OREO 8.1 ROM DOWNLOAD:
- TWRP recovery for Moto Z
– Here is the TWRP update guide for Moto Z. This recovery guide requires an unlock bootloader on Moto Z.
- OFFICIAL LineageOS 15.1 Download link for Moto Z
- GApps download for OFFICIAL LineageOS 15.1 ROM
Root binary is NOT inbuilt in the OFFICIAL LineageOS 15.1 ROM, so you need a separate SuperSu package or LineageOS su binary to install to gain ROOT access on the OFFICIAL LineageOS 15.1 ROM build. Here is LineageOS 15.1 Rooting guide
If there is no in-built ROOT or it does not work for some reason then you can try SuperSU rooting guide to enable ROOT access.
HOW TO UPDATE/INSTALL OFFICIAL LineageOS 15.1 for Moto Z:
Follow this if you are flashing LineageOS 15.1 for Moto Z for the first time, or coming from UNOFFICIAL LineageOS 15.1 ROM or any other custom ROM of any Android version:
NOTE:
If you are on an OFFICIAL LineageOS 14.1 ROM then follow the LineageOS 15.1 Upgrade guide in the next section to upgrade to the OFFICIAL LineageOS 15.1.Points to NOTE:
– Try to avoid restoring apps backup using Titanium Backup. It may break things up.
– Don’t restore system data using Titanium Backup! It will definitely break the current installation.
– It is also discouraged to Restoring Apps + Data using Titanium Backup.- Boot into Recovery.
Make sure to have a Custom recovery like CWM or TWRP or any other custom recovery on your phone.
If you don’t have then download the recovery for Moto Z from above link and follow the Custom Recovery Installation Guide (it’s a generic guide which will work for TWRP as well as CWM recovery or any other recovery) provided it is in .img file extension. - Wipe data or do a factory reset, wipe Cache partition, wipe Dalvik Cache/ART cache and Format the System partition.
– Here is a guide explaining how to wipe data using TWRP recovery.This will delete all your data on your phone. You may consider complete backup of your phone data or take a NANDROID backup of the current ROM
– How to backup all data on your Android Device
– how to take NANDROID backup using TWRP recovery - Download and Copy the LineageOS 15.1 Oreo GApps, SuperSU or any other ROOT package and the LineageOS 15.1 ROM ZIP file to the phone or SD card memory.
- First flash the LineageOS 15.1 ROM ZIP file from device. DON’T REBOOT YET. Then flash the GApps and/or supersu zip from your device memory WITHOUT rebooting.
– Here is a post explaining how to install LineageOS
– Here is a post explaining how to flash GApps using TWRP recovery.
– Here is a post explaining How to Enable ROOT for LineageOS 15.1 ROM - Reboot and Enjoy Android Oreo on the OFFICIAL LineageOS 15.1 for Moto Z.
Upgrading from earlier version of OFFICIAL LineageOS 14.1 or LineageOS 15.1 for Moto Z (griffin):
If you are on an OFFICIAL LineageOS 14.1 (yes, I mean the Android Nougat based OFFICIAL LineageOS 14.1) then you don’t need to wipe the data and you can upgrade to the OFFICIAL LineageOS 15.1 just by cleaning the system partition.
- Copy the latest LineageOS 15.1 for Moto Z ZIP file, Oreo 8.1 GApps and/or supersu ROOT package to the phone or use the updater app to download the LineageOS 15.1.
NOTE:
– If you are on an OFFICIAL LineageOS 14.1 then you will be allowed to download the latest OFFICIAL LineageOS 15.1 using the updater app but you won’t be allowed to upgrade to LineageOS 15.1 on top of LineageOS 14.1
– So, you need to export the downloaded LineageOS 15.1 ROM build file to the SD card or phone memory from the updater app:
You can export the downloaded package to the sdcard/phone memory from the Updater app by long-pressing the downloaded file and then selecting “Export” on the top menu - Boot into Recovery.
– Make sure you have a latest custom Recovery that should be able to flash the LineageOS 15.1 ROM update.
- Format or wipe the system partition from the custom recovery menu.
- First install the OFFICIAL LineageOS 15.1 ROM ZIP file from device. DON’T REBOOT YET. Then flash the GApps and/or supersu zip from your device memory WITHOUT rebooting.
– Here is a post explaining how to install LineageOS
– Here is a post explaining how to flash GApps using TWRP recovery.
– Here is a post explaining How to Enable ROOT for LineageOS 15.1 ROM - Reboot and Enjoy the OFFICIAL LineageOS 15.1 on your phone.
If you have found any BUG on this OFFICIAL LineageOS 15.1 for Moto Z then you can raise a jira ticket on LineageOS website.
Stay tuned or Subscribe to the Moto Z (griffin) forum For other Android Oreo 8.1 ROMs, LineageOS 15.1 ROMs, other ROMs and all other device specific topics.Android Nougat 7.1 ROM, Yureka 2 LineageOS 14.1 has now arrived via an UNOFFICIAL build. This post provides the download link to LineageOS 14.1 ROM for Yureka 2 (wt89536) and guides through the installation process of the same. This LineageOS 14.1 Nougat ROM for Yureka 2 and the TWRP is brought to you by developer vjspranav.
DONATION TO DEVELOPER(s):
If you like this ROM then do consider a small contribution to vjspranav and the LineageOS project:
– Donate to LineageOS project
– No donation link found for vjspranavIf you want the OFFICIAL LineageOS 14.1 update for Yureka 2 or Android Nougat ROMs for other devices then stay tuned to the LineageOS 14.1 ROMs list. For Android OREO based ROMs, stay tuned to the LineageOS 15 page or the AOSP Android Oreo ROMs devices list page.
DISCLAIMER:
THIS IS AN INITIAL BUILD WHICH MAY HAVE MANY BUGS. HAVE A BACKUP BEFORE FLASHING THIS AND TRY AT YOUR OWN RISK. Installing a custom ROM on a Yureka 2 requires an unlocked bootloader on Yureka 2, which may VOID your warranty and may delete all your data. Before proceeding further you may consider backup all data on the phone. You are the only person doing changes to your phone and I cannot be held responsible for the mistakes done by you.Status of Yureka 2 LineageOS 14.1 Nougat 7.1 ROM Download:
WHAT’S WORKING:
– UnknowngKNOWN ISSUES:
– Unknown
REQUIRED LINKS AND FILES FOR THIS Yureka 2 LINEAGEOS 14.1 ANDROID NOUGAT CUSTOM ROM INSTALLATION:
- TWRP download for Yureka 2 (wt89536)
– Here is theTWRP update guide for the Yureka 2. This TWRP recovery guide requires an unlocked bootloader on the Yureka 2.
- ROM Download link of LineageOS 14.1 for Yureka 2
- Nougat GApps Download Link for this ROM
Root binary is NOT inbuilt in LineageOS ROM, so you may need a separate SuperSu package or LineageOS su binary to install to gain ROOT access. Here is LineageOS 14.1 Rooting guide
If there is no in-built ROOT or it does not work for some reason then you can try SuperSU rooting guide to enable ROOT access.HOW TO INSTALL/DOWNLOAD/FLASH/UPDATE THE Yureka 2 TO THE LineageOS 14.1 BASED ANDROID NOUGAT ROM:
Follow this if you are flashing LineageOS 14.1 on the Yureka 2 (wt89536) for the first time, or coming from another ROM:
Points to NOTE:
– Try to avoid restoring apps backup using Titanium Backup. It may break things up.
– Don’t restore system data using Titanium Backup! It will definitely break the current installation.
– It is also discouraged to Restoring Apps + Data using Titanium Backup.- Download and Copy the GApps and the Yureka 2 LineageOS 14.1 ROM ZIP to your phone.
- Boot into Recovery.
Make sure to have a Custom recovery like CWM or TWRP or any other custom recovery. If not then download the recovery for Yureka 2 from above link and follow the Custom Recovery Installation Guide (it’s a generic guide which will work for TWRP as well as CWM recovery or any other recovery) - Wipe data factory reset, Cache partition, Dalvik Cache and Format the System partition.
– Here is a guide explaining how to wipe data using TWRP recovery.This will delete all your data on your phone. You may consider complete backup of your phone data or take a NANDROID backup of the current ROM
– How to backup all data on your Android Device
– how to take NANDROID backup using TWRP recovery - First flash the Yureka 2 LineageOS 14.1 ROM ZIP from device. Then flash the GApps zip from your device memory.
– Here is a post explaining how to install LineageOS - Then reboot into recovery (don’t skip this) and flash the Gapps for LineageOS 14.1 package.
– Here is a post explaining how to flash GApps using TWRP recovery. - Reboot and Enjoy Android Nougat with LineageOS 14.1 ROM on Yureka 2.
Upgrading from earlier version of LineageOS 14.1 for Yureka 2:
- Copy the latest Yureka 2 LineageOS 14.1 ROM ZIP file to your phone.
- Boot into Recovery.
- Flash the LineageOS 14.1 ROM ZIP file from your phone.
– Here is a post explaining how to install LineageOS - Then flash the LineageOS 14.1 Nougat GApps package.
– Here is a post explaining how to flash GApps using TWRP recovery. - Reboot and Enjoy
Complete the initial setup and enjoy Android Nougat 7.1 with LineageOS on the Yureka 2. After the installing LineageOS 14.1 for Yureka 2, you may want to enable ROOT access on your phone and here is how you can do that:
How to Enable ROOT on LineageOS 14.1.Stay tuned or Subscribe to the Yureka 2 (wt89536) forum For other LineageOS 15.1 Android Oreo, Nougat ROMs, LineageOS 14.1 ROMs, other custom ROMs and all other device specific topics.Resurrection Remix Oreo for Redmi NOTE 5 Pro is now available to download via an UNOFFICIAL version. This RR Oreo for Redmi NOTE 5 Pro (whyred) is brought to you by developer Shahan_mik3 and vasishath.
DONATION TO DEVELOPER(s):
If you like this ROM then do consider a small contribution to Shahan_mik3 and the Resurrection Remix OS project:
– Donate to Shahan_mik3
– Donate to Resurrection Remix OS projectIf you want the OFFICIAL RR Oreo update or some more Android Oreo Custom ROMs then stay tuned to one of the following list:
– Resurrection Remix Oreo Download list of devices
– LineageOS 15
– OFFICIAL LineageOS 15.1 Download
– AOSP Oreo ROMs Download devices list page.DISCLAIMER:
THIS IS AN INITIAL BUILD OF RESURRECTION REMIX ANDROID OREO (8.1), WHICH MAY HAVE MANY BUGS. BACKUP THE CURRENT ROM BEFORE FLASHING. TRY AT YOUR OWN RISK.
Installing a custom ROM on a the Redmi NOTE 5 Pro requires a custom recovery to be installed, which may VOID your warranty and may delete all your data. Before proceeding further you may consider backup all data on the phone. You are the only person making changes to your phone and I cannot be held responsible for the mistakes done by you.Status of Resurrection Remix Oreo ROM for Redmi NOTE 5 Pro:
WHAT’S WORKING:
– UnknownKNOWN ISSUES:
– See this list
REQUIRED DOWNLOADS AND LINKS TO UPDATE Redmi NOTE 5 Pro RR OREO (RESURRECTION REMIX) ROM:
- TWRP by vasishath for Redmi NOTE 5 Pro RR Oreo ROM- Follow this guide: How to Install TWRP on Redmi NOTE 5 Pro using Fastboot (This requires an unlocked bootloader)
– Here is How to unlock bootloader using fastboot - ROM Download link to Resurrection Remix Oreo for Redmi NOTE 5 Pro
- Android 8.1 GApps Download Link for Redmi NOTE 5 Pro Resurrection Remix Oreo ROM
- Rooting guide for RR Oreo
HOW TO UPDATE/INSTALL RESURRECTION REMIX OREO FOR Redmi NOTE 5 Pro (ANDROID ANDROID 8.1, RR v6.0.0 ROM):
Follow this to Install RR Oreo for Redmi NOTE 5 Pro for the first time or coming from another Android ROM:
Points to NOTE on BACKUP before updating:
– Try to avoid restoring apps backup using Titanium Backup. It may break things up.
– Don’t restore system data using Titanium Backup! It will definitely break the current installation.
– It is also discouraged to Restoring Apps + Data using Titanium Backup.- Boot into Recovery by one of the following method:
– Power off the phone and keep pressing key combinations while turning on your phone.
– If you have enabled USB debugging and you have ADB utility installed on your PC then you can execute the following command on a console or command prompt:adb reboot recovery
- Wipe data factory reset, Cache partition, Dalvik Cache and Format the System partition using the recovery.
– Here is a guide explaining how to wipe data using TWRP recovery.This will delete all your data on your phone. IGNORE IF YOU DON’T WANT TO OR IF YOU HAVE ALREADY DONE THIS. You may consider complete backup of your phone data or take a NANDROID backup of the current ROM.
– How to backup all data on your Android Device.
– how to take NANDROID backup using TWRP recovery. - Download the Redmi NOTE 5 Pro RR Oreo ROM zip file from the above download link and copy the files to phone.
- Flash/install the Redmi NOTE 5 Pro RR Oreo ROM zip from device.
– Here is a post explaining how to install a ROM zip using TWRP.
Upgrading from earlier version of RR Oreo for Redmi NOTE 5 Pro:
- Copy the latest ROM zip file of RR Oreo for Redmi NOTE 5 Pro to your phone.
- Boot into Recovery.
- Flash the latest RR Oreo ROM ZIP from your phone and wait till it finishes flashing.
– Here is a post explaining how to flash a custom ROM using TWRP recovery. - Reboot and Enjoy
Reboot to system after flashing is done completely. Do the required initial setup and enjoy the RR Oreo ROM for Redmi NOTE 5 Pro. If you face any problem following this guide or post installation then just login and leave a comment to get an instant reply.
Rooting Resurrection Remix Android Oreo ROM on Redmi NOTE 5 Pro:
There is no inbuilt ROOT functionality available on this ROM.
Here is how to How to ROOT RR Oreo ROM, a step-by-step guide !!!The above link is for LineageOS 15.1 Rooting guide, because RR Oreo is based on LineageOS 15.1.
Stay tuned or Subscribe to the Redmi NOTE 5 Pro custom ROMs forum For other Android Oreo ROMs, Android Nougat ROMs, LineageOS ROMs, Resurrection Remix ROM, Omni ROM, AICP ROM, crDroid ROM, and all other device specific topics.If you have any BUGs to report then you can leave a comment here or here is a thread created on xda.
Android 10 based Resurrection Remix Ten ROM for Mi 8 is now available to download. This build of RR Ten for Mi 8 is brought to you by engr.chachi.
Other Android 10 Downloads for Mi 8
Following are some of the other custom ROMs based on Android 10 for Mi 8:
– LineageOS 17.1 for supported devices
– Bliss ROM Android 10 for supported devices
– Android 10 download for all available devicesDONATION TO DEVELOPER(S)/PROJECT:
If you like this ROM then do consider for a contribution to engr.chachi:
– Donate to engr.chachi
[su_note note_color=”#F9D9D9″ text_color=”#AA4343″ radius=”3″ class=”” id=””]This is a custom ROM for Mi 8 which may have many bugs. This firmware has to be installed using a custom recovery such as TWRP, which requires an unlocked bootloader on the phone.
Make sure you BACKUP all the data and all the partitions of your phone before installing this RR Ten ROM.You are the only person making changes to your phone and I cannot be held responsible for anything wrong done by you.[/su_note]
About RR Ten v8.0 based on Android 10:
Resurrection Remix OS is an open-source custom ROM based on LineageOS which provides gesture control, customization, better battery life, regular security merges, OTA updates, etc. This project founded and run by Altan KRK (westcrip) and many others in the team.
The Resurrection Remix (RR) Ten ROM version v8.x is based on the recently released LineageOS 17.1 and Android 10, which is the latest Android to date.
Status of this Mi 8 RR Ten Android 10:
WHAT’S WORKING:
– Almost everythingKNOWN ISSUES:
– Nothing reported yetWhere to Download RR Ten Android 10 for Mi 8?
- RR Ten ROM Android 10 Download for Mi 8
- TWRP for Mi 8
- How to install TWRP recovery
- Xiaomi Bootloader unlock guide – required to install TWRP recovery
- Android 10 GApps
How to Install Resurrection Remix (RR) Ten on Mi 8?
[su_note note_color=”#D8F1C6″ text_color=”#769958″ radius=”3″ class=”” id=””]
Following are the two sub-sections of this Mi 8 Android 10 update guide:- First time installation of RR Ten ROM
- Upgrading RR Ten build from a previous build
[/su_note]
Installing RR OS Ten for the first time:
[su_note note_color=”#D8F1C6″ text_color=”#769958″ radius=”3″ class=”” id=””]This upgrade process requires few guides to be followed and few files to be downloaded. Everything referred in the below guide is provided in the above downloads section.[/su_note]
- Download and Copy the RR ROM 8.x Android 10 zip file for Mi 8 and the Android 10 Gapps zip file to your phone.
- Boot into the TWRP Recovery (with SAR support) to install RR ROM Android 10 on Mi 8.
[su_note note_color=”#D7E3F4″ text_color=”#728095″ radius=”3″ class=”” id=””]- Make sure to have a Custom recovery like a TWRP recovery or any other custom recovery.
– If not then download the TWRP recovery from Downloads link and follow the how to install TWRP recovery guide (it’s a generic guide which will work for TWRP as well as any other recovery)[/su_note] - Wipe system, data, and cache partition.
[su_note note_color=”#D7E3F4″ text_color=”#728095″ radius=”3″ class=”” id=””]- Here is a guide explaining how to wipe using TWRP recovery.[/su_note]
[su_note note_color=”#FBF4DD” text_color=”#A38C68″ radius=”3″ class=”” id=””]This will delete all your data on your phone. You may consider complete backup of your phone data or take a NANDROID backup of the current ROM
– Backup data on Android
– NANDROID backup on TWRP recovery[/su_note] - Install the RR Ten zip file that you have copied into the phone.
- Then flash the Android 10 Gapps zip file.
[su_note note_color=”#D7E3F4″ text_color=”#728095″ radius=”3″ class=”” id=””]- Here is a post explaining how to install GApps using TWRP recovery.[/su_note] - Reboot and Enjoy Android 10 with Resurrection Remix Ten ROM, on your Mi 8.
Upgrade RR Ten ROM Android 10 on Mi 8:
- Copy the latest RR ROM Android 10 zip file for your device
- Boot into TWRP recovery
- Wipe the system partition from the custom recovery menu.
- Install the latest RR ROM zip file.
- Reboot and see you have the GApps and ROOT access or NOT (if you installed previously).
[su_note note_color=”#D8F1C6″ text_color=”#769958″ radius=”3″ class=”” id=””]- Gapps is built in such a way that it will sustain across ROM updates.[/su_note] - If you don’t have GApps after upgrading the Android 10 on the phone, then flash the GApps again.
[su_note note_color=”#D7E3F4″ text_color=”#728095″ radius=”3″ class=”” id=””]- Here is a post explaining how to flash GApps using TWRP recovery.[/su_note] - If you don’t have ROOT after upgrading the Resurrection Remix ROM Android 10 on your phone, then flash the Magisk Installer zip file.
- Once everything is done, reboot and Enjoy the Android 10 RR ROM on Mi 8.
How to Get GCam for RR Ten ROM?
GCam 7.0 and later versions are compatible with RR Ten ROM v8 or any Android 10 ROM in general.
You can always look into the big list of Google Camera APK download page to get a compatible GCam for your phone.Stay tuned or Subscribe to the Mi 8 (dipper) forum For other Android Pie, Android Oreo ROMs, Nougat ROMs, or other ROMs and all other device specific topics.Stock ROM or stock Firmware for Tiitan T41 is now available to download. Here is how to flash stock firmware on Tiitan T41 using Mediatek SP Flash Tool.
Although I will make a very clean beginner’s step by step guide, but it is also advisable for you to go through all the steps in detail, so that you understand what are you doing.

[su_note note_color=”#F9D9D9″ text_color=”#AA4343″ radius=”3″ class=”” id=””]
DISCLAIMER:
THIS STOCK ROM FLASHING IS ONLY FOR Tiitan T41 WHICH IS MEDIATEK MT6739 CHIPSET BASED DEVICE.
DON’T TRY TO FLASH ON OTHER MT6739 BASED DEVICES OR ANY OTHER DEVICE TYPE.
[/su_note][su_note note_color=”#FBF4DD” text_color=”#A38C68″ radius=”3″ class=”” id=””]FLASHING A STOCK ROM ON Tiitan T41 WILL DELETE ALL DATA.
– IT ALWAYS A GOOD IDEA TO KEEP A BACKUP OF ALL DATA SUCH AS: SMS, PHONE CALL, CONTACT, MUSIC, IMAGES, etc.
– ALSO BACKUP THE IMEI AND NVRAM DATA OF YOUR PHONE.
[/su_note]Required Guides and Downloads to Install Stock ROM/Firmware on Tiitan T41:
- Mediatek VCOM Driver
- SP Flash Tool
- ROM Download link of stock firmware for Tiitan T41
- Install stock ROM using SP Flash Tool
Why to flash Stock Firmware/ROM on Tiitan T41:
There could be various reasons why you may want to flash a stock firmware on Tiitan T41 to make it a new like phone. Following are some of the key benefits you get by flashing a stock firmware on Tiitan T41:
- Flashing a stock ROM on Tiitan T41 will make the phone new like at least from software point of view.
- If your phone has become too slow or lagging in performance after a prolonged period of usage, then installing a stock ROM/firmware may bring back the speed.
- If you have rooted your Android phone, then flashing a stock ROM will help you to restore your phone software to original state.
[su_note note_color=”#D7E3F4″ text_color=”#728095″ radius=”3″ class=”” id=””]Sometimes software factory reset from Android settings does not help you get rid of ROOT.
In that case, you must flash a stock Firmware to bring back the phone to original state.[/su_note] - Phone warranty will be VOID if you have ROOT on Android phone or have a custom ROM on Android phone. Flashing a stock Firmware/ROM will bring back the software to original state and will restore your warranty.
How to Flash Stock Fimrware / ROM on Tiitan T41 using Mediatek SP Flash Tool:
- Download and extract the Tiitan T41 stock firmware files.
- Download and install the VCOM driver on your PC.
[su_note note_color=”#D7E3F4″ text_color=”#728095″ radius=”3″ class=”” id=””]VCOM driver is required for the SP Flash Tool to recognize your Tiitan T41 Phone to be able to download stock Fimrmware.[/su_note]
- Download and extract the Mediatek SP Flash Tool zip file.
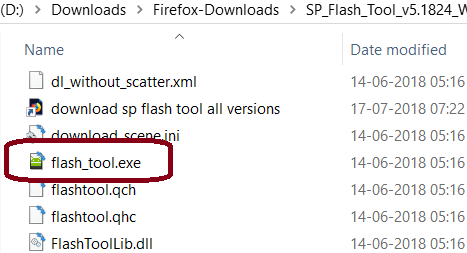
- Go to the extracted SP Flash Tool folder and open the flash_tool.exe file, which is the actual SP Flash Tool application.
See the below screenshot:

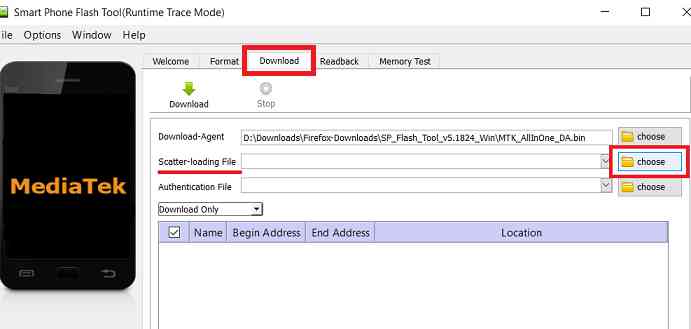
- By default the SP Flash Tool would have opened with the Download Tab open. If not then click on the Download Tab and then click on the choose button to load the Tiitan T41 stock ROM scatter file.
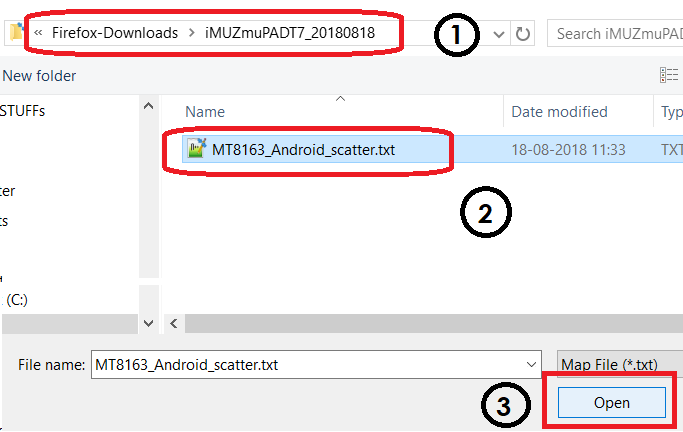
[su_note note_color=”#D7E3F4″ text_color=”#728095″ radius=”3″ class=”” id=””]- You will find a scatter file with a name of somewhat MT6739_Android_scatter.txt in the Tiitan T41 stock firmware package.
– This scatter file contains all the partition information of Tiitan T41 Mediatek phone and which binary file to flash on a which partition and address.[/su_note]See the screenshot below:

- After that a file browser will be opened to find and select the Tiitan T41 stock ROM scatter file.
Go to the Tiitan T41 stock firmware folder where you have extracted, select the Scatter file (somewhat MT6739_Android_scatter.txt) from there and click on Open.See the screenshot below:

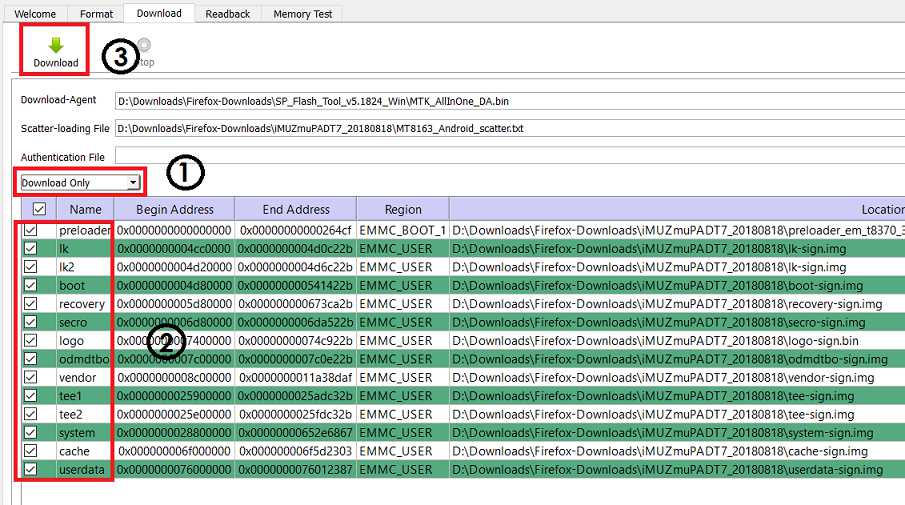
- After loading the scatter file, click on the Download button to start downloading the stock firmware to Tiitan T41.
[su_note note_color=”#FBF4DD” text_color=”#A38C68″ radius=”3″ class=”” id=””]Firmware download does not start just by clicking the Download button. You need to connect the phone in download mode, which we will be doing that in the later step.[/su_note]
[su_note note_color=”#D7E3F4″ text_color=”#728095″ radius=”3″ class=”” id=””]- SP Flash Tool automatically takes all the information and will show you the details of partition and binary file information. Verify all the details before start flashing the stock ROM or the stock firmware on your Mediatek phone.
– Verify the download mode before flashing (marked by number 1 in the screenshot).
– Verify which all partitions are being flashed (marked by number 2 in the screenshot). MAKE SURE THERE IS NO NVRAM OR IMEI PARTITION SELECTED HERE.[/su_note]See the screenshot below:

- Now turn off your Mediatek Phone and wait for few seconds.
Then you hold both the volume up and Volume Down button and connect the phone PC using a USB cable.– You see in the SP Flash tool, it will start downloading the firmware to the Mediatek Phone automatically.
- After the stock ROM is flashed successfully on Tiitan T41, you will see a Download OK confirmation on SP Flash Tool.
See the screenshot below:

After being successfully install stock firmware or the stock ROM on Tiitan T41, you can disconnect the phone and restart if it does not restart automatically.
If you face any problem installing the stock firmware on Tiitan T41 using SP Flash Tool, then leave a reply on this thread. I will reply back as early as possible.
[su_note note_color=”#D7E3F4″ text_color=”#728095″ radius=”3″ class=”” id=””]Stay tuned or Subscribe to the Tiitan T41 forum for recovery, rooting, custom ROM guides etc. and all other device specific topics.[/su_note]