- Search Results
LG G3 Sprint CM13 (cyanogenMod 13) Marshmallow ROM (Device Codename: jfltetmo) goes official on CyanogenMod servers. Official NIGHTLY build are automated builds which makes sure the build is not broken by daily code changes made by developers. NIGHTLY builds are not stable as compared to SNAPSHOT builds and may contain some minor bugs. Here is some brief explanation of the difference between a NIGHTLY and SNAPSHOT.
DISCLAIMER:
Installing custom ROM requires a custom recovery to be installed on your device, which may VOID your warranty and may delete all your data. Before proceeding further you may consider backup your all data or take a NANDROID backup using a recovery. You are the only person doing changes to your phone and I cannot be held responsible for the mistakes done by you. Neither the developer nor we will be held responsible for any disaster that happens to your device.
REQUIRED DOWNLOADS AND LINKS FOR THE LG G3 SPRINT CM13 MARSHMALLOW CUSTOM ROM UPDATE GUIDE:
- Unlocked bootloader on LG G3 Sprint.
- TWRP recovery download link for LG G3 Sprint.
– If you already have an unlocked bootloader then you can download the .img file extension. Then follow this guide: How to flash TWRP using fastboot. - ROM download link of Latest LG G3 Sprint Official CyanogenMod 13
- GApps download link
Root binary is inbuilt since CyanogenMod 12, so you don’t need a separate SuperSu package to install to gain ROOT access. Here is How to Enable ROOT Access on CM13/CyanogenMod 13
For more Custom ROMs, TWRP Recovery Installation guide, Rooting Guide you can have a look at the LG G3 Sprint forum and also you can subscribe to stay updated for this device specific topics.
FLASHING OFFICIAL LG G3 Sprint CM13 (CyanogenMod 13) MARSHMALLLOW CUSTOM ROM:
Follow this if you are flashing CyanogenMod 13 for the first time to your Sprint LG G3, or coming from another ROM:
This will delete all your data on your phone. You may consider backing up your phone data or take a nandroid backup. Here is how to take NANDROID backup using TWRP recovery.
Points to NOTE:
– Try to avoid restoring apps backup using Titanium Backup. It may break things up.
– Don’t restore system data using Titanium Backup! It will definitely break the current installation.
– It is also discouraged to Restoring Apps + Data using Titanium Backup.- Make sure you have a TWRP installed on your LG G3 Sprint.
If you don’t have a recovery then download it from the above link and follow the below guide (Make sure the bootloader is unlocked):
– How to flash TWRP using fastboot. - Download and Copy the GApps and CyanogenMod ROM ZIP to your device.
- Take a backup using a synchronization application or using Samsung Smart Switch or if you have TWRP installed then you can take a NANDROID backup using the TWRP itself.
- Boot into Recovery. Make sure to have already flashed a Custom recovery like CWM or TWRP on the phone.
- Wipe data factory reset, Cache partition, Dalvik Cache and Format the System partition.
– Here is a guide explaining how to wipe data using TWRP recovery. - First flash the CM ROM ZIP from device. Then flash the GApps zip from your device memory.
– Here is a post explaining how to flash a custom ROM using TWRP recovery.
Use the same guide to flash the GApps too. - Reboot and Enjoy the CyanogenMod 13 Marshmallow ROM on your LG G3 Sprint.
- Make sure you have a TWRP installed on your LG G3 Sprint.
Upgrading from earlier version of CyanogenMod 13.0:
- Copy the CyanogenMod 13 ROM ZIP file to your phone.
- Boot into Recovery.
- Flash the latest CM ROM ZIP from your phone.
– Here is a post explaining how to flash a custom ROM using TWRP recovery. - Reboot and Enjoy
The first boot may take long time, so don’t panic and be sure that you have enough battery backup. Let the phone reboot and then enjoy the official CyanogenMod 13 Marshmallow ROM on LG G3 Sprint.
After this CM13 installation you may want to enable ROOT access on your phone and here is how you can do that:
How to Enable ROOT Access on CM13/CyanogenMod 13.Android Nougat 7.1 ROM, LineageOS 14.1 for Galaxy S5 Neo has now arrived via an UNOFFICIAL build. If you want some more LineageOS ROMs for other devices then stay tuned to the LineageOS 14.1 page. This Galaxy S5 Neo LineageOS 14.1 is brought to you by developer Stricted.
DONATION TO DEVELOPER(S):
If you like the ROM or the TWRP recovery brought to you by these developer(s) then consider donation to them. Believe me it motivates and it matters.
Donate to StrictedDISCLAIMER:
THIS IS AN INITIAL BUILD WHICH MAY HAVE MANY MORE BUGS THAN YOU CAN IMAGINE. HAVE A BACKUP BEFORE FLASHING THIS AND TRY AT YOUR OWN RISK. Installing a custom ROM on a Galaxy S5 Neo (G903F, s5neoltexx) may require the bootloader to be unlocked, which may VOID your warranty and may delete all your data. Before proceeding further you may consider a complete backup. You are the only person making changes to your phone and I cannot be held responsible for the mistakes done by YOU.Status of LineageOS 14.1 for Galaxy S5 Neo (G903F, s5neoltexx) Nougat 7.1 ROM:
WHAT’S WORKING:
– Wifi
– NFC
– Bluetooth
– Camera
– Video Playback
– Audio
– Sensors
– GPSKNOWN ISSUES:
As pointed out by penguin:
– No audio when calling over Bluetooth
– Sending SMS results in “not send error” but sms does goes out.
– USB sometimes dies. Only a reboot re-activates USB. Even charging is not happening. This is caused when connecting specific USB devices that trigger an event to launch an app.
– Unable to open camera from time to time. Only solution is to reboot.
REQUIRED LINKS AND FILES FOR LineageOS 14.1 for Galaxy S5 Neo NOUGAT 7.1 BASED CUSTOM ROM:
- Latest available stock FW and baseband
- Recovery for S5 Neo (by Stricted)
– Here is how to: update TWRP on Galaxy S5 Neo (This guide is only for .tar or .tar.md5 TWRP file)
– To flash .img file you can follow this TWRP update guide using fastboot or you can use Flashify to update the .img TWRP. [YOUR DEVICE MIGHT NEED TO BE BOOTLOADER UNLOCKED IF YOU ARE FOLLOWING THIS] - Galaxy S5 Neo LineageOS 14.1 (by Stricted) ROM download link [UNOFFICIAL]
- GApps for Lineage 14.1 for Galaxy S5 Neo LineageOS 14.1 Nougat 7.1 ROM
Root binary is NOT inbuilt in LineageOS 14.1, so you may need a separate SuperSu package or LineageOS su binary to install to gain ROOT access. Here is LineageOS Rooting guide
If there is no in-built ROOT or it does not work for some reason then you can try SuperSU root guide to gain ROOT access.HOW TO INSTALL/DOWNLOAD/FLASH/UPDATE Galaxy S5 Neo LineageOS 14.1 NOUGAT CUSTOM ROM:
Follow this if you are flashing LineageOS 14.1 for Galaxy S5 Neo (G903F, s5neoltexx) for the first time, or coming from another ROM:
Points to NOTE:
– Try to avoid restoring apps backup using Titanium Backup. It may break things up.
– Don’t restore system data using Titanium Backup! It will definitely break the current installation.
– It is also discouraged to Restoring Apps + Data using Titanium Backup.- Download and Copy the GApps and LineageOS 14.1 for Galaxy S5 Neo ROM ZIP to your phone.
- Boot into Recovery. Make sure to have a Custom recovery like CWM or TWRP or any other custom recovery. If not then follow the Recovery Installation Guide for Samsung phones to flash a custom recovery on the Galaxy S5 Neo (G903F, s5neoltexx). (it’s a generic guide which will work for TWRP as well as CWM recovery or any other recovery)
- Wipe data factory reset, Cache partition, Dalvik Cache and Format the System partition.
– Here is a guide explaining how to wipe data.This will delete all your data on your phone. You may consider complete backup of your phone data or take a NANDROID backup of the current ROM
– backup all data
– NANDROID backup - First flash the Galaxy S5 Neo LineageOS 14.1 ROM ZIP from device. Then flash the GApps zip from your device memory.
– Here is a post explains LineageOS update. - DO NOT REBOOT yet. Then flash the LineageOS 14.1 GApps package.
– Here is a post explaining how to update LineageOS GApps. - Reboot and Enjoy the Nougat 7.1 LineageOS 14.1 ROM for Galaxy S5 Neo (G903F, s5neoltexx).
Upgrading from earlier version of Galaxy S5 Neo LineageOS 14.1 (G903F, s5neoltexx):
- Copy the latest LineageOS 14.1 for Galaxy S5 Neo ROM ZIP file to your phone.
- Boot into Recovery.
- Flash the latest LineageOS ROM ZIP from your phone.
– Here is a post explaining how to install LineageOS. - Then flash the LineageOS 14.1 GApps package.
– Here is a post explaining how to flash GApps. - Reboot and Enjoy
Complete the initial setup and enjoy Android Nougat 7.1 with LineageOS 14.1 for Galaxy S5 Neo (G903F, s5neoltexx). After the installation of Galaxy S5 Neo LineageOS 14.1 ROM (G903F, s5neoltexx) you may want to enable ROOT access on your phone and here is how you can do that:
How to Enable ROOT on LineageOS 14.1.Stay tuned or Subscribe to the Galaxy S5 Neo (G903F, s5neoltexx) forum For other Android Nougat ROMs, LineageOS 14.1 ROMs, other ROMs and all other device specific topics.If you have any concerns or found any BUGS on this ROM then here is the development link to Stricted’s thread.
SuperSU zip is an Android ROOT package that can be installed using a custom recovery like TWRP to get ROOT access on an Android Phone. SuperSU ROOT is developed by ChainFire. Here you will find SuperSU zip Download link and how to ROOT using SuperSU.
DISCLAIMER:
INSTALLING SUPERSU ZIP TO ENABLE ROOT ON YOUR ANDROID PHONE MAY FAIL AND MAY ENDUP IN BOOTLOOP OR A BROKEN PHONE.
HAVE A BACKUP OF THE CURRENT OS BEFORE INSTALLING SUPERSU ROOT ZIP PACKAGE.Installing supersu zip may require unlocked bootloader on your phone, which may VOID the warranty and may delete all your data. Before proceeding further you may consider taking a backup of phone data.
At last, but not the least, You are the only person making changes to your phone and I cannot be held responsible for the mistakes done by YOU. Do this at YOUR OWN RISK.
What is SuperSU?
In general, SuperSU is a tool or a utility that can enable ROOT permission on an Android Phone.
SuperSU ROOT package is in a zip file format which can be installed via custom recovery such as TWRP, and contains code or script that copies the su binary into Android system.
This su binary is the one that enables the super-user privilege or we say ROOT privilege for an pplication who requests for it.
How does SuperSU enables ROOT on Android phone?
SuperSU ROOT zip package basically copies the su (super-user) binary into the Android system and gives executable permissions.
This su binary is the primary executable file that enables ROOT privilege when asked by an application.
This is a basic Linux thing. And you know, Android is built on top of Linux kernel.As long as the su binary is there in the system file and it is enabled with executable permission, the corresponding Android phone is treated a ROOTED phone.
Why do you want to ROOT Your Phone?
or
What is the benefit of Rooting?Many Android users don’t even know what is rooting, forget about how to ROOT.
Well, in a simple statement:Rooting gives your Android phone, super power and wings to fly.
There are many endless possibilities are opened when you ROOT your Android phone, in this case when you ROOT Mi Mix 2s.
Following are few of the benefits of ROOTING an Android Phone:- You can remove pre-installed junk applications called as bloatware
– Most of the Android phones come with pre-installed applications by manufacturers such as: Samsung Apps on Samsung phones, Honor Apps on Huawei Honor phones etc. - You can update the phone manually
– No need to wait for OTAs to be pushed by your OEM. - After rooting the phone, there is a possibility that you can install incompatible apps which are only available for specific devices.
– One such example is Google Camera or Xposed modules etc. - Rooting helps you install ad-blocker application phone wide
- You can install Custom ROMs like LineageOS, Resurrection Remix OS, OmniROM etc on your Android Phone
– OEM updates for latest Android releases are pretty much slower as compared to the custom ROMs. Rooting helps you taste the latest Oreo almost as soon as it is released, provided it should be built for the phone by one of the developers.
– After couple of years when your Android Phone no longer will get Android upgrades, custom ROMs will be the only way to keep the phone updated to the latest Android - You can access to system files after rooting your Android phone
– Initially when OnePlus 3 was released it was restricted to use the full potential of RAM by using only almost half of the RAM.
– Unlocking that potential was only possible after rooting the phone and then modifying the system file. - Rooting the Android Phone allows to install more themes, and customization.
Why you should NOT ROOT your phone?
or
What is the disadvantage of Rooting?Rooting is more attractive for above said reasons but there are a handful disadvantages of rooting an Android phone too which you should consider before you root the Android phone.
Let’s see some of the key downfalls of rooting and Android phone:
- You may lose warranty
– Many of the manufacturers now a days supporting software customization on Android phones but on the other hand many OEMs discourage the use of altering software on the phone.
– Although this can completely reverted back to original state, but still OEMs like Samsung user binary or hardware counters that tells how many times the software has been changed on an Android phone. - You may lose all your data on the phone
– Rooting a device involves unlocking the phone’s bootloader and installing a custom recovery.
– This process may erase all the data of your phone. - Rooted Android phones may not pass SafetyNet
– Android has a security mechanism to know if a device is tempered or can be still reliable for security.
– Most of the banking apps use SafetyNet as a security measure, which will be broken after rooting the Android phone. - Official OTA updates for your phone will be stopped
– you have to manually install OTA updates.
– This is an advantage if you know where to download and how to install stock firmware updates otherwise it is the other way round. - Rooting gives system file access, which is very dangerous.
– If any of the core system file is missing, the whole Android system is gone, and the Android phone could be bricked.
SuperSU ROOT zip download link, SuperSU FREE APK and SuperSU Pro APK Download link:
- Download link for Latest SuperSU zip file
- Download link for STABLE SuperSU zip file
- Download link for SuperSU BETA zip file
- Download link to SuperSU APK Free version
- Download link to SuperSU APK Pro version
IMPORTANT NOTE:- Your phone will not be rooted just by installing the SuperSU APK file on your Android phone.
- SuperSU APK Free or Pro version is just a SuperSU ROOT management application.
- The SuperSU APK Free or Pro app will ONLY work if you have already ROOTED your Android Phone.
Before installing the SuperSU zip to get ROOT access:
- Make sure your Android Phone’s bootloader is unlocked before you install the SuperSU zip to enable ROOT.
– Here is a guide that explains how to Unlock Bootloader on an Android Phone. - After unlocking the bootloader, make sure that you have a custom recovery installed on your Android Phone.
– Well, this is a very important aspect of this SuperSU ROOT process. The SuperSU zip file is developed in a way to be installed via a custom recovery. Stock recovery may not be able install this.
– Here is a list of TWRP recovery Download for many Android OEMs.
– And, here is how to install TWRP using Fastboot.
Step By Step Guide.

How to ROOT using SuperSU zip file for Android Phone:
- Download and copy the SuperSU zip package to your Android device. (Download from the above downloads section)
- Now Boot your Android device into TWRP recovery.
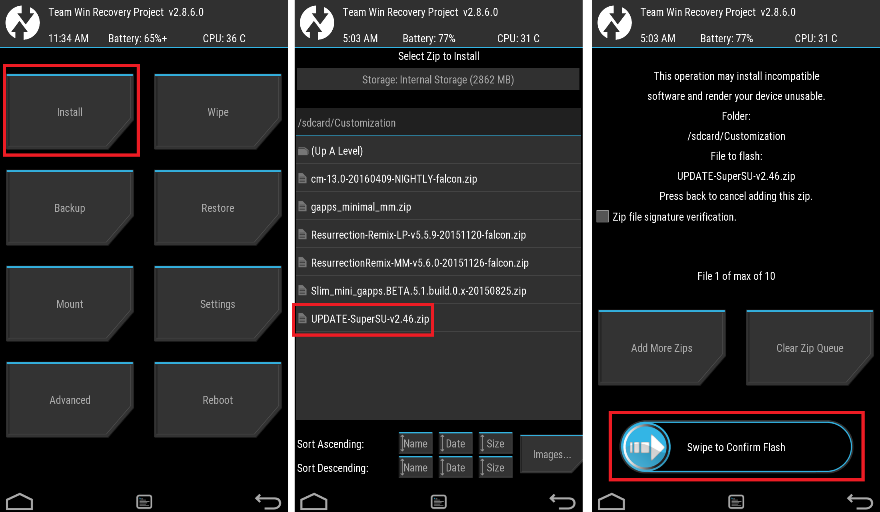
- Then, Select theInstall from TWRP home screen, then select the SuperSU ROOT zip file from the file browser.
- Flash or install the SuperSU zip by Sliding the Swipe to Confirm Flash on TWRP screen.
- Wait for TWRP to flash the SuperSU or the Lineage SU completely. Once the flashing is done just reboot your device.
- Profit!!! Your Android device should now be rooted.
How to check if the SuperSU zip has enabled ROOT on your phone or not?
Install the ROOT checker app from the Play Store and verify if your phone is ROOTED or not.
Here is a screenshot how to flash the SU ROOT binary via TWRP:

if you have any concerns or any difficulties following this guide, then feel free to place a reply on this thread and I assure you to help you out.
Galaxy NOTE 10.1 P600 CM13 Marshmallow ROM has been arrived which is brought to you by developer joshndroid. If you are flashing CyanogenMod for the first time then please be aware that this MAY VOID WARRANTY of your phone and may permanently damage your phone. This Galaxy NOTE 10.1 P600 CM 13 CyanogenMod Marshmallow ROM is for Galaxy NOTE 10.1 P600 and hence make sure on which you are flashing.
DISCLAIMER:
Installing Custom ROM requires your phone to be UNLOCKED in some cases which may VOID WARRANTY. Sometimes if not handled carefully then it may permanently damage your phone and prevent from BOOT. Understand that you are the only person making changes to the device. In case of any damage or any kind of loss as a consequence of this installation, Neither the Developer nor CyanogenMods can be held responsible.
Required Downloads and Links for Galaxy NOTE 10.1 P600 CM13 unofficial ROM flashing:
- Galaxy NOTE 10.1 P600 TWRP recovery download link.
– Download the .img.tar extension TWRP file which can be flashed with ODIN. Follow this guide: How to Install TWRP on Samsung using Odin for the .tar TWRP file.– If you already have an unlocked bootloader then you can download the .img file extension. Then follow this guide: How to flash TWRP using fastboot.
- Galaxy NOTE 10.1 P600 (lt03wifi) ROM Download link
– Scroll down and download the latest ROM. - Google Apps download link
Root binary is inbuilt since CyanogenMod 12, so you don’t need a separate SuperSu package to install to gain ROOT access. Here is How to Enable ROOT Access on CM13/CyanogenMod 13
Flashing Galaxy NOTE 10.1 P600 CM13 (lt03wifi) CyanogenMod 13 Marshmallow ROM:
Follow this if you are flashing CyanogenMod 13 for the first time to your Galaxy NOTE 10.1 P600, or coming from another ROM:
- Download and Copy the GApps and CyanogenMod ROM ZIP to your device.
- Boot into Recovery. Make sure to have a Custom recovery like CWM or TWRP.
If you don’t have a recovery then download it from the above link and follow the beolw guide to flash:
– How to Install TWRP on Samsung using Odin for the .tar TWRP file. - Wipe data factory reset, Cache partition, Dalvik Cache and Format the System partition. Here is a guide explaining how to wipe data using TWRP recovery.
- First flash the CM ROM ZIP from device. Then flash the GApps zip from your device memory.
– Here is a post explaining how to flash a custom ROM using TWRP recovery.
Use the same guide to flash the GApps too. - Reboot and Enjoy the CyanogenMod 13 Marshmallow ROM on your Galaxy NOTE 10.1 P600.
Upgrading from earlier version of CyanogenMod 13.0:
- Copy the CyanogenMod 13 ROM ZIP file to your phone.
- Boot into Recovery.
- Flash the latest CM ROM ZIP from your phone.
– Here is a post explaining how to flash a custom ROM using TWRP recovery. - Reboot and Enjoy
This will delete all your data on your phone. You may consider backing up your phone data or take a nandroid backup. Here is how to take NANDROID backup using TWRP recovery.
Points to NOTE:
– Try to avoid restoring apps backup using Titanium Backup. It may break things up.
– Don’t restore system data using Titanium Backup! It will definitely break the current installation.
– It is also discouraged to Restoring Apps + Data using Titanium Backup.The first boot may take long time, so don’t panic and be sure that you have enough battery backup. Let the phone reboot and then enjoy the official CyanogenMod 13 Marshmallow ROM on Galaxy NOTE 10.1 P600.
After this CM13 installation you may want to enable ROOT access on your phone and here is how you can do that:
How to Enable ROOT Access on CM13/CyanogenMod 13.Here is the OFFICIAL CyanogenMod 14.1 (CM14.1) for Galaxy S5 DUOS (klteduos). You might know that CyanogenMod is now continued as Lineage OS. Stay tuned to the Lineage OS 14.1 Devices list page to get more updates on Lineage OS ROMs. This is an OFFICIAL CyanogenMod 14.1 NIGHTLY update for Galaxy S5 DUOS. Checkout the other Nougat ROM for Galaxy S5 DUOS: UNOFFICIAL CM14 ROM for Galaxy S5 DUOS. In addition to this we have update many OFFICIAL CM14.1 (CyanogenMod 14.1) for many supported devices and many Unofficial CyanogenMod 14/14.1 ROM updates.
DISCLAIMER:
Installing a custom ROM on a the Galaxy S5 DUOS may require the bootloader to be unlocked on Galaxy S5 DUOS and a Custom Recovery on Galaxy S5 DUOS, which may VOID your warranty and may delete all your data. Before proceeding further you may consider backup all data on the phone. You are the only person doing changes to your phone and I cannot be held responsible for the mistakes done by you. ALSO KNOW THAT THIS IS A DEVELOPMENT BUILD AND CONTAINS MORE BUGS THAN YOU CAN THINK.
REQUIRED DOWNLOADS AND LINKS FOR OFFICIAL GALAXY S5 DUOS CM14.1 (CYANOGENMOD 14.1) NOUGAT ROM UPDATE GUIDE:
- TWRP download link for Galaxy S5 DUOS (klteduos).
– here is a guide: Galaxy S5 DUOS TWRP recovery installation guide (for .tar or .tar.md5 extension TWRP file) and How to install Cyanogen recovery (or twrp in .img format) on Galaxy S5 DUOS
- ROM download link of OFFICIAL Cyanogenmod 14.1 for Galaxy S5 DUOS
- CyanogenMod 14.1 GApps download link for Galaxy S5 DUOS CyanogenMod 14.1 ROM
Root binary is inbuilt since CyanogenMod 12, so you don’t need a separate SuperSu package to install to gain ROOT access. Here is How to Enable ROOT on CM14.1/CyanogenMod 14.1
HOW TO INSTALL/FLASH/UPDATE CM14.1 FOR GALAXY S5 DUOS (CYANOGENMOD 14.1 NOUGAT ROM):
Follow these steps if you are flashing CM14.1 for Galaxy S5 DUOS for the first time, or coming from another ROM:
Points to NOTE on BACKUP:
– Try to avoid restoring apps backup using Titanium Backup. It may break things up.
– Don’t restore system data using Titanium Backup! It will definitely break the current installation.
– It is also discouraged to Restoring Apps + Data using Titanium Backup.- Download and Copy the Nougat GApps and CyanogenMod 14.1 Nougat ROM ZIP to Galaxy S5 DUOS (klteduos).
- Boot into Recovery. Make sure to have a Custom recovery like CWM or TWRP or any other custom recovery.
- Wipe data factory reset, Cache partition, Dalvik Cache and Format the System partition.
– Here is a guide explaining how to wipe data using TWRP recovery.This will delete all your data on your phone. You may consider complete backup of your phone data or take a NANDROID backup of the current ROM.
– How to backup all data on your Android Device.
– how to take NANDROID backup using TWRP recovery. - First flash the Galaxy S5 DUOS CM14.1 ROM ZIP from device.
– Here is a post explaining how to flash a custom ROM using TWRP recovery. - Then reboot into recovery (don’t skip this) and flash the CM14.1 Nougat Google Apps package.
– Here is a post explaining how to flash GApps using TWRP recovery. - Reboot and Enjoy the CyanogenMod 14.1 Nougat ROM on Galaxy S5 DUOS.
Upgrading from earlier version of Galaxy S5 DUOS CM14.1 Nougat ROM:
- Copy the Galaxy S5 DUOS CM14.1 ROM ZIP file to your phone.
- Boot into Recovery.
- Flash the latest CM14.1 ROM ZIP from your phone.
– Here is a post explaining how to flash a custom ROM using TWRP recovery. - Then flash the CM14.1 Nougat Google Apps package.
– Here is a post explaining how to flash GApps using TWRP recovery. - Reboot and Enjoy
Complete the initial setup and enjoy Android Nougat 7.0.0_r1 with CyanogenMod 14.1 On Galaxy S5 DUOS (codename: klteduos). After this CM14.1 installation you may want to enable ROOT access on your phone and here is how you can do that:
How to Enable ROOT on CM14.1/CyanogenMod 14.1.Stay tuned or Subscribe to the Galaxy S5 DUOS (klteduos) forum For other Android Nougat ROMs, CyanogenMod 14 ROMs, other ROMs and all other device specific topics.Android Oreo 8.0 ROM, Galaxy S4 Active LineageOS 15 has now arrived via an UNOFFICIAL build. This LineageOS 15 for Galaxy S4 Active (jactivelte, i9295) is brought to you by developer tsvetkov_vlad.
DONATION TO DEVELOPER:
If you like this ROM then do consider a contribution to tsvetkov_vlad for his efforts:
Donate to tsvetkov_vladIf you want the OFFICIAL LineageOS update or some more Android Oreo ROMs then stay tuned to the LineageOS 15 ROMs page or the AOSP Android Oreo devices list page.
DISCLAIMER:
THIS IS A BETA ROM AND MAY HAVE MANY BUGS. HAVE A BACKUP BEFORE FLASHING THIS LINEAGEOS ROM AND TRY AT YOUR OWN RISK. Installing a custom ROM on a Galaxy S4 Active (jactivelte) requires the bootloader to be unlocked on the Galaxy S4 Active (jactivelte) phone, which may VOID your warranty and may delete all your data. Before proceeding further you may consider backup all data on the phone. You are the only person doing changes to your phone and I cannot be held responsible for the mistakes done by you.Content structure:
Status of Galaxy S4 Active LineageOS 15 Oreo Custom ROM:
WHAT’S WORKING:
– WIFI
– Bluetooth
– RIL(2G,3G,SMS,Incoming calls)
– LED
– Sensors
– Audio Playback
– GPS
– IR BlasterKNOWN ISSUES:
– Camera
– Home button(wake up screen)
– NFC
– Video Playback
– VoLTE (not tested)
REQUIRED LINKS AND FILES FOR Galaxy S4 Active LINEAGEOS 15 OREO CUSTOM ROM:
- TWRP recovery link for Galaxy S4 Active (jactivelte, i9295) [Use This TWRP ONLY]
– Here is theTWRP update guide for the Galaxy S4 Active (jactivelte).
- ROM Download link of LineageOS 15 for Galaxy S4 Active
- LineageOS 15 GApps download link for Galaxy S4 Active LineageOS 15 Oreo 8.0 ROM (Download the stock ARM64 GApps)
Root binary is NOT inbuilt in LineageOS 15, so you may need a separate SuperSu package or LineageOS su binary to install to gain ROOT access. Here is LineageOS Rooting guide
If there is no in-built ROOT or it does not work for some reason then you can try SuperSU rooting guide to enable ROOT access.HOW TO INSTALL/DOWNLOAD/FLASH/UPDATE LineageOS 15 FOR Galaxy S4 Active OREO CUSTOM ROM:
Follow this if you are flashing LineageOS 15 for Galaxy S4 Active for the first time, or coming from another ROM:
Points to NOTE:
– Try to avoid restoring apps backup using Titanium Backup. It may break things up.
– Don’t restore system data using Titanium Backup! It will definitely break the current installation.
– It is also discouraged to Restoring Apps + Data using Titanium Backup.- Boot into Recovery. Make sure to have a Custom recovery like CWM or TWRP or any other custom recovery. If not then follow the Custom Recovery Installation Guide for Galaxy S4 Active (it’s a generic guide which will work for TWRP as well as CWM recovery or any other recovery)
- Wipe data factory reset, Cache partition, Dalvik Cache and Format the System partition.
– Here is a guide explaining how to wipe data using TWRP recovery.This will delete all your data on your phone. You may consider complete backup of your phone data or take a NANDROID backup of the current ROM
– How to backup all data on your Android Device
– how to take NANDROID backup using TWRP recovery - Download and Copy the LineageOS 15 GApps and Galaxy S4 Active LineageOS 15 ROM ZIP file to your phone.
- First flash the Galaxy S4 Active LineageOS 15 ROM ZIP from device. Then flash the GApps for LineageOS 15 zip from your device memory.
– Here is a post explaining how to install LineageOS - Then reboot into recovery (don’t skip this) and flash the Gapps for LineageOS 15 package.
– Here is a post explaining how to flash GApps using TWRP recovery. - Reboot and Enjoy the Oreo 8.0 LineageOS 15 ROM for Galaxy S4 Active.
Upgrading from earlier version of LineageOS 15 for Galaxy S4 Active (jactivelte):
- Copy the latest Galaxy S4 Active Lineage 15 ROM ZIP file to your phone.
- Boot into Recovery.
- Flash the latest LinegeOS ROM ZIP from your phone.
– Here is a post explaining how to install LineageOS - Then flash the Lineage 15 Oreo GApps package.
– Here is a post explaining how to flash GApps using TWRP recovery. - Reboot and Enjoy
Complete the initial setup and enjoy Android Oreo 8.0 with LineageOS 15 for Galaxy S4 Active. After the installation of LineageOS 15 for Galaxy S4 Active you may want to enable ROOT access on your phone and here is how you can do that:
How to Enable ROOT on LineageOS 15.Stay tuned or Subscribe to the Galaxy S4 Active LineageOS forum For other Android Oreo, Nougat ROMs, LineageOS 15 ROMs, other ROMs and all other device specific topics.If you have found any BUG or any issues with this ROM, then following is the development thread at XDA created.
Galaxy S7 Edge CM14.1 (CyanogenMod 14.1, hero2qltechn) Nougat ROM is an unofficial CM14.1 build. Here we also have the Lineage OS 14.1 for Galaxy S7 Edge. For latest updates, stay tuned to the Lineage OS device list page.
[su_note note_color=”#D8F1C6″ text_color=”#769958″ radius=”3″ class=”” id=””]
LineageOS 16 for Galaxy S7 Edge is also available to download.[/su_note]In addition to this official ROM we have update many OFFICIAL CM14.1 (CyanogenMod 14.1) for many supported devices and many Unofficial CyanogenMod 14/14.1 ROM updates. This CM14.1 is ONLY for Galaxy S7 EDGE SNAPDRAGON variant and this build is brought to you by developer travis82.
Earlier travis82 had brought the CM13 for S7 Edge SnapDragon variant. If you like this ROM or work of the developer then please consider a donation to Travis Mills (travis82).
CAUTION:
This is an initial build and may have many BUGs leaving this ROM unusable as a daily driver. So, please take a backup using a synchronization application or using Samsung Smart Switch or if you have TWRP installed then boot into TWRP recovery and take a NANDROID backup using the TWRP itself before flashing this ROM. You are the only person making changes to your phone. Neither the developer nor we can be held responsible for any disaster that happens to your device.Status of Galaxy S7 Edge CyanogenMod 14.1 (CM14.1) Nougat ROM:
KNOWN ISSUES:
– NOT KNOWNWHAT’S WORKING:
– NOT KNOWN
Recommended files for CM14.1 Galaxy S7 Edge (CyanogenMod 14.1, hero2qltechn) Nougat ROM installation:
- TWRP recovery download for Galaxy S7 Edge (hero2qltechn)
– The .tar extension Recovery file which can be flashed with ODIN (probably without unlocking bootloader). Follow this guide: How to Install TWRP on Samsung using Odin for the .tar TWRP file.
- ROM download link for Galaxy S7 Edge (hero2qltechn) CyanogenMod 14.1
- Nougat GApps download link for Galaxy S7 Edge (hero2qltechn) CM14.1
Root binary is inbuilt since CyanogenMod 12, so you don’t need a separate SuperSu package to install to gain ROOT access. Here is How to Enable ROOT on CM14.1/CyanogenMod 14.1
Installing CyanogenMod 14.1 on (hero2qltechn) Galaxy S7 Edge CM14.1 Nougat ROM:
Make sure that you have a custom recovery installed on your Galaxy S7 Edge phone. If not then download the recovery from above downloads section and you can follow this TWRP recovery installation on Samsung phone using ODIN guide.
Follow this if you are flashing CyanogenMod 14.1 ROM for the first time to your Galaxy S7 Edge phone, or coming from another ROM:
This will delete all your data on your phone. You may consider backing up your phone data or take a nandroid backup. Here is how to take NANDROID backup using TWRP recovery.
Points to NOTE on BACKUP:
– Try to avoid restoring apps backup using Titanium Backup. It may break things up.
– Don’t restore system data using Titanium Backup! It will definitely break the current installation.
– It is also discouraged to Restoring Apps + Data using Titanium Backup.- Download and Copy the GApps and Galaxy S7 Edge CyanogenMod 14.1 ROM ZIP to your phone.
- Boot into Recovery. Make sure to have a Custom recovery like CWM or TWRP or any other custom recovery.
- Wipe data factory reset, Cache partition, Dalvik Cache and Format the System partition.
– Here is a guide explaining how to wipe data using TWRP recovery.This will delete all your data on your phone. You may consider complete backup of your phone data or take a NANDROID backup of the current ROM.
– How to backup all data on your Android Device.
– how to take NANDROID backup using TWRP recovery. - First flash the CM14.1 ROM ZIP from device. Then flash the GApps zip from your device memory.
– Here is a post explaining how to flash a custom ROM using TWRP recovery. - Now flash the Google Apps package.
– Here is a post explaining how to flash GApps using TWRP recovery. - Reboot and Enjoy the CyanogenMod 14.1 Nougat ROM on your Galaxy S7 Edge.
Upgrading from earlier version of CyanogenMod 14.1 ROM on Galaxy S7 Edge Snapdragon variant:
- Copy the latest Galaxy S7 Edge CyanogenMod 14.1 ROM ZIP file to your phone.
- Boot into Recovery.
- Flash the latest CM ROM ZIP from your phone and wait till it finishes flashing.
– Here is a post explaining how to flash a custom ROM using TWRP recovery. - After that flash the Google Apps package.
– Here is a post explaining how to flash GApps using TWRP recovery. - Reboot and Enjoy
Complete the initial setup and enjoy Android Nougat 7.1 with CyanogenMod 14.1 for Galaxy S7 Edge. After this CM14.1 installation you may want to enable ROOT access on your phone and here is how you can do that:
How to Enable ROOT Access on CM14.1/CyanogenMod 14.1Stay tuned or Subscribe to the Samsung Galaxy S7 Edge (hero2qltechn) forum For upcoming Android Nougat ROMs, CyanogenMod Custom ROMs, other ROMs and all other device specific topics.Android Oreo 8.1 ROM, LineageOS 15.1 for Galaxy J7 Prime (on7xelte) has now arrived via a development build. This LineageOS 15.1 for Galaxy J7 Prime (on7xelte) is brought to you by developer DarkLord1731.
DONATION TO DEVELOPER:
If you like this ROM then do consider for a small contribution to DarkLord1731 and/or LineageOS project:
– donation to DarkLord1731
– Donate to LineageOS projectIf you want the OFFICIAL LineageOS update or some more Android Oreo ROMs then stay tuned to the LineageOS 15 Oreo ROM page or the AOSP Android Oreo devices list page or the AICP 13 Oreo ROMs list.
DISCLAIMER:
THIS IS A BETA BUILD WHICH MAY HAVE MINOR BUGS. HAVE A BACKUP BEFORE FLASHING THIS LINEAGEOS ROM AND TRY AT YOUR OWN RISK. Installing a custom ROM on a Galaxy J7 Prime (on7xelte) requires the bootloader to be unlocked on the Galaxy J7 Prime (on7xelte) phone, which may VOID your warranty and may delete all your data. Before proceeding further you may consider backup all data on the phone. You are the only person doing changes to your phone and I cannot be held responsible for the mistakes done by you.Content structure:
Status of LineageOS 15.1 for Galaxy J7 Prime Oreo 8.1 Download:
WHAT’S WORKING:
– Almost EverythingKNOWN ISSUES:
– Sometimes screen on delay once after a reboot
REQUIRED LINKS AND FILES FOR LineageOS 15.1 for Galaxy J7 Prime OREO CUSTOM ROM:
- TWRP recovery link for Galaxy J7 Prime (on7xelte)
– Here is the TWRP update guide for the Galaxy J7 Prime (on7xelte).
- LineageOS 15.1 Download link for Galaxy J7 Prime (on7xelte)
- LineageOS 15.1 GApps download link for LineageOS 15.1 for Galaxy J7 Prime Oreo 8.1 ROM
Root binary is NOT inbuilt in LineageOS 15.1, so you may need a separate SuperSu package or LineageOS su binary to install to gain ROOT access. Here is LineageOS Rooting guide
If there is no in-built ROOT or it does not work for some reason then you can try SuperSU rooting guide to enable ROOT access.HOW TO INSTALL/DOWNLOAD/FLASH/UPDATE LineageOS 15.1 FOR Galaxy J7 Prime OREO CUSTOM ROM:
Follow this if you are flashing LineageOS 15.1 for Galaxy J7 Prime for the first time, or coming from another ROM:
Points to NOTE:
– Try to avoid restoring apps backup using Titanium Backup. It may break things up.
– Don’t restore system data using Titanium Backup! It will definitely break the current installation.
– It is also discouraged to Restoring Apps + Data using Titanium Backup.- Boot into Recovery. Make sure to have a Custom recovery like CWM or TWRP or any other custom recovery. If not then follow the Custom Recovery Installation Guide for Galaxy J7 Prime (it’s a generic guide which will work for TWRP as well as CWM recovery or any other recovery)
- Wipe data factory reset, Cache partition, Dalvik Cache and Format the System partition.
– Here is a guide explaining how to wipe data using TWRP recovery.This will delete all your data on your phone. You may consider complete backup of your phone data or take a NANDROID backup of the current ROM
– How to backup all data on your Android Device
– how to take NANDROID backup using TWRP recovery - Download and Copy the LineageOS 15.1 GApps and the Android Oreo based LineageOS 15.1 for Galaxy J7 Prime ROM ZIP file to your phone.
- First flash the LineageOS 15.1 for Galaxy J7 Prime Oreo ROM ZIP from device. Then flash the GApps for LineageOS 15.1 zip from your device memory.
– Here is a post explaining how to install LineageOS - Then reboot into recovery (don’t skip this) and flash the Gapps for LineageOS 15.1 package.
– Here is a post explaining how to flash GApps using TWRP recovery. - Reboot and Enjoy the Oreo 8.1 LineageOS 15.1 ROM for Galaxy J7 Prime.
Upgrading from earlier version of LineageOS 15.1 for Galaxy J7 Prime (on7xelte):
- Copy the latest Galaxy J7 Prime Lineage 15 Oreo ROM ZIP file to your phone.
- Boot into Recovery.
- Flash the latest LinegeOS ROM ZIP from your phone.
– Here is a post explaining how to install LineageOS - Then flash the Lineage 15 Oreo GApps package.
– Here is a post explaining how to flash GApps using TWRP recovery. - Reboot and Enjoy
Complete the initial setup and enjoy Android Oreo 8.1 with LineageOS 15.1 for Galaxy J7 Prime. After the installation of LineageOS 15.1 for Galaxy J7 Prime you may want to enable ROOT access on your phone and here is how you can do that:
How to Enable ROOT on LineageOS 15.1.Stay tuned or Subscribe to the Galaxy J7 Prime LineageOS forum For other Android Oreo, Nougat ROMs, LineageOS 15.1 ROMs, other ROMs and all other device specific topics.For any concerns on this ROM, you can further look for the following thread on xda.
Android Nougat 7.1 ROM, LineageOS 14.1 for Galaxy TAB S2 9.7 WiFi has now arrived via an UNOFFICIAL build. Also, here comes the LineageOS 15 for Galaxy Tab S2 9.7 Wifi. If you want some more LineageOS ROMs or wanna taste the OFFICIAL LineageOS build then stay tuned to the LineageOS 14.1 ROM collection page. IN addition to this LineageOS 14.1, we also had the legacy CM14.1 for Galaxy Tab S2 9.7 WiFi. This Galaxy TAB S2 9.7 WiFi LineageOS 14.1 is brought to you by developer T_I and all the Galaxy TAB S2 9.7 WiFi TWRP recovery brought to you by developer ashyt16
DONATION TO DEVELOPER:
If you like T_I’s work and want him to keep up this good work then you can consider a donation to him:
– Donate to T_IDISCLAIMER:
THIS IS AN INITIAL BUILD WHICH MAY NOT BOOT AT ALL. HAVE A BACKUP BEFORE FLASHING THIS AND TRY AT YOUR OWN RISK. Installing a custom ROM on a Galaxy TAB S2 9.7 WiFi (gts210wifi, SM-T810) may require the bootloader to be unlocked, which may VOID your warranty and may delete all your data. Before proceeding further you may consider backup all data on the phone. You are the only person doing changes to your phone and I cannot be held responsible for the mistakes done by you.Status of LineageOS 14.1 for Galaxy TAB S2 9.7 WiFi Nougat 7.1 ROM:
WHAT’S WORKING:
– Not KnownKNOWN ISSUES:
– Not Known
REQUIRED LINKS AND FILES FOR LineageOS 14.1 for Galaxy TAB S2 9.7 WiFi NOUGAT 7.1 BASED CUSTOM ROM:
- Latest FW and baseband
- TWRP download for Galaxy TAB S2 9.7 WiFi (gts210wifi, SM-T810)
– Here is: Custom Recovery Installation Guide for Samsung Galaxy TAB S2 9.7 WiFi (This guide is only for .tar TWRP file)
– To flash .img file you can follow this TWRP update guide using fastboot or you can use Flashify to update the .img TWRP. - ROM Download Link of Galaxy TAB S2 9.7 WiFi LineageOS 14.1 ROM (gts210wifi, SM-T810)
- LineageOS 14.1 Nougat GApps download link for Galaxy TAB S2 9.7 WiFi LineageOS 14.1 Nougat 7.1 ROM
Root binary is NOT inbuilt in LineageOS 14.1, so you may need a separate SuperSu package or LineageOS su binary to install to gain ROOT access. Here is How to Enable ROOT on LineageOS 14.1
If there is no in-built ROOT or it does not work for some reason then you can try flashing SuperSU zip using recovery to gain ROOT access.HOW TO INSTALL/DOWNLOAD/FLASH/UPDATE Galaxy TAB S2 9.7 WiFi LineageOS 14.1 NOUGAT CUSTOM ROM:
Follow this if you are flashing LineageOS 14.1 for Galaxy TAB S2 9.7 WiFi (gts210wifi, SM-T810) for the first time, or coming from another ROM:
Points to NOTE:
– Try to avoid restoring apps backup using Titanium Backup. It may break things up.
– Don’t restore system data using Titanium Backup! It will definitely break the current installation.
– It is also discouraged to Restoring Apps + Data using Titanium Backup.- Download and Copy the GApps and LineageOS 14.1 for Galaxy TAB S2 9.7 WiFi ROM ZIP to your phone.
- Boot into Recovery. Make sure to have a Custom recovery like CWM or TWRP or any other custom recovery. If not then follow the Custom Recovery Installation Guide for Galaxy TAB S2 9.7 WiFi (gts210wifi, SM-T810) (it’s a generic guide which will work for TWRP as well as CWM recovery or any other recovery)
- Wipe data factory reset, Cache partition, Dalvik Cache and Format the System partition.
– Here is a guide explaining how to wipe data using TWRP recovery.This will delete all your data on your phone. You may consider complete backup of your phone data or take a NANDROID backup of the current ROM
– How to backup all data on your Android Device
– how to take NANDROID backup using TWRP recovery - First flash the Galaxy TAB S2 9.7 WiFi LineageOS 14.1 ROM ZIP from device. Then flash the GApps zip from your device memory.
– Here is a post explaining how to install LineageOS. - DO NOT REBOOT yet. Then flash the LineageOS 14.1 Nougat GApps package.
– Here is a post explaining how to flash GApps using TWRP recovery. - Reboot and Enjoy the Nougat 7.1 LineageOS 14.1 ROM for Galaxy TAB S2 9.7 WiFi (gts210wifi, SM-T810).
Upgrading from earlier version of Galaxy TAB S2 9.7 WiFi LineageOS 14.1 (gts210wifi, SM-T810):
- Copy the latest LineageOS 14.1 for Galaxy TAB S2 9.7 WiFi ROM ZIP file to your phone.
- Boot into Recovery.
- Flash the latest LineageOS ROM ZIP from your phone.
– Here is a post explaining how to install LineageOS. - Then flash the LineageOS 14.1 Nougat GApps package.
– Here is a post explaining how to flash GApps using TWRP recovery. - Reboot and Enjoy
Complete the initial setup and enjoy Android Nougat 7.1 with LineageOS 14.1 for Galaxy TAB S2 9.7 WiFi (gts210wifi, SM-T810). After the installation of Galaxy TAB S2 9.7 WiFi LineageOS 14.1 ROM (gts210wifi, SM-T810) you may want to enable ROOT access on your phone and here is how you can do that:
How to Enable ROOT on LineageOS 14.1.Stay tuned or Subscribe to the Galaxy TAB S2 9.7 WiFi (gts210wifi, SM-T810) forum For other Android Nougat ROMs, LineageOS 14.1 ROMs, other ROMs and all other device specific topics.This guide will tell you how to rooting Galaxy ALPHA and how to install a TWRP custom recovery on your Samsung Galaxy ALPHA (SM-G850F). A custom recovery is the world to some beautiful custom ROMs for your device. If you agree with me then you do understand the need of a custom recovery for a device. Samsung Galaxy ALPHA was recently released to market and today we have the TWRP custom recovery for that. With this first custom recovery you will also see some custom ROMs like Cyanogenmod 12, Paranoid Android and more for Samsung Galaxy ALPHA in near future.
After installing TWRP recovery you can install many android mods such as GCam APK, enable navigation gesture, enable face unlock, viper4android etc. and many more.
DISCLAIMER:
Installing custom recovery on your device may VOID your warranty and may delete all your data. Before proceeding further you may consider backup your all data. Understand the fact that you are the only person responsible for everything that you do with you device. If you blame me for a disaster that happened to your device then I will simply laugh at you.
[Galaxy Alpha TWRP Custom recovery and Rooting guide]
Before going into details make sure that you have the following things in hand to start with the recovery installation guide.Things required for Rooting Galaxy ALPHA and installing TWRP custom recovery guide:
- Download and install KIES that contains driver for Galaxy ALPHA
- A Linux/Windows PC or a MAC installed with Fastboot and adb binaries:
– 15 Seconds ADB Installer for Windows
– Minimal ADB and Fastboot for Windows
ADB Fastboot Installation guide for Linux or MAC - Latest SuperSU by chainfire
- TWRP Recovery Download link for Galaxy ALPHA
- Download Samsung ODIN flashing application
- Enough time with a smart and cool brain
You may follow the below link to backup all the data on your android device:
Step by step guide to take full backup of your phone dataSTEP by STEP recovery installation guide for Galaxy ALPHA:
If you already have ROOT then follow this process to flash the recovery easily.
Download the latest recovery file in img format from the above link and copy it in the sdcard.
Access to your phone’s console by using adb or terminal emulator app and type the below commands:$ su
# dd if=/sdcard/recoveryfilename.img of=/dev/block/mmcblk0p10
That’s all.
And make sure that you enter the command right.If you don’t have ROOT on your phone then follow this below guide.
STEP 1:Put your phone into download mode.
Press and hold these three buttons until you see a WARNING SCREEN! to enter into the download mode:
Volume DOWN keys + Power key + Home keyWhen you see the WARNING SCREEN press the volume UP key to continue into the recovery mode.
STEP 2:Open the ODIN application on your PC.
Connect your phone(while it is still in the download mode) to the PC using a USB cable.
ODIN will show an Added! message on the message box.
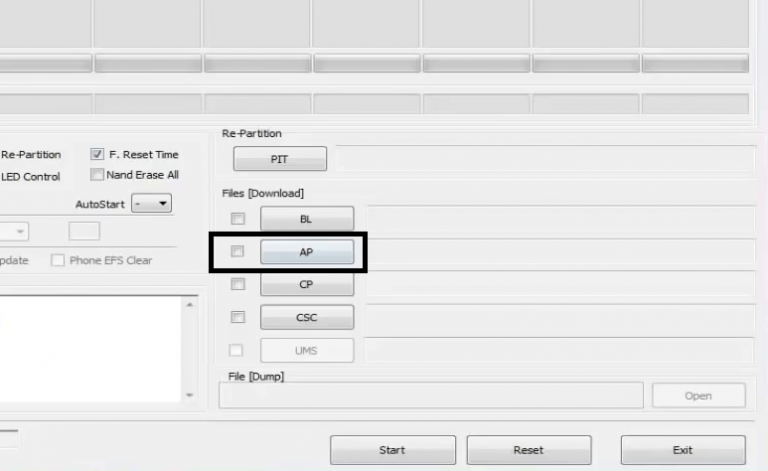
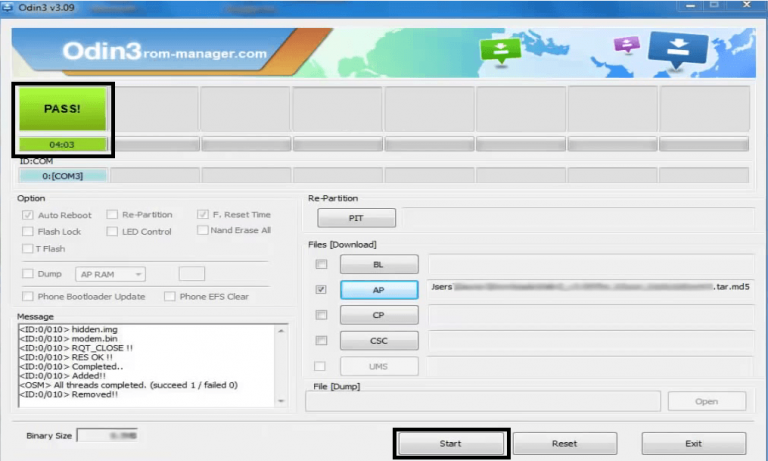
[Device added on the ODIN screen]STEP 3:Click on the AP button on the ODIN application and select the CWM recovery file.

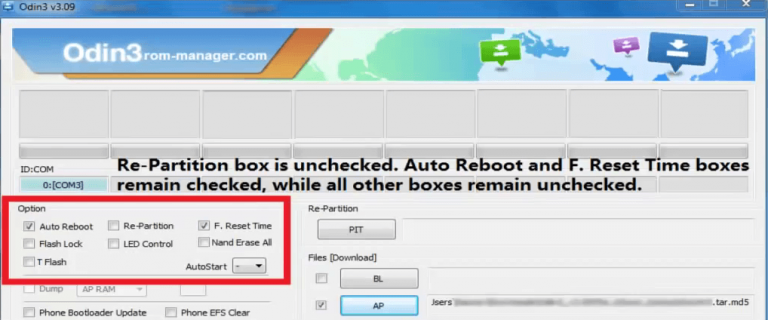
[Click on the AP button and select the recovery file]STEP 4:Select the appropriate options before flashing the recovery image.
only the Auto Reboot and F. Reset Time
Make sure all other boxes are un-checked.
[Select the options]STEP 5:Select the start button, which will start the flashing process.
When you get the PASS message, then your phone will reboot automatically.
[Click on Start and wait till it completes]You may disconnect your phone and proceed for the next process from here on.
Rooting Galaxy ALPHA using the custom recovery:
NOTE:
Rooting guide will only work after the custom recovery installation.
If you will SKIP the custom recovery installation process and perform only these steps then rooting will not be done.STEP 1:Copy the Flashable ROOTing zip file that you have downloaded to your SD card.
STEP 2:Press and hold these three buttons until you see a WARNING SCREEN! to enter into the recovery mode:
Volume UP keys + Power key + Home keyWhen you see the WARNING SCREEN press the volume UP key to continue into the recovery mode.
STEP 3:Select the Install option in the TWRP recovery screen and Select the BETA-SuperSU-v2.xx.zip zip file where you have kept in the SD card.
Wait for the flashing to be done and then reboot your phone.After successfully completing all the above mentioned steps your device will be rooted. That’s all… have fun.
Stay tuned or Subscribe to the Galaxy Alpha forum For upcoming Android Nougat ROMs, CyanogenMod Custom ROMs, other ROMs and all other device specific topics.