- Search Results
CM14 for Galaxy Note 2 CM14/CyanogenMod 14 has now arrived through an UNOFFICIAL build. Here we also have the Lineage OS 14.1 ROM for Galaxy NOTE 2. For latest updates, stay tuned to the Lineage OS device list page. Since Google released Android Nougat Source code, we have update many Android NOUGAT AOSP ROMs and also many CyanogenMod 14/CM14 ROMs updated and many are yet to come. This CyanogenMod 14/CM14 for Galaxy Note 2 is brought to you by developer Tilak sidduram. If you like developer’s work and wanna him keep up this good work then consider donating: Donate to tilaksidduram via PayPal.
DISCLAIMER:
THIS IS STILL AN EARLY BUILD. THIS MAY NOT BOOT AT ALL OR EVEN IF IT BOOTS IT MAY HAVE MANY BUGS AND MAY NOT BE USED AS A DAILY DRIVER. TRY AT YOUR OWN RISK. Installing custom ROM requires a custom recovery to be installed on your device, which may VOID your warranty and may delete all your data. Before proceeding further you may consider backup your all data. You are the only person doing changes to your phone and neither the developer(s) nor we can be held responsible for the mistakes done by you.Status of (n7100) Galaxy Note 2 CM14 (CyanogenMod 14) Nougat 7.0 ROM:
WHAT’S WORKING:
– Not knownKNOWN ISSUES:
– Not known
REQUIRED LINKS AND FILES FOR GALAXY NOTE 2 CM14/CYANOGENMOD 14 NOUGAT 7.0 CUSTOM ROM:
- TWRP recovery download for Galaxy Note 2
– Here is: Custom Recovery Installation Guide for Samsung Galaxy Note 2 (This guide is only for .tar TWRP file)
– To flash .img file you can follow this TWRP update guide using fastboot or you can use Flashify to update the .img TWRP. - ROM Download link to tilaksidduram’s CM14 for Galaxy Note 2 Nougat 7.0 ROM (n7100)
- Nougat GApps download link for Galaxy Note 2 CM14 ROM
Root binary is inbuilt since CyanogenMod 12, so you don’t need a separate SuperSu package to install to gain ROOT access. Here is How to Enable ROOT on CM14/CyanogenMod 14
HOW TO INSTALL/DOWNLOAD/FLASH/UPDATE GALAXY NOTE 2 CM14/CYANOGENMOD 14 (n7100) NOUGAT 7.0 CUSTOM ROM:
Follow this if you are flashing Galaxy Note 2 CM14/CyanogenMod 14 for the first time, or coming from another ROM:
This will delete all your data on your phone. You may consider backing up your phone data or take a nandroid backup. Here is how to take NANDROID backup using TWRP recovery.
Points to NOTE:
– Try to avoid restoring apps backup using Titanium Backup. It may break things up.
– Don’t restore system data using Titanium Backup! It will definitely break the current installation.
– It is also discouraged to Restoring Apps + Data using Titanium Backup.- Download and Copy the GApps and Galaxy Note 2 CM14/CyanogenMod 14 ROM ZIP to your phone.
- Boot into Recovery.
- Wipe data factory reset, Cache partition, Dalvik Cache and Format the System partition.
– Here is a guide explaining how to wipe data using TWRP recovery.This will delete all your data on your phone. You may consider complete backup of your phone data or take a NANDROID backup of the current ROM
– How to backup all data on your Android Device
– how to take NANDROID backup using TWRP recovery - First flash the CM14 ROM ZIP from device.
– Here is a post explaining how to flash a custom ROM using TWRP recovery. - Then reboot into recovery (don’t skip this) and flash the CyanogenMod 14 Nougat GApps package.
– Here is a post explaining how to flash GApps using TWRP recovery. - Reboot and Enjoy the CM14 for Galaxy Note 2.
Upgrading from earlier version of CyanogenMod 14/CM14 for Galaxy Note 2:
- Copy the latest Galaxy Note 2 CM14/CyanogenMod 14 ROM ZIP file to your phone.
- Boot into Recovery.
- Flash the latest CM ROM ZIP from your phone.
– Here is a post explaining how to flash a custom ROM using TWRP recovery. - Then flash the CM14 Nougat GApps package.
– Here is a post explaining how to flash GApps using TWRP recovery. - Reboot and Enjoy
Complete the initial setup and enjoy Android Nougat 7.0.0 with CyanogenMod 14/CM14 for Note 2 (n7100). After this CM14 installation you may want to enable ROOT access on your phone and here is how you can do that:
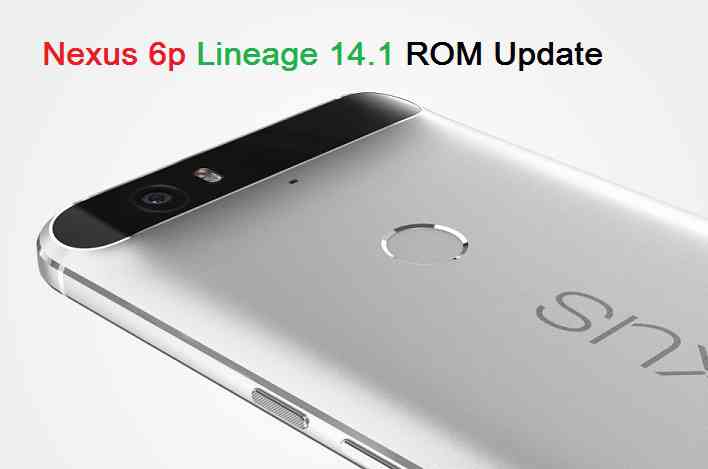
How to Enable ROOT on CM14/CyanogenMod 14.Stay tuned or Subscribe to the Galaxy Note 2 (n7100) forum For other Android Nougat ROMs, CyanogenMod 14 ROMs, other ROMs and all other device specific topics.Android Nougat 7.1 ROM, Nexus 6P LineageOS 14.1 has now arrived via an UNOFFICIAL build. If you want some more Lineage ROMs or wanna taste the OFFICIAL Lineage build then stay tuned the LineageOS 14.1 ROMs page or the latest Android O LineageOS 15 list of supported devices. Before this there was the CM14.1 for Nexus 6P. This LineageOS 14.1 for Nexus 6P (angler) is brought to you by developer razorloves and kronflux.
DISCLAIMER:
THIS IS AN INITIAL BUILD WHICH MAY NOT BOOT AT ALL. HAVE A BACKUP BEFORE FLASHING THIS AND TRY AT YOUR OWN RISK. Installing a custom ROM on a Nexus 6P (angler) requires the bootloader to be unlocked on the Nexus 6P (angler) phone, which may VOID your warranty and may delete all your data. Before proceeding further you may consider backup all data on the phone. You are the only person doing changes to your phone and I cannot be held responsible for the mistakes done by you.Status of Nexus 6P LineageOS 14.1 Nougat 7.1 Custom ROM:
WHAT’S WORKING:
– Not KnownKNOWN ISSUES:
– Not Known
REQUIRED LINKS AND FILES FOR Nexus 6P LineageOS 14.1 NOUGAT CUSTOM ROM:
- TWRP recovery link for Nexus 6P (angler)
– Here is theTWRP update guide for the Nexus 6P (angler). This TWRP recovery guide requires an unlocked bootloader on the Nexus 6P (angler).
- ROM Download link of LineageOS 14.1 for Nexus 6P (angler) [by kronflux]
- ROM Download link of LineageOS 14.1 for Nexus 6P (angler) [by razorloves]
- Lineage Nougat GApps download link for Nexus 6P LineageOS 14.1 Nougat 7.1 ROM
- Google Assistant for LineageOS [OPTIONAL]
– Use the following guide: installing a flashable zip
Root binary is inbuilt in LineageOS 14.1, so you don’t need a separate SuperSu package to install to gain ROOT access. Here is How to Enable ROOT on LineageOS 14.1
If there is no in-built ROOT or it does not work for some reason then you can try flashing SuperSU zip using recovery to gain ROOT access.HOW TO INSTALL/DOWNLOAD/FLASH/UPDATE LineageOS 14.1 FOR Nexus 6P NOUGAT CUSTOM ROM:
Follow this if you are flashing LineageOS 14.1 for Nexus 6P (angler) for the first time, or coming from another ROM:
Points to NOTE:
– Try to avoid restoring apps backup using Titanium Backup. It may break things up.
– Don’t restore system data using Titanium Backup! It will definitely break the current installation.
– It is also discouraged to Restoring Apps + Data using Titanium Backup.- Download and Copy the GApps and Nexus 6P LineageOS 14.1 ROM ZIP to your phone.
- Boot into Recovery. Make sure to have a Custom recovery like CWM or TWRP or any other custom recovery. If not then follow the Custom Recovery Installation Guide for Nexus 6P (angler) (it’s a generic guide which will work for TWRP as well as CWM recovery or any other recovery)
- Wipe data factory reset, Cache partition, Dalvik Cache and Format the System partition.
– Here is a guide explaining how to wipe data using TWRP recovery.This will delete all your data on your phone. You may consider complete backup of your phone data or take a NANDROID backup of the current ROM
– How to backup all data on your Android Device
– how to take NANDROID backup using TWRP recovery - First flash the Nexus 6P LineageOS 14.1 ROM ZIP from device. Then flash the GApps zip from your device memory.
– Here is a post explaining how to install LineageOS - Then reboot into recovery (don’t skip this) and flash the LineageOS 14.1 Nougat GApps package.
– Here is a post explaining how to flash GApps using TWRP recovery. - Reboot and Enjoy the Nougat 7.1 LineageOS 14.1 ROM for Nexus 6P (angler).
Upgrading from earlier version of LineageOS 14.1 for Nexus 6P (angler):
- Copy the latest Nexus 6P LineageOS 14.1 ROM ZIP file to your phone.
- Boot into Recovery.
- Flash the latest CM ROM ZIP from your phone.
– Here is a post explaining how to install LineageOS - Then flash the LineageOS 14.1 Nougat GApps package.
– Here is a post explaining how to flash GApps using TWRP recovery. - Reboot and Enjoy
Complete the initial setup and enjoy Android Nougat 7.1 with LineageOS 14.1 for Nexus 6P (angler). After the installation of LineageOS 14.1 for Nexus 6P (angler) you may want to enable ROOT access on your phone and here is how you can do that:
How to Enable ROOT on LineageOS 14.1.Stay tuned or Subscribe to the Nexus 6P (angler) forum For other Android Nougat ROMs, LineageOS 14.1 ROMs, other ROMs and all other device specific topics.Android Marshmallow ROM, LeEco Le Pro 3 LineageOS 13 has now arrived via an UNOFFICIAL build. In adiition, we also have the LineageOS 14.1 for Le Pro 3. If you want some more Lineage ROMs for other devices or wanna taste the OFFICIAL Lineage build then stay tuned the LineageOS 13 ROM collection page and for Lineage 14.1 stay tuned to the LineageOS 14.1 ROM collection page. This LineageOS 13 for Le Pro 3 (zl1) is brought to you by developer codeworkx. If you like this ROM then please consider a donation to codeworkx, to keep him motivated.
DISCLAIMER:
THIS IS AN INITIAL BUILD WHICH MAY NOT BOOT AT ALL. HAVE A BACKUP BEFORE FLASHING THIS AND TRY AT YOUR OWN RISK. Installing a custom ROM on a Le Pro 3 (zl1) requires the bootloader to be unlocked on the Le Pro 3 (zl1) phone, which may VOID your warranty and may delete all your data. Before proceeding further you may consider backup all data on the phone. You are the only person doing changes to your phone and I cannot be held responsible for the mistakes done by you.Status of Le Pro 3 LineageOS 13 Marshmallow Custom ROM:
WHAT’S WORKING:
– Not KnownKNOWN ISSUES:
– Not Known
REQUIRED LINKS AND FILES FOR Le Pro 3 LineageOS 13 MARSHMALLOW CUSTOM ROM:
- TWRP recovery link for Le Pro 3 (zl1)
– Here is theTWRP update guide for the Le Pro 3 (zl1). This TWRP recovery guide requires an unlocked bootloader on the Le Pro 3 (zl1).
- ROM Download link of LineageOS 13 for Le Pro 3 by codeworkxf
- LineageOS 13 Marshmallow GApps download link for Le Pro 3 LineageOS 13 Marshmallow ROM
Root binary is inbuilt in LineageOS 13, so you don’t need a separate SuperSu package to install to gain ROOT access. Here is How to Enable ROOT on LineageOS 13
If there is no in-built ROOT or it does not work for some reason then you can try flashing SuperSU zip using recovery to gain ROOT access.HOW TO INSTALL/DOWNLOAD/FLASH/UPDATE LineageOS 13 FOR Le Pro 3 Marshmallow CUSTOM ROM:
Follow this if you are flashing LineageOS 13 for Le Pro 3 (zl1) for the first time, or coming from another ROM:
Points to NOTE:
– Try to avoid restoring apps backup using Titanium Backup. It may break things up.
– Don’t restore system data using Titanium Backup! It will definitely break the current installation.
– It is also discouraged to Restoring Apps + Data using Titanium Backup.- Download and Copy the GApps and Le Pro 3 LineageOS 13 ROM ZIP to your phone.
- Boot into Recovery. Make sure to have a Custom recovery like CWM or TWRP or any other custom recovery. If not then follow the Custom Recovery Installation Guide for Le Pro 3 (zl1) (it’s a generic guide which will work for TWRP as well as CWM recovery or any other recovery)
- Wipe data factory reset, Cache partition, Dalvik Cache and Format the System partition.
– Here is a guide explaining how to wipe data using TWRP recovery.This will delete all your data on your phone. You may consider complete backup of your phone data or take a NANDROID backup of the current ROM
– How to backup all data on your Android Device
– how to take NANDROID backup using TWRP recovery - First flash the Le Pro 3 LineageOS 13 ROM ZIP from device. Then flash the GApps zip from your device memory.
– Here is a post explaining how to install LineageOS. - Then reboot into recovery (don’t skip this) and flash the LineageOS 13 Marshmallow GApps package.
– Here is a post explaining how to flash GApps using TWRP recovery. - Reboot and Enjoy the Marshmallow LineageOS 13 ROM for Le Pro 3 (zl1).
Upgrading from earlier version of LineageOS 13 for Le Pro 3 (zl1):
- Copy the latest Le Pro 3 LineageOS 13 ROM ZIP file to your phone.
- Boot into Recovery.
- Flash the latest CM ROM ZIP from your phone.
– Here is a post explaining how to install LineageOS. - Then flash the LineageOS 13 Marshmallow GApps package.
– Here is a post explaining how to flash GApps using TWRP recovery. - Reboot and Enjoy
Complete the initial setup and enjoy Android Marshmallow with LineageOS 13 for Le Pro 3 (zl1). After the installation of LineageOS 13 for Le Pro 3 (zl1) you may want to enable ROOT access on your phone and here is how you can do that:
How to Enable ROOT on LineageOS 13.Stay tuned or Subscribe to the Le Pro 3 (zl1) forum For other Android Marshmallow ROMs, LineageOS 13 ROMs, other ROMs and all other device specific topics.Android Nougat 7.1 ROM, LineageOS 14.1 for Galaxy NOTE 2 LTE has now arrived via an OFFICIAL build. If you want some more LineageOS ROMs then stay tuned to the LineageOS 14.1 ROM Devices list page. This Galaxy NOTE 2 LTE LineageOS 14.1 is an OFFICIAL LineageOS for Galaxy NOTE 2 LTE, which means you will be getting weekly updates of this ROM for your device. I am not sure but I think this OFFICIAL LineageOS 14.1 for Galaxy NOTE 2 LTE is brought to you by PoisonNinja and contributors.
DISCLAIMER:
HAVE A BACKUP BEFORE FLASHING THIS AND TRY AT YOUR OWN RISK. Installing a custom ROM on a Galaxy NOTE 2 LTE (t0lte, SM-N7105) may require the bootloader to be unlocked, which may VOID your warranty and may delete all your data. Before proceeding further you may consider backup all data on the phone. You are the only person doing changes to your phone and I cannot be held responsible for the mistakes done by you.Status of LineageOS 14.1 for Galaxy NOTE 2 LTE (t0lte, SM-N7105) Nougat 7.1 ROM:
WHAT’S WORKING:
– Not KnownKNOWN ISSUES:
– Not Known
REQUIRED LINKS AND FILES FOR LineageOS 14.1 for Galaxy NOTE 2 LTE NOUGAT 7.1 CUSTOM ROM:
- TWRP download link for Galaxy NOTE 2 LTE
TWRP download link for Galaxy NOTE 2 LTE SK Telecom
TWRP download link for Galaxy NOTE 2 LTE Korea– Here is: Custom Recovery Installation Guide for Samsung Galaxy NOTE 2 LTE (This guide is only for .tar or .tar.md5 TWRP file)
– To flash .img file you can follow this TWRP update guide using fastboot or you can use Flashify to update the .img TWRP. [YOUR DEVICE MIGHT NEED TO BE BOOTLOADER UNLOCKED IF YOU ARE FOLLOWING THIS] - ROM Download link of OFFICIAL LineageOS 14.1 for Galaxy NOTE 2 LTE (t0lte, SM-N7105)
– All other NOTE 2 variants viz. Galaxy NOTE 2 LTE SK Telecom (t0lteskt) and the LTE Korea (t0ltektt) are now merged into the t0lte LineageOS build. You don’t need a separate LineageOS build for the same. - LineageOS 14.1 GApps download link for Galaxy NOTE 2 LTE LineageOS 14.1 Nougat 7.1 ROM
Root binary is NOT inbuilt in LineageOS 14.1, so you may need a separate SuperSu package or LineageOS su binary to install to gain ROOT access. Here is How to Enable ROOT on LineageOS 14.1
If there is no in-built ROOT or it does not work for some reason then you can try flashing SuperSU zip using recovery to gain ROOT access.HOW TO INSTALL/DOWNLOAD/FLASH/UPDATE Galaxy NOTE 2 LTE LineageOS 14.1 NOUGAT CUSTOM ROM:
Follow this if you are flashing LineageOS 14.1 for Galaxy NOTE 2 LTE (t0lte, SM-N7105) for the first time, or coming from another ROM:
Points to NOTE:
– Try to avoid restoring apps backup using Titanium Backup. It may break things up.
– Don’t restore system data using Titanium Backup! It will definitely break the current installation.
– It is also discouraged to Restoring Apps + Data using Titanium Backup.- Download and Copy the GApps and LineageOS 14.1 for Galaxy NOTE 2 LTE ROM ZIP to your phone.
- Boot into Recovery. Make sure to have a Custom recovery like CWM or TWRP or any other custom recovery. If not then follow the Custom Recovery Installation Guide for Galaxy NOTE 2 LTE (t0lte, SM-N7105) (it’s a generic guide which will work for TWRP as well as CWM recovery or any other recovery)
- Wipe data factory reset, Cache partition, Dalvik Cache and Format the System partition.
– Here is a guide explaining how to wipe data using TWRP recovery.This will delete all your data on your phone. You may consider complete backup of your phone data or take a NANDROID backup of the current ROM
– How to backup all data on your Android Device
– how to take NANDROID backup using TWRP recovery - First flash the Galaxy NOTE 2 LTE LineageOS 14.1 ROM ZIP from device. Then flash the GApps zip from your device memory.
– Here is a post explaining how to install LineageOS. - DO NOT REBOOT yet. Then flash the LineageOS 14.1 GApps package.
– Here is a post explaining how to flash LineageOS 14.1 GApps using TWRP recovery. - Reboot and Enjoy the Nougat 7.1 LineageOS 14.1 ROM for Galaxy NOTE 2 LTE (t0lte, SM-N7105).
Upgrading from earlier version of Galaxy NOTE 2 LTE LineageOS 14.1 (t0lte, SM-N7105):
- Copy the latest LineageOS 14.1 for Galaxy NOTE 2 LTE ROM ZIP file to your phone.
- Boot into Recovery.
- Flash the latest LineageOS ROM ZIP from your phone.
– Here is a post explaining how to install LineageOS. - Then flash the LineageOS 14.1 Nougat GApps package.
– Here is a post explaining how to flash GApps using TWRP recovery. - Reboot and Enjoy
Complete the initial setup and enjoy Android Nougat 7.1 with LineageOS 14.1 for Galaxy NOTE 2 LTE (t0lte, SM-N7105). After the installation of Galaxy NOTE 2 LTE LineageOS 14.1 ROM (t0lte, SM-N7105) you may want to enable ROOT access on your phone and here is how you can do that:
How to Enable ROOT on LineageOS 14.1.Stay tuned or Subscribe to the Galaxy NOTE 2 LTE (t0lte, SM-N7105) forum For other Android Nougat ROMs, LineageOS 14.1 ROMs, other ROMs and all other device specific topics.Android Oreo 8.0 ROM, LineageOS 15 for Galaxy NOTE Edge (tbltexx) has now arrived via a development build. This LineageOS 15 for Galaxy NOTE Edge (tbltexx) is brought to you by developer micky387.
DONATION TO DEVELOPER:
If you like this ROM then do consider for a small contribution to micky387:
Donate to micky387If you want the OFFICIAL LineageOS update or some more Android Oreo ROMs then stay tuned to the LineageOS 15 page or the AOSP Android Oreo devices list page or the AICP 13 Oreo ROMs list.
DISCLAIMER:
THIS IS AN INITIAL BUILD WHICH MAY NOT BOOT AT ALL OR EVEN IF IT BOOTS IT MAY HAVE MANY BUGS. HAVE A BACKUP BEFORE FLASHING THIS LINEAGEOS ROM AND TRY AT YOUR OWN RISK. Installing a custom ROM on a Galaxy NOTE Edge (tbltexx) requires the bootloader to be unlocked on the Galaxy NOTE Edge (tbltexx) phone, which may VOID your warranty and may delete all your data. Before proceeding further you may consider backup all data on the phone. You are the only person doing changes to your phone and I cannot be held responsible for the mistakes done by you.Content structure:
Status of LineageOS 15 for Galaxy NOTE Edge Oreo ROM Download:
WHAT’S WORKING:
– UnknownKNOWN ISSUES:
– Call/data : partially broken
– Camera: can have some Fc but working
– NFC: lot of issues
– AudioFX: All audio work (mp3,video, youtube but can play with effect)
– Gps: working but perhaps some problem to fix satellite ??
REQUIRED LINKS AND FILES FOR LineageOS 15 for Galaxy NOTE Edge OREO CUSTOM ROM:
- TWRP recovery link for Galaxy NOTE Edge (tbltexx)
– Here is theTWRP update guide for the Galaxy NOTE Edge (tbltexx).
- LineageOS 15 Download link for Galaxy NOTE Edge
- LineageOS 15 GApps download link for LineageOS 15 for Galaxy NOTE Edge Oreo 8.0 ROM
Root binary is NOT inbuilt in LineageOS 15, so you may need a separate SuperSu package or LineageOS su binary to install to gain ROOT access. Here is LineageOS Rooting guide
If there is no in-built ROOT or it does not work for some reason then you can try SuperSU rooting guide to enable ROOT access.HOW TO INSTALL/DOWNLOAD/FLASH/UPDATE LineageOS 15 FOR Galaxy NOTE Edge OREO CUSTOM ROM:
Follow this if you are flashing LineageOS 15 for Galaxy NOTE Edge for the first time, or coming from another ROM:
Points to NOTE:
– Try to avoid restoring apps backup using Titanium Backup. It may break things up.
– Don’t restore system data using Titanium Backup! It will definitely break the current installation.
– It is also discouraged to Restoring Apps + Data using Titanium Backup.- Boot into Recovery. Make sure to have a Custom recovery like CWM or TWRP or any other custom recovery. If not then follow the Custom Recovery Installation Guide for Galaxy NOTE Edge (it’s a generic guide which will work for TWRP as well as CWM recovery or any other recovery)
- Wipe data factory reset, Cache partition, Dalvik Cache and Format the System partition.
– Here is a guide explaining how to wipe data using TWRP recovery.This will delete all your data on your phone. You may consider complete backup of your phone data or take a NANDROID backup of the current ROM
– How to backup all data on your Android Device
– how to take NANDROID backup using TWRP recovery - Download and Copy the LineageOS 15 GApps and the Android Oreo based LineageOS 15 for Galaxy NOTE Edge ROM ZIP file to your phone.
- First flash the LineageOS 15 for Galaxy NOTE Edge Oreo ROM ZIP from device. Then flash the GApps for LineageOS 15 zip from your device memory.
– Here is a post explaining how to install LineageOS - Then reboot into recovery (don’t skip this) and flash the Gapps for LineageOS 15 package.
– Here is a post explaining how to flash GApps using TWRP recovery. - Reboot and Enjoy the Oreo 8.0 LineageOS 15 ROM for Galaxy NOTE Edge.
Upgrading from earlier version of LineageOS 15 for Galaxy NOTE Edge (tbltexx):
- Copy the latest Galaxy NOTE Edge Lineage 15 Oreo ROM ZIP file to your phone.
- Boot into Recovery.
- Flash the latest LinegeOS ROM ZIP from your phone.
– Here is a post explaining how to install LineageOS - Then flash the Lineage 15 Oreo GApps package.
– Here is a post explaining how to flash GApps using TWRP recovery. - Reboot and Enjoy
Complete the initial setup and enjoy Android Oreo 8.0 with LineageOS 15 for Galaxy NOTE Edge. After the installation of LineageOS 15 for Galaxy NOTE Edge you may want to enable ROOT access on your phone and here is how you can do that:
How to Enable ROOT on LineageOS 15.Stay tuned or Subscribe to the Galaxy NOTE Edge LineageOS forum For other Android Oreo, Nougat ROMs, LineageOS 15 ROMs, other ROMs and all other device specific topics.If you have found any issues or BUGs on this ROM then here is the xda link where you can place all your concerns.
If you are looking to install/update LineageOS 15.1 for LG G3 Sprint, then it’s now available via a development build. This Lineage OS 15.1 for LG G3 Sprint (ls990) is brought to you by developer HardStyl3r.
DONATION TO DEVELOPER(S):
If you like this ROM then do consider for a small contribution to HardStyl3r and Lineage OS project:
– Donate to HardStyl3r
– Donate to LineageOS projectIf you want the OFFICIAL Lineage OS 15.1 then here is the OFFICIAL Lineage OS 15.1 supported devices list or the Android Oreo ROMs devices list page.
DISCLAIMER:
THIS IS AN INITIAL BUILD WHICH MAY HAVE MANY BUGS.
FLASH AT YOUR OWN RISK.
Installing a custom ROM (ls990) may require an unlock bootloader on LG G3 Sprint, which may VOID your warranty and may delete all your data. Before proceeding further you may consider backup all data on the phone. You are the only person doing changes to your phone; neither the developer nor I can be held responsible for the mistakes done by you.Status of Lineage OS 15.1 for LG G3 Sprint (ls990) Android 8.1 Oreo ROM:
WHAT’S WORKING:
– UnknownKNOWN ISSUES:
– Unknown
REQUIRED LINKS AND FILES FOR THIS LineageOS 15.1 for LG G3 Sprint ANDROID 8.1 OREO CUSTOM ROM:
- TWRP recovery for LG G3 Sprint (ls990)
This TWRP recovery guide may require an unlocked bootloader on the LG G3 Sprint.
– Here is the LG G3 Sprint unlock bootloader guide - ROM Download link of Lineage OS 15.1 for LG G3 Sprint
- GApps for LineageOS 15.1
– Download any Oreo 8.1 GApps for the LG G3 Sprint.
su Root binary is NOT inbuilt in Lineage OS 15.1, so you may need to install a separate SuperSu package or LineageOS su binary to gain ROOT access. Here is LineageOS 15.1 Root guide
If there is no in-built ROOT or it does not work for some reason then you can try SuperSU rooting guide to enable ROOT access.
HOW TO UPDATE/INSTALL Lineage OS 15.1 FOR LG G3 Sprint; ANDROID 8.1 OREO CUSTOM ROM:
Follow this if you are flashing LineageOS 15.1 on LG G3 Sprint for the first time, or coming from another ROM:
Points to NOTE:– Try to avoid restoring apps backup using Titanium Backup. It may break things up.
– Don’t restore system data using Titanium Backup! It will definitely break the current installation.
– It is also discouraged to Restoring Apps + Data using Titanium Backup.- Download and Copy the GApps and LG G3 Sprint LineageOS 15.1 ROM ZIP files to your phone.
- Boot into the TWRP custom Recovery to install this Lineage OS 15.1 for LG G3 Sprint.
– Make sure to have a Custom recovery like a TWRP recovery or any other custom recovery.
If not then download the TWRP recovery from Downloads link and follow the Custom Recovery Installation Guide (it’s a generic guide which will work for TWRP as well as CWM recovery or any other recovery) - Wipe the data partition (or do a factory reset), Cache partition, Dalvik Cache or ART cache and Format the System partition.
– Here is a guide explaining how to wipe using TWRP recovery.This will delete all your data on your phone. You may consider complete backup of your phone data or take a NANDROID backup of the current ROM
– How to backup all data on your Android Device
– how to take NANDROID backup using TWRP recovery - First install the LG G3 Sprint LineageOS 15.1 ROM file that you have copied into the phone.
– Then install the Oreo 8.1 ARM64 GApps zip from your phone memory.– Here is a post explaining how to install Lineage OS
- Then reboot into recovery (don’t skip this) and install the Oreo Gapps for Lineage OS 15.1 package.
– Here is a post explaining how to install GApps using TWRP recovery. - Reboot and Enjoy the Android 8.1 Oreo Lineage OS 15.1 on LG G3 Sprint.
Upgrading from earlier version of LineageOS 15.1 on LG G3 Sprint (ls990):
- Copy the latest LG G3 Sprint Lineage OS 15.1 ROM ZIP file to your phone.
- Boot into Recovery to install this LineageOS 15.1 ROM on LG G3 Sprint.
- Install the Lineage OS 15.1 ROM ZIP that you copied on your phone.
– Here is a post explaining how to install LineageOS - Then install the Lineage OS 15.1 GApps package.
(Mostly the GApps is kind of self sustainable across ROM updates. You may need to follow this only If you don’t have Gapps after updating to the latest Lineage OS 15.1 on your device.)– Here is a post explaining how to install GApps using TWRP recovery.
- Done. Reboot and Enjoy
Complete the initial setup and enjoy Android 8.1 Oreo with Lineage OS 15.1 on LG G3 Sprint. After the installation of Lineage OS 15.1 for LG G3 Sprint you may want to enable ROOT access on your phone and here is how you can do that:
– LineageOS 15.1 ROOT.Stay tuned or Subscribe to the LG G3 Sprint (ls990) Lineage OS forum For other Android Oreo, Nougat ROMs, LineageOS 15.1 ROMs, or other ROMs and all other device specific topics.You can now download and install LineageOS 16 for Galaxy NOTE 3 China. Here is how to install LineageOS 16 on Galaxy NOTE 3 China, with a step-by-step guide.
Follow the links to get other LineageOS 16 and Android Pie ROM builds.
This build of LineageOS 16 for Galaxy NOTE 3 China is brought to you by developer Jprimero15.
DONATION TO DEVELOPER(S)/PROJECT:
If you like this ROM then do consider for a contribution to Jprimero15 and LineageOS project:
– Donate to Jprimero15
– Donate to LineageOS project

[su_note note_color=”#F9D9D9″ text_color=”#AA4343″ radius=”3″ class=”” id=””]DISCLAIMER:
THIS IS AN INITIAL BUILD OF Galaxy NOTE 3 China LineageOS 16 WHICH MAY HAVE MINOR BUGS.
MAKE SURE TO BACKUP ALL DATA OF YOUR PHONE BEFORE FLASHING.[/su_note][su_note note_color=”#FBF4DD” text_color=”#A38C68″ radius=”3″ class=”” id=””]Installing a TWRP recovery on Galaxy NOTE 3 China may delete all your data. Before proceeding further you may consider backup all data on the phone.
You are the only person doing changes to your phone; neither the developer nor I can be held responsible for the mistakes done by you.[/su_note]
Status of Galaxy NOTE 3 China LineageOS 16 ROM:
WHAT’S WORKING:
– UnknownKNOWN ISSUES:
– UnknownREQUIRED GUIDES AND DOWNLOADS TO INSTALL Galaxy NOTE 3 China LineageOS 16 ANDROID 9 PIE ROM:
[styledlist style=”yes”]- TWRP for Galaxy NOTE 3 China (hltecn) to install LineageOS 16 ROM
- Install TWRP recovery using ODIN
- ROM Download link of Galaxy NOTE 3 China LineageOS 16 ROM
- MindTheGApps for LineageOS 16
- How to Root LineageOS 16
[/styledlist]
HOW TO UPDATE/INSTALL LineageOS 16 FOR Galaxy NOTE 3 China – Android 9 Pie CUSTOM ROM:
[su_note note_color=”#D7E3F4″ text_color=”#728095″ radius=”3″ class=”” id=””]
Following are the two sub-sections of this LineageOS 16 guide:- Fresh installation of Galaxy NOTE 3 China LineageOS 16 ROM
- Updating a new Galaxy NOTE 3 China LineageOS 16 on top of previous LineageOS 16 ROM[/su_note]
Flashing LineageOS 16 on Galaxy NOTE 3 China for the first time:
[su_note note_color=”#FBF4DD” text_color=”#A38C68″ radius=”3″ class=”” id=””]
Points to NOTE:- Try to avoid restoring apps backup using Titanium Backup. It may break things up.
- Don’t restore system data using Titanium Backup! It will definitely break the current installation.
- It is also discouraged to Restoring Apps + Data using Titanium Backup.
[/su_note]
- Download and Copy the LineageOS 16 Gapps and the Galaxy NOTE 3 China LineageOS 16 ROM ZIP file to your phone.
- Boot into the TWRP custom Recovery to install this LineageOS 16 for Galaxy NOTE 3 China.
[su_note note_color=”#D7E3F4″ text_color=”#728095″ radius=”3″ class=”” id=””]- Make sure to have a Custom recovery like a TWRP recovery or any other custom recovery.
– If not then download the TWRP recovery from Downloads link and follow how to install TWRP on Samsung using ODIN (it’s a generic guide which will work for TWRP as well as any other recovery)[/su_note] - Wipe the data partition (or do a factory reset), Cache partition, Dalvik Cache or ART cache and Format the System partition.
[su_note note_color=”#D7E3F4″ text_color=”#728095″ radius=”3″ class=”” id=””]- Here is a guide explaining how to wipe using TWRP recovery.[/su_note]
[su_note note_color=”#FBF4DD” text_color=”#A38C68″ radius=”3″ class=”” id=””]This will delete all your data on your phone. You may consider complete backup of your phone data or take a NANDROID backup of the current ROM
– How to backup all data on your Android Device
– how to take NANDROID backup using TWRP recovery[/su_note] - Install the Galaxy NOTE 3 China LineageOS 16 ROM file that you have copied into the phone.
[su_note note_color=”#D7E3F4″ text_color=”#728095″ radius=”3″ class=”” id=””]- Here is a post explaining how to install LineageOS[/su_note] - Then install the Android Pie MindTheGapps for LineageOS 16 package.
[su_note note_color=”#D7E3F4″ text_color=”#728095″ radius=”3″ class=”” id=””]- Here is a post explaining how to install GApps using TWRP recovery.[/su_note] - Reboot and Enjoy the Galaxy NOTE 3 China LineageOS 16 Android 9 Pie ROM.
Upgrading a new version of LineageOS 16 for Galaxy NOTE 3 China (hltecn):
- Copy the latest ROM zip file of LineageOS 16 for Galaxy NOTE 3 China, LineageOS 16 GApps and/or Magisk ROOT package to the phone
- Boot into Recovery.
– Make sure you have a latest custom Recovery that should be able to flash the LineageOS 16 ROM update. - Format or wipe the system partition from the custom recovery menu.
- Install the LineageOS 16 ROM for Galaxy NOTE 3 China.
[su_note note_color=”#D7E3F4″ text_color=”#728095″ radius=”3″ class=”” id=””]- Here is a post explaining how to install LineageOS[/su_note] - Reboot and see you have the GApps and ROOT access or NOT.- Gapps is built in such a way that it will sustain across ROM updates.
- If you don’t have GApps after upgrading the LineageOS 16 on Galaxy NOTE 3 China, then flash the GApps.
[su_note note_color=”#D7E3F4″ text_color=”#728095″ radius=”3″ class=”” id=””]- Here is a post explaining how to flash GApps using TWRP recovery.[/su_note] - If you don’t have ROOT after upgrading the LineageOS 16 on Galaxy NOTE 3 China, then flash the SuperSU or Magisk or the Lineage SU binary.
[su_note note_color=”#D7E3F4″ text_color=”#728095″ radius=”3″ class=”” id=””]- Here is a post explaining How to Enable ROOT on LineageOS 16 ROM[/su_note] - Once everything is done, reboot and Enjoy the LineageOS 16 for Galaxy NOTE 3 China.
[su_note note_color=”#D8F1C6″ text_color=”#769958″ radius=”3″ class=”” id=””]Complete the initial setup and enjoy Android 9 Pie with LineageOS 16 on Galaxy NOTE 3 China.[/su_note]
After installing LineageOS 16 on Galaxy NOTE 3 China you may want to install Google Camera (GCam) or enable ROOT access on your phone and here is how you can do that:
– How to ROOT LineageOS 16
– GCam Download for Android Pie (this page contains a huge list of GCam for all available devices)[su_note note_color=”#D7E3F4″ text_color=”#728095″ radius=”3″ class=”” id=””]If there is no ROOT access for some reason even after installing the LineageOS SU binary, then you can try SuperSU rooting guide to enable ROOT access.[/su_note]
Stay tuned or Subscribe to the Galaxy NOTE 3 China (hltecn) LineageOS forum For other Android Pie, Android Oreo ROMs, Nougat ROMs, or other ROMs and all other device specific topics.TWRP Recovery for Mi Mix 3 (perseus) is now available to download. This post guides how to download and install TWRP on Mi Mix 3 and also guides how to ROOT Mi Mix 3 (using TWRP recovery).
After installing TWRP recovery on Mi Mix 3 you can install many android mods such as google camera (gcam) APK, enable navigation gesture, enable face unlock, viper4android audio enhancement etc. and many more.
The TWRP recovery for Mi Mix 3 is brought to you by developer(s) Mauronofrio.
DONATION TO DEVELOPER(S) AND PROJECT:
If you like this ROM then do consider for a contribution to Mauronofrio and TWRP project:
– Donate to Mauronofrio
– Donate to TWRP’s Lead developer
[su_note note_color=”#F9D9D9″ text_color=”#AA4343″ radius=”3″ class=”” id=””]DISCLAIMER:
THIS IS AN INITIAL UNOFFICIAL TWRP FOR Mi Mix 3. FLASH AT YOUR OWN RISK[/su_note][su_note note_color=”#FBF4DD” text_color=”#A38C68″ radius=”3″ class=”” id=””]INSTALLING THE TWRP FOR Mi Mix 3 NEEDS AN UNLOCK BOOTLOADER ON Mi Mix 3.
DURING THE BOOTLOADER UNLOCK PROCESS ALL THE PHONE DATA WILL BE ERASED.[/su_note][su_note note_color=”#F9D9D9″ text_color=”#AA4343″ radius=”3″ class=”” id=””]
You are the only person making changes to your phone and I cannot be held responsible for the mistakes done by you.
[/su_note]
Content structure:
INFORMATION OF THIS TWRP FOR Mi Mix 3:
– TWRP version: 3.x.x
– Supported Android Version: Android 9
– Built from – OmniROM AOSP source
– Custom ROM supported: AOSP or AOSP based Android Pie 9.0 ROMDOWNLOAD LINK OF TWRP FOR Mi Mix 3, OTHER DOWNLOADS AND REQUIRED GUIDES:
- Mi Mix 3 Phone, USB cable and a Windows, or Linux or MAC PC with ADB and fastboot installed on it.
- ADB and Fastboot utility.
Below are the download links and guides to install:
– 15 Seconds ADB Installer for Windows
– Minimal ADB and Fastboot for Windows
– How to install ADB and fastboot on Linux
– How to install ADB and fastboot on MAC - Ulocked bootloader on the Mi Mix 3
- USB drivers
- TWRP download for Mi Mix 3
- Force Encryption disabler download
STEP BY STEP GUIDE OF HOW TO DOWNLOAD AND INSTALL TWRP FOR Mi Mix 3:
- Connect the Mi Mix 3 to the PC using the USB cable and install required USB driver
- Install 15 Seconds ADB Installer or Minimal ADB and Fastboot on Windows or Linux or MAC as per the PC you have
- Reboot the Mi Mix 3 into bootloader mode and Unlock bootloader of Mi Mix 3
- Then, on your PC, go to the directory where you have downloaded the TWRP for Mi Mix 3 and then open the command console or terminal on this directory on your PC.
[su_note note_color=”#D7E3F4″ text_color=”#728095″ radius=”3″ class=”” id=””]- To open a command window on Windows OS in the current directory, press shift + Right Click anywhere on Windows explorer, or some folder.
– Then on the menu opened, just press the “w” key on the keyboard or select “Open command window here” to open a command window.[/su_note] - Now connect your phone to the PC using a USB cable, if not connected yet.
- Enter the following command on the opened command window:
adb reboot bootloader
to put your phone into bootloader mode where you can flash/install TWRP for Mi Mix 3.
[su_note note_color=”#D7E3F4″ text_color=”#728095″ radius=”3″ class=”” id=””]If your phone asks for permission; such as “Allow USB debugging” then just tap on OK to proceed.[/su_note] - Now when your phone is on the bootloader mode just execute the following command on the console:
fastboot flash recovery twrp-3.2.x.x-xxx.img
[su_note note_color=”#D7E3F4″ text_color=”#728095″ radius=”3″ class=”” id=””]While executing this command make sure to replace the twrp-3.2.x.x-xxx.img with the actual filename of the TWRP for Mi Mix 3[/su_note]
- Wait for the fastboot command to install the TWRP for Mi Mix 3.
Once it is done, execute the below command:fastboot reboot
when the phone is booting press and hold the volume + button to enter into TWRP recovery.
[su_note note_color=”#FBF4DD” text_color=”#A38C68″ radius=”3″ class=”” id=””]IT IS IMPORTANT THAT YOU REBOOT INTO RECOVERY AND DISABLE FORCE ENCRYPTION BEFORE BOOTING INTO SYSTEM OR STARTING THE PHONE. IF NOT DONE THE TWRP WILL BE REPLACED BY STOCK RECOVERY.[/su_note]
- From TWRP, disable encryption and flash the Disable Force Encryption zip file
[su_note note_color=”#D7E3F4″ text_color=”#728095″ radius=”3″ class=”” id=””]- Format data partition from TWRP to disable Encryption to be able to use the data partition.
– Then you flash the Disable Force Encryption zip file so that the system will not encrypt it again.[/su_note]
[su_note note_color=”#D8F1C6″ text_color=”#769958″ radius=”3″ class=”” id=””]That’s all. You should have the TWRP installed on your Mi Mix 3.[/su_note]
You may now want to ROOT Mi Mix 3 or may want to install some custom ROM or want to explore what else can you do with this TWRP? Head over to the following section to know more.
What to do after you install TWRP for Mi Mix 3:
- You can enable Mi Mix 3 ROOT access
- You can install one of the custom ROMs available for Mi Mix 3
- You can install some of the mods available for Mi Mix 3
Well, this isn’t it. You can install customized themes, sound mods, Xposed modules etc. after installing the TWRP for Mi Mix 3.
TWRP recovery is the gateway to many goodies for your phone.Now, if you want to ROOT Mi Mix 3 then below is a step-by-step by guide for the same.
[su_note note_color=”#F9D9D9″ text_color=”#AA4343″ radius=”3″ class=”” id=””]ROOTING Mi Mix 3 MAY BRICK THE PHONE.
MAKE SURE YOU READ THE ADVANTAGES AND DISADVANTAGES OF ANDROID ROOT BEFORE YOU PROCEED FURTHER.
Before proceeding further you may consider backup all data on the phone.[/su_note]REQUIRED DOWNLOADS OR LINKS FOR Mi Mix 3 ROOT GUIDE:
[su_note note_color=”#D7E3F4″ text_color=”#728095″ radius=”3″ class=”” id=””]Make sure you have already unlocked the bootloader and installed TWRP for Mi Mix 3
– Well, this is a very important aspect to enable ROOT for Mi Mix 3. The SuperSU zip file is developed in a way to be installed via a TWRP recovery or other custom recovery. Stock recovery may not be able install this SuperSU or Magisk ROOT on Mi Mix 3.[/su_note]
-
Download the latest SuprSU or Magisk ROOT for Mi Mix 3 or one of the following:
- SuperSU download link:
- Download link for Latest SuperSU zip file
- Download link for STABLE SuperSU zip file
- Download link for SuperSU BETA zip file
- Download link to SuperSU APK Free version
- Download link to SuperSU APK Pro version
- Download link to Magisk ROOT zip file
- DM Verity disabler download
IMPORTANT NOTE:- The Mi Mix 3 will not be rooted just by installing the SuperSU APK file on your Android phone.
- SuperSU APK Free or Pro version is just a SuperSU ROOT management application.
- The SuperSU APK Free or Pro app will ONLY work if you have already ROOTED your Android Phone.
Step-by-Step guide on how to ROOT Mi Mix 3 using SuperSU or Magisk zip file:
- Download and copy the SuperSU or Magisk ROOT file and the no verity encrypt file to Mi Mix 3. (I hope you have already downloaded all the files from the above downloads section)
- Now restart the Mi Mix 3 to boot into TWRP recovery.
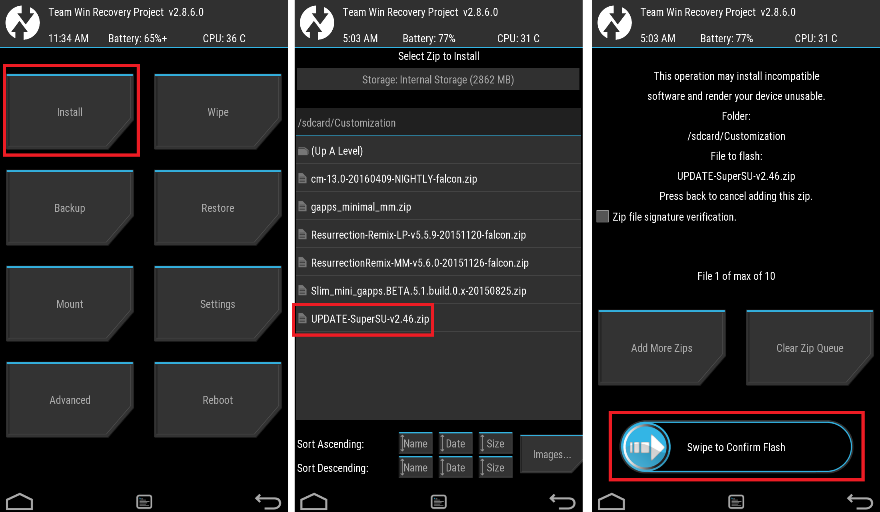
- Then, Select the Install from TWRP home screen, then select the SuperSU ROOT zip file from the file browser.
- Flash or install the SuperSU or Magisk zip file for Mi Mix 3, by Sliding the Swipe to Confirm Flash on TWRP screen.
Here is a screenshot how to flash the SuperSU ROOT for Mi Mix 3 via TWRP:

- Wait for TWRP to flash the SuperSU or the Magisk. Once the flashing is done just reboot your device.
- Then flash the no verity encrypt zip file.
- Profit!!! You should now have a Mi Mix 3 ROOT enabled phone.
How to check if ROOT is enabled on Mi Mix 3 or NOT?
Install the ROOT checker app from the Play Store and verify if your phone is ROOTED or not.
If you face any problems on this guide to install TWRP for Mi Mix 3 or to following the Mi Mix 3 root guide then, you can login and reply here. Either me or some other user on this forum will reply back to your query as soon as possible.
Stay tuned or Subscribe to the Mi Mix 3 (perseus) forum For other Android Custom ROMs, Lineage OS ROMs, and all other device specific topics.This post will be helpful for almost all of us who all are using an Android device.
If you lose your Android device in which you have logged in to a Google Account, you can remotely locate your device and factory reset or erase your valuable information on your phone or tablet.
So that at least your valuable data will be secured from wrong hands.Now a days most of the things has come down to your finger tips by means of a smartphone and associated applications.
For example:
You might have installed facebook app, any banking apps like Citibank Mobile app(or any mobile banking app), e-mail client apps, Valuable contacts, your personal data or files or pictures etc. and you can’t imagine how badly your social life or personal life may be damaged.So here there is a way to save your data residing in your Android device when it is lost, not by using any of the third party applications but by using built in Google features only.
Here I am going to guide you how to set-up Android Device Manager in your Android device and how to use it.
How to Turn On Android device Manager:
Setting up android device manager is really very easy.
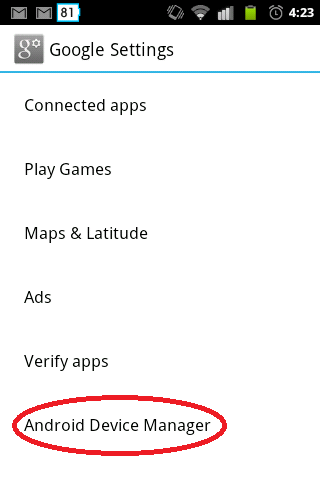
Just follow the below mentioned steps and your device is ready to be explored by Google from anywhere:- Open
 Google Settings from your device’s apps menu.
- Touch Android Device Manager.

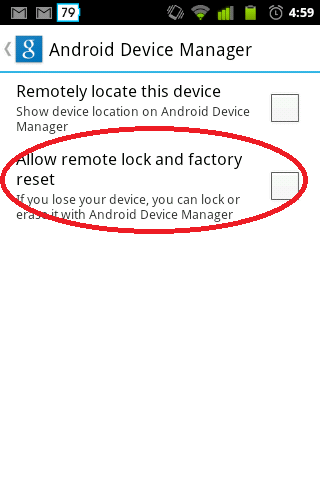
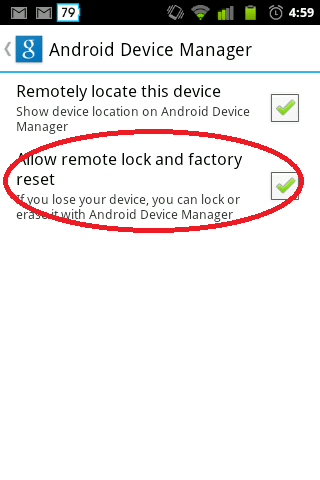
You have the following options:
- Remotely locate this device: Remotely locate a device and find its approximate location on Google Maps.
- For devices running 4.1 and higher, location access must also be enabled.
- To turn it on, go to Google Settings > Location > Access location.
- Allow remote lock and factory reset: Remotely lock or erase all data on your device. You can also change the lock screen passcode. Touch this option, then select Activate to turn on the device administrator.
How to use Android device manager:
- STEP 1: Sign in to your Google Account on android.com/devicemanager.
- If you’re using a Google Apps account, you will sign in to your My Devices page.
- All devices associated with your Google Account will receive a notification to enable it if it’s turned off.
- STEP 2: If you have more than one device, select the arrow next to the device name to change it.
- To rename the device, use the edit icon.
- To rename the device, use the

- All devices associated with your Google Account will receive a notification to enable it if it’s turned off.
- When your device is located, its approximate location is indicated by a blue circle on the map.
- The device manager also displays the name of the place where the device is located, the time it was located, and when it was last used.
following device administration options are available:
- Ring: Ring your device at full volume for 5 minutes – even if it’s set to silent or vibrate.
- Lock: Lock your device with a new password.
- Erase: Perform a factory reset, which permanently deletes all of your data.
Trouble shooting:
Please Make sure the following things:
- – Your device is being online or it is connected to Internet
- – Your Android is running Google Play services version 3.2.25 or higher.
Now if your Android device doesn’t appear in Android Device Manager, or if you see Unknown location, follow these steps:
- STEP 1: Open Google Settings from your device’s apps menu.
- STEP 2: Touch Android Device Manager.
- STEP 3: Uncheck Allow remote factory reset.
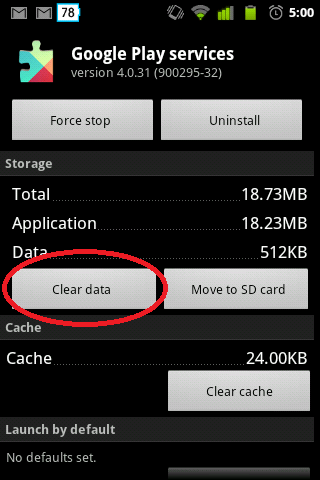
- STEP 4: Go to your device’s main Settings menu, then touch Apps > All > Google Play services.
- STEP 5: Touch Clear Data. Note that this action doesn’t remove personal data.
- STEP 6: Go back to Google Settings and select Allow remote lock and factory reset.
- STEP 7: Restart your device.
NOTE: If your device is offline, Android Device Manager won’t be able to ring, lock, or erase the device until there’s a mobile data or Wi-Fi connection.
Select any of the options in advance, and the action will be performed once the device is back online.Android Device Manager won’t work for devices those are powered off.
As I already told that LineageOS 16 for Galaxy S3 was on the way, but today here it is. This build of LineageOS 16 for Galaxy S3 is brought to you by developer ChronoMonochrome (chrono).
DONATION TO DEVELOPER(S)/PROJECT:
If you like this ROM then do consider for a contribution to ChronoMonochrome and LineageOS project:
– Donate to ChronoMonochrome
– Donate to LineageOS project[su_note note_color=”#D7E3F4″ text_color=”#728095″ radius=”3″ class=”” id=””]
If you want GCam on the Galaxy S3 after installing this LineageOS 16 ROM, then you can visit this Google Camera page to download a compatible APK.
[/su_note][su_note note_color=”#D7E3F4″ text_color=”#728095″ radius=”3″ class=”” id=””]
Searching where to download LineageOS 16 for Galaxy S3?
Wondering how to install LineageOS 16 on Galaxy S3?
If you have one of the question for your Galaxy S3, then you are at the right place and here is where to download and how to install LineageOS 16 on Galaxy S3, with a step-by-step guide.
[/su_note]Follow the links to get other LineageOS 16 and Android Pie ROM builds.

[su_note note_color=”#F9D9D9″ text_color=”#AA4343″ radius=”3″ class=”” id=””]DISCLAIMER:
THIS IS AN INITIAL BUILD OF Galaxy S3 LineageOS 16 WHICH MAY HAVE MINOR BUGS.
MAKE SURE TO BACKUP ALL DATA OF YOUR PHONE BEFORE FLASHING.[/su_note][su_note note_color=”#FBF4DD” text_color=”#A38C68″ radius=”3″ class=”” id=””]Installing a TWRP recovery on Galaxy S3 may delete all your data. Before proceeding further you may consider backup all data on the phone.
You are the only person doing changes to your phone; neither the developer nor I can be held responsible for the mistakes done by you.[/su_note]
Status of Galaxy S3 LineageOS 16 ROM:
WHAT’S WORKING:
– Almost EverythingKNOWN ISSUES:
– Video recording
– Many other minor BUGsREQUIRED GUIDES AND DOWNLOADS TO INSTALL Galaxy S3 ON LineageOS 16 ANDROID 9 PIE ROM:
[styledlist style=”yes”]- TWRP for Galaxy S3 (i9300) to install LineageOS 16 ROM
- Install TWRP recovery on Samsung
- ROM Download link for Galaxy S3 LineageOS 16
- MindTheGApps for LineageOS 16
- How to Root LineageOS 16
[/styledlist]
HOW TO UPDATE/INSTALL LineageOS 16 FOR Galaxy S3 – Android 9 Pie CUSTOM ROM:
[su_note note_color=”#D7E3F4″ text_color=”#728095″ radius=”3″ class=”” id=””]
Following are the two sub-sections of this LineageOS 16 guide:- Fresh installation of Galaxy S3 LineageOS 16 ROM
- Updating a new Galaxy S3 LineageOS 16 on top of previous LineageOS 16 ROM
[/su_note]
Flashing LineageOS 16 on Galaxy S3 for the first time:
[su_note note_color=”#FBF4DD” text_color=”#A38C68″ radius=”3″ class=”” id=””]
Points to NOTE:- Try to avoid restoring apps backup using Titanium Backup. It may break things up.
- Don’t restore system data using Titanium Backup! It will definitely break the current installation.
- It is also discouraged to Restoring Apps + Data using Titanium Backup.
[/su_note]
- Download and Copy the LineageOS 16 Gapps and the Galaxy S3 LineageOS 16 ROM ZIP file to your phone.
- Boot into the TWRP custom Recovery to install this LineageOS 16 for Galaxy S3.
[su_note note_color=”#D7E3F4″ text_color=”#728095″ radius=”3″ class=”” id=””]- Make sure to have a Custom recovery like a TWRP recovery or any other custom recovery.
– If not then download the TWRP recovery from Downloads link and follow how to install TWRP on Samsung using ODIN (it’s a generic guide which will work for TWRP as well as any other recovery)[/su_note] - Wipe the data partition (or do a factory reset), Cache partition, Dalvik Cache or ART cache and Format the System partition.
[su_note note_color=”#D7E3F4″ text_color=”#728095″ radius=”3″ class=”” id=””]- Here is a guide explaining how to wipe using TWRP recovery.[/su_note]
[su_note note_color=”#FBF4DD” text_color=”#A38C68″ radius=”3″ class=”” id=””]This will delete all your data on your phone. You may consider complete backup of your phone data or take a NANDROID backup of the current ROM
– How to backup all data on your Android Device
– how to take NANDROID backup using TWRP recovery[/su_note] - Install the Galaxy S3 LineageOS 16 ROM file that you have copied into the phone.
[su_note note_color=”#D7E3F4″ text_color=”#728095″ radius=”3″ class=”” id=””]- Here is a post explaining how to install LineageOS[/su_note] - Then install the Android Pie MindTheGapps for LineageOS 16 package.
[su_note note_color=”#D7E3F4″ text_color=”#728095″ radius=”3″ class=”” id=””]- Here is a post explaining how to install GApps using TWRP recovery.[/su_note] - Reboot and Enjoy the Galaxy S3 LineageOS 16 Android 9 Pie ROM.
Upgrading a new version of LineageOS 16 for Galaxy S3 (i9300):
- Copy the latest ROM zip file of LineageOS 16 for Galaxy S3, LineageOS 16 GApps and/or Magisk ROOT package to the phone
- Boot into Recovery.
– Make sure you have a latest custom Recovery that should be able to flash the LineageOS 16 ROM update. - Format or wipe the system partition from the custom recovery menu.
- Install the LineageOS 16 ROM for Galaxy S3.
[su_note note_color=”#D7E3F4″ text_color=”#728095″ radius=”3″ class=”” id=””]- Here is a post explaining how to install LineageOS[/su_note] - Reboot and see you have the GApps and ROOT access or NOT.- Gapps is built in such a way that it will sustain across ROM updates.
- If you don’t have GApps after upgrading the LineageOS 16 on Galaxy S3, then flash the GApps.
[su_note note_color=”#D7E3F4″ text_color=”#728095″ radius=”3″ class=”” id=””]- Here is a post explaining how to flash GApps using TWRP recovery.[/su_note] - If you don’t have ROOT after upgrading the LineageOS 16 on Galaxy S3, then flash the SuperSU or Magisk or the Lineage SU binary.
[su_note note_color=”#D7E3F4″ text_color=”#728095″ radius=”3″ class=”” id=””]- Here is a post explaining How to Enable ROOT on LineageOS 16 ROM[/su_note] - Once everything is done, reboot and Enjoy the LineageOS 16 for Galaxy S3.
[su_note note_color=”#D8F1C6″ text_color=”#769958″ radius=”3″ class=”” id=””]Complete the initial setup and enjoy Android 9 Pie with LineageOS 16 on Galaxy S3.[/su_note]
After installing LineageOS 16 on Galaxy S3 you may want to install Google Camera (GCam) or enable ROOT access on your phone and here is how you can do that:
– LineageOS 16 ROOT
– Google Camera APK for Android Pie (this page contains a huge list of GCam for all available devices)[su_note note_color=”#D7E3F4″ text_color=”#728095″ radius=”3″ class=”” id=””]If there is no ROOT access for some reason even after installing the LineageOS SU binary, then you can try SuperSU rooting guide to enable ROOT access.[/su_note]
Stay tuned or Subscribe to the Galaxy S3 (i9300) LineageOS forum For other Android Pie, Android Oreo ROMs, Nougat ROMs, or other ROMs and all other device specific topics.- TWRP recovery download for Galaxy Note 2