- Search Results
CM14 for Verizon Galaxy S5 CM14/CyanogenMod 14 has now arrived through an UNOFFICIAL build. In addition to this we also have Lineage 14.1 for Galaxy S5 VERIZON. For latest updates, stay tuned to the Lineage OS device list page. Since Google released Android Nougat Source code, we have update many Android NOUGAT AOSP ROMs and also many CyanogenMod 14/CM14 ROMs updated and many are yet to come. If you are looking CM14 for Galaxy S5 then here is the Galaxy S5 CM14/CyanogenMod 14 Nougat 7.0 ROM. This CyanogenMod 14/CM14 for Galaxy S5 Verizon is brought to you by developer haggertk.
DISCLAIMER:
THIS IS STILL AN EARLY BUILD. THIS ROM MAY NOT BOOT AT ALL OR EVEN IF IT BOOTS IT MAY CONTAIN MANY BUGS THAN YOU CAN IMAGINE MAKING IT UNUSABLE AS A DAILY DRIVER. TRY AT YOUR OWN RISK. Installing custom ROM requires a custom recovery to be installed on your device, which may VOID your warranty and may delete all your data. Before proceeding further you may consider backup your all data. You are the only person doing changes to your phone and neither the developer(s) nor we can be held responsible for the mistakes done by you.Status of (G900V, kltevzw) Verizon Galaxy S5 CM14/CyanogenMod 14 Nougat 7.0 ROM:
WHAT’S WORKING:
– Not KnownKNOWN ISSUES:
– Not Known
REQUIRED LINKS AND FILES FOR VERIZON GALAXY S5 CM14/CYANOGENMOD 14 NOUGAT 7.0 CUSTOM ROM:
- SafeStrap download link of recovery for S5 Verizon by Hashcode (This needs a pre-rooted S5 Verizon phone and BusyBox installed)
– See if this OneClick Root will help for Samsung Galaxy S5 Verizon (G900V, kltevzw)
- ROM Download link to haggertk’s CM14 for Galaxy S5 Verizon Nougat 7.0 ROM (G900V, kltevzw)
- Nougat GApps download link for Galaxy S5 Verizon CM14 ROM
Root binary is inbuilt since CyanogenMod 12, so you don’t need a separate SuperSu package to install to gain ROOT access. Here is How to Enable ROOT on CM14/CyanogenMod 14
HOW TO INSTALL/DOWNLOAD/FLASH/UPDATE VERIZON GALAXY S5 CM14/CYANOGENMOD 14 (G900V, kltevzw) NOUGAT 7.0 CUSTOM ROM:
Follow this if you are flashing Verizon Galaxy S5 CM14/CyanogenMod 14 for the first time, or coming from another ROM:
This will delete all your data on your phone. You may consider backing up your phone data or take a nandroid backup. Here is how to take NANDROID backup using TWRP recovery.
Points to NOTE:
– Try to avoid restoring apps backup using Titanium Backup. It may break things up.
– Don’t restore system data using Titanium Backup! It will definitely break the current installation.
– It is also discouraged to Restoring Apps + Data using Titanium Backup.- Download and Copy the GApps and Verizon Galaxy S5 CM14/CyanogenMod 14 ROM ZIP to your phone.
- Boot into Recovery.
- Wipe data factory reset, Cache partition, Dalvik Cache and Format the System partition.
– Here is a guide explaining how to wipe data using TWRP recovery.This will delete all your data on your phone. You may consider complete backup of your phone data or take a NANDROID backup of the current ROM
– How to backup all data on your Android Device
– how to take NANDROID backup using TWRP recovery - First flash the CM14 ROM ZIP from device.
– Here is a post explaining how to flash a custom ROM using TWRP recovery. - Then reboot into recovery (don’t skip this) and flash the CyanogenMod 14 Nougat GApps package.
– Here is a post explaining how to flash GApps using TWRP recovery. - Reboot and Enjoy the CM14 for Galaxy S5 Verizon.
Upgrading from earlier version of CyanogenMod 14/CM14 for S5 Verizon:
- Copy the latest Verizon Galaxy S5 CM14/CyanogenMod 14 ROM ZIP file to your phone.
- Boot into Recovery.
- Flash the latest CM ROM ZIP from your phone.
– Here is a post explaining how to flash a custom ROM using TWRP recovery. - Then flash the CM14 Nougat GApps package.
– Here is a post explaining how to flash GApps using TWRP recovery. - Reboot and Enjoy
Complete the initial setup and enjoy Android Nougat 7.0.0 with CyanogenMod 14/CM14 for S5 (G900V, kltevzw). After this CM14 installation you may want to enable ROOT access on your phone and here is how you can do that:
How to Enable ROOT on CM14/CyanogenMod 14.Stay tuned or Subscribe to the Galaxy S5 Verizon (G900V, kltevzw) forum For other Android Nougat ROMs, CyanogenMod 14 ROMs, other ROMs and all other device specific topics.Android Nougat 7.1 ROM, CM14/14.1 for Xiaomi Mi Max (CyanogenMod 14.1). In addition to this CM14.1 ROM we also have the Lineage 14.1 for Mi Max (hydrogen). For latest updates, stay tuned to the Lineage OS device list page. here we have update many Android NOUGAT AOSP ROMs, Official CM14/CM14.1 nougat ROMs list and we also have updated List of Available CyanogenMod 14 ROMs and many are yet to come including this CM14/14.1 for Xiaomi Mi Max (hydrogen), which is brought to you by developer karthick111.
DISCLAIMER:
THIS IS AN INITIAL BUILD. THIS MAY NOT BOOT AT ALL OR IF IT BOOTS IT MAY HAVE MANY MORE BUGS THAN YOU CAN IMAGINE AND HENCE CANNOT BE USED AS A DAILY DRIVER IN ANYWAY. TRY AT YOUR OWN RISK. Installing a custom ROM on a Xiaomi Mi Max requires the bootloader to be unlocked on the Xiaomi Mi Max phone, which may VOID your warranty and may delete all your data. Before proceeding further you may consider backup all data on the phone. You are the only person doing changes to your phone and I cannot be held responsible for the mistakes done by you.Status of CM14/14.1 for Xiaomi Mi Max CM14/14.1 (CyanogenMod 14/14.1) Nougat 7.1 ROM:
WHAT’S WORKING:
– Not knownKNOWN ISSUES:
– Not known
REQUIRED LINKS AND FILES FOR XIAOMI MI MAX CM14/14.1 (CYANOGENMOD 14/14.1, NOUGAT) CUSTOM ROM:
- TWRP recovery download link for Xiaomi Mi Max (hydrogen).
Follow this guide to flash TWRP: Install TWRP using Fastboot. This TWRP installation requires Unlocked bootloader on Xiaomi Mi Max) - ROM Download link to calsurferpunk’s CyanogenMod 14.1/CM14.1 for Xiaomi Mi Max (hydrogen) Nougat 7.1
- Nougat GApps download link for Xiaomi Mi Max CM14/14.1 ROM
Root binary is inbuilt since CyanogenMod 12, so you don’t need a separate SuperSu package to install to gain ROOT access. Here is How to Enable ROOT on CM14/14.1 (CyanogenMod 14/14.1)
If there is no in-built ROOT then you can try flashing SuperSU zip using recovery to gain ROOT access.
HOW TO INSTALL/DOWNLOAD/FLASH/UPDATE CM14/14.1 FOR XIAOMI MI MAX (CYANOGENMOD 14/14.1) NOUGAT CUSTOM ROM:
Follow this if you are flashing CyanogenMod 14/14.1 for Xiaomi Mi Max for the first time, or coming from another ROM:
Points to NOTE:
– Try to avoid restoring apps backup using Titanium Backup. It may break things up.
– Don’t restore system data using Titanium Backup! It will definitely break the current installation.
– It is also discouraged to Restoring Apps + Data using Titanium Backup.- Download and Copy the GApps and Xiaomi Mi Max CM14/14.1 ROM ZIP to your phone.
- Boot into Recovery. Make sure to have a Custom recovery like CWM or TWRP or any other custom recovery. If not then follow the TWRP Recovery Installation Guide for Xiaomi Mi Max (it’s a generic guide which will work for TWRP as well as CWM recovery or any other recovery)
- Wipe data factory reset, Cache partition, Dalvik Cache and Format the System partition.
– Here is a guide explaining how to wipe data using TWRP recovery.This will delete all your data on your phone. You may consider complete backup of your phone data or take a NANDROID backup of the current ROM
– How to backup all data on your Android Device
– how to take NANDROID backup using TWRP recovery - First flash the Xiaomi Mi Max CM14/14.1 ROM ZIP from device. Then flash the GApps zip from your device memory.
– Here is a post explaining how to flash a custom ROM using TWRP recovery. - Then reboot into recovery (don’t skip this) and flash the CyanogenMod 14.1 Nougat GApps package.
– Here is a post explaining how to flash GApps using TWRP recovery. - Reboot and Enjoy the Nougat 7.1 ROM CyanogenMod 14.1 for Xiaomi Mi Max.
Upgrading from earlier version of CyanogenMod 14/14.1 for Xiaomi Mi Max:
- Copy the latest Xiaomi Mi Max CM14/14.1 ROM ZIP file to your phone.
- Boot into Recovery.
- Flash the latest CM ROM ZIP from your phone.
– Here is a post explaining how to flash a custom ROM using TWRP recovery. - Then flash the CM14/14.1 Nougat GApps package.
– Here is a post explaining how to flash GApps using TWRP recovery. - Reboot and Enjoy
Complete the initial setup and enjoy Android Nougat 7.1 with CM14/14.1 for Xiaomi Mi Max. After the installation of CM14/14.1 for Xiaomi Mi Max you may want to enable ROOT access on your phone and here is how you can do that:
How to Enable ROOT on CM14/14.1 (CyanogenMod 14/14.1).Stay tuned or Subscribe to the Xiaomi Mi Max (hydrogen) forum For other Android Nougat ROMs, CyanogenMod 14/14.1 ROMs, other ROMs and all other device specific topics.Samsung Galaxy S5 crDroid Nougat 7.1 ROM is now available through UNOFFCIAL build. In addition to this ROM, here comes the Android Oreo based Lineage OS 15 for Galaxy S5. We also have Lineage OS 14.1 for Galaxy S5, Nougat 7.1 AICP ROM for Galaxy S5 and OFFICIAL CM14.1 ROM for Galaxy S5. This crDroid Nougat 7.1 ROM for Galaxy S5 brought to you by developer thisisapoorusernamechoice.
If you want crDroid for other devices then here is a list of crDroid Nougat 7.1 ROMs. If you want other Nougat ROMs then checkout the following Nougat ROM collections: Lineage OS 14.1 ROMs collection, Resurrection Remix Nougat ROMs collection.
Installing a custom ROM on a the Galaxy S5 may require the bootloader to be unlocked on Galaxy S5 and a Custom Recovery on Galaxy S5. Before proceeding further you may consider backup all data on the phone. You are the only person doing changes to your phone and I cannot be held responsible for the mistakes done by you.Status of Samsung Galaxy S5 crDroid Nougat 7.1 ROM build:
WHAT’S WORKING:
– Not KnownKNOWN ISSUES:
– Not Known
REQUIRED DOWNLOADS AND LINKS Galaxy S5 crDroid NOUGAT 7.1 ROM UPDATE GUIDE:
- TWRP download link for Galaxy S5
– TWRP Installation Guide for Galaxy S5 (g900f, klte) (This guide is only for .tar TWRP file)
- ROM download link for Galaxy S5 crDroid Nougat 7.1 ROM
- Android 7.1 Nougat GApps download link for Galaxy S5 crDroid ROM
Root binary is inbuilt since CyanogenMod 12, so you don’t need a separate SuperSu package to install to gain ROOT access on a CM14 ROM or a CM14 based ROM. As crDroid is a CM14 based ROM, so here is How to Enable ROOT on crDroid ROM
HOW TO INSTALL/FLASH/UPDATE crDroid FOR Galaxy S5 NOUGAT 7.1 ROM:
Follow these steps if you are flashing Nougat 7.1 crDroid for Galaxy S5 for the first time, or coming from another ROM:
Points to NOTE on BACKUP:
– Try to avoid restoring apps backup using Titanium Backup. It may break things up.
– Don’t restore system data using Titanium Backup! It will definitely break the current installation.
– It is also discouraged to Restoring Apps + Data using Titanium Backup.- Download and Copy the Nougat GApps and Galaxy S5 crDroid Nougat 7.1 ROM zip to the phone memory.
- Boot into Recovery. Make sure to have a Custom recovery like CWM or TWRP or any other custom recovery.
- Wipe data factory reset, Cache partition, Dalvik Cache and Format the System partition.
– Here is a guide explaining how to wipe data using TWRP recovery.This will delete all your data on your phone. You may consider complete backup of your phone data or take a NANDROID backup of the current ROM.
– How to backup all data on your Android Device.
– how to take NANDROID backup using TWRP recovery. - First flash the ROM zip of Galaxy S5 crDroid from device.
– Here is a post explaining how to flash a custom ROM using TWRP recovery. - Then reboot into recovery (don’t skip this) and flash the crDroid Nougat Google Apps package.
– Here is a post explaining how to flash GApps using TWRP recovery. - Reboot and Enjoy the crDroid Nougat for Galaxy S5.
Upgrading from earlier version of Galaxy S5 crDroid Nougat 7.1 ROM:
- Copy the Galaxy S5 crDroid ROM ZIP file to your phone.
- Boot into Recovery.
- Flash the latest ROM zip of Galaxy S5 crDroid from your phone.
– Here is a post explaining how to flash a custom ROM using TWRP recovery. - Then flash the crDroid Nougat Google Apps package.
– Here is a post explaining how to flash GApps using TWRP recovery. - Reboot and Enjoy
Complete the initial setup and enjoy Android Nougat 7.1 with crDroid for Galaxy S5 (codename: klte). After this crDroid installation you may want to enable ROOT access on your phone and here is how you can do that:
As crDroid is a CM14 based ROM, so here is How to Enable ROOT on crDroid ROMStay tuned or Subscribe to the Galaxy S5 (klte) forum For other Android Nougat ROMs, CyanogenMod 14 ROMs, other ROMs and all other device specific topics.If you are looking to install/update LineageOS 15.1 for Honor 9 Lite, then it’s now available via a development build. This LineageOS 15.1 for Honor 9 Lite (leland) is brought to you by developer AndropaX.
Follow the links to get LineageOS 16 and Android Pie ROM builds.
DONATION TO DEVELOPER(S):
If you like this ROM then do consider for a small contribution to AndropaX and LineageOS project:
– Donate to AndropaX
– Donate to LineageOS projectIf you want the OFFICIAL LineageOS 15.1 then here is the OFFICIAL LineageOS 15.1 supported devices list or the Android Oreo ROMs devices list page.
DISCLAIMER:
THIS IS AN INITIAL DEVELOPMENT BUILD WHICH MAY NOT BOOT AT ALL OR EVEN IF IT BOOTS, IT MAY HAVE MANY BUGS.
FLASH AT YOUR OWN RISK.
Installing a custom ROM on a Honor 9 Lite (leland) may require an unlocked bootloader, which may VOID your warranty and may delete all your data. Before proceeding further you may consider backup all data on the phone. You are the only person doing changes to your phone; neither the developer nor I can be held responsible for the mistakes done by you.Status of LineageOS 15.1 for Honor 9 Lite (leland) Android 8.1 Oreo ROM:
WHAT’S WORKING:
– UnknownKNOWN ISSUES:
– Unknown
REQUIRED LINKS AND FILES FOR THIS LineageOS 15.1 for Honor 9 Lite ANDROID 8.1 OREO CUSTOM ROM:
- TWRP for Honor 9 Lite (leland) by JamesBott
– Here is theTWRP update guide for the Honor 9 Lite. This TWRP recovery guide may require an unlocked bootloaderon the Honor 9 Lite.
– Here is Huawei/Honor bootloader unlock guide - LineageOS 15.1 Download link for Honor 9 Lite
- GApps for Lineage 15.1
– Download any Oreo 8.1 ARM64 GApps for the Honor 9 Lite.
Root binary is NOT inbuilt in LineageOS 15.1, so you may need to install a separate SuperSu package or LineageOS su binary to gain ROOT access. Here is LineageOS 15.1 Root guide
If there is no in-built ROOT or it does not work for some reason then you can try SuperSU rooting guide to enable ROOT access.
HOW TO INSTALLLineageOS 15.1 FOR Honor 9 Lite; ANDROID 8.1 OREO CUSTOM ROM:
Follow this if you are flashing LineageOS 15.1 on Honor 9 Lite for the first time, or coming from another ROM:
Points to NOTE:
– Try to avoid restoring apps backup using Titanium Backup. It may break things up.
– Don’t restore system data using Titanium Backup! It will definitely break the current installation.
– It is also discouraged to Restoring Apps + Data using Titanium Backup.- Download and Copy the GApps and Honor 9 Lite LineageOS 15.1 ROM ZIP files to your phone.
- Boot into the custom Recovery.
– Make sure to have a Custom recovery like a TWRP recovery or any other custom recovery. If not then download the TWRP recovery from Downloads link and follow the Custom Recovery Installation Guide (it’s a generic guide which will work for TWRP as well as CWM recovery or any other recovery) - Wipe the data partition (or do a factory reset), Cache partition, Dalvik Cache or ART cache and Format the System partition.
– Here is a guide explaining how to wipe using TWRP recovery.This will delete all your data on your phone. You may consider complete backup of your phone data or take a NANDROID backup of the current ROM
– How to backup all data on your Android Device
– how to take NANDROID backup using TWRP recovery - First install the Honor 9 Lite LineageOS 15.1 ROM file that you have copied into the phone.
– Then install the Oreo 8.1 ARM64 GApps zip from your phone memory.– Here is a post explaining how to install LineageOS
- Then reboot into recovery (don’t skip this) and install the Oreo Gapps for LineageOS 15.1 package.
– Here is a post explaining how to install GApps using TWRP recovery. - Reboot and Enjoy the Android 8.1 Oreo LineageOS 15.1 on Honor 9 Lite.
Upgrading from earlier version of LineageOS 15.1 on Honor 9 Lite (leland):
- Copy the latest Honor 9 Lite Lineage 15.1 ROM ZIP file to your phone.
- Boot into Recovery.
- Install the latest LineageOS 15.1 ROM ZIP that you copied on your phone.
– Here is a post explaining how to install LineageOS - Then install the Lineage 15.1 GApps package.
(Mostly the GApps is kind of self sustainable across ROM updates. You may need to follow this only If you don’t have Gapps after updating to the latest LineageOS 15.1 on your device.)– Here is a post explaining how to install GApps using TWRP recovery.
- Done. Reboot and Enjoy
Complete the initial setup and enjoy Android 8.1 Oreo with LineageOS 15.1 on Honor 9 Lite. After the installation of LineageOS 15.1 for Honor 9 Lite you may want to enable ROOT access on your phone and here is how you can do that:
– LineageOS 15.1 ROOT.Stay tuned or Subscribe to the Honor 9 Lite (leland) LineageOS forum For other Android Oreo, Nougat ROMs, LineageOS 15.1 ROMs, or other ROMs and all other device specific topics.LineageOS 17 for Mi Mix 2s is now available to download and install from a developer build. This article explains how to install Mi Mix 2s LineageOS 17 ROM based on Android 10, with a step-by-step guide.
This Mi Mix 2s LineageOS 17 build is brought to you by developer bgcngm.
Follow the links to get other Android 10 builds such as: LineageOS 17.1 and 17 and Android 10 Download for supported devices.
DONATION TO DEVELOPER(S)/PROJECT:
If you like this ROM then do consider for a contribution to bgcngm and LineageOS project:
– Donate to bgcngm
– Donate to LineageOS project
[su_note note_color=”#F9D9D9″ text_color=”#AA4343″ radius=”3″ class=”” id=””]DISCLAIMER:
THIS IS AN INITIAL BUILD OF LineageOS 17 FOR Mi Mix 2s, WHICH MAY HAVE MANY BUGS.
MAKE SURE TO BACKUP ALL DATA OF YOUR PHONE AND KEEP IT IN YOUR MIND THAT YOU ARE FLASHING AT YOUR OWN RISK.[/su_note][su_note note_color=”#FBF4DD” text_color=”#A38C68″ radius=”3″ class=”” id=””]Installing LineageOS 17 for Mi Mix 2s requires an unlock bootloader on Mi Mix 2s, which may VOID your warranty and may delete all your data. Before proceeding further you may consider backup all data on the phone.
You are the only person making changes to your phone; neither the developer nor I can be held responsible for the mistakes done by you.[/su_note]
Status of the Mi Mix 2s LineageOS 17 Android 10 custom ROM:
WHAT’S WORKING:
– Telephony (Calls and Data)
– Camera (and flashlight)
– WiFi
– NFC
– Bluetooth
– Audio (Record and Playback)
– Video Playback
– Sensors
– GPS
– HW crypto (FBE)KNOWN ISSUES:
– Nothing reported yetREQUIRED GUIDES AND DOWNLOADS OF LineageOS 17 FOR Mi Mix 2s:
- Latest firmware based on Android Pie is required.
– This build is based on Android 9 firmware with proprietary blobs from MIUI 8.10.25 dev package. - ROM Download link of Mi Mix 2s LineageOS 17
- Mi Mix 2s TWRP Download (polaris) for this Mi Mix 2s LineageOS 17 ROM
- How to install TWRP recovery
- Mi Mix 2s unlock bootloader guide – required to install TWRP recovery
- GApps for LineageOS 17 (Download the nano GApps for LineageOS 17)
- How to Root LineageOS 17
- Download ADB to sideload the ROM
– 15 Seconds ADB Installer for Windows
– Minimal ADB and Fastboot for Windows
– ADB Fastboot for Linux and MAC
HOW TO DOWNLOAD AND INSTALL Mi Mix 2s LineageOS 17 Android 10 CUSTOM ROM:
[su_note note_color=”#D7E3F4″ text_color=”#728095″ radius=”3″ class=”” id=””]
Following are the two sub-sections of this Mi Mix 2s LineageOS 17 update guide:- First time installation of LineageOS 17 for Mi Mix 2s
- Upgrading LineageOS 17 for Mi Mix 2s from a previous build of LineageOS 17 ROM
[/su_note]
Download and Install LineageOS 17 for Mi Mix 2s for the first time:
[su_note note_color=”#D8F1C6″ text_color=”#769958″ radius=”3″ class=”” id=””]This ROM update process requires few guides to be followed and few files to be downloaded. Everything referred in the below guide is provided in the above downloads section.[/su_note]
- Download and Copy the LineageOS 17 ROM for Mi Mix 2s and the GApps for LineageOS 17 to your phone.
- Boot into the TWRP custom Recovery to install this Mi Mix 2s LineageOS 17 Android 10 custom ROM. Make sure to use the TWRP provided in above downloads section or any system-as-root configured TWRP for Mi Mix 2s
[su_note note_color=”#D7E3F4″ text_color=”#728095″ radius=”3″ class=”” id=””]- By now your phone must have an unlocked bootloader to proceed with other steps. If not, unlock the bootloader first and proceed ahead.[/su_note] - Wipe the data partition, Cache partition, vendor partition and system partition.
[su_note note_color=”#D7E3F4″ text_color=”#728095″ radius=”3″ class=”” id=””]- Here is a guide explaining how to wipe using TWRP recovery.[/su_note]
[su_note note_color=”#FBF4DD” text_color=”#A38C68″ radius=”3″ class=”” id=””]- Format the data partition to decrypt it, if flashing over MIUI firmware.
This will delete all your data on your phone. You may consider taking a complete backup of your phone data or take a backup of all relevant partitions.
– How to backup data on Android
– how to take NANDROID backup using TWRP recovery[/su_note] - Install the Mi Mix 2s LineageOS 17 ROM file that you have copied into the phone.
[su_note note_color=”#D7E3F4″ text_color=”#728095″ radius=”3″ class=”” id=””]- Here is a post explaining how to install LineageOS[/su_note] - Reboot into the TWRP recovery again.
- Then install the LineageOS 17 GApps package.
[su_note note_color=”#D7E3F4″ text_color=”#728095″ radius=”3″ class=”” id=””]- Here is a post explaining how to install GApps using TWRP recovery.[/su_note] - Reboot and Enjoy the Android 10 based LineageOS 17 for Mi Mix 2s.
Upgrading from earlier version of LineageOS 17 for Mi Mix 2s (polaris):
- Copy the latest ROM zip file of LineageOS 17 for Mi Mix 2s, LineageOS 17 GApps and/or Magisk ROOT package to the phone
- Boot into Recovery to flash the updated LineageOS 17 for Mi Mix 2s
- Wipe the system partition from the TWRP recovery menu.
- Install the Mi Mix 2s LineageOS 17 update.
[su_note note_color=”#D7E3F4″ text_color=”#728095″ radius=”3″ class=”” id=””]- Here is a post explaining how to install LineageOS[/su_note] - Reboot and see you have the GApps and ROOT access or NOT.
[su_note note_color=”#D8F1C6″ text_color=”#769958″ radius=”3″ class=”” id=””]- Gapps is built in such a way that it will sustain across ROM updates.[/su_note] - If you don’t have GApps after upgrading the LineageOS 17 on Mi Mix 2s, then flash the GApps.
[su_note note_color=”#D7E3F4″ text_color=”#728095″ radius=”3″ class=”” id=””]- Here is a post explaining how to flash GApps using TWRP recovery.[/su_note] - If you don’t have ROOT after upgrading the LineageOS 17 on Mi Mix 2s, then flash the SuperSU or Magisk or the Lineage SU binary.
[su_note note_color=”#D7E3F4″ text_color=”#728095″ radius=”3″ class=”” id=””]- Here is a post explaining How Root LineageOS 17[/su_note] - Once everything is done, reboot and Enjoy the LineageOS 17 on Mi Mix 2s.
[su_note note_color=”#D8F1C6″ text_color=”#769958″ radius=”3″ class=”” id=””]Complete the initial setup and enjoy Android 10 with LineageOS 17 on Mi Mix 2s.[/su_note]
Some Screenshots of LineageOS 17
[rl_gallery id=”103801″]
After installing LineageOS 17 on Mi Mix 2s you may want to install Google Camera (GCam) or enable ROOT access on your phone and here is how you can do that:
– How Root LineageOS 17Where to Download Google Camera for Mi Mix 2s LineageOS 17?
GCam 7.2 and GCam 7.0 are compatible with LineageOS 17 or any Android 10 ROM in general.
In case you won’t get your device in the above lists, you can always look into the big list of GCam for Android 10 (this page contains a huge list of GCam for all available devices)[su_note note_color=”#D7E3F4″ text_color=”#728095″ radius=”3″ class=”” id=””]If there is no ROOT access for some reason even after installing the LineageOS SU binary, then you can try the SuperSU Zip to enable ROOT access.[/su_note]
Stay tuned or Subscribe to the Mi Mix 2s (polaris) LineageOS forum For other Android 10, Android Oreo ROMs, Nougat ROMs, or other ROMs and all other device specific topics.Good news. You can now download and install LineageOS 16 for Huawei Mate 9. Here is how to install LineageOS 16 on Huawei Mate 9, with a step-by-step guide. This LineageOS 16 build is brought to you by developer micky387.
Follow the links to get other LineageOS 16 and Android Pie ROM builds.
DONATION TO DEVELOPER(S)/PROJECT:
If you like this ROM then do consider for a contribution to micky387 and LineageOS project:
– Donate to micky387
– Donate to LineageOS project

[su_note note_color=”#F9D9D9″ text_color=”#AA4343″ radius=”3″ class=”” id=””]DISCLAIMER:
THIS IS AN INITIAL BUILD OF LineageOS 16 FOR Huawei Mate 9, WHICH MAY HAVE MANY BUGS.
MAKE SURE TO BACKUP ALL DATA OF YOUR PHONE.
FLASH AT YOUR OWN RISK.[/su_note][su_note note_color=”#FBF4DD” text_color=”#A38C68″ radius=”3″ class=”” id=””]Installing a custom ROM requires an unlock bootloader on Huawei Mate 9, which has been abandoned now by Huawei.
Because of the above said fact, devices with already unlocked bootloader can only flash this LineageOS 16 for Huawei Mate 9.
You are the only person doing changes to your phone; neither the developer nor I can be held responsible for the mistakes done by you.[/su_note]Status of the Huawei Mate 9 LineageOS 16 ROM:
WHAT’S WORKING:
– UnknownKNOWN ISSUES:
– UnknownREQUIRED GUIDES AND DOWNLOADS TO INSTALL LineageOS 16 ON Huawei Mate 9:
- TWRP for Huawei Mate 9 (hi3660) for this Huawei Mate 9 LineageOS 16 ROM
- How to install TWRP recovery
- Huawei Mate 9 unlock bootloader guide – required to install TWRP recovery
- ROM download link for Huawei Mate 9 LineageOS 16 [UPDATED TO LATEST BUILD]
- MindTheGApps for LineageOS 16 / GApps for LineageOS 16
- How to root LineageOS 16
HOW TO DOWNLOAD AND INSTALL LineageOS 16 ON Huawei Mate 9 – Android 9 Pie CUSTOM ROM:
[su_note note_color=”#D7E3F4″ text_color=”#728095″ radius=”3″ class=”” id=””]
Following are the two sub-sections of this Huawei Mate 9 LineageOS 16 guide:- First time installation of LineageOS 16 on Huawei Mate 9
- Upgrading LineageOS 16 on Huawei Mate 9 from a previous build of LineageOS 16 ROM
[/su_note]
Flashing LineageOS 16 on Huawei Mate 9 for the first time:
[su_note note_color=”#FBF4DD” text_color=”#A38C68″ radius=”3″ class=”” id=””]
Points to NOTE:- Try to avoid restoring apps backup using Titanium Backup. It may break things up.
- Don’t restore system data using Titanium Backup! It will definitely break the current installation.
- It is also discouraged to Restoring Apps + Data using Titanium Backup.
[/su_note]
- Download and Copy the Huawei Mate 9 LineageOS 16 ROM and GApps ZIP file to your phone.
- Boot into the TWRP custom Recovery to install this LineageOS 16 on Huawei Mate 9.
[su_note note_color=”#D7E3F4″ text_color=”#728095″ radius=”3″ class=”” id=””]- Make sure to have a Custom recovery like a TWRP recovery or any other custom recovery.
– If not then download the TWRP recovery from Downloads link and follow the Custom Recovery Installation Guide (it’s a generic guide which will work for TWRP as well as any other recovery)
– Installing TWRP recovery requires an unlocked bootloader on Huawei Mate 9[/su_note] - Wipe the data partition (or do a factory reset), Cache partition, Dalvik Cache or ART cache and Format the System partition.
[su_note note_color=”#D7E3F4″ text_color=”#728095″ radius=”3″ class=”” id=””]- Here is a guide explaining how to wipe using TWRP recovery.[/su_note]
[su_note note_color=”#FBF4DD” text_color=”#A38C68″ radius=”3″ class=”” id=””]This will delete all your data on your phone. You may consider complete backup of your phone data or take a NANDROID backup of the current ROM
– How to backup all data on your Android Device
– how to take NANDROID backup using TWRP recovery[/su_note] - First flash the LineageOS 16 for Huawei Mate 9
[su_note note_color=”#D7E3F4″ text_color=”#728095″ radius=”3″ class=”” id=””]- Here is a post explaining how to install recovery flashable zip file[/su_note] - Then install the MindTheGapps for LineageOS 16 package.
[su_note note_color=”#D7E3F4″ text_color=”#728095″ radius=”3″ class=”” id=””]- Here is a post explaining how to install GApps using TWRP recovery.[/su_note] - Reboot and Enjoy the Android 9 Pie LineageOS 16 on Huawei Mate 9.
Upgrading from earlier version of LineageOS 16 on Huawei Mate 9 (hi3660):
- Copy the latest ROM zip file of LineageOS 16 for Huawei Mate 9, LineageOS 16 GApps and/or Magisk ROOT package to the phone
- Boot into Recovery.- Make sure you have a latest custom Recovery that should be able to flash the LineageOS 16 ROM update.
- Format or wipe the system partition from the custom recovery menu.
- Install the LineageOS 16 for Huawei Mate 9.
[su_note note_color=”#D7E3F4″ text_color=”#728095″ radius=”3″ class=”” id=””]- Here is a post explaining how to install LineageOS[/su_note] - Reboot and see you have the GApps and ROOT access or NOT.
[su_note note_color=”#D8F1C6″ text_color=”#769958″ radius=”3″ class=”” id=””]- Gapps is built in such a way that it will sustain across ROM updates.[/su_note] - If you don’t have GApps after upgrading the LineageOS 16 on Huawei Mate 9, then flash the GApps.
[su_note note_color=”#D7E3F4″ text_color=”#728095″ radius=”3″ class=”” id=””]- Here is a post explaining how to flash GApps using TWRP recovery.[/su_note] - If you don’t have ROOT after upgrading the LineageOS 16 on Huawei Mate 9, then flash the SuperSU or Magisk or the Lineage SU binary.
[su_note note_color=”#D7E3F4″ text_color=”#728095″ radius=”3″ class=”” id=””]- Here is a post explaining How to Enable ROOT on LineageOS 16 ROM[/su_note] - Once everything is done, reboot and Enjoy the LineageOS 16 on Huawei Mate 9.
[su_note note_color=”#D8F1C6″ text_color=”#769958″ radius=”3″ class=”” id=””]Complete the initial setup and enjoy Android 9 Pie with LineageOS 16 on Huawei Mate 9.[/su_note]
After installing LineageOS 16 on Huawei Mate 9 you may want to install Google Camera (GCam) or enable ROOT access on your phone and here is how you can do that:
– How to ROOT LineageOS 16
– GCam Download for Android Pie (this page contains a huge list of GCam for all available devices)[su_note note_color=”#D7E3F4″ text_color=”#728095″ radius=”3″ class=”” id=””]If there is no ROOT access for some reason even after installing the LineageOS SU binary, then you can try SuperSU rooting guide to enable ROOT access.[/su_note]
Stay tuned or Subscribe to the Huawei Mate 9 (hi3660) LineageOS forum For other Android Pie, Android Oreo ROMs, Nougat ROMs, or other ROMs and all other device specific topics.Google camera enhances the photography experience on any phone it works. Today we have a working port(s) of Google Camera (or) GCam for Redmi K30 Pro or the Zoom variant. The compatible Google Camera port(s) are brought to you by Arnova8G2 and Urnyx05.
Available versions of GCam for Redmi K30 Pro / Zoom
Below are the available version(s) of Google Camera APK for Redmi K30 Pro
- GCam 7.3
The GCam 7.x versions(s) bring Astrophotography mode and better night sight mode to the Redmi K30 Pro along with other older features such as HDR+, Timelapse, portrait mode, etc. The available GCam port(s) are compatible on Android 10.

[su_note note_color=”#FBF4DD” text_color=”#A38C68″ radius=”3″ class=”” id=””]Both the Redmi K30 Pro and the Zoom variant are similar devices launched in different geographical regions. This guide of GCam is primarily written for the Redmi K30 Pro but it also works on the Redmi K30 Pro Zoom variant.[/su_note]
Status of this Redmi K30 Pro Google Camera
WHAT’S WORKING
– All basic features
– Auxiliary lenses (zoom and wide angle)KNOWN ISSUES
– Nothing reported yetIf in case you have found any issue with the given Google Camera for Redmi K30 Pro which is not mentioned above, Help us by mentioning the issues in comments, Our Fix google camera issues post may help you to fix the issues on your own.
[/su_note][su_note note_color=”#D8F1C6″ text_color=”#769958″ radius=”3″ class=”” id=””]
Where to Download GCam for Redmi K30 Pro / Zoom?
Below are the available download link to the compatible GCam APK files –
GCam 7.3 [RECOMMENDED] Select the v1.6 to download
GCam 7.3
[/su_note]How to Install Google Camera APK on Redmi K30 Pro / Zoom?
- Download any GCam APK file from the above download link(s).
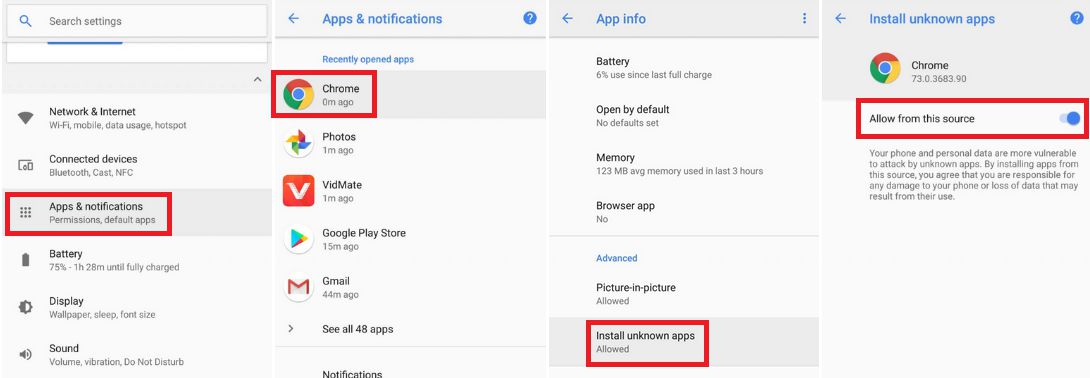
- To install apps from a third-party app other than Play Store you need to enable app installation from Unknown Sources on your Android device.
For Android 10 version, enable Install Unknown Apps from the app from which you are going to install the Google Camera APK. For example: if you have downloaded the Google Camera apk file on Google chrome or firefox browser on your phone. Or you have downloaded and copied the apk file to the file browser and you want to install it from there.
Go to Settings > Apps & notifications > Open the app (Chrome, Firefox or file manager app etc) > Install unknown apps and enable Allow from this source
See the below screenshots that enables to install unknown apps on Pie for Chrome app (you need to enable on the app from where you want to install the apk):

- Once enabled, click on the downloaded app to install.
- Once installed you can clear the app data and open the app and enjoy the feature packed Google Camera APK on Redmi K30 Pro.
How to Enable Aux Lenses (WIde Angle and Zoom lens)?
Go to Advanced > Auxiliary Camera and then enable all the options.
How to shoot in astrophotography mode?
Google Camera version 7.0 and up comes with Astrophotography mode by default, but there are conditions that must be met to enable astrophotography mode. Usually, following conditions must be met to capture in Astrophotography mode if manually not force enabled:
- It can be enabled on Night Sight mode (only)
- The phone must be kept static (use a tripod or keep the phone somewhere to keep it static)
- There must be low light condition
- It may take few seconds for this mode to come up when the above conditions are met
[su_note note_color=”#FBF4DD” text_color=”#A38C68″ radius=”3″ class=”” id=””]- When the display shows something like “Astrophotography is on” or similar, then it is shooting in astrophotography mode otherwise not.
– If the GCam takes a lot of time usually more than 30 seconds then it is capturing in astro mode.
– When I kept the phone static in front of a good light source, the Astrophotography mode did not turn on.
So, make sure it is a low light environment.[/su_note]New features are keep coming on the Google Camera app and hence there could be many versions of these ported apps for Redmi K30 Pro. This page will always have all available working GCam APK for Redmi K30 Pro.
Visit the following link for Redmi K30 Pro updates on other Google Camera, Custom ROMs and all other device specific topics.You need to have a custom Recovery on your phone if you want to install Custom ROMs. TWRP is such a popular Custom Recovery available for many devices including Nexus 6.
DISCLAIMER:
Installing custom recovery on your device may VOID your warranty and may delete all your data. Before proceeding further you may consider backup of your all data. Understand the fact that you are the only person responsible for everything that you do with you device.If you blame me for a disaster that happened to your device then I will simply laugh at you.
Required files for TWRP flashing on Nexus 6:
– Driver for Your Nexus device
– 15 Seconds ADB Installer for Windows
– Minimal ADB and Fastboot for Windows
– ADB & Fastboot installation guide on MAC/Linux
– Recovery image for your corresponding device from the next link: TWPR custom recovery for Nexus 6 SHAMUYou may follow the below link to backup all the data on your android device:
Step by step guide to take full backup of your phone dataSTEP by STEP TWRP flashing guide for Google Nexus 6:
The complete process will be split into three things as following:
– Unlocking the Bootloader
– Installing a custom recoveryUnlocking the Bootloader:
- Turn the phone off.
- Then boot it into the bootloader/fastboot mode by holding volume up + volume down + power.
- Open a command console and go to the directory where you have extracted adb and fastboot
Type the following command in the console:$ fastboot devices
- If the phone has been recognized by the command above, proceed to unlocking the bootloader with the following command::
$ fastboot oem unlock
NOTE:
This command will list the connected devices.
If your phones serial number shows up you are good to go and may continue.
If the phone is NOT listed this indicates that your drivers are not installed correctly.
In order for you to continue you must configure your drivers properly so that your phone is listed under fastboot devices.NOTE:
Remember that this step will wipe EVERYTHING off the phone.
If you have not taken a backup of your phone data then do it here:
Step by step guide to take full backup of your phone dataFlashing a Custom Recovery:
- Find out the appropriate custom recovery for your device.
- Copy the custom recovery into the directory where you have kept the adb and fastboot files.
- Now type the following command to install the custom recovery image onto your Nexus device:
$ fastboot flash recovery <recovery_image_file.name>
- Place the recovery image name in the <recovery_image_file.name> field.
- Reboor your phone from fastboot mode:
$ fastboot reboot
There is a good news, that you can now download and install LineageOS 16 for HTC One Max. Here is how to install LineageOS 16 on HTC One Max, with a step-by-step guide. This LineageOS 16 build is brought to you by developer tarkzim.
Follow the links to get other LineageOS 16 and Android Pie ROM builds.
DONATION TO DEVELOPER(S)/PROJECT:
If you like this ROM then do consider for a contribution to tarkzim and LineageOS project:
– Donate to tarkzim
– Donate to LineageOS project

[su_note note_color=”#F9D9D9″ text_color=”#AA4343″ radius=”3″ class=”” id=””]DISCLAIMER:
THIS IS AN INITIAL BUILD OF LineageOS 16 FOR HTC One Max, WHICH MAY HAVE MANY BUGS.
MAKE SURE TO BACKUP ALL DATA OF YOUR PHONE.
FLASH AT YOUR OWN RISK.[/su_note][su_note note_color=”#FBF4DD” text_color=”#A38C68″ radius=”3″ class=”” id=””]Installing a custom ROM may require an unlock bootloader on HTC One Max, which may VOID your warranty and may delete all your data. Before proceeding further you may consider backup all data on the phone.
You are the only person doing changes to your phone; neither the developer nor I can be held responsible for the mistakes done by you.[/su_note]Status of the HTC One Max LineageOS 16 ROM:
WHAT’S WORKING:
– UnknownKNOWN ISSUES:
– UnknownREQUIRED GUIDES AND DOWNLOADS TO INSTALL LineageOS 16 ON HTC One Max:
- TWRP for HTC One Max (t6) for this HTC One Max LineageOS 16 ROM
- How to install TWRP recovery
- HTC One Max bootloader unlock guide – required to install TWRP recovery
- ROM download link for HTC One Max LineageOS 16
- MindTheGApps for LineageOS 16 / GApps for LineageOS 16
- How to root LineageOS 16
HOW TO DOWNLOAD AND INSTALL LineageOS 16 ON HTC One Max – Android 9 Pie CUSTOM ROM:
[su_note note_color=”#D7E3F4″ text_color=”#728095″ radius=”3″ class=”” id=””]
Following are the two sub-sections of this HTC One Max LineageOS 16 guide:- First time installation of LineageOS 16 on HTC One Max
- Upgrading LineageOS 16 on HTC One Max from a previous build of LineageOS 16 ROM
[/su_note]
Flashing LineageOS 16 on HTC One Max for the first time:
[su_note note_color=”#FBF4DD” text_color=”#A38C68″ radius=”3″ class=”” id=””]
Points to NOTE:- Try to avoid restoring apps backup using Titanium Backup. It may break things up.
- Don’t restore system data using Titanium Backup! It will definitely break the current installation.
- It is also discouraged to Restoring Apps + Data using Titanium Backup.
[/su_note]
- Download and Copy the HTC One Max LineageOS 16 ROM and GApps ZIP file to your phone.
- Boot into the TWRP custom Recovery to install this LineageOS 16 on HTC One Max.
[su_note note_color=”#D7E3F4″ text_color=”#728095″ radius=”3″ class=”” id=””]- Make sure to have a Custom recovery like a TWRP recovery or any other custom recovery.
– If not then download the TWRP recovery from Downloads link and follow the how to install twrp Guide (it’s a generic guide which will work for TWRP as well as any other recovery)
– Installing TWRP recovery requires an unlocked bootloader on HTC One Max[/su_note] - Wipe the data partition (or do a factory reset), Cache partition, Dalvik Cache or ART cache and Format the System partition.
[su_note note_color=”#D7E3F4″ text_color=”#728095″ radius=”3″ class=”” id=””]- Here is a guide explaining how to wipe using TWRP recovery.[/su_note]
[su_note note_color=”#FBF4DD” text_color=”#A38C68″ radius=”3″ class=”” id=””]This will delete all your data on your phone. You may consider complete backup of your phone data or take a NANDROID backup of the current ROM
– How to backup all data on your Android Device
– how to take NANDROID backup using TWRP recovery[/su_note] - First flash the LineageOS 16 for HTC One Max
[su_note note_color=”#D7E3F4″ text_color=”#728095″ radius=”3″ class=”” id=””]- Here is a post explaining how to install recovery flashable zip file[/su_note] - Then install the MindTheGapps for LineageOS 16 package.
[su_note note_color=”#D7E3F4″ text_color=”#728095″ radius=”3″ class=”” id=””]- Here is a post explaining how to install GApps using TWRP recovery.[/su_note] - Reboot and Enjoy the Android 9 Pie LineageOS 16 on HTC One Max.
Upgrading from earlier version of LineageOS 16 on HTC One Max (t6):
- Copy the latest ROM zip file of LineageOS 16 for HTC One Max, LineageOS 16 GApps and/or Magisk ROOT package to the phone
- Boot into Recovery.- Make sure you have a latest custom Recovery that should be able to flash the LineageOS 16 ROM update.
- Format or wipe the system partition from the custom recovery menu.
- Install the LineageOS 16 for HTC One Max.
[su_note note_color=”#D7E3F4″ text_color=”#728095″ radius=”3″ class=”” id=””]- Here is a post explaining how to install LineageOS[/su_note] - Reboot and see you have the GApps and ROOT access or NOT.
[su_note note_color=”#D8F1C6″ text_color=”#769958″ radius=”3″ class=”” id=””]- Gapps is built in such a way that it will sustain across ROM updates.[/su_note] - If you don’t have GApps after upgrading the LineageOS 16 on HTC One Max, then flash the GApps.
[su_note note_color=”#D7E3F4″ text_color=”#728095″ radius=”3″ class=”” id=””]- Here is a post explaining how to flash GApps using TWRP recovery.[/su_note] - If you don’t have ROOT after upgrading the LineageOS 16 on HTC One Max, then flash the SuperSU or Magisk or the Lineage SU binary.
[su_note note_color=”#D7E3F4″ text_color=”#728095″ radius=”3″ class=”” id=””]- Here is a post explaining How to Enable ROOT on LineageOS 16 ROM[/su_note] - Once everything is done, reboot and Enjoy the LineageOS 16 on HTC One Max.
[su_note note_color=”#D8F1C6″ text_color=”#769958″ radius=”3″ class=”” id=””]Complete the initial setup and enjoy Android 9 Pie with LineageOS 16 on HTC One Max.[/su_note]
After installing LineageOS 16 on HTC One Max you may want to install Google Camera (GCam) or enable ROOT access on your phone and here is how you can do that:
– LineageOS 16 ROOT
– GCam for Android Pie (this page contains a huge list of GCam for all available devices)[su_note note_color=”#D7E3F4″ text_color=”#728095″ radius=”3″ class=”” id=””]If there is no ROOT access for some reason even after installing the LineageOS SU binary, then you can try SuperSU rooting guide to enable ROOT access.[/su_note]
Stay tuned or Subscribe to the HTC One Max (t6) LineageOS forum For other Android Pie, Android Oreo ROMs, Nougat ROMs, or other ROMs and all other device specific topics.Android Oreo 8.0 ROM, Galaxy Trend Plus LineageOS 15 has now arrived via a development build. This post provides the download link to LineageOS 15 ROM for Galaxy Trend Plus and guides through the installation process of the same. If you want the OFFICIAL LineageOS 15 update or some more Android Oreo ROMs then stay tuned to the LineageOS 15 ROMs page or the AOSP Android Oreo ROMs devices list page. This LineageOS 15 Oreo ROM for Galaxy Trend Plus (kyleproxx, S7580) is brought to you by developer Đỗ Hoàng Khánh Nam.
DONATION TO DEVELOPER(s):
Donation link not found for Đỗ Hoàng Khánh Nam.
DISCLAIMER:
THIS IS AN INITIAL BUILD WHICH MAY NOT BOOT AT ALL. HAVE A BACKUP BEFORE FLASHING THIS AND TRY AT YOUR OWN RISK. Installing a custom ROM on a Galaxy Trend Plus requires an unlocked bootloader on Galaxy Trend Plus, which may VOID your warranty and may delete all your data. Before proceeding further you may consider backup all data on the phone. You are the only person doing changes to your phone and I cannot be held responsible for the mistakes done by you.Content structure:
Status of Samsung Galaxy Trend Plus LineageOS 15 Oreo 8 ROM:
WHAT’S WORKING:
– UnknownKNOWN ISSUES:
– Unknown
REQUIRED LINKS AND FILES FOR THIS Galaxy Trend Plus LINEAGEOS 15 OREO CUSTOM ROM INSTALLATION:
- TWRP download for Galaxy Trend Plus (kyleproxx, S7580)
– Here is theTWRP update guide for the Galaxy Trend Plus. This TWRP recovery guide requires an unlocked bootloader on the Galaxy Trend Plus.
- ROM Download link of LineageOS 15 for Galaxy Trend Plus
- Gapps Download link for LienageOS 15
Root binary is NOT inbuilt in LineageOS ROM, so you may need a separate SuperSu package or LineageOS su binary to install to gain ROOT access. Here is LineageOS Rooting guide
If there is no in-built ROOT or it does not work for some reason then you can try SuperSU rooting guide to enable ROOT access.HOW TO INSTALL/DOWNLOAD/FLASH/UPDATE THE Galaxy Trend Plus TO THE LineageOS 15 BASED ANDROID OREO ROM:
Follow this if you are flashing LineageOS 15 on the Galaxy Trend Plus for the first time, or coming from another ROM:
Points to NOTE:
– Try to avoid restoring apps backup using Titanium Backup. It may break things up.
– Don’t restore system data using Titanium Backup! It will definitely break the current installation.
– It is also discouraged to Restoring Apps + Data using Titanium Backup.- Download and Copy the GApps and the Galaxy Trend Plus LineageOS 15 ROM ZIP to your phone.
- Boot into Recovery.
Make sure to have a Custom recovery like CWM or TWRP or any other custom recovery. If not then download the recovery for Galaxy Trend Plus from above link and follow the Custom Recovery Installation Guide (it’s a generic guide which will work for TWRP as well as CWM recovery or any other recovery) - Wipe data factory reset, Cache partition, Dalvik Cache and Format the System partition.
– Here is a guide explaining how to wipe data using TWRP recovery.This will delete all your data on your phone. You may consider complete backup of your phone data or take a NANDROID backup of the current ROM
– How to backup all data on your Android Device
– how to take NANDROID backup using TWRP recovery - First flash the Galaxy Trend Plus LineageOS 15 ROM ZIP from device. Then flash the GApps zip from your device memory.
– Here is a post explaining how to install LineageOS - Then reboot into recovery (don’t skip this) and flash the Gapps for LineageOS 15 package.
– Here is a post explaining how to flash GApps using TWRP recovery. - Reboot and Enjoy Android Oreo with LineageOS 15 ROM on Galaxy Trend Plus.
Upgrading from earlier version of LineageOS 15 for Galaxy Trend Plus:
- Copy the latest Galaxy Trend Plus Lineage 15 ROM ZIP file to your phone.
- Boot into Recovery.
- Flash the LineageOS ROM ZIP from your phone.
– Here is a post explaining how to install LineageOS - Then flash the LineageOS 15 Oreo GApps package.
– Here is a post explaining how to flash GApps using TWRP recovery. - Reboot and Enjoy
Complete the initial setup and enjoy Android Oreo 8.0 with LineageOS on the Galaxy Trend Plus (kyleproxx, S7580). After the installing LineageOS 15 for Galaxy Trend Plus, you may want to enable ROOT access on your phone and here is how you can do that:
How to Enable ROOT on LineageOS 15.Stay tuned or Subscribe to the Galaxy Trend Plus (kyleproxx, S7580) forum For other Android Oreo, Nougat ROMs, LineageOS 15 ROMs, other custom ROMs and all other device specific topics.- SafeStrap download link of recovery for S5 Verizon by Hashcode (This needs a pre-rooted S5 Verizon phone and BusyBox installed)