- Search Results
Android 8.1 Oreo based LineageOS 15.1 for Galaxy S3 Neo is now available to download via an unofficial build. This Android 8.1 Oreo based LineageOS 15.1 for Galaxy S3 Neo (i9300i, i9301, s3ve3g) is brought to you by developer Thargorsson (PythonLimited).
DONATION TO DEVELOPER(S):
If you like this ROM then do consider for a contribution to Thargorsson and LineageOS project:
– No donation link found Thargorsson
– Donate to LineageOS projectBy the time the LineageOS 15.1 which is based on Android Oreo 8.1 for Galaxy S3 Neo has come, we already have Android Pie based LineageOS 16 to Download for many devices. you can have a look for the latest update for your device.
If you want the OFFICIAL LineageOS 15.1 then here is the OFFICIAL LineageOS 15.1 supported devices list or the Android Oreo ROM supported devices list page.

[su_note note_color=”#F9D9D9″ text_color=”#AA4343″ radius=”3″ class=”” id=””]DISCLAIMER:
THIS IS AN INITIAL BUILD WHICH HAS MANY BUGS.
MAKE SURE TO BACKUP EVERYTHING AND FLASH AT YOUR OWN RISK.Installing a custom ROM requires a custom recovery on Galaxy S3 Neo, which may VOID your warranty and may delete all your data. Before proceeding further you may consider backup all data on the phone.
You are the only person doing changes to your phone; neither the developer nor I can be held responsible for the mistakes done by you.[/su_note]
Status of LineageOS 15.1 for Galaxy S3 Neo – Android 8.1 Oreo ROM:
WHAT’S WORKING:
– Boot
– Sound
– Wifi
– Bluetooth
– SensorsKNOWN ISSUES:
– Search and Developer options in settings crash (flash magisk to fix)
– Camera
– RIL (partially)
– Vibration on buttons
– no SuperSU support only MagiskREQUIRED LINKS AND FILES FOR THIS LineageOS 15.1 for Galaxy S3 Neo ANDROID 8.1 OREO CUSTOM ROM:
- Galaxy S3 Neo TWRP Download (i9300i, i9301, s3ve3g)
- ROM Download link of LineageOS 15.1 for Galaxy S3 Neo
- GApps for LineageOS 15.1
su Root binary is NOT inbuilt in LineageOS 15.1, so you may need to install a separate SuperSu package or LineageOS su binary to gain ROOT access. Here is LineageOS 15.1 Root guide
If there is no in-built ROOT or it does not work for some reason then you can try SuperSU rooting guide to enable ROOT access.
HOW TO UPDATE/INSTALL LineageOS 15.1 FOR Galaxy S3 Neo; ANDROID 8.1 OREO CUSTOM ROM:
– Fresh LineageOS 15.1 installation guide
– LineageOS 15.1 update on top of previous LineageOS 15.1 ROMFollow this if you are flashing LineageOS 15.1 on Galaxy S3 Neo for the first time, or coming from another ROM:
[su_note note_color=”#FBF4DD” text_color=”#A38C68″ radius=”3″ class=”” id=””]Points to NOTE:
– Try to avoid restoring apps backup using Titanium Backup. It may break things up.
– Don’t restore system data using Titanium Backup! It will definitely break the current installation.
– It is also discouraged to Restoring Apps + Data using Titanium Backup.
[/su_note]- Download and Copy the GApps and Galaxy S3 Neo LineageOS 15.1 ROM ZIP files to your phone.
- Boot into the TWRP custom Recovery to install this LineageOS 15.1 for Galaxy S3 Neo.
– Make sure to have a Custom recovery like a TWRP recovery or any other custom recovery.
If not then download the TWRP recovery from Downloads link and follow this guide to install TWRP on Galaxy S3 Neo - Wipe the data partition (or do a factory reset), Cache partition, Dalvik Cache or ART cache and Format the System partition.
– Here is a guide explaining how to wipe using TWRP recovery.This will delete all your data on your phone. You may consider complete backup of your phone data or take a NANDROID backup of the current ROM
– How to backup all data on your Android Device
– how to take NANDROID backup using TWRP recovery - Install the Galaxy S3 Neo LineageOS 15.1 ROM file that you have copied into the phone.
– Here is a post explaining how to install LineageOS
- Then reboot into recovery (don’t skip this) and install the Oreo Gapps for LineageOS 15.1 package.
– Here is a post explaining how to install GApps using TWRP recovery. - Reboot and Enjoy the Android 8.1 Oreo LineageOS 15.1 on Galaxy S3 Neo.
Upgrading from earlier version of LineageOS 15.1 on Galaxy S3 Neo (i9300i, i9301, s3ve3g):
- Copy the latest LineageOS 15.1 for Galaxy S3 Neo ROM ZIP file, Oreo 8.1 GApps and/or supersu ROOT package to the phone
- Boot into Recovery.
– Make sure you have a latest custom Recovery that should be able to flash the LineageOS 15.1 ROM update.
- Format or wipe the system partition from the custom recovery menu.
- Install the LineageOS 15.1 ROM for Galaxy S3 Neo.
– Here is a post explaining how to install LineageOS
- Reboot and see you have the GApps and ROOT access or NOT.
– Gapps is built in such a way that it will sustain across ROM updates.
- If you don’t have GApps after upgrading the LineageOS 15.1 on Galaxy S3 Neo, then flash the GApps.
– Here is a post explaining how to flash GApps using TWRP recovery.
- If you don’t have ROOT after upgrading the LineageOS 15.1 on Galaxy S3 Neo, then flash the SuperSU or Magisk or the Lineage SU binary.
– Here is a post explaining How to Enable ROOT for LineageOS 15.1 ROM
- Once everything is done, reboot and Enjoy the LineageOS 15.1 for Galaxy S3 Neo.
Complete the initial setup and enjoy Android 8.1 Oreo with LineageOS 15.1 on Galaxy S3 Neo. After the installation of LineageOS 15.1 for Galaxy S3 Neo you may want to enable ROOT access on your phone and here is how you can do that:
– LineageOS 15.1 ROOT.Stay tuned or Subscribe to the Galaxy S3 Neo (i9300i, i9301, s3ve3g) LineageOS forum For other Android Oreo, Nougat ROMs, LineageOS 15.1 ROMs, or other ROMs and all other device specific topics.
Jiayu S3 Plus CM13 (CyanogenMod 13) Marshmallow Custom ROM is an UNOFFICIAL Android Marshmallow build for Jiayu S3 Plus (device codename: n560a). This jiayu S3+ CM13 (CyanogenMod 13) ROM is brought to you by developer Rohan 007 and karthick111. Current status of this ROM is UNKNOWN. It is strongly recommended that you take either a NANDROID backup or a complete sync of your phone data.
DISCLAIMER:
Installing custom ROM requires a custom recovery to be installed on your device, which in-turn may require the bootloader to be unlocked which may VOID your warranty and may delete all your data. Before proceeding further you may consider backup your all data. You are the only person making changes on your phone and neither we nor the developer can be held responsible for the mistakes done by YOU.Here is a Jiayu S3 Plus Android Nougat ROM. If you are interested to try then you can have a look on that.
REQUIRED DOWNLOADS AND GUIDES FOR JIAYU S3 PLUS CM13 ROM FLASHING:
- ROM Download link for Jiayu S3 Plus CM13 (CyanogenMod 13) [by Roahn 007]
- ROM Download link for Jiayu S3 Plus CM13 (CyanogenMod 13) [by karthick111]
- Google Apps download link for Jiayu S3 Plus CM13 ROM
If required:
– 15 Seconds ADB Installer for Windows
– Minimal ADB and Fastboot for Windows
ADB Fastboot Installation guide for Linux and MACThe CyanogenMod 13 ROM for Jiayu S3 Plus comes with inbuilt ROOT, so SuperSU zip file is not required. After this CM13 installation you may want to enable ROOT access on your phone and here is how you can do that:
How to Enable ROOT Access on CM13/CyanogenMod 13Stay tuned or Subscribe to the Jiayu S3 Plus forum For upcoming Android Nougat ROMs, CyanogenMod Custom ROMs, other ROMs and all other device specific topics.
JIAYU S3+ CM13 (CYANOGENMOD 13) MARSHMALLOW CUSTOM ROM INSTALLATION GUIDE:
Make sure that you have unlocked the bootloader and installed a custom recovery on your Jiayu S3 Plus (device codename: n560a). If not then you can try this generic Bootloader unlock guide for any Android device.
Follow this if you are flashing CyanogenMod 13 ROM for the first time to your Jiayu S3 Plus, or coming from another ROM:
This will delete all your data on your phone. You may consider backing up your phone data or take a nandroid backup. Here is how to take NANDROID backup using TWRP recovery.
Points to NOTE:
– Try to avoid restoring apps backup using Titanium Backup. It may break things up.
– Don’t restore system data using Titanium Backup! It will definitely break the current installation.
– It is also discouraged to Restoring Apps + Data using Titanium Backup.- Download and Copy the GApps and Jiayu S3 Plus CyanogenMod 13 ROM ZIP to your phone.
- Take a backup using a synchronization application or if you have TWRP installed then boot into TWRP recovery and take a NANDROID backup using the TWRP itself.
- Boot into Recovery. Make sure to have a Custom recovery like CWM or TWRP or any other custom recovery.
- Wipe data factory reset, Cache partition, Dalvik Cache and Format the System partition.
– Here is a guide explaining how to wipe data using TWRP recovery. - First flash the CM13 ROM ZIP from device. Then flash the GApps zip from your device memory.
– Here is a post explaining how to flash a custom ROM using TWRP recovery.
– Use the same guide to flash the GApps too. - Reboot and Enjoy the CyanogenMod 13 Marshmallow ROM on your Jiayu S3 Plus.
Upgrading from earlier version of CyanogenMod 13 ROM on Jiayu S3 Plus:
- Copy the Jiayu S3 Plus CyanogenMod 13 ROM ZIP file to your phone.
- Boot into Recovery.
- Flash the latest CM ROM ZIP from your phone.
– Here is a post explaining how to flash a custom ROM using TWRP recovery.
– Use the same guide to flash the GApps too. - Reboot and Enjoy
Complete the initial setup and enjoy Android Marshmallow 6.0.1 with CyanogenMod 13 for Jiayu S3 Plus. After this CM13 installation you may want to enable ROOT access on your phone and here is how you can do that:
How to Enable ROOT Access on CM13/CyanogenMod 13Stay tuned or Subscribe to the Jiayu S3 Plus forum For other Android Nougat ROMs, CyanogenMod 14 ROMs, other ROMs and all other device specific topics.Android Nougat 7.1 ROM, OnePlus 3 LineageOS 14.1 has now arrived via an UNOFFICIAL build. If you want some more Lineage ROMs or wanna taste the OFFICIAL Lineage build then stay tuned the LineageOS 14.1 ROM collection page. Before this there was the CM14.1 for OnePlus 3. This LineageOS 14.1 for OnePlus 3 (rain) is brought to you by developer Matssa.
DISCLAIMER:
THIS IS AN INITIAL BUILD WHICH MAY NOT BOOT AT ALL. HAVE A BACKUP BEFORE FLASHING THIS AND TRY AT YOUR OWN RISK. Installing a custom ROM on a OnePlus 3 (rain) requires the bootloader to be unlocked on the OnePlus 3 (rain) phone, which may VOID your warranty and may delete all your data. Before proceeding further you may consider backup all data on the phone. You are the only person doing changes to your phone and I cannot be held responsible for the mistakes done by you.Status of OnePlus 3 LineageOS 14.1 Nougat 7.1 Custom ROM:
WHAT’S WORKING:
– Not KnownKNOWN ISSUES:
– Not Known
REQUIRED LINKS AND FILES FOR ONEPLUS 3 LINEAGE OS 14.1 NOUGAT CUSTOM ROM:
- OnePlus 3 TWRP link
– Here is how to install TWRP on OnePlus 3. This TWRP recovery guide requires bootloader to be unlocked on the OnePlus 3 (rain).
- ROM Download link of LineageOS 14.1 for OnePlus 3 (rain)
- LineageOS GApps download link for OnePlus 3 (rain) LineageOS 14.1 Nougat 7.1 ROM
Root binary is inbuilt in LineageOS 14.1, so you don’t need a separate SuperSu package to install to gain ROOT access. Here is How to Enable ROOT on LineageOS 14.1
If there is no in-built ROOT or it does not work for some reason then you can try updating SuperSU to gain ROOT access.HOW TO INSTALL/DOWNLOAD/FLASH/UPDATE LineageOS 14.1 FOR ONEPLUS 3 NOUGAT CUSTOM ROM:
Follow this if you are flashing LineageOS 14.1 for OnePlus 3 (rain) for the first time, or coming from another ROM:
Points to NOTE:
– Try to avoid restoring apps backup using Titanium Backup. It may break things up.
– Don’t restore system data using Titanium Backup! It will definitely break the current installation.
– It is also discouraged to Restoring Apps + Data using Titanium Backup.- Download and Copy the GApps and OnePlus 3 (rain) LineageOS 14.1 ROM ZIP to your phone.
- Boot into Recovery. Make sure to have a Custom recovery like CWM or TWRP or any other custom recovery. If not then follow the TWRP installation guide (it’s a generic guide which will work for TWRP as well as CWM recovery or any other recovery)
- Wipe data factory reset, Cache partition, Dalvik Cache and Format the System partition.
– Here is a guide explaining clean data using TWRP.This will delete all your data on your phone. You may consider complete backup of your phone data or take a NANDROID backup of the current ROM
– Data backup guide
– NANDROID Backup guide - First flash the OnePlus 3 (rain) LineageOS 14.1 ROM ZIP from device. Then flash the GApps zip from your device memory.
– Here is a post explaining how to install LineageOS. - Then reboot into recovery (don’t skip this) and flash the LOS 14.1 Nougat Gapps package.
– Here is a post explaining how to install GApps. - Reboot and Enjoy the Nougat 7.1 LineageOS 14.1 ROM for OnePlus 3 (rain).
Upgrading from earlier version of LineageOS 14.1 for OnePlus 3 (rain):
- Copy the latest OnePlus 3 (rain) LineageOS 14.1 ROM ZIP file to your phone.
- Boot into Recovery.
- Flash the latest CM ROM ZIP from your phone.
– Here is a post explaining how to install LineageOS. - Then flash the Android Nougat GApps package.
– Here is a post explaining TWRP flashing procedure. - Reboot and Enjoy
Complete the initial setup and enjoy Android Nougat 7.1 with LineageOS 14.1 for OnePlus 3 (rain). After the installation of LineageOS 14.1 for OnePlus 3 (rain) you may want to enable ROOT access on your phone and here is how you can do that:
How to Enable ROOT on LineageOS 14.1.Stay tuned or Subscribe to the OnePlus 3 (rain) forum For other Android Nougat ROMs, LineageOS 14.1 ROMs, other ROMs and all other device specific topics.Looking to download TWRP recovery for your HTC phone??… then yes, you are at the right place. Here is a list of download links of TWRP recovery for HTC phones. Here you will find several officially maintained TWRP recoveries and several TWRP recoveries built by individual developers for almost all the HTC phones available out there.

Table of Contents:
What is TWRP recovery??
TWRP stands for Team Win Recovery Project (TWRP) is a custom recovery for Android phones, which is an open source project. Team Win project started on porting of CM7 for HTC EVO 4G and later settled to work on a custom recovery project which is now TWRP, one of the leading custom recovery available to date covering a wide range of available Android phones and Tablets.
Why do you need TWRP recovery for your HTC Phone?
With the help of TWRP recovery, you will be able to install a wide range of custom ROMs available for a particular device. It’s for sure, an Android device won’t get the latest Android update after 2 or 3 years of its inception. If you need to have the latest Android running on your phone, then you need to install a custom Android ROM like Lineage OS Custom ROM, CyanogenMod Custom ROM, Resurrection Remix Custom ROM etc. and this is not possible without a custom recovery like TWRP recovery.
In addition to installing custom ROM, the TWRP custom recovery has some more features as compared to any other stock recovery. Here are few features of them:
– Touch screen support
– Current ROM image backup and restore
– F2FS filesystem support
– MTP support (You can access files while using TWRP recovery)
– ADB sideload installation support
– Many more other featuresList of available Downloads of TWRP recovery for HTC Phones:
How to install TWRP recovery on a HTC phone:
The TWRP recovery for a HTC phone is available in .img file extension
– To flash TWRP custom recovery on any HTC phone, first, the bootloader has to be unlocked and then the .img TWRP file has to be flashed using a fastboot.– Here is the bootloader unlock guide for HTC phones.
– After unlocking the bootloader flash the .img TWRP file using the following guide. The following guide is a generic guide that applies for all .img extension files regardless of HTC or any other OEM:
Install TWRP using fastboot [THIS GUIDE REQUIRES THE BOOTLOADER TO BE UNLOCKED ON YOUR PHONE. THIS MAY VOID WARRANTY]That’s all my friend. The above list is not complete and will be updated when more and more devices are made available with TWRP support. Some HTC devices may have TWRP yet is missing from our list. These missing devices will also be added soon. If your device is missing from the list then you can place a request in the below reply box to add your device.
Stock ROM or stock Firmware S0450WW for BLU Studio J8M LTE is now available to download. Here is how to flash stock firmware S0450WW on BLU Studio J8M LTE using Mediatek SP Flash Tool.
Although I will make a very clean beginner’s step by step guide, but it is also advisable for you to go through all the steps in detail, so that you understand what are you doing.

[su_note note_color=”#F9D9D9″ text_color=”#AA4343″ radius=”3″ class=”” id=””]
DISCLAIMER:
THIS STOCK ROM FLASHING IS ONLY FOR BLU Studio J8M LTE WHICH IS MEDIATEK MT6737 CHIPSET BASED DEVICE.
DON’T TRY TO FLASH ON OTHER MT6737 BASED DEVICES OR ANY OTHER DEVICE TYPE.
[/su_note][su_note note_color=”#FBF4DD” text_color=”#A38C68″ radius=”3″ class=”” id=””]FLASHING A STOCK ROM ON BLU Studio J8M LTE WILL DELETE ALL DATA.
– IT ALWAYS A GOOD IDEA TO KEEP A BACKUP OF ALL DATA SUCH AS: SMS, PHONE CALL, CONTACT, MUSIC, IMAGES, etc.
– ALSO BACKUP THE IMEI AND NVRAM DATA OF YOUR PHONE.
[/su_note]Required Guides and Downloads to Install Stock ROM/Firmware S0450WW on BLU Studio J8M LTE:
- Mediatek VCOM Driver
- SP Flash Tool
- ROM Download link of stock firmware S0450WW for BLU Studio J8M LTE
- Install stock ROM using SP Flash Tool
Why to flash S0450WW Stock Firmware/ROM on BLU Studio J8M LTE:
There could be various reasons why you may want to flash a stock firmware on BLU Studio J8M LTE to make it a new like phone. Following are some of the key benefits you get by flashing a stock firmware on BLU Studio J8M LTE:
- Flashing a stock ROM on BLU Studio J8M LTE will make the phone new like at least from software point of view.
- If your phone has become too slow or lagging in performance after a prolonged period of usage, then installing a stock ROM/firmware may bring back the speed.
- If you have rooted your Android phone, then flashing a stock ROM will help you to restore your phone software to original state.
[su_note note_color=”#D7E3F4″ text_color=”#728095″ radius=”3″ class=”” id=””]Sometimes software factory reset from Android settings does not help you get rid of ROOT.
In that case, you must flash a stock Firmware to bring back the phone to original state.[/su_note] - Phone warranty will be VOID if you have ROOT on Android phone or have a custom ROM on Android phone. Flashing a stock Firmware/ROM will bring back the software to original state and will restore your warranty.
How to Flash Stock Fimrware / ROM S0450WW on BLU Studio J8M LTE using Mediatek SP Flash Tool:
- Download and extract the BLU Studio J8M LTE stock firmware files.
- Download and install the VCOM driver on your PC.
[su_note note_color=”#D7E3F4″ text_color=”#728095″ radius=”3″ class=”” id=””]VCOM driver is required for the SP Flash Tool to recognize your BLU Studio J8M LTE Phone to be able to download stock Fimrmware.[/su_note]
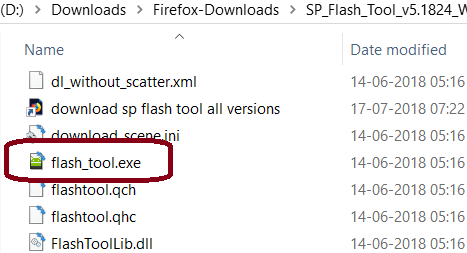
- Download and extract the Mediatek SP Flash Tool zip file.
- Go to the extracted SP Flash Tool folder and open the flash_tool.exe file, which is the actual SP Flash Tool application.
See the below screenshot:

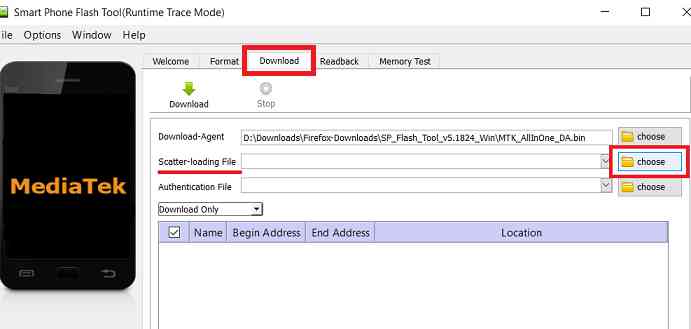
- By default the SP Flash Tool would have opened with the Download Tab open. If not then click on the Download Tab and then click on the choose button to load the BLU Studio J8M LTE stock ROM scatter file.
[su_note note_color=”#D7E3F4″ text_color=”#728095″ radius=”3″ class=”” id=””]- You will find a scatter file with a name of somewhat MT6737_Android_scatter.txt in the BLU Studio J8M LTE stock firmware package.
– This scatter file contains all the partition information of BLU Studio J8M LTE Mediatek phone and which binary file to flash on a which partition and address.[/su_note]See the screenshot below:

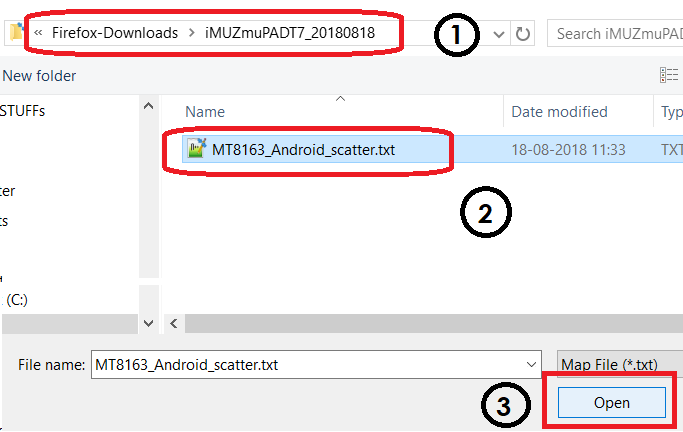
- After that a file browser will be opened to find and select the BLU Studio J8M LTE S0450WW stock ROM scatter file.
Go to the BLU Studio J8M LTE S0450WW stock firmware folder where you have extracted, select the Scatter file (somewhat MT6737_Android_scatter.txt) from there and click on Open.See the screenshot below:

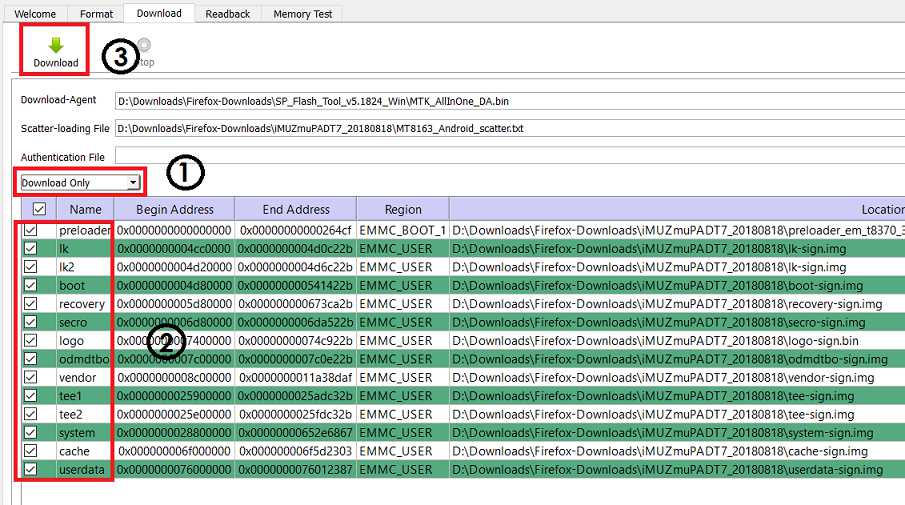
- After loading the scatter file, click on the Download button to start downloading the stock firmware to BLU Studio J8M LTE.
[su_note note_color=”#FBF4DD” text_color=”#A38C68″ radius=”3″ class=”” id=””]Firmware download does not start just by clicking the Download button. You need to connect the phone in download mode, which we will be doing that in the later step.[/su_note]
[su_note note_color=”#D7E3F4″ text_color=”#728095″ radius=”3″ class=”” id=””]- SP Flash Tool automatically takes all the information and will show you the details of partition and binary file information. Verify all the details before start flashing the stock ROM or the stock firmware on your Mediatek phone.
– Verify the download mode before flashing (marked by number 1 in the screenshot).
– Verify which all partitions are being flashed (marked by number 2 in the screenshot). MAKE SURE THERE IS NO NVRAM OR IMEI PARTITION SELECTED HERE.[/su_note]See the screenshot below:

- Now turn off your Mediatek Phone and wait for few seconds.
Then you hold both the volume up and Volume Down button and connect the phone PC using a USB cable.– You see in the SP Flash tool, it will start downloading the firmware to the Mediatek Phone automatically.
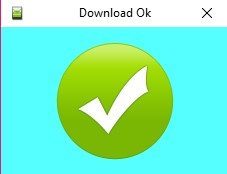
- After the stock ROM is flashed successfully on BLU Studio J8M LTE, you will see a Download OK confirmation on SP Flash Tool.
See the screenshot below:

After being successfully install S0450WW stock firmware or the stock ROM on BLU Studio J8M LTE, you can disconnect the phone and restart if it does not restart automatically.
If you face any problem installing the S0450WW stock firmware on BLU Studio J8M LTE using SP Flash Tool, then leave a reply on this thread. I will reply back as early as possible.
[su_note note_color=”#D7E3F4″ text_color=”#728095″ radius=”3″ class=”” id=””]Stay tuned or Subscribe to the BLU Studio J8M LTE forum for recovery, rooting, custom ROM guides etc. and all other device specific topics.[/su_note]s
Here is the much awaited Nougat 7.0 ROM for OnePlus 3 CyanogenMod 14 (CM14). In addition to this we also have the Lineage 14.1 ROM for OnePlus 3. For the official Lineage ROM update stay tuned to the Lineage 14.1 ROM Device list. Apart from all these, we have update many Android NOUGAT AOSP ROMs and also many CyanogenMod 14 ROM downloads updated and many are yet to come. We have two OnePlus 3 CM14 Nougat ROMs brought to you by developer Taker18. If you want to donate Taker18 for his awesome work, you can donate him using this Link. One more build is brought to you by Daleski.
DISCLAIMER:
Installing a custom ROM on a the OnePlus 3 may require the bootloader to be unlocked on Oneplus 3 and a Custom Recovery on OnePlus 3. OnePlus covers warranty on software modification but this may delete all your data. Before proceeding further you may consider backup all data on the phone. You are the only person doing changes to your phone and I cannot be held responsible for the mistakes done by you.Status of OnePlus 3 CyanogenMod 14 Nougat ROM build:
WHAT’S WORKING:
– Not KnownKNOWN ISSUES:
– Not Known
REQUIRED DOWNLOADS AND LINKS FOR ONEPLUS 3 CM14 (CYANOGENMOD 14) NOUGAT ROM UPDATE GUIDE:
- TWRP download link for OnePlus 3
- Unlocked bootloader on OnePlus 3 and TWRP recovery installed on OnePlus 3
- ROM download link of Cyanogenmod 14 for OnePlus 3 by Taker18
- ROM download link of OnePlus 3 CM14 Nougat 7.0 ROM by Daleski’s ROM’s
- CyanogenMod 14 GApps download link for CM14 OnePlus 3 CyanogenMod 14 Nougat Update
Root binary is inbuilt since CyanogenMod 12, so you don’t need a separate SuperSu package to install to gain ROOT access. Here is How to Enable ROOT on CM14/CyanogenMod 14
HOW TO INSTALL/FLASH/UPDATE CM14 on ONEPLUS 3 (CYANOGENMOD 14 NOUGAT ROM):
Follow these steps if you are flashing CyanogenMod 14 on OnePlus 3 for the first time, or coming from another ROM:
Points to NOTE on BACKUP:
– Try to avoid restoring apps backup using Titanium Backup. It may break things up.
– Don’t restore system data using Titanium Backup! It will definitely break the current installation.
– It is also discouraged to Restoring Apps + Data using Titanium Backup.- Download and Copy the Nougat GApps and CyanogenMod 14 Nougat ROM ZIP to your OnePlus 3 phone.
- Boot into Recovery. Make sure to have a Custom recovery like CWM or TWRP or any other custom recovery.
- Wipe data factory reset, Cache partition, Dalvik Cache and Format the System partition.
– Here is a guide explaining how to wipe data using TWRP recovery.This will delete all your data on your phone. You may consider complete backup of your phone data or take a NANDROID backup of the current ROM.
– How to backup all data on your Android Device.
– how to take NANDROID backup using TWRP recovery. - First flash the OnePlus 3 CM14 ROM ZIP from device.
– Here is a post explaining how to flash a custom ROM using TWRP recovery. - Then reboot into recovery (don’t skip this) and flash the CM14 Nougat Google Apps package.
– Here is a post explaining how to flash GApps using TWRP recovery. - Reboot and Enjoy the CyanogenMod 14 Nougat ROM on OnePlus 3.
Upgrading from earlier version of OnePlus 3 CM14 Nougat ROM:
- Copy the CM14 ROM ZIP file to your phone.
- Boot into Recovery.
- Flash the latest CM14 ROM ZIP from your phone.
– Here is a post explaining how to flash a custom ROM using TWRP recovery. - Then flash the CM14 Nougat Google Apps package.
– Here is a post explaining how to flash GApps using TWRP recovery. - Reboot and Enjoy
Complete the initial setup and enjoy Android Nougat 7.0.0_r1 with CyanogenMod 14 On OnePlus 3 (codename: rain). After this CM14 installation you may want to enable ROOT access on your phone and here is how you can do that:
How to Enable ROOT on CM14/CyanogenMod 14.Stay tuned or Subscribe to the OnePlus 3 forum For other Android Nougat ROMs, CyanogenMod 14 ROMs, other ROMs and all other device specific topics.TWRP recovery is important to ROOT or install a custom ROM such as LineageOS, RR OS, etc. This is a list of TWRP recovery for Samsung Android phones. The list contains all official and unofficially built TWRP recovery for almost all Samsung Android devices.

What is TWRP recovery??
TWRP stands for Team Win Recovery Project (TWRP) is a custom recovery for Android phones, which is an open source project. Team Win project started on porting of CM7 for HTC EVO 4G and later settled to work on a custom recovery project which is now TWRP, one of the leading custom recovery available to date covering a wide range of available Android phones and Tablets.
Why do you need TWRP recovery for your Samsung Phone?
With the help of TWRP recovery, you will be able to install a wide range of custom ROMs available for a particular device. It’s for sure, an Android device won’t get the latest Android update after 2 or 3 years of its inception. If you need to have the latest Android running on your phone, then you need to install a custom Android ROM like Lineage OS, CyanogenMod, Resurrection Remix ROM etc. and this is not possible without a custom recovery like TWRP recovery.
In addition to installing custom ROM, the TWRP custom recovery has some more features as compared to any other stock recovery. Here are few features of them:
– Touch screen support
– Current ROM image backup and restore
– F2FS filesystem support
– MTP support (You can access files while using TWRP recovery)
– ADB sideload installation support
– Many more other featuresList of available TWRP recoveries for Samsung Phones:
How to Install TWRP Recovery on a Samsung phone:
The TWRP recovery for a Samsung phone may be in two file extensions: .tar or .tar.md5 and .img
– Following is the guide to install a TWRP on Samsung Phone with .tar or .tar.md5 extension using ODIN (a third party Windows Application) [THIS IS THE EASIEST AND DOES NOT REQUIRE ANY BOOTLOADER UNLOCK]
– Following guide is a generic guide that applies for all .img extension files:
Install TWRP using fastboot [THIS GUIDE REQUIRES THE BOOTLOADER TO BE UNLOCKED ON YOUR PHONE. THIS WILL TRIP THE KNOX ON YOUR SAMSUNG PHONE AND MAY VOID WARRANTY]That’s all my friend. The above list is not complete and will be updated when more and more devices are made available with TWRP support. Some Samsung devices may have TWRP yet is missing from our list. These missing devices will also be added soon. If your device is missing from the list then you can place a request in the below reply box to add your device.
Android Nougat 7.1 ROM, LineageOS 14.1 for Galaxy S3 Mini has now arrived via an UNOFFICIAL build. If you want some more LineageOS ROMs or wanna taste the OFFICIAL LineageOS build then stay tuned to the LineageOS 14.1 ROM collection page. Or if you are looking for other Nougat ROMs, then here is the CM14.1 for Galaxy S3 Mini. This Galaxy S3 Mini LineageOS 14.1 is brought to you by developer 3liteking148.
DISCLAIMER:
THIS IS AN INITIAL BUILD WHICH MAY HAVE MANY MORE BUGS THAN YOU CAN IMAGINE. HAVE A BACKUP BEFORE FLASHING THIS AND TRY AT YOUR OWN RISK. Installing a custom ROM on a Galaxy S3 Mini (golden) may require the bootloader to be unlocked, which may VOID your warranty and may delete all your data. Before proceeding further you may consider backup all data on the phone. You are the only person doing changes to your phone and I cannot be held responsible for the mistakes done by you.Status of LineageOS 14.1 for Galaxy S3 Mini (golden) Nougat 7.1 ROM:
WHAT’S WORKING:
– Not KnownKNOWN ISSUES:
– Not Known
REQUIRED LINKS AND FILES FOR LineageOS 14.1 for Galaxy S3 Mini NOUGAT 7.1 BASED CUSTOM ROM:
- Latest FW and baseband
- TWRP download link for Galaxy S3 Mini
– Here is: Custom Recovery Installation Guide for Samsung Galaxy S3 Mini (This guide is only for .tar TWRP file)
– To flash .img file you can follow this TWRP update guide using fastboot or you can use Flashify to update the .img TWRP. - ROM Download Link of Galaxy S3 Mini LineageOS 14.1 ROM (golden)
- LineageOS 14.1 GApps download link for Galaxy S3 Mini LineageOS 14.1 Nougat 7.1 ROM
Root binary is NOT inbuilt in LineageOS 14.1, so you may need a separate SuperSu package or LineageOS su binary to install to gain ROOT access. Here is How to Enable ROOT on LineageOS 14.1
If there is no in-built ROOT or it does not work for some reason then you can try flashing SuperSU zip using recovery to gain ROOT access.HOW TO INSTALL/DOWNLOAD/FLASH/UPDATE Galaxy S3 Mini LineageOS 14.1 NOUGAT CUSTOM ROM:
Follow this if you are flashing LineageOS 14.1 for Galaxy S3 Mini (golden) for the first time, or coming from another ROM:
Points to NOTE:
– Try to avoid restoring apps backup using Titanium Backup. It may break things up.
– Don’t restore system data using Titanium Backup! It will definitely break the current installation.
– It is also discouraged to Restoring Apps + Data using Titanium Backup.- Download and Copy the GApps and LineageOS 14.1 for Galaxy S3 Mini ROM ZIP to your phone.
- Boot into Recovery. Make sure to have a Custom recovery like CWM or TWRP or any other custom recovery. If not then follow the Custom Recovery Installation Guide for Galaxy S3 Mini (golden) (it’s a generic guide which will work for TWRP as well as CWM recovery or any other recovery)
- Wipe data factory reset, Cache partition, Dalvik Cache and Format the System partition.
– Here is a guide explaining how to wipe data using TWRP recovery.This will delete all your data on your phone. You may consider complete backup of your phone data or take a NANDROID backup of the current ROM
– How to backup all data on your Android Device
– how to take NANDROID backup using TWRP recovery - First flash the Galaxy S3 Mini LineageOS 14.1 ROM ZIP from device. Then flash the GApps zip from your device memory.
– Here is a post explaining how to install LineageOS. - DO NOT REBOOT yet. Then flash the LineageOS 14.1 GApps package.
– Here is a post explaining how to flash LineageOS 14.1 GApps using TWRP recovery. - Reboot and Enjoy the Nougat 7.1 LineageOS 14.1 ROM for Galaxy S3 Mini (golden).
Upgrading from earlier version of Galaxy S3 Mini LineageOS 14.1 (golden):
- Copy the latest LineageOS 14.1 for Galaxy S3 Mini ROM ZIP file to your phone.
- Boot into Recovery.
- Flash the latest LineageOS ROM ZIP from your phone.
– Here is a post explaining how to install LineageOS. - Then flash the LineageOS 14.1 Nougat GApps package.
– Here is a post explaining how to flash GApps using TWRP recovery. - Reboot and Enjoy
Complete the initial setup and enjoy Android Nougat 7.1 with LineageOS 14.1 for Galaxy S3 Mini (golden). After the installation of Galaxy S3 Mini LineageOS 14.1 ROM (golden) you may want to enable ROOT access on your phone and here is how you can do that:
How to Enable ROOT on LineageOS 14.1.Stay tuned or Subscribe to the Galaxy S3 Mini (golden) forum For other Android Nougat ROMs, LineageOS 14.1 ROMs, other ROMs and all other device specific topics.OnePlus 3 TESLA Nougat 7.0 ROM is now available through UNOFFCIAL build. Earlier developers had brought the OnePlus 3 CM14/CyanogenMod 14 Nougat 7.0 ROM. Here we have TESLA for OnePlus 3 Nougat 7.0 ROM brought to you by developer Eliminater. If you like this TESLA Nougat ROM by Eliminater then you can Donate the developer to keep up his good work. Donate to Eliminater via Paypal.
Since Google released Android Nougat Source code, we have update many Android NOUGAT ROMs and also many CyanogenMod 14/CM14 ROMs updated and many are yet to come.
Installing a custom ROM on a the OnePlus 3 may require the bootloader to be unlocked on Oneplus 3 and a Custom Recovery on OnePlus 3. OnePlus retains warranty even after installing third party software but this process will delete all your data. Before proceeding further you may consider backup all data on the phone. You are the only person doing changes to your phone and I cannot be held responsible for the mistakes done by you.Status of OnePlus 3 TESLA Nougat 7.0 ROM build:
WHAT’S WORKING:
– Almost everythingKNOWN ISSUES:
– Nothing as such
REQUIRED DOWNLOADS AND LINKS ONEPLUS 3 TESLA NOUGAT 7.0 ROM UPDATE GUIDE:
- TWRP download link for OnePlus 3
– Unlocked bootloader on OnePlus 3 and TWRP recovery installed on OnePlus 3
- ROM download link to Eliminater’s OnePlus 3 TESLA Nougat 7.0 ROM
- Nougat 7.0 GApps download link for OnePlus 3 TESLA ROM
Root might not be there by default in the ROM. So, here is How to enable ROOT on OnePlus 3 TESLA Nougat 7.0 AOSP
HOW TO INSTALL/FLASH/UPDATE TESLA FOR ONEPLUS 3 NOUGAT 7.0 ROM:
Follow these steps if you are flashing Nougat 7.0 TESLA for OnePlus 3 for the first time, or coming from another ROM:
Points to NOTE on BACKUP:
– Try to avoid restoring apps backup using Titanium Backup. It may break things up.
– Don’t restore system data using Titanium Backup! It will definitely break the current installation.
– It is also discouraged to Restoring Apps + Data using Titanium Backup.- Download and Copy the Nougat GApps and OnePlus 3 TESLA Nougat 7.0 ROM zip to the phone memory.
- Boot into Recovery. Make sure to have a Custom recovery like CWM or TWRP or any other custom recovery.
- Wipe data factory reset, Cache partition, Dalvik Cache and Format the System partition.
– Here is a guide explaining how to wipe data using TWRP recovery.This will delete all your data on your phone. You may consider complete backup of your phone data or take a NANDROID backup of the current ROM.
– How to backup all data on your Android Device.
– how to take NANDROID backup using TWRP recovery. - First flash the ROM zip of OnePlus 3 TESLA from device.
– Here is a post explaining how to flash a custom ROM using TWRP recovery. - Then reboot into recovery (don’t skip this) and flash the TESLA Nougat Google Apps package.
– Here is a post explaining how to flash GApps using TWRP recovery. - Reboot and Enjoy the TESLA Nougat for OnePlus 3.
Upgrading from earlier version of OnePlus 3 TESLA Nougat 7.0 ROM:
- Copy the OnePlus 3 TESLA ROM ZIP file to your phone.
- Boot into Recovery.
- Flash the latest ROM zip of OnePlus 3 TESLA from your phone.
– Here is a post explaining how to flash a custom ROM using TWRP recovery. - Then flash the TESLA Nougat Google Apps package.
– Here is a post explaining how to flash GApps using TWRP recovery. - Reboot and Enjoy
Complete the initial setup and enjoy Android Nougat 7.0 with TESLA for OnePlus 3 (codename: rain). After this TESLA installation you may want to enable ROOT access on your phone and here is how you can do that:
Enable ROOT on OnePlus 3 TESLA Nougat 7.0 AOSPStay tuned or Subscribe to the OnePlus 3 (rain) forum For other Android Nougat ROMs, CyanogenMod 14 ROMs, other ROMs and all other device specific topics.Dev thread for this OnePlus 3 TESLA Nougat 7.0 ROM is here.
LineageOS 15 for Oppo Find 7 (find7) is now available to download via an initial development build. This post provides the download link to the Android Oreo based Lineage OS 15 for Oppo Find 7 (find7) and guides through the installation process of the same. This LineageOS 15 for Oppo Find 7 is brought to you by developer Wuxianlin.
DONATION TO DEVELOPER(S):
No donation link found for Wuxianlin.
If you want the OFFICIAL Lineage OS 15 update or some more Android Oreo ROMs then stay tuned to the LineageOS 15 ROMs page or the AOSP Oreo ROMs devices list page.
DISCLAIMER:
THIS IS AN INITIAL BUILD WHICH MAY NOT BOOT AT ALL. HAVE A BACKUP BEFORE FLASHING THIS AND TRY AT YOUR OWN RISK. Installing a custom ROM requires an unlocked bootloader on Oppo Find 7, which may VOID your warranty and may delete all your data. Before proceeding further you may consider backup all data on the phone. Understand that you are the only person making changes to your phone and I cannot be held responsible for the mistakes done by you.Content structure:
Status of LineageOS 15 for Oppo Find 7 Oreo 8 ROM:
WHAT’S WORKING:
– UnknownKNOWN ISSUES:
– Camera is not working
REQUIRED LINKS AND FILES FOR LineageOS 15 for Oppo Find 7 OREO ROM:
- TWRP recovery for Oppo Find 7
– Here is the TWRP update guide for Oppo Find 7. This recovery guide requires an unlocked bootloader on the phone.
- LineageOS 15 Download link for Oppo Find 7 (find7)
- GApps download for LineageOS 15 Oreo ROM
Root binary is NOT inbuilt in Lineage OS ROM, so you may need a separate SuperSu package or LineageOS su binary to install to gain ROOT access. Here is Lineage OS Rooting guide
If there is no in-built ROOT or it does not work for some reason then you can try SuperSU rooting guide to enable ROOT access.HOW TO INSTALL/DOWNLOAD/FLASH/UPDATE THE Lineage OS 15 for Oppo Find 7Oppo Find 7:
Follow this if you are flashing LineageOS 15 for Oppo Find 7 for the first time, or coming from another ROM:
Points to NOTE:
– Try to avoid restoring apps backup using Titanium Backup. It may break things up.
– Don’t restore system data using Titanium Backup! It will definitely break the current installation.
– It is also discouraged to Restoring Apps + Data using Titanium Backup.- Boot into Recovery.
Make sure to have a Custom recovery like CWM or TWRP or any other custom recovery. If not then download the recovery for Oppo Find 7 from above link and follow the Custom Recovery Installation Guide (it’s a generic guide which will work for TWRP as well as CWM recovery or any other recovery) - Wipe data factory reset, Cache partition, Dalvik Cache and Format the System partition.
– Here is a guide explaining how to wipe data using TWRP recovery.This will delete all your data on your phone. You may consider complete backup of your phone data or take a NANDROID backup of the current ROM
– How to backup all data on your Android Device
– how to take NANDROID backup using TWRP recovery - Download and Copy the Oreo GApps and the LineageOS 15 ROM ZIP to the phone.
- First flash the Lineage OS 15 Oreo ROM ZIP file from device. Then flash the Oreo GApps zip from your device memory.
– Here is a post explaining how to install Lineage OS - Then reboot into recovery (don’t skip this) and flash the Gapps for LineageOS 15 package.
– Here is a post explaining how to flash GApps using TWRP recovery. - Reboot and Enjoy Android Oreo with LineageOS 15 for Oppo Find 7.
Upgrading from earlier version of Lineage OS 15 for Oppo Find 7 (find7):
- Copy the latest Lineage OS 15 for Oppo Find 7 Oreo ROM ZIP file to the phone.
- Boot into Recovery.
- Flash the ROM ZIP that you copied.
– Here is a post explaining how to install LineageOS - Then flash the LineageOS 15 GApps package.
– Here is a post explaining how to flash GApps using TWRP recovery. - Reboot and Enjoy
Complete the initial setup and enjoy Android Oreo 8.0 with LineageOS 15 for Oppo Find 7. After the installing the LineageOS 15 ROM, you may want to enable ROOT access on your phone and here is how you can do that:
How to Enable ROOT on LineageOS 15 ROM.Stay tuned or Subscribe to the Oppo Find 7 (find7) forum For other Android Oreo, Nougat ROMs, LineageOS 15 ROMs, other custom ROMs and all other device specific topics.