- Search Results
If you are looking to download a Stock Samsung Firmware with out registering in any websites or without any download bandwidth limitations then you must be thankful to Developer zxz0O0 who has developed an easy to use one click Stock Samsung Firmware Downloader, SamFirm. I am just excited to introduce this tool to you and I am sure you will be loving this Tool. Here I will be explaining in a Step By Step Guide explaining just How to Download the Latest Firmware for your Samsung Phone or Tablet using SamFirm.
PROS:
– One click FW Download
– No bandwidth Limitation
– Downloaded from Samsung Servers
– Pause/Resume functionality for DownloadCONS:
– Can only Download the Latest Firmware. (There is no way you can download an older FW)
– Unable to detect the phone info automatically (You must be thankful first for the Tool. I guess you have not lost your fingers yet)DISCLAIMER:
Manually upgrading a firmware requires patience and a little bit of technical knowledge. Flashing a new Firmware will delete all the data on your Samsung Phone/Tablet. Before proceeding further you may consider backup your all data. Also understand that YOU are the only person making changes to your phone and I cannot be held responsible for the mistakes done by you.HOW TO USE THE SAMFIRM TOOL TO DOWNLOAD STOCK SAMSUNG FIRMWARE:
Step By Step Guide.

PRE-REQUISITES AND DOWNLOADS FOR THIS SAMFIRM UTILITY:
– Samsung Phone INFO App.
– SamFirm Download Link v0.3.5DOWNLOAD STOCK SAMSUNG FIRMWARE IN AUTO MODE:
- Install the Samsung Phone App and be ready at least with your Samsung phone’s Model number and Region Info.
If you don’t know these info then Install the Samsung Info App and get the details from the App. - Enter the Model info and Region Info in the appropriate fields.
- Select the Auto mode and click on the Check Update.
- On the right side of the Tool you will see the Stock Samsung Firmware details if the info filled by you is correct.
- Just check the Decrypt automatically checkbox and click on Download.
- Select the destination directory where you want to keep the Downloaded file.
DOWNLOAD STOCK SAMSUNG FIRMWARE IN MANUAL MODE:
- Install the Samsung Phone App and be ready with your Samsung phone’s Model number, Region Info, PDA Info, CSC Info and Phone Info.
If you don’t know these info then Install the Samsung Info App and get the details from the App. - Select the Manual mode.
- Enter the Model number, Region Info, PDA Info, CSC Info and Phone Info in the appropriate fields.
- Click on the Chekck Update to check the Latest FW available for your Samsung Device on Samsung Servers.
- On the right side of the Tool you will see the Stock Samsung Firmware details if the filled info is correct.
- Just check the Decrypt automatically checkbox and click on Download.
- Select the destination directory where you want to keep the Downloaded file.
TIPS:
By default this TOOL gets the latest FirmWare from the Samsung Server for the Selected Samsung Device. If you will use this tool from day 1 when you got your Samsung device then you can have a collection of all Firmwares and you may switch to any of the firmwares at any time using ODIN.The NEXT STEP what you want is to flash or install this Stock Firmware. So, visit the below link to get it done:
How to Install Stock Firmware on Samsung Device Using ODINHere is a Development thread @ xda created by the Developer himself.
Please Add Lineage OS Rom for Samsung Galaxy Tab A 9.7 (SM-T555)
(4G Model)
This Device has 2GB ram.
Please made a rom for this device… Thanks in advance..Galaxy S4 T-Mobile CM13 (cyanogenMod 13) Marshmallow ROM (Device Codename: jfltetmo) goes official on CyanogenMod servers. Official NIGHTLY build are automated builds which makes sure the build is not broken by daily code changes made by developers. NIGHTLY builds are not stable as compared to SNAPSHOT builds and may contain some minor bugs. Here is some brief explanation of the difference between a NIGHTLY and SNAPSHOT.
DISCLAIMER:
Installing custom ROM requires a custom recovery to be installed on your device, which may VOID your warranty and may delete all your data. Before proceeding further you may consider backup your all data or take a NANDROID backup using a recovery. You are the only person doing changes to your phone and I cannot be held responsible for the mistakes done by you. Neither the developer nor we will be held responsible for any disaster that happens to your device.
REQUIRED DOWNLOADS AND LINKS FOR THE Galaxy S4 T-Mobile CM13 ROM UPDATE GUIDE:
- Galaxy S4 T-Mobile TWRP recovery download link.
– Download the .img.tar extension TWRP file for YOUR DEVICE ONLY which can be flashed with ODIN. Follow this guide: How to Install TWRP on Samsung using Odin for the img.tar TWRP file.– If you already have an unlocked bootloader then you can download the .img file extension. Then follow this guide: How to flash TWRP using fastboot.
- T-Mobile Galaxy S4 Official CyanogenMod 13 ROM download link
- GApps download link
Root binary is inbuilt since CyanogenMod 12, so you don’t need a separate SuperSu package to install to gain ROOT access. Here is How to Enable ROOT Access on CM13/CyanogenMod 13
FLASHING OFFICIAL Galaxy S4 T-Mobile CM13 (CyanogenMod 13) MARSHMALLLOW CUSTOM ROM:
Follow this if you are flashing CyanogenMod 13 for the first time to your T-Mobile Galaxy S4, or coming from another ROM:
This will delete all your data on your phone. You may consider backing up your phone data or take a nandroid backup. Here is how to take NANDROID backup using TWRP recovery.
Points to NOTE:
– Try to avoid restoring apps backup using Titanium Backup. It may break things up.
– Don’t restore system data using Titanium Backup! It will definitely break the current installation.
– It is also discouraged to Restoring Apps + Data using Titanium Backup.- Make sure you have a TWRP installed on your Galaxy S4 T-Mobile.
If you don’t have a recovery then download it from the above link and see if the below guide works for you:
– How to Install TWRP on Samsung using Odin for the .tar TWRP file. - Download and Copy the GApps and CyanogenMod ROM ZIP to your device.
- Take a backup using a synchronization application or using Samsung Smart Switch or if you have TWRP installed then you can take a NANDROID backup using the TWRP itself.
- Boot into Recovery. Make sure to have already flashed a Custom recovery like CWM or TWRP on the phone.
- Wipe data factory reset, Cache partition, Dalvik Cache and Format the System partition.
– Here is a guide explaining how to wipe data using TWRP recovery. - First flash the CM ROM ZIP from device. Then flash the GApps zip from your device memory.
– Here is a post explaining how to flash a custom ROM using TWRP recovery.
Use the same guide to flash the GApps too. - Reboot and Enjoy the CyanogenMod 13 Marshmallow ROM on your Galaxy S4 T-Mobile.
- Make sure you have a TWRP installed on your Galaxy S4 T-Mobile.
Upgrading from earlier version of CyanogenMod 13.0:
- Copy the CyanogenMod 13 ROM ZIP file to your phone.
- Boot into Recovery.
- Flash the latest CM ROM ZIP from your phone.
– Here is a post explaining how to flash a custom ROM using TWRP recovery. - Reboot and Enjoy
The first boot may take long time, so don’t panic and be sure that you have enough battery backup. Let the phone reboot and then enjoy the official CyanogenMod 13 Marshmallow ROM on Galaxy S4 T-Mobile.
After this CM13 installation you may want to enable ROOT access on your phone and here is how you can do that:
How to Enable ROOT Access on CM13/CyanogenMod 13.Android Oreo 8.1 ROM, Galaxy Tab S2 8.1 WiFi LineageOS 15.1 has now arrived via an UNOFFICIAL build. If you want the OFFICIAL LineageOS update or some more Android Oreo ROMs then stay tuned to the LineageOS 15 page or the AOSP Android Oreo devices list page. This LineageOS 15.1 for Galaxy Tab S2 8.1 WiFi 2016 (gts28vewifi, SM-T713) is brought to you by developer LuK1337 and LuK1337.
DONATION TO DEVELOPER:
If you like this ROM then do consider a contribution to LuK1337 and luca020400 for their efforts:
Donate to LuK1337
Donate to luca020400DISCLAIMER:
THIS IS AN ALPHA ROM AND MAY HAVE MANY BUGS. HAVE A BACKUP BEFORE FLASHING THIS ROM AND TRY AT YOUR OWN RISK. Installing a custom ROM on a Galaxy Tab S2 8.1 WiFi (gts28vewifi, SM-T713) requires an unlocked bootloader on the Galaxy Tab S2 8.1 WiFi (gts28vewifi, SM-T713), which may VOID your warranty and may delete all your data. Before proceeding further you may consider backup all data on the phone. You are the only person doing changes to your phone and I cannot be held responsible for the mistakes done by you.Status of Galaxy Tab S2 8.1 WiFi 2016 LineageOS 15.1 Oreo 8.1 ROM:
WHAT’S WORKING:
– Wifi
– Bluetooth
– Video Playback
– Audio ( Record and Playback )
– Sensors
– GPSKNOWN ISSUES:
– Camera
– SELinux is permissive
REQUIRED LINKS AND FILES FOR Galaxy Tab S2 8.1 WiFi LINEAGEOS 15 OREO CUSTOM ROM:
- TWRP recovery link for Galaxy Tab S2 8.1 WiFi (gts28vewifi, SM-T713)- Here is theTWRP update guide for the Galaxy Tab S2 8.1 WiFi (gts28vewifi, SM-T713).
- ROM Download link of LineageOS 15.1 for Galaxy Tab S2 8.1 WiFi
- ROM Download link of LineageOS 15.1 for Galaxy Tab S2 8.1 WiFi
- LineageOS 15.1 GApps download link for Galaxy Tab S2 8.1 WiFi LineageOS 15.1 Oreo 8.1 ROM (Download the stock ARM64 GApps)
Root binary is NOT inbuilt in LineageOS 15.1, so you may need a separate SuperSu package or LineageOS su binary to install to gain ROOT access. Here is LineageOS Rooting guide
If there is no in-built ROOT or it does not work for some reason then you can try SuperSU rooting guide to enable ROOT access.HOW TO INSTALL/DOWNLOAD/FLASH/UPDATE LineageOS 15.1 FOR Galaxy Tab S2 8.1 WiFi OREO CUSTOM ROM:
Follow this if you are flashing LineageOS 15.1 for Galaxy Tab S2 8.1 WiFi for the first time, or coming from another ROM:
Points to NOTE:
– Try to avoid restoring apps backup using Titanium Backup. It may break things up.
– Don’t restore system data using Titanium Backup! It will definitely break the current installation.
– It is also discouraged to Restoring Apps + Data using Titanium Backup.- Boot into Recovery. Make sure to have a Custom recovery like CWM or TWRP or any other custom recovery. If not then follow the Custom Recovery Installation Guide for Galaxy Tab S2 8.1 WiFi (it’s a generic guide which will work for TWRP as well as CWM recovery or any other recovery)
- Wipe data factory reset, Cache partition, Dalvik Cache and Format the System partition.
– Here is a guide explaining how to wipe data using TWRP recovery.This will delete all your data on your phone. You may consider complete backup of your phone data or take a NANDROID backup of the current ROM
– How to backup all data on your Android Device
– how to take NANDROID backup using TWRP recovery - Download and Copy the LineageOS 15.1 GApps and Galaxy Tab S2 8.1 WiFi LineageOS 15.1 ROM ZIP file to your phone.
- First flash the Galaxy Tab S2 8.1 WiFi LineageOS 15.1 ROM ZIP from device. Then flash the GApps for LineageOS 15.1 zip from your device memory.
– Here is a post explaining how to install LineageOS - Then reboot into recovery (don’t skip this) and flash the Gapps for Oreo ROM package.
– Here is a post explaining how to flash GApps using TWRP recovery. - Reboot and Enjoy the Oreo 8.1 LineageOS 15.1 ROM for Galaxy Tab S2 8.1 WiFi.
Upgrading from earlier version of LineageOS 15.1 for Galaxy Tab S2 8.1 WiFi (gts28vewifi, SM-T713):
- Copy the latest Galaxy Tab S2 8.1 WiFi Lineage 15 ROM ZIP file to your phone.
- Boot into Recovery.
- Flash the latest LineageOS ROM ZIP from your phone.
– Here is a post explaining how to install LineageOS - Then flash the GApps for LineageOS 15.1 package.
– Here is a post explaining how to flash GApps using TWRP recovery. - Reboot and Enjoy
Complete the initial setup and enjoy Android Oreo 8.1 with LineageOS 15.1 for Galaxy Tab S2 8.1 WiFi. After the installation of LineageOS 15.1 for Galaxy Tab S2 8.1 WiFi you may want to enable ROOT access on your phone and here is how you can do that:
How to Enable ROOT on LineageOS 15.1.Stay tuned or Subscribe to the Galaxy Tab S2 8.1 WiFi (SM-T713) LineageOS forum For other Android Oreo, Nougat ROMs, LineageOS 15.1 ROMs, other ROMs and all other device specific topics.If you have found any BUG or any issues with this ROM, then following is the development thread at XDA.
Here is the much awaited Nougat 7.0 ROM for Galaxy Tab 4 10.1 3G CyanogenMod 14 (CM14). In addition, we also have the Lineage OS 14.1 for Galaxy Tab 4 10.1 3G. For latest updates, stay tuned to the Lineage OS device list page. Since Google released Android Nougat Source code, we have update many Android NOUGAT AOSP ROMs and also many CyanogenMod 14 ROMs updated and many are yet to come. This Galaxy Tab 4 10.1 3G for CyanogenMod 14 is brought to you by developer sub77.
DISCLAIMER:
THIS IS STILL AN EARLY BUILD AND CONTAINS BUGS. Installing custom ROM requires a custom recovery to be installed on your device, which may VOID your warranty and may delete all your data. Before proceeding further you may consider backup your all data. You are the only person doing changes to your phone and neither the developer(s) nor we can be held responsible for the mistakes done by you.Status of (SM-T531) Galaxy Tab 4 10.1 3G CM14 (CyanogenMod 14) Nougat 7.0 ROM:
WHAT’S WORKING:
– Not knownKNOWN ISSUES:
– Not known
REQUIRED LINKS AND FILES FOR GALAXY TAB 4 10.1 3G CM14 (CYANOGENMOD 14, NOUGAT) CUSTOM ROM:
- TWRP recovery for Tab 4 10.1 3G SM-T531
– Custom Recovery Installation Guide on Samsung Galaxy Tab 4 10.1 3G – SM T531
- ROM Download link for Galaxy Tab 4 10.1 3G (SM-T531) CM14 ROM (Download the file for matisse3g ONLY)
- Nougat GApps download link for Galaxy Tab 4 10.1 3G CM14 ROM
Root binary is inbuilt since CyanogenMod 12, so you don’t need a separate SuperSu package to install to gain ROOT access. Here is How to Enable ROOT on CM14/CyanogenMod 14
HOW TO INSTALL/DOWNLOAD/FLASH/UPDATE GALAXY TAB 4 10.1 3G CM14 (CYANOGENMOD 14) (SM-T531) NOUGAT CUSTOM ROM:
Follow this if you are flashing CyanogenMod 14 ROM for the first time to Galaxy Tab 4 10.1 3G, or coming from another ROM:
This will delete all your data on your phone. You may consider backing up your phone data or take a nandroid backup. Here is how to take NANDROID backup using TWRP recovery.
Points to NOTE:
– Try to avoid restoring apps backup using Titanium Backup. It may break things up.
– Don’t restore system data using Titanium Backup! It will definitely break the current installation.
– It is also discouraged to Restoring Apps + Data using Titanium Backup.- Download and Copy the GApps and Galaxy Tab 4 10.1 3G CyanogenMod 14 ROM ZIP to your phone.
- Boot into Recovery. Make sure to have a Custom recovery like CWM or TWRP or any other custom recovery. If not then follow the Custom Recovery Installation Guide for Samsung Galaxy Tab 4 10.1 3G – SM T531 (it’s a generic guide which will work for TWRP as well as CWM recovery)
- Wipe data factory reset, Cache partition, Dalvik Cache and Format the System partition.
– Here is a guide explaining how to wipe data using TWRP recovery.This will delete all your data on your phone. You may consider complete backup of your phone data or take a NANDROID backup of the current ROM
– How to backup all data on your Android Device
– how to take NANDROID backup using TWRP recovery - First flash the CM14 ROM ZIP from device. Then flash the GApps zip from your device memory.
– Here is a post explaining how to flash a custom ROM using TWRP recovery. - Then reboot into recovery (don’t skip this) and flash the CM14 Nougat Google Apps package.
– Here is a post explaining how to flash GApps using TWRP recovery. - Reboot and Enjoy the CM14 for Galaxy Tab 4 10.1 3G.
Upgrading from earlier version of CyanogenMod 14 for Tab 4 10.1 3G:
- Copy the latest Galaxy Tab 4 10.1 3G CyanogenMod 14 ROM ZIP file to your phone.
- Boot into Recovery.
- Flash the latest CM ROM ZIP from your phone.
– Here is a post explaining how to flash a custom ROM using TWRP recovery. - Then flash the CM14 Nougat Google Apps package.
– Here is a post explaining how to flash GApps using TWRP recovery. - Reboot and Enjoy
Complete the initial setup and enjoy Android Nougat 7.0.0 with CyanogenMod 14 for Tab 4 10.1 3G (SM-T531). After this CM14 installation you may want to enable ROOT access on your phone and here is how you can do that:
How to Enable ROOT on CM14/CyanogenMod 14.Stay tuned or Subscribe to the Galaxy Tab 4 10.1 3G forum For other Android Nougat ROMs, CyanogenMod 14 ROMs, other ROMs and all other device specific topics.The latest TWRP Recovery for Galaxy A8 2018 (jackpotlte) is now available to download. On this Galaxy A8 2018 TWRP recovery guide, you will find the TWRP Download for Galaxy A8 2018 and a step by step guide to update/install TWRP recovery on Galaxy A8 2018.
If you want to root the Galaxy A8 2018 or want to install custom ROM then you need to install a custom recovery such as a TWRP for Galaxy A8 2018 phone. Well, for that case this is what is the guide that you need.
This TWRP for Galaxy A8 2018 is built by BlackMesa123
DONATION TO PROJECT/DEVELOPER(s):
If you like this ROM then do consider for a small contribution to BlackMesa123 and TWRP project:
– Donate to BlackMesa123DISCLAIMER:
Make sure that your phone is not RMM locked.
INSTALLING TWRP ON Galaxy A8 2018 MAY BRICK AND ERASE ALL THE DATA ON YOUR PHONE DURING THE PROCESS.
Before proceeding further you may consider backup all data on the phone.
You are the only person making changes to your phone and I cannot be held responsible for the mistakes done by you.
INFORMATION OF THIS TWRP FOR Galaxy A8 2018:
– TWRP version: 3.2.2.0
– Supported Android Version: Android Oreo
– Built from: OmniROM AOSP sources
– Custom ROM supported: AOSP based Android Oreo ROMsGalaxy A8 2018 TWRP RECOVERY DOWNLOAD, OTHER REQUIRED DOWNLOADS AND GUIDES:
- Galaxy A8 2018 Phone, USB cable and a Windows PC installed with ODIN Application
- Samsung USB driver Download Link
- Samsung Odin DownloadIf the latest ODIN does not work, you can download one of the following older ODIN version:
– ODIN application 3.10.7
– ODIN application 3.10.6 - TWRP download for Galaxy A8 2018
- latest no-verity-opt-encrypt.zip download link
- RMM bypass.zip download link
HOW TO INSTALL CUSTOM RECOVERY TWRP FOR Galaxy A8 2018:
Make Sure You have already done the below:
Make sure that you have already downloaded all of the above mentioned files and done the following things:- Installed Samsung USB driver for your phone
- Installed the ODIN application on your Windows PC
- Enable OEM Unlock on your phone- In some newer Samsung phones like: Galaxy Note 5 and Galaxy S6 edge+ and later, you need to enable OEM Unlock option in Developer Options.- By default the Developer Options is hidden and you need to enable the Developer Options first. Go to the below link (the link will open in a new window), enable Developer options and come back to this page:
How To Enable Developer Options– Now when you have enabled the Developer Options, go to the Developer Options and then enable the OEM Unlock option.
HOW INSTALL TWRP ON Galaxy A8 2018 USING ODIN:
- Connect the Galaxy A8 2018 to the PC using the USB cable and install required Samsung USB driver
- Restart the Galaxy A8 2018 phone into download mode in order to install TWRP for Galaxy A8 2018 using the ODIN application.
Press and hold the below three buttons until you see a WARNING SCREEN! to enter into the Download mode:
Volume DOWN key + Power key + Home key
When you see the WARNING SCREEN press the volume UP key to continue into the Download mode.
- Restart the Galaxy A8 2018 phone into download mode in order to install TWRP for Galaxy A8 2018 using the ODIN application.
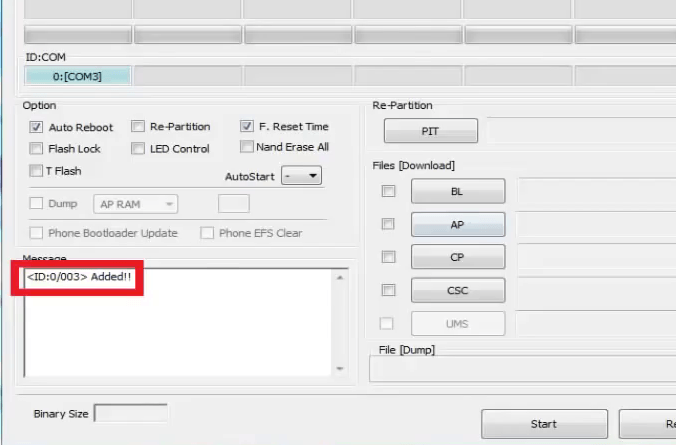
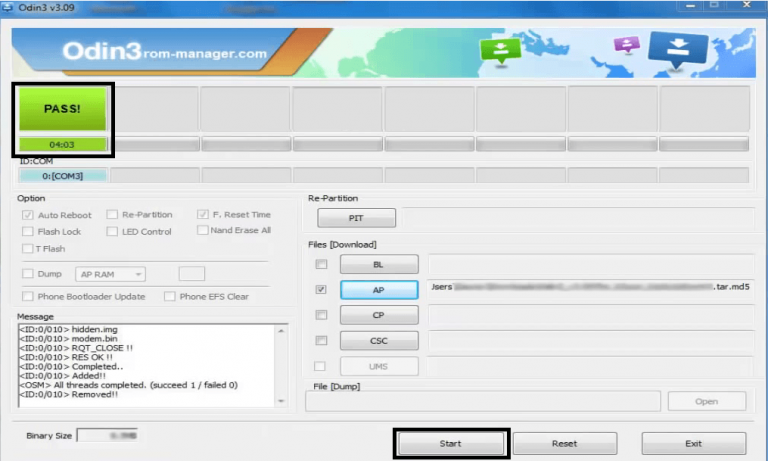
- Open the ODIN application on your Windows PC and see the device is already connected
– At this moment I believe your phone is already connected to the PC, if not, then Connect your phone (while it is still in the download mode) to the PC using a USB cable.
– ODIN will show an Added! message on the message box with a port number on the top left screen of ODIN application.TROUBLESHOOTING:
– If you don’t see an Added message and a port number, then try uninstall and re-install the Samsung Driver.
– Try a different USB driver or Install Samsung Kies to install default Samsung Drivers.
 [Device Added on ODIN]
- Open the ODIN application on your Windows PC and see the device is already connected
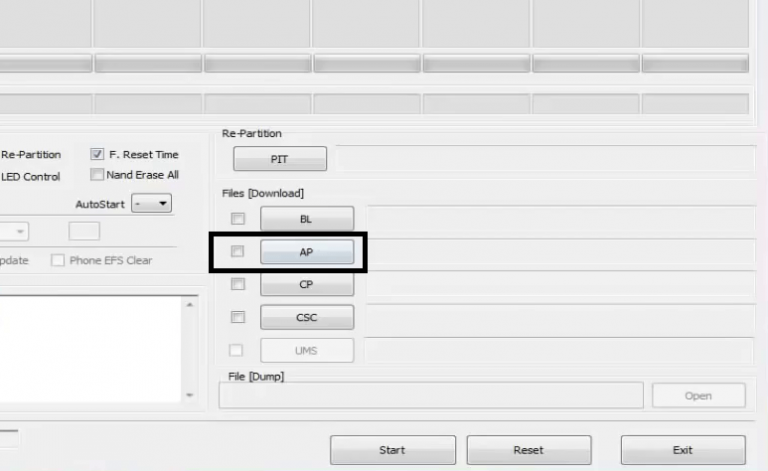
- Then click on the AP button on the ODIN application and select the TWRP for Galaxy A8 2018 which might be in .tar or tar.md5 file extension
 [Click on the AP button and select the TWRP recovery for Galaxy A8 2018]
- Then click on the AP button on the ODIN application and select the TWRP for Galaxy A8 2018 which might be in .tar or tar.md5 file extension
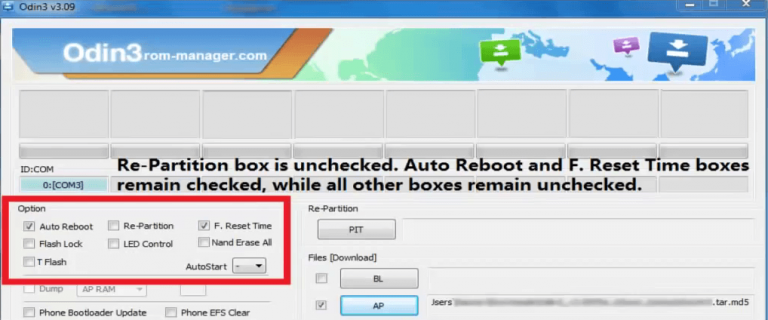
- Select the appropriate options before flashing the twrp on Galaxy A8 2018.
Make sure only the Auto Reboot and F. Reset Time are checked and all other boxes are un-checked.
 [Select the ODIN Options]
- Select the appropriate options before flashing the twrp on Galaxy A8 2018.
- Select the Start button, which will start the flashing process. When you get the PASS message, then your phone will reboot automatically
 [Click on Start and wait till it completes]
TROUBLESHOOTING:
– If you see a FAIL message on the screen then read the log on the left side of the ODIN application and try to FIX the ERROR.
That’s all.
What to do after you install TWRP for Galaxy A8 2018:
Now your Samsung Galaxy A8 2018 is installed with the TWRP recovery and you may disconnect your phone. Here are some more guides using the TWRP recovery:
- You can bypass RMM lock on Galaxy A8 2018
- You can root the Galaxy A8 2018
- You can install one of the custom ROMs available for Galaxy A8 2018
- How to reset Android using TWRP
- How to take NANDROID backup using TWRP
Well, this isn’t it. You can install customized themes, sound mods, Xposed modules etc. after installing the TWRP on Galaxy A8 2018.
But before you can use the TWRP on Galaxy A8 2018, you have to bypass the RMM lock.
Follow the below step by step instructions to bypass RMM lock on Galaxy A8 2018.How to flash RMM bypass zip on Galaxy A8 2018 using TWRP:
- Restart the Galaxy A8 2018 to boot into TWRP recovery.
- You need to decrypt the /data partition on the Galaxy A8 2018- Go to Wipe>Format Data and follow the on-screen instructions.
- When /data partition is wiped, go the the TWRP home screen and reboot into TWRP recovery.
– This time the /data partition would be mounted by TWRP. [THIS IS IMPORTANT] - Now download and copy the no-verity-opt-encrypt.zip and RMM bypass.zip file to Galaxy A8 2018. (You can download the files from the above downloads section)
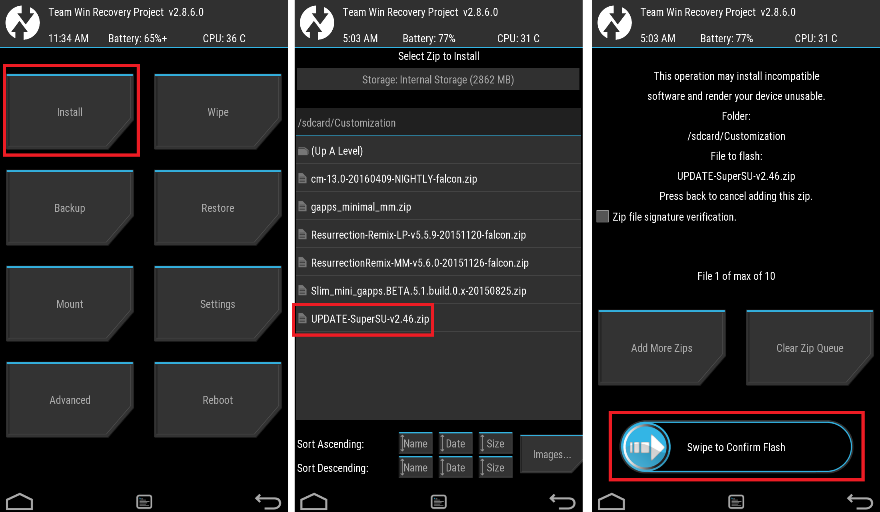
- Then, Select the Install from TWRP home screen, then select the no-verity-opt-encrypt.zip file and RMM bypass zip file from the file browser.
- Flash or install both the zip file on Galaxy A8 2018, by Sliding the Swipe to Confirm Flash on TWRP screen.Here is a screenshot how to flash the SuperSU ROOT (you replace with RMM patch) for Galaxy A8 2018 via TWRP:

- Wait for TWRP to flash the no-verity-opt-encrypt.zip file and RMM bypass zip file on Galaxy A8 2018. Once the flashing is done just reboot your device.
- Profit!!! You should now have a fully featured TWRP on Galaxy A8 2018.
Now, if you want to ROOT Galaxy A8 2018 then below is a step-by-step by guide for the same.
REQUIRED DOWNLOADS OR LINKS FOR ROOTING Galaxy A8 2018:
- Make sure you have already installed TWRP for Galaxy A8 2018
– Well, this is a very important aspect of how to ROOT Galaxy A8 2018. The SuperSU zip file is developed in a way to be installed via a TWRP recovery or other custom recovery. Stock recovery may not be able to install this SuperSU or Magisk ROOT on Galaxy A8 2018. - Download the latest SuprSU ROOT or the Magisk ROOT for Galaxy A8 2018 or one of the following:
- Download link for Latest SuperSU zip file
- Download link for STABLE SuperSU zip file
- Download link for SuperSU BETA zip file
- Download link to SuperSU APK Free version
- Download link to SuperSU APK Pro version
- Download link to Magisk ROOT zip file
IMPORTANT NOTE:- The Galaxy A8 2018 rooting will not work just by installing the SuperSU APK file on your Android phone.
- SuperSU APK Free or Pro version is just a SuperSU ROOT management application.
- The SuperSU APK Free or Pro app will ONLY work if you have already ROOTED your Android Phone.
Step-by-Step guide on how to ROOT Galaxy A8 2018 using SuperSU or Magisk ROOT zip file:
Galaxy A8 2018 ROOTING using TWRP recovery
- Download and copy the SuperSU or Magisk ROOT file to Galaxy A8 2018. (I hope you have already downloaded the SuperSU zip file from the above downloads section)
- Now restart the Galaxy A8 2018 to boot into TWRP recovery.
- Then, Select the Install from TWRP home screen, then select the SuperSU ROOT zip file from the file browser.
- Flash or install the SuperSU or Magisk ROOT zip file for Galaxy A8 2018, by Sliding the Swipe to Confirm Flash on TWRP screen.Here is a screenshot how to flash the SuperSU ROOT for Galaxy A8 2018 via TWRP:
- Wait for TWRP to flash the SuperSU or the Magisk on Galaxy A8 2018. Once the flashing is done just reboot your device.
- Profit!!! You should now have a Galaxy A8 2018 ROOT enabled phone.
How to check if ROOT is enabled on Galaxy A8 2018 or NOT?
Install the ROOT checker app from the Play Store and verify if your phone is ROOTED or not.
If you face any problems on this guide to install TWRP for Galaxy A8 2018 then, you can login and reply here. Either me or some other user on this forum will revert back to your query as soon as possible.
Stay tuned or Subscribe to the Galaxy A8 2018 (jackpotlte) forum For other Android Custom ROMs, LineageOS ROMs, and all other device specific topics.For more information on this TWRP, you can visit the xda thread.
Android Nougat 7.1 ROM, LineageOS 14.1 for Galaxy TAB PRO 8.4 LTE has now arrived via an UNOFFICIAL build. If you want some more LineageOS ROMs or wanna taste the OFFICIAL LineageOS build then stay tuned to the LineageOS Nougat ROM page. This Galaxy TAB PRO 8.4 LTE LineageOS 14.1 is brought to you by developer promeo123.
DONATION TO DEVELOPER:
No donation link found for promeo123.
DISCLAIMER:
THIS IS AN INITIAL BUILD WHICH MAY HAVE MANY MORE BUGS THAN YOU CAN IMAGINE. HAVE A BACKUP BEFORE FLASHING THIS AND TRY AT YOUR OWN RISK. Installing a custom ROM on a Galaxy TAB PRO 8.4 LTE (mondrianlte, SM-T325) may require the bootloader to be unlocked, which may VOID your warranty and may delete all your data. Before proceeding further you may consider a complete backup. You are the only person making changes to your phone and I cannot be held responsible for the mistakes done by YOU.Status of LineageOS 14.1 for Galaxy TAB PRO 8.4 LTE (mondrianlte, SM-T325) Nougat 7.1 ROM:
WHAT’S WORKING:
– Not KnownKNOWN ISSUES:
– Not Known
REQUIRED LINKS AND FILES FOR LineageOS 14.1 for Galaxy TAB PRO 8.4 LTE NOUGAT 7.1 BASED CUSTOM ROM:
- Latest stock FW and baseband
- TWRP for TAB PRO 8.4 LTE
– Here is: how to install TWRP for TAB PRO 8.4 LTE (This guide is only for .tar or .tar.md5 TWRP file)
– To flash .img file you can follow this TWRP update guide using fastboot or you can use Flashify to update the .img TWRP. [YOUR DEVICE MIGHT NEED TO BE BOOTLOADER UNLOCKED IF YOU ARE FOLLOWING THIS] - TAB PRO 8.4 LTE LineageOS 14.1 ROM download link
- LineageOS Nougat GApps for Galaxy TAB PRO 8.4 LTE LineageOS 14.1 Nougat 7.1 ROM
Root binary is NOT inbuilt in LineageOS 14.1, so you may need a separate SuperSu package or LineageOS su binary to install to gain ROOT access. Here is how to root LineageOS
If there is no in-built ROOT or it does not work for some reason then you can try the SuperSU to gain ROOT access.HOW TO INSTALL/DOWNLOAD/FLASH/UPDATE Galaxy TAB PRO 8.4 LTE LineageOS 14.1 NOUGAT CUSTOM ROM:
Follow this if you are flashing LineageOS 14.1 for Galaxy TAB PRO 8.4 LTE (mondrianlte, SM-T325) for the first time, or coming from another ROM:
Points to NOTE:
– Try to avoid restoring apps backup using Titanium Backup. It may break things up.
– Don’t restore system data using Titanium Backup! It will definitely break the current installation.
– It is also discouraged to Restoring Apps + Data using Titanium Backup.- Download and Copy the GApps and LineageOS 14.1 for Galaxy TAB PRO 8.4 LTE ROM ZIP to your phone.
- Boot into Recovery. Make sure to have a Custom recovery like CWM or TWRP or any other custom recovery. If not then follow the Recovery Installation Guide for Samsung phones to flash a custom recovery on the Galaxy TAB PRO 8.4 LTE (mondrianlte, SM-T325). (it’s a generic guide which will work for TWRP as well as CWM recovery or any other recovery)
- Wipe data factory reset, Cache partition, Dalvik Cache and Format the System partition.
– Here is a guide explaining Erasing data using TWRP recovery.This will delete all your data on your phone. You may consider complete backup of your phone data or take a NANDROID backup of the current ROM
– How to backup all data on your Android Device
– how to take NANDROID backup using TWRP recovery - First flash the Galaxy TAB PRO 8.4 LTE LineageOS 14.1 ROM ZIP from device. Then flash the GApps zip from your device memory.
– Here is a post explaining how to install LineageOS. - DO NOT REBOOT yet. Then flash the LineageOS 14.1 GApps package.
– Here is a post explaining how to install LineageOS 14.1 GApps. - Reboot and Enjoy the Nougat 7.1 LineageOS 14.1 ROM for Galaxy TAB PRO 8.4 LTE (mondrianlte, SM-T325).
Upgrading from earlier version of Galaxy TAB PRO 8.4 LTE LineageOS 14.1 (mondrianlte, SM-T325):
- Copy the latest LineageOS 14.1 for Galaxy TAB PRO 8.4 LTE ROM ZIP file to your phone.
- Boot into Recovery.
- Flash the latest LineageOS ROM ZIP from your phone.
– Here is a post explaining how to update LineageOS. - Then flash the LineageOS 14.1 GApps package.
– Here is a post explaining how to flash GApps. - Reboot and Enjoy
Complete the initial setup and enjoy Android Nougat 7.1 with LineageOS 14.1 for Galaxy TAB PRO 8.4 LTE (mondrianlte, SM-T325). After the installation of Galaxy TAB PRO 8.4 LTE LineageOS 14.1 ROM (mondrianlte, SM-T325) you may want to enable ROOT access on your phone and here is how you can do that:
How to Enable ROOT on LineageOS 14.1.Stay tuned or Subscribe to the Galaxy TAB PRO 8.4 LTE (mondrianlte, SM-T325) forum For other Android Nougat ROMs, LineageOS 14.1 ROMs, other ROMs and all other device specific topics.Galaxy S3 AT&T CM13 (cyanogenMod 13) Marshmallow ROM (Device Codename: d2att, i747) goes official on CyanogenMod servers. Official NIGHTLY build are automated builds which makes sure the build is not broken by daily code changes made by developers. NIGHTLY builds are not stable as compared to SNAPSHOT builds and may contain some minor bugs. Here is some brief explanation of the difference between a NIGHTLY and SNAPSHOT.
DISCLAIMER:
Installing custom ROM requires a custom recovery to be installed on your device, which may VOID your warranty and may delete all your data. Before proceeding further you may consider backup your all data or take a NANDROID backup using a recovery. You are the only person doing changes to your phone and I cannot be held responsible for the mistakes done by you. Neither the developer nor we will be held responsible for any disaster that happens to your device.
REQUIRED DOWNLOADS AND LINKS FOR THE Galaxy S3 AT&T CM13 (i747) ROM UPDATE GUIDE:
- AT&T Galaxy S3 (i747) TWRP recovery download link.
– Download the .img.tar extension TWRP file for YOUR DEVICE ONLY which can be flashed with ODIN. Follow this guide: How to Install TWRP on Samsung using Odin for the img.tar TWRP file.– If you already have an unlocked bootloader then you can download the .img file extension. Then follow this guide: How to flash TWRP using fastboot.
- AT&T S3 (i747) Official CyanogenMod 13 ROM download link
- GApps download link
Root binary is inbuilt since CyanogenMod 12, so you don’t need a separate SuperSu package to install to gain ROOT access. Here is How to Enable ROOT Access on CM13/CyanogenMod 13
FLASHING OFFICIAL Galaxy S3 AT&T CM13 (CyanogenMod 13) MARSHMALLLOW CUSTOM ROM:
Follow this if you are flashing CyanogenMod 13 for the first time to your S3 AT&T, or coming from another ROM:
This will delete all your data on your phone. You may consider backing up your phone data or take a nandroid backup. Here is how to take NANDROID backup using TWRP recovery.
Points to NOTE:
– Try to avoid restoring apps backup using Titanium Backup. It may break things up.
– Don’t restore system data using Titanium Backup! It will definitely break the current installation.
– It is also discouraged to Restoring Apps + Data using Titanium Backup.- Make sure you have a TWRP installed on your AT&T Galaxy S3.
If you don’t have a recovery then download it from the above link and see if the below guide works for you:
– How to Install TWRP on Samsung using Odin for the .tar TWRP file. - Download and Copy the GApps and CyanogenMod ROM ZIP to your device.
- Take a backup using a synchronization application or using Samsung Smart Switch or if you have TWRP installed then you can take a NANDROID backup using the TWRP itself.
- Boot into Recovery. Make sure to have already flashed a Custom recovery like CWM or TWRP on the phone.
- Wipe data factory reset, Cache partition, Dalvik Cache and Format the System partition.
– Here is a guide explaining how to wipe data using TWRP recovery. - First flash the CM ROM ZIP from device. Then flash the GApps zip from your device memory.
– Here is a post explaining how to flash a custom ROM using TWRP recovery.
Use the same guide to flash the GApps too. - Reboot and Enjoy the CyanogenMod 13 Marshmallow ROM on your Galaxy S3 AT&T.
- Make sure you have a TWRP installed on your AT&T Galaxy S3.
Upgrading from earlier version of CyanogenMod 13.0:
- Copy the CyanogenMod 13 ROM ZIP file to your phone.
- Boot into Recovery.
- Flash the latest CM ROM ZIP from your phone.
– Here is a post explaining how to flash a custom ROM using TWRP recovery. - Reboot and Enjoy
The first boot may take long time, so don’t panic and be sure that you have enough battery backup. Let the phone reboot and then enjoy the official CyanogenMod 13 Marshmallow ROM on Galaxy S3 AT&T.
After this CM13 installation you may want to enable ROOT access on your phone and here is how you can do that:
How to Enable ROOT Access on CM13/CyanogenMod 13.Android Nougat 7.1 ROM, LineageOS 14.1 for Galaxy TAB 3 7.0 SPRINT has now arrived via an UNOFFICIAL and OFFICIAL build. If you want some more LineageOS ROMs for other devices then stay tuned to the LineageOS 14.1 page. This Galaxy TAB 3 7.0 SPRINT LineageOS 14.1 is brought to you by developer Relyt2012 and another build is brought to you by deadman96385.
DONATION TO DEVELOPER(S):
If you like the ROM or the TWRP recovery brought to you by these developer(s) then consider donation to them. Believe me it motivates and it matters too.
– donation to deadman96385
– donation to gr8noleDISCLAIMER:
THIS IS AN INITIAL BUILD WHICH MAY HAVE MANY MORE BUGS THAN YOU CAN IMAGINE. HAVE A BACKUP BEFORE FLASHING THIS AND TRY AT YOUR OWN RISK. Installing a custom ROM on a Galaxy TAB 3 7.0 SPRINT (lt02ltespr, SM-T217S) may require the bootloader to be unlocked, which may VOID your warranty and may delete all your data. Before proceeding further you may consider a complete backup. You are the only person making changes to your phone and I cannot be held responsible for the mistakes done by YOU.Status of LineageOS 14.1 for Galaxy TAB 3 7.0 SPRINT (lt02ltespr, SM-T217S) Nougat 7.1 ROM:
WHAT’S WORKING:
– Not KnownKNOWN ISSUES:
– Not Known
REQUIRED LINKS AND FILES FOR LineageOS 14.1 for Galaxy TAB 3 7.0 SPRINT NOUGAT 7.1 BASED CUSTOM ROM:
- Latest available stock FW and baseband
- TWRP 3.0 (by lilferraro) | TWRP 2.7 (by gr8nole) for TAB 3 7.0 SPRINT
– Here is: how to install TWRP for TAB 3 7.0 SPRINT (This guide is only for .tar or .tar.md5 TWRP file)
– To flash .img file you can follow this TWRP update guide using fastboot or you can use Flashify to update the .img TWRP. [YOUR DEVICE MIGHT NEED TO BE BOOTLOADER UNLOCKED IF YOU ARE FOLLOWING THIS] - TAB 3 7.0 SPRINT LineageOS 14.1 OFFICIAL ROM download link
- TAB 3 7.0 SPRINT LineageOS 14.1 (by deadman96385) ROM download link [UNOFFICIAL]
- TAB 3 7.0 SPRINT LineageOS 14.1 (by Relyt2012) ROM download link [UNOFFICIAL]
- LineageOS Nougat GApps for Galaxy TAB 3 7.0 SPRINT LineageOS 14.1 Nougat 7.1 ROM
Root binary is NOT inbuilt in LineageOS 14.1, so you may need a separate SuperSu package or LineageOS su binary to install to gain ROOT access. Here is how to root LineageOS
If there is no in-built ROOT or it does not work for some reason then you can try installing SuperSU to gain ROOT access.HOW TO INSTALL/DOWNLOAD/FLASH/UPDATE Galaxy TAB 3 7.0 SPRINT LineageOS 14.1 NOUGAT CUSTOM ROM:
Follow this if you are flashing LineageOS 14.1 for Galaxy TAB 3 7.0 SPRINT (lt02ltespr, SM-T217S) for the first time, or coming from another ROM:
Points to NOTE:
– Try to avoid restoring apps backup using Titanium Backup. It may break things up.
– Don’t restore system data using Titanium Backup! It will definitely break the current installation.
– It is also discouraged to Restoring Apps + Data using Titanium Backup.- Download and Copy the GApps and LineageOS 14.1 for Galaxy TAB 3 7.0 SPRINT ROM ZIP to your phone.
- Boot into Recovery. Make sure to have a Custom recovery like CWM or TWRP or any other custom recovery. If not then follow the Recovery Installation Guide for Samsung phones to flash a custom recovery on the Galaxy TAB 3 7.0 SPRINT (lt02ltespr, SM-T217S). (it’s a generic guide which will work for TWRP as well as CWM recovery or any other recovery)
- Wipe data factory reset, Cache partition, Dalvik Cache and Format the System partition.
– Here is a guide explaining Erasing data using TWRP recovery.This will delete all your data on your phone. You may consider complete backup of your phone data or take a NANDROID backup of the current ROM
– How to backup all data on your Android Device
– how to take NANDROID backup using TWRP recovery - First flash the Galaxy TAB 3 7.0 SPRINT LineageOS 14.1 ROM ZIP from device. Then flash the GApps zip from your device memory.
– Here is a post explaining how to install LineageOS. - DO NOT REBOOT yet. Then flash the LineageOS 14.1 GApps package.
– Here is a post explaining how to install LineageOS 14.1 GApps. - Reboot and Enjoy the Nougat 7.1 LineageOS 14.1 ROM for Galaxy TAB 3 7.0 SPRINT (lt02ltespr, SM-T217S).
Upgrading from earlier version of Galaxy TAB 3 7.0 SPRINT LineageOS 14.1 (lt02ltespr, SM-T217S):
- Copy the latest LineageOS 14.1 for Galaxy TAB 3 7.0 SPRINT ROM ZIP file to your phone.
- Boot into Recovery.
- Flash the latest LineageOS ROM ZIP from your phone.
– Here is a post explaining how to update LineageOS. - Then flash the LineageOS 14.1 GApps package.
– Here is a post explaining how to flash GApps. - Reboot and Enjoy
Complete the initial setup and enjoy Android Nougat 7.1 with LineageOS 14.1 for Galaxy TAB 3 7.0 SPRINT (lt02ltespr, SM-T217S). After the installation of Galaxy TAB 3 7.0 SPRINT LineageOS 14.1 ROM (lt02ltespr, SM-T217S) you may want to enable ROOT access on your phone and here is how you can do that:
How to Enable ROOT on LineageOS 14.1.Stay tuned or Subscribe to the Galaxy TAB 3 7.0 SPRINT (lt02ltespr, SM-T217S) forum For other Android Nougat ROMs, LineageOS 14.1 ROMs, other ROMs and all other device specific topics.If you have any concerns or found any BUGS on this ROM then here is the development link to Relyt2012’s thread.
Android Oreo 8.1 ROM, Galaxy Tab S2 9.7 WiFi LineageOS 15.1 has now arrived via an UNOFFICIAL build. If you want the OFFICIAL LineageOS update or some more Android Oreo ROMs then stay tuned to the LineageOS 15 page or the AOSP Android Oreo devices list page. This LineageOS 15.1 for Galaxy Tab S2 9.7 WiFi 2016 (gts210vewifi, SM-T813) is brought to you by developer LuK1337 and luca020400.
DONATION TO DEVELOPER:
If you like this ROM then do consider a contribution to LuK1337 and luca020400 for their efforts:
Donate to LuK1337
Donate to luca020400DISCLAIMER:
THIS IS AN ALPHA ROM AND MAY HAVE MANY BUGS. HAVE A BACKUP BEFORE FLASHING THIS ROM AND TRY AT YOUR OWN RISK. Installing a custom ROM on a Galaxy Tab S2 9.7 WiFi (gts210vewifi, SM-T813) requires an unlocked bootloader on the Galaxy Tab S2 9.7 WiFi (gts210vewifi, SM-T813), which may VOID your warranty and may delete all your data. Before proceeding further you may consider backup all data on the phone. You are the only person doing changes to your phone and I cannot be held responsible for the mistakes done by you.Status of Galaxy Tab S2 9.7 WiFi 2016 LineageOS 15.1 Oreo 8.1 ROM:
WHAT’S WORKING:
– Wifi
– Bluetooth
– Video Playback
– Audio ( Record and Playback )
– Sensors
– GPSKNOWN ISSUES:
– Camera
– SELinux is permissive
REQUIRED LINKS AND FILES FOR Galaxy Tab S2 9.7 WiFi LINEAGEOS 15 OREO CUSTOM ROM:
- TWRP recovery link for Galaxy Tab S2 9.7 WiFi (gts210vewifi, SM-T813)- Here is theTWRP update guide for the Galaxy Tab S2 9.7 WiFi (gts210vewifi, SM-T813).
- ROM Download link of LineageOS 15.1 for Galaxy Tab S2 9.7 WiFi
- ROM Download link of LineageOS 15 for Galaxy Tab S2 9.7 WiFi
- LineageOS 15.1 GApps download link for Galaxy Tab S2 9.7 WiFi LineageOS 15.1 Oreo 8.1 ROM (Download the stock ARM64 GApps)
Root binary is NOT inbuilt in LineageOS 15.1, so you may need a separate SuperSu package or LineageOS su binary to install to gain ROOT access. Here is LineageOS Rooting guide
If there is no in-built ROOT or it does not work for some reason then you can try SuperSU rooting guide to enable ROOT access.HOW TO INSTALL/DOWNLOAD/FLASH/UPDATE LineageOS 15.1 FOR Galaxy Tab S2 9.7 WiFi OREO CUSTOM ROM:
Follow this if you are flashing LineageOS 15.1 for Galaxy Tab S2 9.7 WiFi for the first time, or coming from another ROM:
Points to NOTE:
– Try to avoid restoring apps backup using Titanium Backup. It may break things up.
– Don’t restore system data using Titanium Backup! It will definitely break the current installation.
– It is also discouraged to Restoring Apps + Data using Titanium Backup.- Boot into Recovery. Make sure to have a Custom recovery like CWM or TWRP or any other custom recovery. If not then follow the Custom Recovery Installation Guide for Galaxy Tab S2 9.7 WiFi (it’s a generic guide which will work for TWRP as well as CWM recovery or any other recovery)
- Wipe data factory reset, Cache partition, Dalvik Cache and Format the System partition.
– Here is a guide explaining how to wipe data using TWRP recovery.This will delete all your data on your phone. You may consider complete backup of your phone data or take a NANDROID backup of the current ROM
– How to backup all data on your Android Device
– how to take NANDROID backup using TWRP recovery - Download and Copy the LineageOS 15.1 GApps and Galaxy Tab S2 9.7 WiFi LineageOS 15.1 ROM ZIP file to your phone.
- First flash the Galaxy Tab S2 9.7 WiFi LineageOS 15.1 ROM ZIP from device. Then flash the GApps for LineageOS 15.1 zip from your device memory.
– Here is a post explaining how to install LineageOS - Then reboot into recovery (don’t skip this) and flash the Gapps for Oreo ROM package.
– Here is a post explaining how to flash GApps using TWRP recovery. - Reboot and Enjoy the Oreo 8.1 LineageOS 15.1 ROM for Galaxy Tab S2 9.7 WiFi.
Upgrading from earlier version of LineageOS 15.1 for Galaxy Tab S2 9.7 WiFi (gts210vewifi, SM-T813):
- Copy the latest Galaxy Tab S2 9.7 WiFi Lineage 15 ROM ZIP file to your phone.
- Boot into Recovery.
- Flash the latest LineageOS ROM ZIP from your phone.
– Here is a post explaining how to install LineageOS - Then flash the GApps for LineageOS 15.1 package.
– Here is a post explaining how to flash GApps using TWRP recovery. - Reboot and Enjoy
Complete the initial setup and enjoy Android Oreo 8.1 with LineageOS 15.1 for Galaxy Tab S2 9.7 WiFi. After the installation of LineageOS 15.1 for Galaxy Tab S2 9.7 WiFi you may want to enable ROOT access on your phone and here is how you can do that:
How to Enable ROOT on LineageOS 15.1.Stay tuned or Subscribe to the Galaxy Tab S2 9.7 WiFi (SM-T813) LineageOS forum For other Android Oreo, Nougat ROMs, LineageOS 15.1 ROMs, other ROMs and all other device specific topics.If you have found any BUG or any issues with this ROM, then following is the development thread at XDA.
- Install the Samsung Phone App and be ready at least with your Samsung phone’s Model number and Region Info.