GCam Port | Google Camera APK v9.2 (May 2024) › Forums › Itel › P51 › How To Install TWRP Recovery and Root Itel P51
- This topic has 0 replies, 1 voice, and was last updated 5 years, 3 months ago by Siba.
- AuthorPosts
- May 23, 2024 at 9:01 PM #78234SibaKeymaster
TWRP for Itel P51 is now available to download from TWRP builder as an unofficial build and this post guides you how to install TWRP on Itel P51 and ROOT Itel P51 (using TWRP recovery).
After installing TWRP recovery on Itel P51 you can install many android mods such as google camera (gcam) apk, enable navigation gesture, enable face unlock, viper4android audio enhancement etc. and many more.
[su_note note_color=”#F9D9D9″ text_color=”#AA4343″ radius=”3″ class=”” id=””]DISCLAIMER:
THIS IS AN UNOFFICIALLY BUILD TWRP FOR Itel P51. FLASH AT YOUR OWN RISK.
INSTALLING THE TWRP RECOVERY AND ROOT Itel P51 NEEDS AN UNLOCK BOOTLOADER ON YOUR PHONE.
DURING THE BOOTLOADER UNLOCK PROCESS ALL THE PHONE DATA WILL BE ERASED. MAKE SURE TO BACKUP EVERYTHING.
[/su_note]
Content structure:
DOWNLOAD LINK OF TWRP FOR Itel P51, OTHER DOWNLOADS AND REQUIRED GUIDES:
- Unlocked bootloader on Itel P51
- TWRP recovery download for Itel P51
- USB drivers for Mediatek
- ADB and Fastboot Download
– 15 Seconds ADB Installer for Windows
– Minimal ADB and Fastboot for Windows - Latest MTK Droid Root and tools
- Latest MTK SP Flash Tool for Windows
- Install ADB and fastboot on Linux PC
- Latest MTK SP Flash Tool for Linux 64-bit
- Latest MTK SP Flash Tool for Linux 32-bit
REQUIRED DOWNLOADS IF YOU ARE USING A WINDOWS PC:
REQUIRED DOWNLOADS IF YOU ARE USING A LINUX PC:
STEP BY STEP GUIDE OF HOW TO INSTALL TWRP FOR Itel P51:
Follow the below step by step guide to install the TWRP for Itel P51
Before installing TWRP you may require an unlocked bootloader on Itel P51.
Installing TWRP on Itel P51 requires a scatter file to be created.
A scatter file of a Mediatek device is what tells about the presence of different partition and the start address of each partition.[su_note note_color=”#D7E3F4″ text_color=”#728095″ radius=”3″ class=”” id=””]
Either you can download the scatter file from the downloads section or you can create it by yourself using the following guide.
[/su_note]How to create scatter file for Itel P51:
This guide need the Droid MTK Tool. With the help of Droid MTK Tool we will create the scatter file for Itel P51.
- Download the Droid MTK Tool from the above Downloads section.
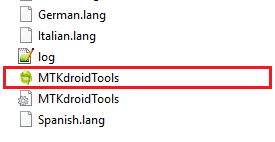
- It’s in a zip file, so extract that file or open using WinRar or some application and then open the MTKDroidTools.exe file.
- Enable USB Debugging under Developer Options on the Itel P51; to make the device accessible via ADB.
– If you don’t know how to do this then here is How to Enable Developer Options and How to Enable USB Debugging and OEM unlock.
- Then connect the phone using the USB cable to the PC.
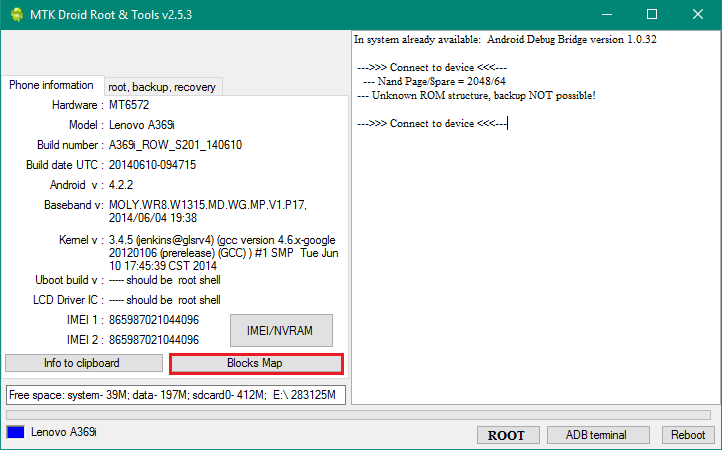
– When you connect the phone to the PC, MTKDroidTool will show all the information about your phone.
- On the below portion of the screen you will see a Blocks Map button. Click on the button
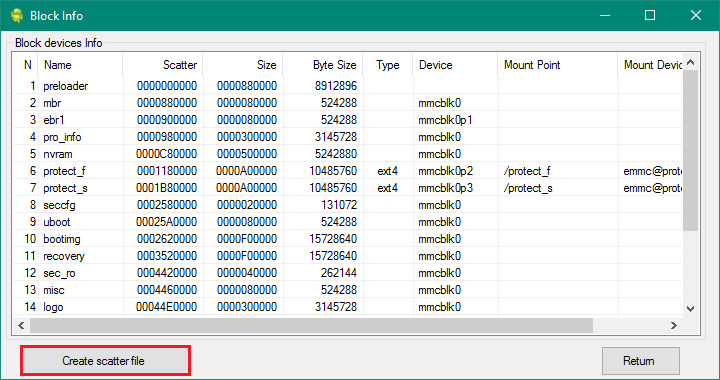
- On the next screen you have all the partition information and starting address of all the partitions of Itel P51.
On the bottom of the screen you see a Create scatter file button.– Click on the button to create scatter file for Itel P51.
- Save the scatter file for Itel P51 in a location which you can remember and access easily.
Now Install TWRP on Itel P51 using SP Flash Tool:
TWRP recovery download to a Mediatek phone is done by SP Flash tool, which uses a scatter file to know which address the recovery partition starts.
Make sure you have downloaded the SP Flash tool and created the scatter file for Itel P51.Follow the below steps to install the TWRP on Itel P51 using the scatter file.
- Open the SP Flash tool zip file and then open the flash_tool.exe file.
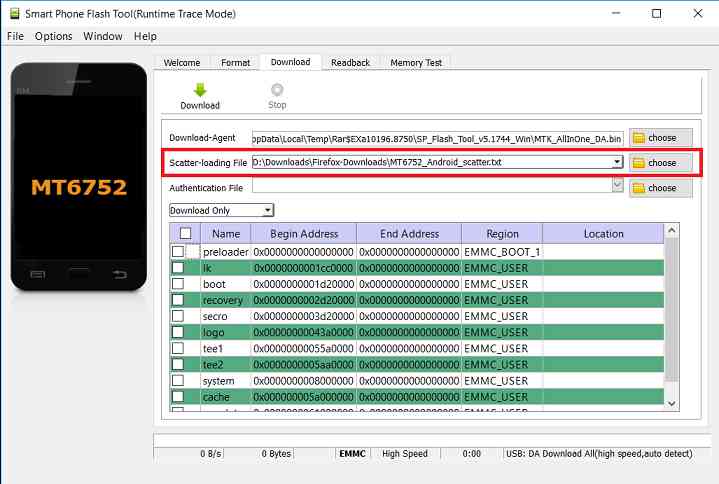
- Click browse on the the scatter-loading file section and select the Itel P51 scatter file you created earlier using the MTKDroid Tool.
After selecting the scatter file, the SP Flash tool application automatically find available partitions and other details.
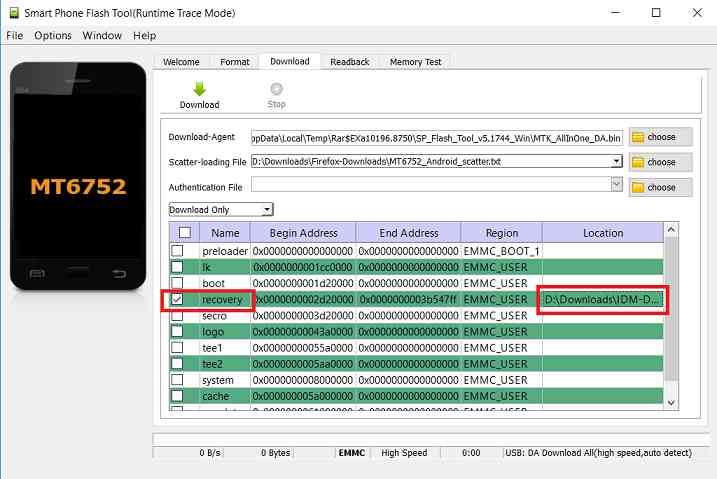
- Now select the location next to the Recovery partition and select the TWRP for Itel P51, which is in .img format.
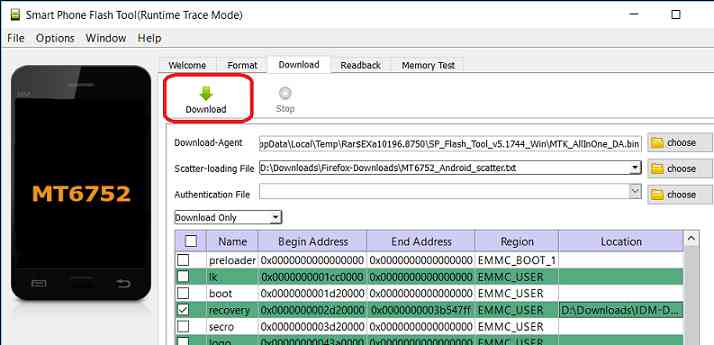
- Then click on the Download button to start downloading/flashing of the TWRP recovery on Itel P51 as shown in the picture.
- After clicking on the download button you will see a red bar on the bottom followed by a yellow bar.
When the TWRP is downloaded to Itel P51, the SP Flash tool will alert you saying Download is done.
That’s all.
What to do after you install TWRP for Itel P51:
- You can root the Itel P51
- You can install one of the custom ROMs available for Itel P51
- You can install some of the mods available on Itel P51
Well, this isn’t it. You can install customized themes, sound mods, Xposed modules etc. after installing the TWRP for Itel P51.
TWRP recovery is the gateway to many goodies for your phone.Now, if you want to ROOT Itel P51 then below is a step-by-step by guide for the same.
[su_note note_color=”#F9D9D9″ text_color=”#AA4343″ radius=”3″ class=”” id=””]
ROOTING Itel P51 MAY BRICK THE PHONE.
MAKE SURE YOU READ THE ADVANTAGES AND DISADVANTAGES OF ROOTING BEFORE YOU PROCEED FURTHER.
Before proceeding further you may consider backup all data on the phone.
You are the only person making changes to your phone and I cannot be held responsible for the mistakes done by you.
[/su_note]REQUIRED DOWNLOADS OR GUIDES FOR Itel P51 ROOTING:
- Make sure you have already unlocked the bootloader and installed TWRP for Itel P51
– Well, this is a very important aspect of this SuperSU ROOT process. The SuperSU zip file is developed in a way to be installed via a TWRP recovery or other custom recovery. Stock recovery may not be able install this SuperSU or Magisk ROOT zip file.
- Download the latest SuprSU ROOT for Itel P51 or one of the following:
- Download link for Latest SuperSU zip file
- Download link for STABLE SuperSU zip file
- Download link for SuperSU BETA zip file
- Download link to SuperSU APK Free version
- Download link to SuperSU APK Pro version
- Download link to Magisk ROOT zip file (RECOMMENDED)
IMPORTANT NOTE:- Your phone will not be rooted just by installing the SuperSU APK file on your Android phone.
- SuperSU APK Free or Pro version is just a SuperSU ROOT management application.
- The SuperSU APK Free or Pro app will ONLY work if you have already ROOTED your Android Phone.
Step-by-Step guide on how to ROOT Itel P51 using SuperSU or Magisk zip file:
- Download and copy the SuperSU or Magisk ROOT file to Itel P51. (I hope you have already downloaded the files from the above downloads section)
- Now restart the Itel P51 to boot into TWRP recovery.
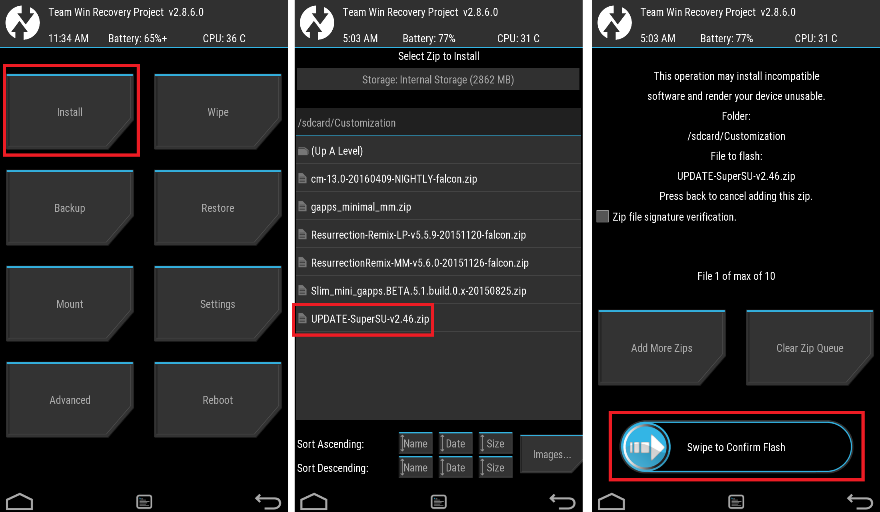
- Then, Select the Install from TWRP home screen, then select the SuperSU ROOT zip file from the file browser.
- Flash or install the SuperSU or Magisk for Itel P51, by Sliding the Swipe to Confirm Flash on TWRP screen.
- Wait for TWRP to flash the SuperSU or the Magisk. Once the flashing is done just reboot your device.
- Profit!!! You should now have a Itel P51 ROOT enabled phone.
How to check if ROOT is enabled on Itel P51 or NOT?
Install the ROOT checker app from the Play Store and verify if your phone is ROOTED or not.
Here is a screenshot how to flash the SuperSU ROOT binary via TWRP:

If you face any problems on this guide to install TWRP for Itel P51 then, you can login and reply here. Either me or some other user on this forum will revert back to your query as soon as possible.
Stay tuned or Subscribe to the Itel P51 forum For other Android Custom ROMs, LineageOS ROMs, and all other device specific topics. - AuthorPosts
- You must be logged in to reply to this topic.
