
LibreNMS is a free and open-source fully featured auto discovering network monitoring tool that is based on PHP, MySQL and uses SNMP protocol. It supports various hardware such as Cisco, Juniper, Foundry, and operating systems including Linux, Windows, FreeBSD, etc.
In this article, I will discuss how to install LibreNMS in Ubuntu Linux.
Prerequisites
You should have access to a user account that has sudo privileges.
How to install LibreNMS in Ubuntu
For running LibreNMS we require a database server, PHP, and a web server. Follow the given steps to install all the required packages and LibreNMS on your system.
Installing web server
We will use Nginx as a web server so if you are installing Nginx on your system you should not have another web server installed.
First, run the given command to make sure the apt repository is updated –
sudo apt updateNow if you have apache installed simply remove it by using –
sudo apt -y remove apache2Use the following command to install Nginx –
sudo apt -y install nginxOnce the package gets installed use the following command to start and enable Nginx services –
sudo systemctl start nginxsudo systemctl enable nginxMake sure Nginx services are active and running –
sudo systemctl status nginx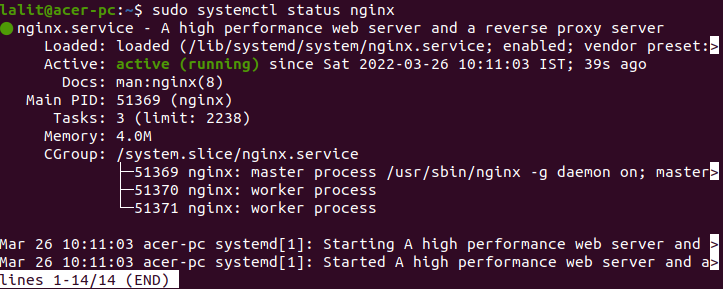
Installing PHP
Next, we need to install Php on our system you can use the following command to install PHP and other required packages-
sudo apt -y install wget php php-{pear,cgi,common,curl,mbstring,gd,mysql,bcmath,imap,json,xml,snmp,fpm,zip}You can verify the installation of PHP by using the given command –
php -v
Configure PHP-FPM
Use the following command to edit both php.ini files –
sudo nano /etc/php/*/fpm/php.inisudo nano /etc/php/*/cli/php.iniIn the Date section set your own time zone.

Save both the files and restart PHP-FPM services –
sudo systemctl restart php*-fpm.serviceInstalling and configuring database server
We will use MariaDB as our database server. Use the following command to install it on your system –
sudo apt install mariadb-serverPress y and then enter if it asks for your confirmation.
LibreNMS is not fully compatible with MYSQL strict mode so disable it for now –
sudo nano /etc/mysql/mariadb.conf.d/50-server.cnfIn mysqld section add the given lines –
[mysqld]
innodb_file_per_table=1
sql-mode=""
lower_case_table_names=0
Save this file and exit.
Now restart the MariaDB services –
sudo systemctl restart mariadbOnce the database server is set up, create a database for LibreNMS.
First, use the following command to log in to the MariaDB server –
sudo mysql -u rootNext, create a database for LibreNMS by using the given query-
CREATE DATABASE librenms CHARACTER SET utf8mb4 COLLATE utf8mb4_unicode_ci;Use the given query to create a user –
CREATE USER 'librenms'@'localhost' IDENTIFIED BY 'StrongPassword';Grant all the privileges to the user on the created database –
GRANT ALL PRIVILEGES ON librenms.* TO 'librenms'@'localhost';FLUSH PRIVILEGES;exitInstalling LibreNMS
In this section, we will download and install LibreNMS on our system. First, use the given command to install git if it is not installed already –
sudo apt install git -yLibreNMS will run under its own user called librenms so use the following command to add a new user –
sudo useradd -r -M -d /opt/librenms librenmsgetent passwd librenmsAdd the created user to the group www-data –
sudo usermod -a -G librenms www-dataUse the following command to install some prerequisite packages to your system –
sudo apt install rrdtool whois fping imagemagick graphviz mtr-tiny nmap python3 python3-pip python3-mysqldb snmp snmpd python3-memcache mtr-tiny composer acl unzip python3-pymysql python3-dotenv python3-redis python3-setuptools python3-systemd -yClone LibreNMS from GitHub –
git clone https://github.com/librenms/librenms.git librenmsMove the downloaded folder librenms to /opt –
sudo mv librenms/ /opt/Configure snmpd
Next, configure snmpd –
sudo cp /opt/librenms/snmpd.conf.example /etc/snmp/snmpd.confsudo nano /etc/snmp/snmpd.confAdd the following string to your own community –
com2sec readonly default LibreStr0ngSecretNext download the distro –
curl -o distro https://raw.githubusercontent.com/librenms/librenms-agent/master/snmp/distrochmod +x distrosudo mv distro /usr/bin/distroRestart snmpd –
sudo systemctl restart snmpdConfigure PHP-FPM
Copy default PHP-FPM www.conf file by using –
sudo cp /etc/php/*/fpm/pool.d/www.conf /etc/php/*/fpm/pool.d/librenms.confNow open and edit librenms.conf file by using –
sudo nano /etc/php/*/fpm/pool.d/librenms.confChange [www] to [librenms]:
Change user and group to librenms –
user = librenmsgroup = librenmsChange listen to a unique name –
listen = /run/php-fpm-librenms.sockCreate LibreNMS cron job
Create the cron job by using the given command –
sudo cp /opt/librenms/librenms.nonroot.cron /etc/cron.d/librenmsCopy logrotate configuration
Use the following command to rotate the old logs of directory /opt/librenms/logs –
sudo cp /opt/librenms/misc/librenms.logrotate /etc/logrotate.d/librenmsProvide the required permissions –
sudo chown -R librenms:librenms /opt/librenmssudo setfacl -d -m g::rwx /opt/librenms/rrd /opt/librenms/logs /opt/librenms/bootstrap/cache/ /opt/librenms/storage/sudo setfacl -R -m g::rwx /opt/librenms/rrd /opt/librenms/logs /opt/librenms/bootstrap/cache/ /opt/librenms/storage/Run composer install –
sudo su - librenms./scripts/composer_wrapper.php install --no-devexitEnable lnms command –
sudo ln -s /opt/librenms/lnms /usr/bin/lnmssudo cp /opt/librenms/misc/lnms-completion.bash /etc/bash_completion.d/Configure Nginx
Now create the VirtualHost definition for Nginx to be used by LibreNMS.
sudo nano /etc/nginx/conf.d/librenms.confAdd the given content to this file –
server {
 listen      80;
 server_name librenms.example.com;
 root        /opt/librenms/html;
 index       index.php;

 charset utf-8;
 gzip on;
 gzip_types text/css application/javascript text/javascript application/x-javascript image/svg+xml text/plain text/xsd text/xsl text/xml image/x-icon;
 location / {
  try_files $uri $uri/ /index.php?$query_string;
 }
 location ~ [^/]\.php(/|$) {
  fastcgi_pass unix:/run/php-fpm-librenms.sock;
  fastcgi_split_path_info ^(.+\.php)(/.+)$;
  include fastcgi.conf;
 }
 location ~ /\.(?!well-known).* {
  deny all;
 }
}
Check the syntax by using –
sudo nginx -tFinally restart the Nginx –
sudo rm /etc/nginx/sites-enabled/defaultsudo systemctl restart nginxRestart PHP-FPM services –
sudo systemctl restart php7.4-fpm.serviceAccess LibreNMS Web interface
Open a browser and enter the given URL –
http://server_ipFor example –
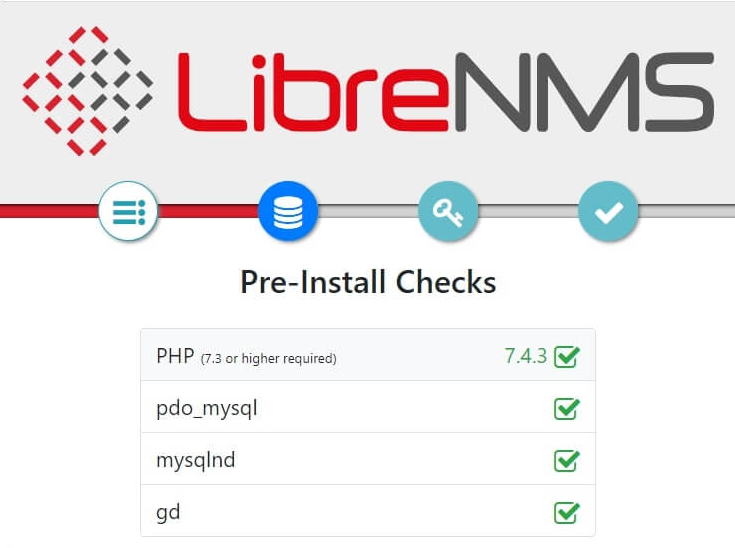
http://librenms.example.com/install.phpFirst, confirm that preinstall check is successful –
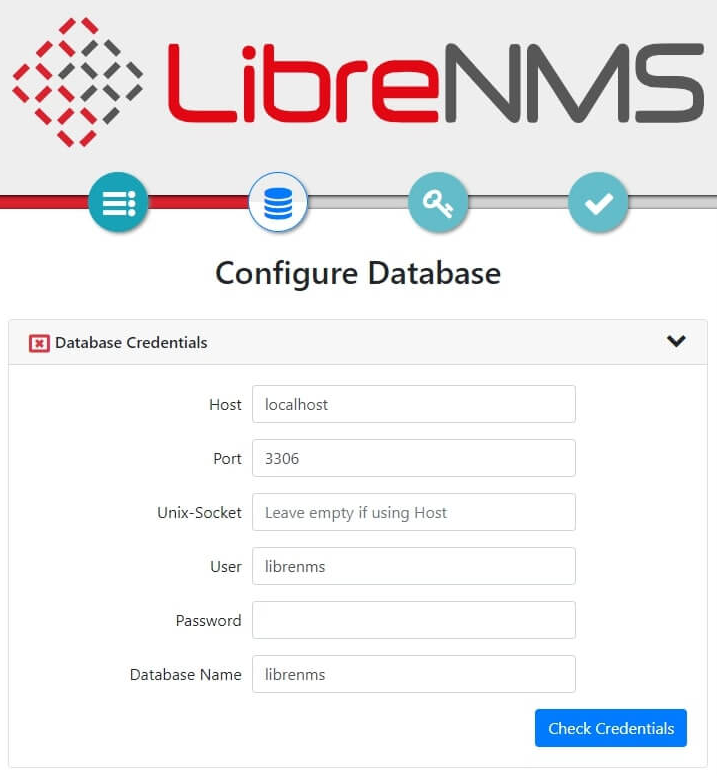
Next, enter your database credentials i.e. user name, password, and database name, and click on the Check Credentials button.
Once the database credential check is successful click on Build Database.
On the next screen, enter create a new user choose a user name, enter the password for it and enter your email finally click on Add User.

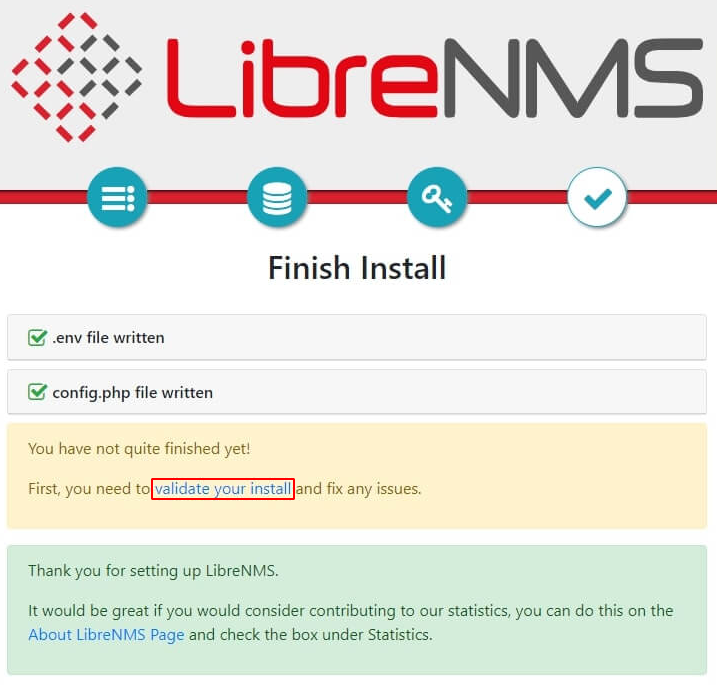
Next click on validate your install to fix any issue and finish the installation.
Finally, you can log in to LibreNMS by entering the username and password that you have created –

For more information on the usage of LibreNMS, you can visit its official website.
Conclusion
Ok, so we hope you have set up LibreNMS successfully on your Ubuntu system. Now for any query you can write us in the comments below.