Ubuntu comes in two releases the first one is LTS and the second is standard versions. LTS (Long Term Support) version is released once in two years while the standard version is released once in six months. The support for LTS is given for five years and for standard versions it is nine months.
Ubuntu 20.04 LTS is recently released by the Canonical. If you are using Ubuntu18.04 LTS or Ubuntu 19.10 and excited to use Ubuntu 20.04 then you can upgrade it by following this article. Ahead in this article, we will show you how to upgrade your system to Ubuntu 20.04 LTS from a previous version of Ubuntu.
Things to know if you are upgrading to a new version
The benefits of upgrading a system are you get the latest software, including new security patches, and all the upgraded technology that comes with a new release without reinstalling and reconfiguring your system.
- Once your system gets upgraded you can’t downgrade it. You can go back to the previous version only by reinstalling it.
- All your data and applications setting will remain the same. But it is always recommended to take a backup of your data.
- Create a backup of your system and keep it on a separate disk. So that whenever needed it can be used to restore the system.
- You need to have good internet speed while upgrading the system.
- The upgrade might not available immediately after its release.
How to upgrade the Ubuntu from the terminal?
This method is suitable for Ubuntu servers and desktops. To upgrade your system from the terminal, you should have an update-manager-core package installed. To install it use the following command in your terminal –
sudo apt install update-manager-core
Run the following command to check and install the updates for the current version –
sudo apt update && sudo apt upgrade
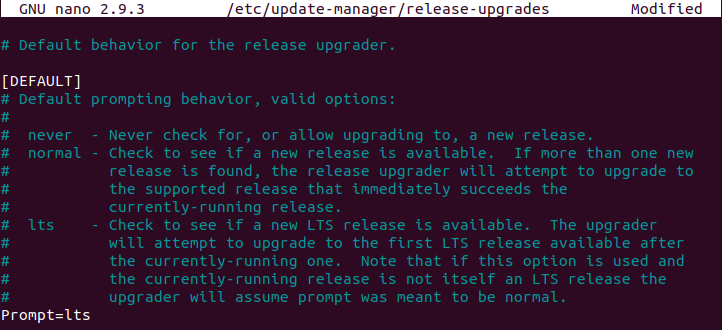
Now run the following command and set the prompt=lts in /etc/update-manager/release-upgrades
sudo nano /etc/update-manager/release-upgrades

To upgrade the current ubuntu version to Ubuntu 20.04 LTS, Use the following command in your terminal-
sudo do-release-upgrade
If this command does not find any new upgrade then you can force the installer to install the current development version of Ubuntu. Use the option -d with the above command to install the upgrades –
sudo do-release-upgrade -d
This command will check and ask you to confirm the up-gradation of Ubuntu, press y to start it. Depending on your internet speed it can take several minutes to complete the download and upgrade to Ubuntu 20.04 LTS.
How to upgrade Ubuntu in GUI, Step by step guide
This method is suitable for those who are using Ubuntu desktop. Follow the below steps to upgrade your system –
Press the windows key and search for software updater in the search bar and then click on it to launch it.

When launched first it will check for the updates for the current version of Ubuntu. If it does find any, first install them and then restart your system. Now launch the update manager once again if it says that the system is up to date then click on the settings.

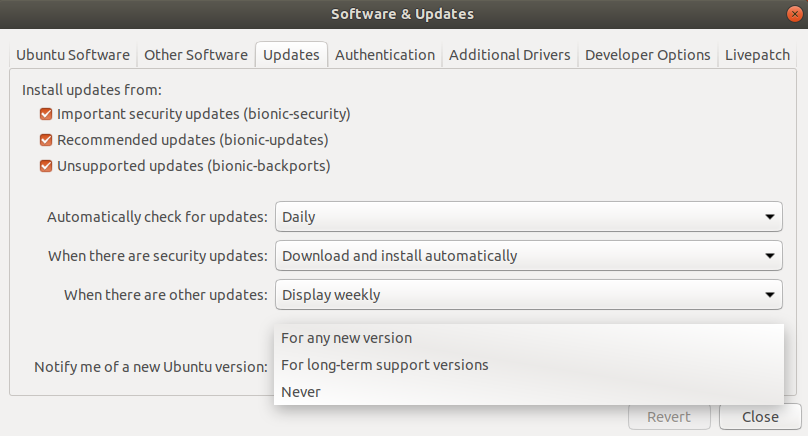
Next click on the updates tab set notify me of a new Ubuntu version For long-term support versions if you want to install an LTS release. It will ask you to enter your password, enter it to make the changes.

Click on close to go back to the software updater window and then click on ok. Now reopen the update manager this time it should display the update for a new release of Ubuntu. Click on upgrade to start up-gradation.
If still, no upgrade appears then open your terminal and run the following command –
update-manager -d
This will open the new window of software updater.

Here click on upgrade this will ask you to enter your password, enter it. Next, you will see a release note click on the upgrade again.

This will start downloading the new packages and remove the obsolete ones. Finally, you will be asked to restart your system to complete the process of up-gradation. Now current version of Ubuntu is upgraded to a new Ubuntu 20.04 LTS. You can start using it.
