
I have already discussed the installation and configuration of the Z shell in Ubuntu/Linux Mint which is quite similar to Fish Shell.
Ahead in this article, we will see the fish shell in more detail, but before that, I will briefly define what is a Unix shell and how we can categories them.
So, In Unix or a Unix like system such as Linux, a shell is a program that interprets the command, executes, takes input(s), and prints output(s) on a terminal window, typically where it runs.
Basically it acts as an intermediary between user and kernel. It is available to use when you launch the terminal window. Bash (bourne again shell ) comes default with many Linux distributions.
What are the Types Of Shells available in Unix?
Majorly Unix shells can be categorized into –
- Bourne Shell (sh) – It has $ character as default prompt. POSIX shell (sh), bash, Korn shell, etc are the shells that come under this category.
- C Shell (csh) – It uses % character as default prompt. Z shell, c shell, tcsh are some shells that come under this category.
What Is a Fish Shell?
The friendly interactive shell also abbreviated as fish, is a smart and user-friendly Unix shell. Its syntax derives neither from the bourne shell and nor from the c shell, So it is considered as an exotic shell. Unlike many other shells that disable many features by default to save system resources, it enables many of them to provide more features to its users. Some of its features are given below –
Features Of Fish Shell
- It provides auto-suggestions based on previous commands executed.
- You can configure it through the web
- Provide advanced tab completion feature
- Syntax highlighting with strict error checking
- Supports for X clipboard
- It maintains searchable command history
How to Install Fish Shell?
To install it in Ubuntu/Linux Mint we have to add the PPA repository of fish shell in our system. Execute the following command to add it-
sudo apt-add-repository ppa:fish-shell/release-3
then run following command to update apt’s source list-
sudo apt-get update
And then finally run the below command to install it in your system –
sudo apt-get install fish
How To Use Fish Shell?
Now once the installation of the fish shell gets completed. Use the fish command in your terminal-
fish

When you type a command in the terminal, based on previously run commands it automatically suggests the complete command in light grey color for example – when I press s it suggests me like in the following image –

For using the tab completion feature first write a few words and then press the tab button to see the possible commands that can be used. Look at the following image –

The fish shell highlights invalid commands by turning it into the red color while valid commands are displayed in a different color. Similarly, a valid path gets underlined while invalid paths turn its color into red. You can see the syntax highlighting in the following image-
![]()
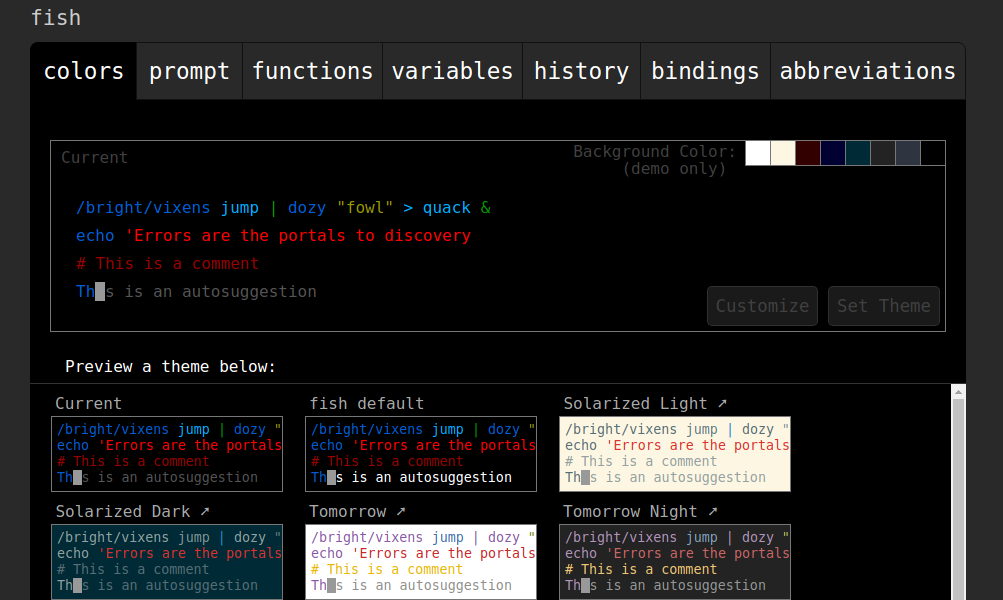
To configure shell write fish_config on command prompt and press enter. This will open the configuration settings in your default web browser. Here you can choose the color, set a new prompt, can see the history of commands executed. The image given below shows the configuration menu –
You can exit from the fish shell to bash by executing exit command in the terminal.
Setting Fish As Default Shell
Follow the below steps to set fish as your default shell –
first, locate the shell by using-
whereis fish

Then run the following command –
chsh -s /usr/bin/fish

It will ask you for the user’s password. Enter your password and press enter. You can access bash by using bash command and to exit from it just type exit and press enter.
To set bash as your default shell again, use-
$ chsh -s /bin/bash