
SSH or Secure Shell is a cryptographic network protocol for securely getting access to a remote computer using a terminal. It provides a secure channel over the unsecured network to execute commands and operate a system remotely.
There are various different ways to authenticate users who are going to connect to a remote server using ssh. Password-based authentication and public-key-based authentication are the most widely used methods.
In this article, we will discuss how to set up a passwordless ssh login using public key-based authentication on a Linux system.
Prerequisites
In order to complete this guide, you should have the following.
- Access to a user account with superuser privileges
- SSH access to a remote server in terminal
Setup ssh key-based authentication
SSH uses public-key cryptography to authenticate the remote computer. It is a robust and more secure alternative to logging in with an account password. Asymmetric cryptographic algorithms are used to generate a pair of keys one is private which is kept secret and store in a local computer and the other one is the public key which can be shared anywhere.
Before you generate ssh keys check whether you already have these on your system if yes then you can use the existing one otherwise go and create ssh keys.
Use the given command to check if this file already exists on your system –
ls -al ~/.ssh/id_*.pub
If you see output like file or directory not found or match not found then go to the next step to create ssh keys pair.
Create a new SSH key pair
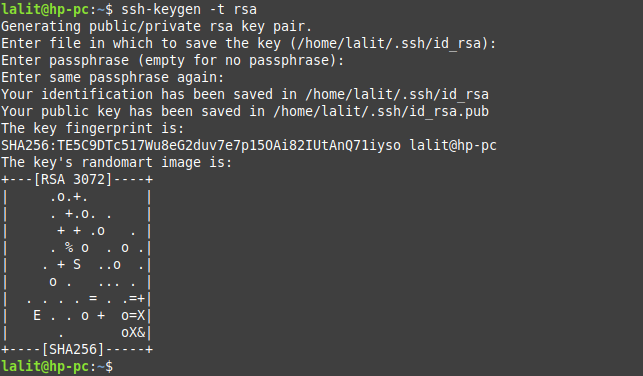
On your system open the terminal and use the following command to generate the SSH key pair (RSA keys) –
ssh-keygen -t rsa
This will prompt you to enter the following for the keypair that will be generated –
Filename – Enter the filename and press enter to proceed if you don’t pass any name it will proceed with the default one i.e. id_rsa
Passphrase – Enter at least a five-character password and retype it if asked again and press enter. You can skip it also but protecting your keys with a password is a good idea. Now a pair of public and private keys will be generated inside the .ssh directory in your current working directory.
Copy the public key to the remote server
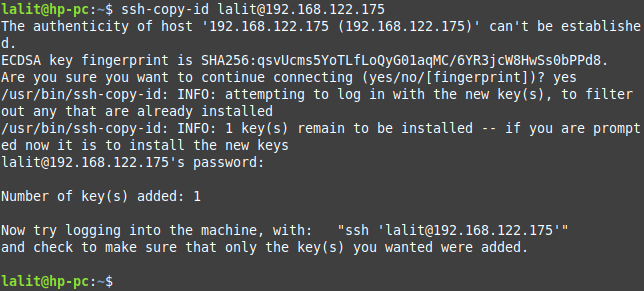
To manage the remote server from your local computer you need to upload the public key on it. Use the following command to copy the public key to the remote server.
ssh-copy-id user@server-ip-address
For example –
ssh-copy-id lalit@192.168.122.175
This will prompt you to enter the remote user login password and then the key will be added to the file authorized_keys on the remote server.
Log in to the remote server using SSH key-based authentication method
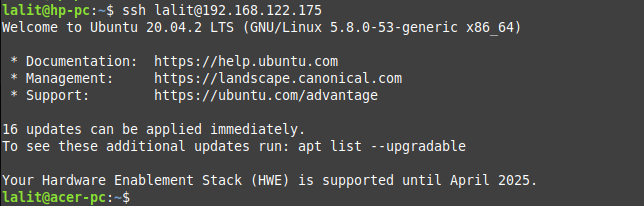
Now everything has been set up you can use the following command to log in on the remote server.
ssh remote_user@server_ip_address
For example –
ssh lalit@192.168.122.175
If you protected your ssh key pair with a password then a window will open asking you to enter the password. Once you enter the password to open this file you will get connected to the remote server.
Disable server password authentication
Before you disable the password authentication on your remote server make sure you are login to that server with the public key authentication method.
Use the given command to login into the remote server with the public key authentication method –
ssh remote_user@server_ip_address
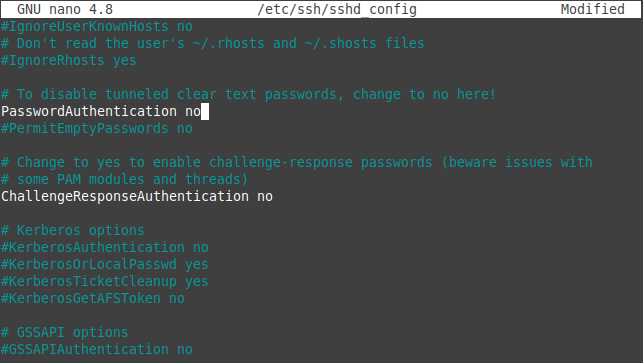
Next open and modify the ssh configuration file i.e. /etc/ssh/sshd_config use –
sudo nano /etc/ssh/sshd_config
In this configuration file find the given directive and modify it as given below.
PasswordAuthentication no
ChallengeResponseAuthentication no
UsePAM no
You can see this configuration file in the given image.
Save this file and exit.
Next reboot your ssh server to make the changes effective, use-
systemctl restart sshd
Conclusion
The ssh key-based authentication is very useful when you are dealing with a large number of servers and you want to automate such as automatic backup using scripts, executing commands remotely, etc.
Now if you have a query then write us in the comments below.