Grub
Grub is a bootloader that is used to manage the multiple operating systems installed on a computer. A boot loader is the first program that runs when a computer starts. It is responsible for loading and transferring control to the operating system’s kernel. The GNU GRUB is derived from the GRand Unified Bootloader, which was originally developed by Erich Stefan Boleyn and was predominantly used for Unix-like systems.
Make Changes Through Your Terminal
Backup the current configuration file-
1. Open your terminal
2. Type sudo cp /etc/default/grub /etc/default/grub.orig
 It will ask you to enter your password, Once you enter it the current grub configuration will be copied to
 grub.orig which get stored in /etc/default directory.
Make Changes-
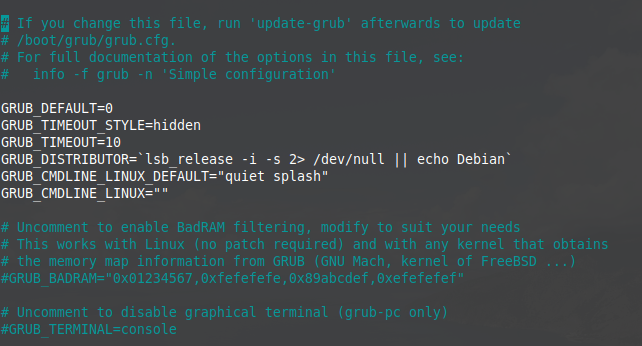
Now you can change the default values that are given in the file. The boot options are numbered from top to bottom which starts from 0. If no option is selected within the given time it will boot into the default OS. Open the configuration file using a text editor.
Type sudo nano /etc/default/grub in your terminal and press enter-
![]()
Have a look at the configuration file of grub which is given below-

You can change the default boot option by locating and entering the number on which an entry appeared in the boot menu of grub. For example, the current default os in my system is Linux. I can change it to Windows by changing value 0, into 4 in GRUB_DEFAULT. That is given in the above file. Similarly, you can change the other values also.
For the custom menu and submenu that is the order in which operating systems are displayed in the boot menu, you should read this Grub2/Custom menu.
Once you are done editing save your changes and exit from the editor.
Update the grub-
The final step is to update the changes into grub. The change that you have made will appear after you run the update command. The following command runs the grub configuration script and updates the /boot/grub/grub.cfg file.
sudo update-grub

Make changes by using Gurb-Customizer
Grub-customizer is software that provides a graphical user interface to change the grub settings. You can change the following things in this –
- Order in which entries appear in the menu and submenus
- Default entry
- Visibility time
- kernel parameters
- The appearance of the boot menu etc
Add repository-
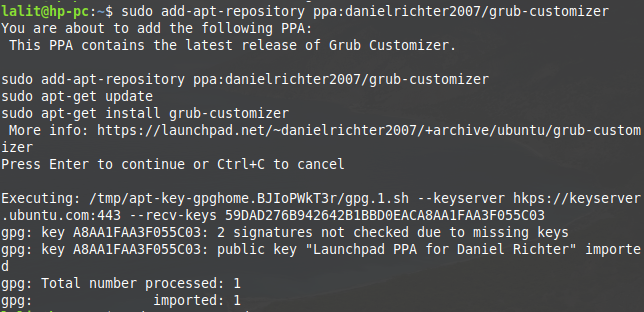
Before you download it you have to add the official PPA repository of software in your system. Open your terminal and run the following command-
sudo add-get-repository ppa:danielrichter2007/grub-customizer(use in Debian based distributions)
Meanwhile, it will prompt to press enter to continue or ctrl+c to cancel the process, press the enter.

sudo apt-get update– run this command after adding the repository to get it updated in the system.
Install the grub-customizer –
Now to install the software execute the following commands into your terminal-
sudo apt-get install grub-cutomizer(in Debian based distributions)
sudo yum install grub-customizer.x86_64 (in distributions using yum package manager) or
sudo dnf install -y grub-customizer (in Fedora)
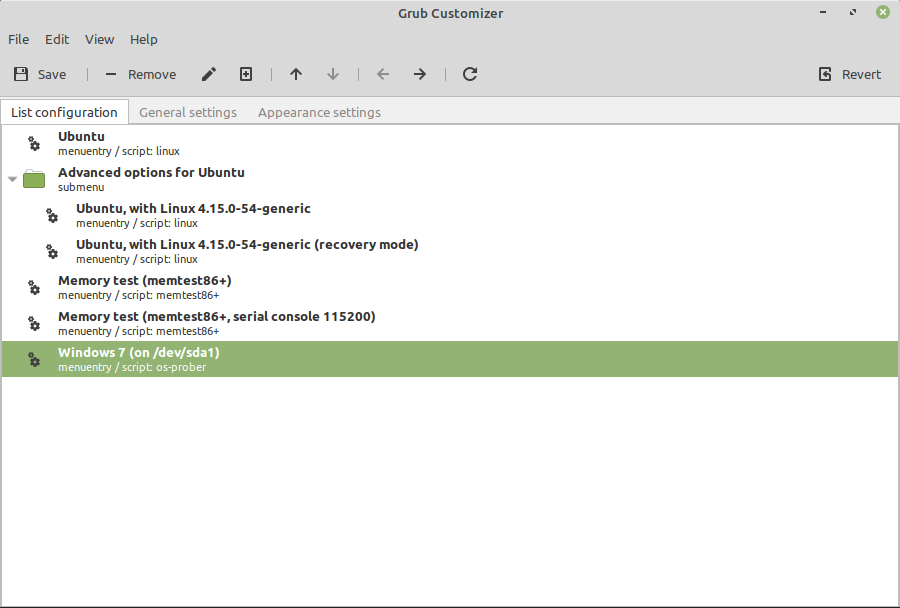
Once it gets installed launch the software and make the changes accordingly. Software interface will look something like this-

make changes and save it.
Remove grub-customizer –
You can remove the software after making changes into your bootloader by the commands that are given below-
sudo apt-get remove grub-customizer (in Debian based systems)
also, use the below command to remove the unused dependencies
sudo apt-get autoremove
sudo yum remove grub-customizer.x86_64(systems using yum package manager like centOS)
suo dnf remove grub-customizer (use In Fedora)
