
Oodo is a suite of business management software that includes applications such as CRM, e-commerce, billing, accounting, warehouse, project management, etc integrated into a single software. It comes in two versions community and proprietary that has some extra features.
In this article, I will discuss how to install Oodo in a Ubuntu system.
Prerequisites
To follow this guide you should have the following –
- A system with a recent version of Ubuntu installed on it
- Access to a user account with root permissions
Installing Oodo in Ubuntu
Follow the given steps to install Oodo on your Ubuntu system.
Update your system
Run the following command to update the package list on your system –
sudo apt updateAnd use the given command to upgrade packages to their latest version –
sudo apt upgrade -yInstall prerequisite dependencies
Use the following command to install the required dependencies in your system –
sudo apt install git python3-pip build-essential wget python3-dev python3-venv python3-wheel libfreetype6-dev libxml2-dev libzip-dev libldap2-dev libsasl2-dev python3-setuptools node-less libjpeg-dev zlib1g-dev libpq-dev libxslt1-dev libldap2-dev libtiff5-dev libjpeg8-dev libopenjp2-7-dev liblcms2-dev libwebp-dev libharfbuzz-dev libfribidi-dev libxcb1-devType y and then press enter if it asks for your confirmation.
Create an Oodo user
The next step is to create an Oodo user in your system as running Oodo under the root user can cause security risks –
sudo useradd -m -d /opt/odoo -U -r -s /bin/bash odooInstall PostgreSQL
Oodo uses PostgreSQL as database backend so install it by running the given command in your terminal –
sudo apt install postgresql -yOnce the installation is completed create a PostgreSQL user with the same name as Oodo user that you created in the previous step.
sudo su - postgres -c "createuser -s odoo"Install Wkhtmltopdf
The next step is to install wkhtmltopdf which is a set of open-source command-line tools for rendering HTML pages into pdf and various other formats using the Qt WebKit rendering engine.
Oodo require it to print pdf reports so install it by running the given command in your terminal –
sudo wget https://github.com/wkhtmltopdf/packaging/releases/download/0.12.6-1/wkhtmltox_0.12.6-1.focal_amd64.debAnd then use to install the downloaded deb package –
sudo apt install ./wkhtmltox_0.12.6-1.focal_amd64.debInstalling Oodo in Ubuntu
We will install Oodo in a Python virtual environment so first change user to Oodo user –
sudo su - odooClone the Oodo source code from GitHub –
git clone https://www.github.com/odoo/odoo --depth 1 --branch 14.0 /opt/odoo/odoo14Move to the Oodo user’s home directory –
cd /opt/odooCreate a python virtual environment for Oodo by using –
python3 -m venv odoo-venvActivate the virtual environment –
source odoo-venv/bin/activateInstall the required python modules by executing the given commands –
pip3 install wheelpip3 install -r odoo14/requirements.txtAfter downloading python modules deactivate the Python virtual environment –
deactivateCreate a new directory for adding third party addons –
mkdir /opt/odoo/odoo-custom-addonsSwitch back to the previous user by using-
exitCreate an Odoo configuration file
Use the following command to create an Oodo configuration file –
sudo nano /etc/odoo.confAdd the following content into this file –
[options]
;This is the password that allows database operations:
admin_passwd = passwd23@
db_host = False
db_port = False
db_user = odoo
db_password = False
addons_path = /opt/odoo/odoo14/addons,/opt/odoo/odoo-custom-addons
Create a systemd unit file
Create a service unit file called oodo.service by using the given command –
sudo nano /etc/systemd/system/odoo.serviceand add the following content to this file –
[Unit]
Description=Odoo
Requires=postgresql.service
After=network.target postgresql.service

[Service]
Type=simple
SyslogIdentifier=odoo
PermissionsStartOnly=true
User=odoo
Group=odoo
ExecStart=/opt/odoo/odoo-venv/bin/python3 /opt/odoo/odoo14/odoo-bin -c /etc/odoo.conf
StandardOutput=journal+console

[Install]
WantedBy=multi-user.target
Restart systemd to make it aware of new unit files –
sudo systemctl daemon-reloadStart and enable oodo service by using –
sudo systemctl start oodosudo systemctl enable --now oodoCheck if Oodo service is running or not –
sudo systemctl status oodo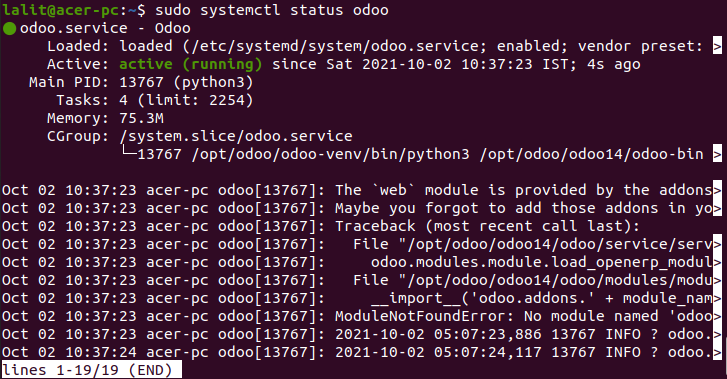
Testing Oodo installation
After successfully following all the steps that are given above you can now test your Oodo installation. Open a browser and enter the given URL –
http://domain_or_IP_address:8069For example –
http://localhost:8069If the installation is successful you will see the output as given in the image below –
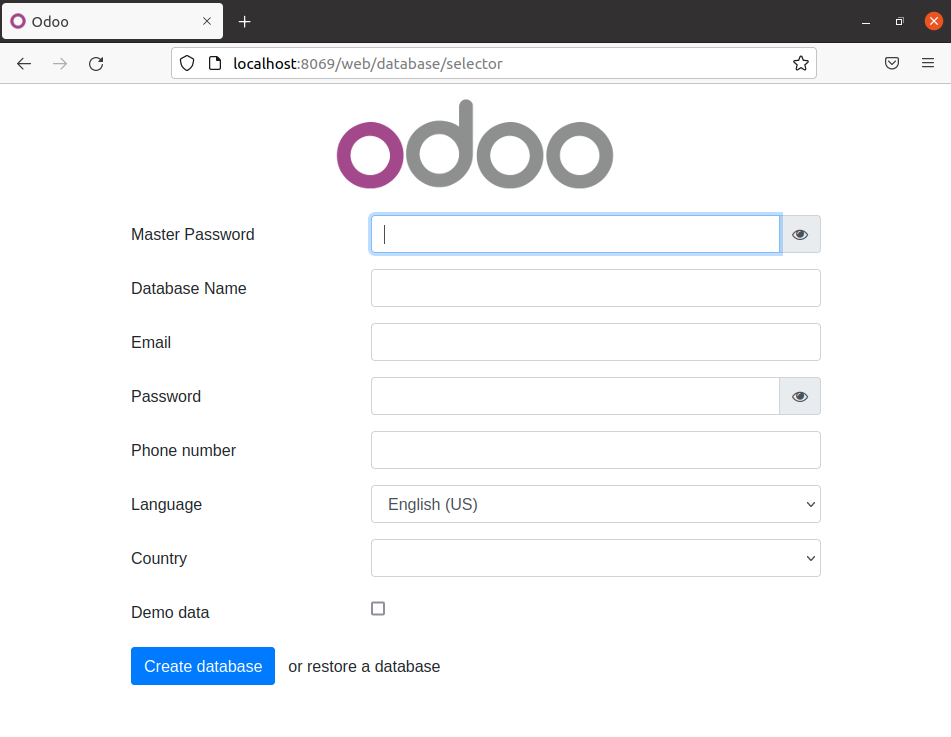
Here you can fill in the details and create a database for Oodo and start using Oodo on your system.
Conclusion
You have successfully set up Oodo on your Ubuntu system. Now if you have a query then write us in the comments below.