PostgreSQL or Postgres is a free and open-source relational database management system. It is a robust, extensible, and technical standard-compliant database management system. PostgreSQL is a successor of the Ingres database which is developed at UC Berkley in 1996.
It is designed to handle from simple to more complex tasks and can be used on a single computer to Dataware houses with many concurrent users. It is cross-platform and used as the default database for macOS Server.
In this article, I will discuss how to install and configure PostgreSQL in Ubuntu.
Prerequisites
To follow this guide you should have the following.
- A system with a recent version of Ubuntu installed on it
- Access to a user account with root privileges
- Working internet connection for downloading required packages
How to install PostgreSQL in Ubuntu
There are various ways to install PostgreSQL in Ubuntu, you can install it from the Ubuntu repository or from the official repository of PostgreSQL.
Installing PostgreSQL from Ubuntu repository
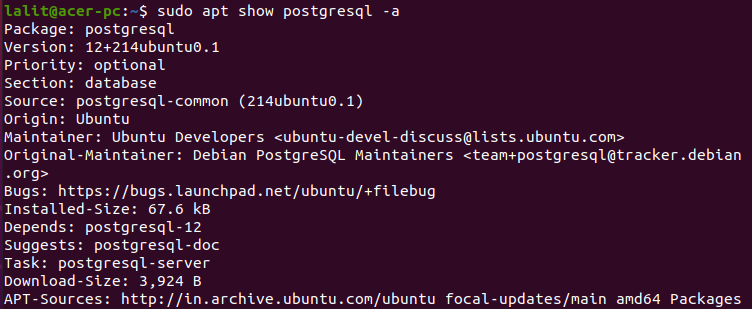
Installing PostgreSQL from the Ubuntu repository is easy but you might get a relatively older version of it. You can check the version available in the Ubuntu repository by using –
sudo apt show postgresql

First, update the local package repository using the following command.
sudo apt update
Next, use the given command to install PostgreSQL in Ubuntu.
sudo apt install postgresql postgresql-contrib
Where postgresql-contrib package add some other functionalities that are not the part of postgresql package.
Press y and then enter to proceed with the installation process.
You can verify the installation by using
psql -V
This will display the output as given in the image below.
![]()
Installing PostgreSQL from its official repository
To install PostgreSQL from its official repository, first, you need to add the repository to your system. This is recommended way to install PostgreSQL on your system.
Make sure you have the wget tool installed on your system –
sudo apt install wget ca-certificates
Import the GPG key using the given command in your terminal –
wget --quiet -O - https://www.postgresql.org/media/keys/ACCC4CF8.asc | sudo apt-key add -
Now add the repository by using –
sudo sh -c 'echo "deb http://apt.postgresql.org/pub/repos/apt $(lsb_release -cs)-pgdg main" > /etc/apt/sources.list.d/pgdg.list'
Next, update the package list by using –
sudo apt update
Finally use the following command to install the latest version of PostgreSQL on your Ubuntu system –
sudo apt -y install postgresql postgresql-contrib
Again you can verify the installation by using –
psql -V
![]()
Check the status of PostgreSQL services
After installation PostgreSQL services automatically get started you can check their status by using the given command –
sudo systemctl status postgresql
This should display the given result.

Start PostgreSQL to enter commands
You can now connect to PostgreSQL to create and manage databases. By default, PostgreSQL creates a special user called postgres that has all permissions.
Use the given command to log in to this account –
sudo su postgres
Now use the given command to access the PostgreSQL shell –
psql
This will change your prompt as you can see in the image below.

You can check the list of existing databases by using –
\l

Similarly, you can create databases and tables or manage them by running SQL commands in PostgreSQL prompt.
Conclusion
Ok, I hope you can now install and use the PostgreSQL database on your Ubuntu system. Now if you have a query the write us in the comments below.
