LAMP is an acronym of Linux, Apache, MySQL, and PHP. It is a group of opensource software that is used to run a web server on the Linux operating system. Similarly, WAMP(Windows, Apache, MySQL, PHP) is used in windows and MAMP(Mac OS, Apache, MySQL, PHP) is used in Mac OS to develop PHP web apps. Since we are using Linux we will setup the PHP web app development environment for the same.
Setting Up LAMP
There are two ways to set up the web app development environment –
1. Install each software individually i.e. Apache, MySQL, and PHP
2. Install bundled software, which includes all the software component needed for the development
You can use either of them, For beginners, I will recommend using the second method for the sake of simplicity.
How to install LAMP Stack
1. To start installing LAMP stack which is a bundled software open the terminal by pressing ctrl+alt+t in your Linux operating system. Execute the command that is given below-
sudo apt-get install lamp-server^
Or you can also use the tasksel utitlity in debian based systems which provides a menu in the terminal that includes a number of grouped packages like LAMP, DNS server, mail server, samba file server, etc. to configure server quickly. You can choose any one of them by navigating and pressing the space key. So before you use the tasksel utility you have to install it into your system.
sudo apt-get install tasksel
And then run the utility by using the given command-
sudo tasksel
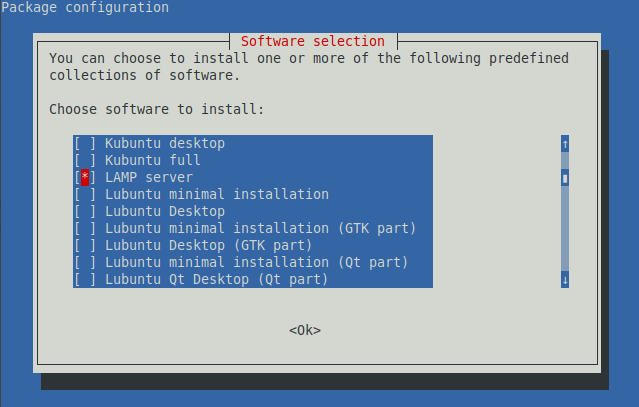
It will display a menu like this –

Now select the LAMP from the menu once it gets selected you can proceed by pressing enter. Press OK or type Y and press enter whenever it asks for the confirmation to download the software.
2. While installing MySQL it may prompt to enter the password for the root user. Simply enter a password and if asked to re-enter the password enter the same password again and press ok it will again proceed with the installation process.
3. Once the installation gets completed. Check that installed software are working or not to do the same follow the steps that are given ahead-
Test Apache Webserver –
To test the apache webserver type http://localhost/ in your browser. If a message “It works!” displayed that means Apache is working fine.
Test PHP –
To test PHP we will have to create a file phpinfo.php inside the /var/www/html To create the file type the following command in your terminal-
sudo nano /var/www/html/phpinfo.php

Write the code <?php phpinfo();?> inside the file, press ctrl+s to save and press ctrl +x to exit from the text editor.
Restart the Apache webserver by the following command –
sudo /etc/init.d/apache2 restart
Now to test PHP type the http://localhost/phpinfo.php inside your browser, if it displays the information related to PHP that is installed on your system that means PHP is working fine.
Install the phpMyAdmin
phpMyAdmin is an opensource software that is used to handle the administration of MySQL over the web. It is written in PHP. And supports a wide range of operations on MySQL and MariaDB. So, for the easy database administration, we will install it by using the given command –
sudo apt-get install phpmyadmin
Once it starts configuring first it will ask to enter MySQL application password for phpmyadmin, enter a password and press enter to proceed. Next, it will ask to confirm the entered password now enter the same password again to confirm it and press enter.
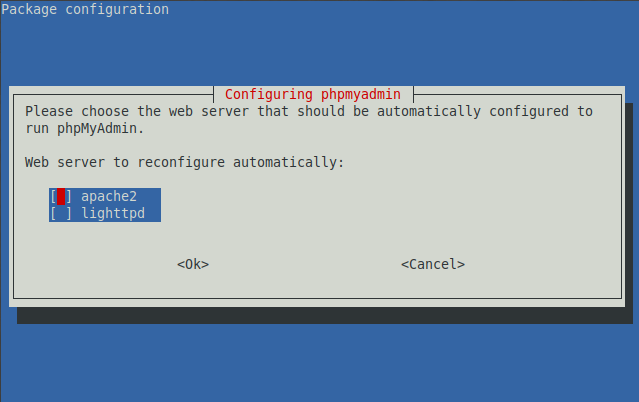
Next, it will ask to select webserver between apache2 and lighthttpd.

Select apache2 by navigating to it and pressing the space key and finally press enter for the further installation process. Once it gets done now test it.
Test phpMyAdmin –
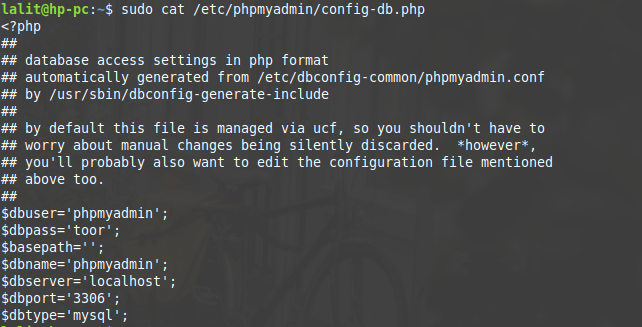
To test the phpMyAdmin installation enter http://localhost/phpmyadmin/ into your browser. And enter username and password to log in. If you don’t know your exact login credentials it may give some error while login. To avoid this, you can check your username and password by executing the following command into your terminal-
sudo cat /etc/phpmyadmin/config-db.php

As you can see above dbuser i.e. phpmyadmin is my username and dbpass i.e. toor is my password. Now I can log in into phpMyadmin by using these credentials. Now everything has been set up we have a web server root directory at /var/www/html please note some distribution may have this at /var/www/If you find yourself stuck at any step you can write to us for help in the comments below.
