Java is one of the most popular programming languages used today. One of the biggest reasons why Java is so popular is platform independence. That means a program written in java can run on several different types of machines. But the only thing is JRE(Java Runtime Environment) should be installed on the computer where you want to run the code.
There are various packages available such as JRE, OpenJDK, Oracle JDK, etc for the installation of java in Linux.
Ahead in this article, we will discuss the difference between these packages and installing them on Ubuntu, Linux Mint, etc.
Different packages for Java platform
Java platform consists of various programs and each of them has its own functionality. For example –
JDK –
Java compiler is provided as part of JDK(Java Development Kit) which compiles java source code to an intermediate code called byte code. JDK is required if you want to develop software using java. There are different versions of it available in Linux –
- OpenJDK – It is an open-source implementation of JDK It works the same as Oracle JDK.
- Oracle JDK – It is the official JDK from Oracle. It has a few additional features. Some applications such as android studio recommend using Oracle JDK to avoid any issue while developing softwares.
JRE –
Java Runtime Environment or JRE consists of Just-In-Time compiler which converts intermediate code i.e. byte code to native machine code. Installing JRE is sufficient if you want only run java programs.
Check if Java is installed or not
OpenJDK comes pre-installed in many distributions. To check if it is installed in your system or not, use the following command in your terminal-
java --version
This will display the current version of OpenJDK installed in your system.
How to Install OpenJDK (Java 11) in Ubuntu?
As discussed above OpenJDK is an opensource implementation of the java development kit. It comes preinstalled in Ubuntu, Linux Mint, and many other distributions. Still, If it is not in your system and you want to install it then use the following command in your terminal-
sudo apt-get install default-jdk
This will include JRE in it. If you want to install only JRE then use the following command –
sudo apt-get install default-jre
If you want to uninstall it for any reason then use the following command –
sudo apt-get purge openjdk*
How to Install Oracle Java 13 (JDK 13) in Ubuntu?
Oracle JDK is officially distributed by Oracle. To install it in Debian/Ubuntu-based distribution follow the given steps –
1. Add the Linuxuprising PPA in your system with the following command-
sudo add-apt-repository ppa:linuxuprising/java
and then update the OS repository with
sudo apt-get update
2. Now use the following command to install the java 13 in your system –
sudo apt install oracle-java13-installer
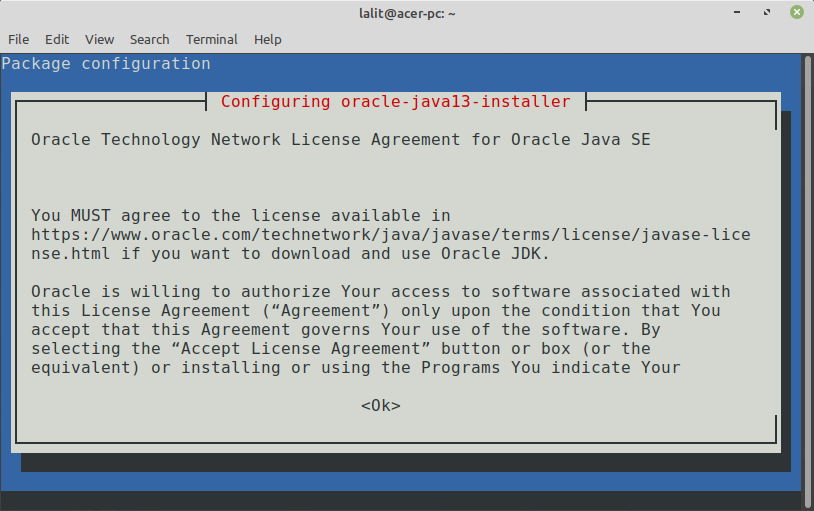
This will prompt you for Oracle network license agreement, read it by scrolling down and then press the Tab button to select Ok. The screen will look something like this –

Once you press ok it will again ask you to accept the license, select yes and then press enter.

How to Make Oracle Java 13 as default?
If oracle java 13 doesn’t become default automatically in your system then make it default with the following command –
sudo apt install oracle-java13-set-default
and if you don’t want it to be the default anymore, then use the following command –
sudo apt remove oracle-java13-set-default
Now I hope you have successfully set up the JDK and JRE in your system. If you have any issue then write us in the comments below.
