
DHCP is a networking protocol used to assign IP addresses and other network parameters automatically to devices connected to a network using a client-server architecture.
As you know each device on the internet has a unique IP address. There are two ways to assign an IP address to a newly connected device on a network. The first way is to manually configure the network interface and assign an IP address by hand, this is known as static configuration. The second way is to use DHCP to configure IP automatically.
You can imagine what if you have to configure IP addresses of thousands of computers manually this is where DHCP becomes very useful and efficient.
In this article, you will see how to set up a DHCP server on Linux.
How does DHCP work?
The DHCP operation falls into four phases i.e. DHCP server discovery, IP lease offer, IP lease request, and IP lease acknowledgment this process is often abbreviated as DORA (Discovery, Offer, Request, Acknowledgement). All these phases are explained below.
- DHCP server discovery – A client which is configured to use DHCP when connects to a network sends DHCPDISCOVER packet to the DHCP server
- IP lease offer – When DHCP server receives the DHCPDISOCVER packet it reservers an IP and reply with DHCPOFFER packet to the client or connected device
- IP lease request – Now when the client receives DHCPOFFER packet it sends a DHCPREQUEST packet to the server showing it is ready to receive the network configuration information provided in the DHCPOFFER packet
- IP lease acknowledgment – Finally when the DHCP server receives the DHCPREQUEST packet from the client, it sends the DHCPACK packet showing that the client is now permitted to use the IP address assigned to it.
At this point, the Ip configuration process gets completed.
Installation of DHCP server
The implementation of an open-source version of the DHCP server which is maintained by ISC ( Internet System Consortium ) is available for various distributions. Here I will use Ubuntu Linux to set up our DHCP server.
Now use the given command to install the DHCP server on Ubuntu.
sudo apt install isc-dhcp-server
When it asks for your confirmation press y and then enter.
Configuring DHCP server
By default, DHCP server configuration does not include any subnet on which DHCP server should lease IP addresses. So if you attempt to start the server you may get an error that the subnet is not configured.
The main DHCP configuration file is /etc/dhcp/dhcpd.conf you can add a subnet to this file.
Use a text editor to edit this file –
sudo nano /etc/dhcp/dhcpd.conf
Set the following global parameters given in the file the option definition will common to all the supported networks.

Here replace the domain-name and domain-name-servers option’s value with yours. Each name server will be separated by a comma. The default-lease-time is a value in seconds in which a leased IP address will expire if the DHCP client does not ask for any other specific expiry lease time.
Similarly the max-lease-time is a value in seconds that defines a maximum expiry time for an IP address leased by the DHCP server.
Next, define a subnet or subnetwork and IP range.
For example –
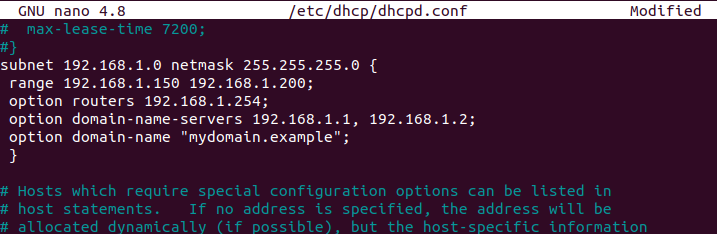
subnet 192.168.1.0 netmask 255.255.255.0 {
 range 192.168.1.150 192.168.1.200;
 option routers 192.168.1.254;
 option domain-name-servers 192.168.1.1, 192.168.1.2;
 option domain-name "mydomain.example";
}
This will result in the DHCP server giving clients an IP address in the range 192.168.1.150 to 192.168.1.200. It will lease an IP address for 600 seconds if the client doesn’t ask for a specific time frame. Otherwise, the maximum (allowed) lease will be 7200 seconds. The server will also “advise” the client to use 192.168.1.254 as the default gateway and 192.168.1.1 and 192.168.1.2 as its DNS servers.
Configure static IP on a DHCP client machine
If you want to configure a computer with fixed or static IP then add the given lines in the DHCP configuration file on the DHCP server.
host mint-node {
	 hardware ethernet 00:f0:m4:6y:32:0g;
	 fixed-address 192.168.1.15;
 }
Now save the configuration file and exit from your editor.
Start DHCP server
Now its time to start your DHCP server, use the given command to start it –
sudo systemctl start isc-dhcp-server.service
Use the given command to enable it to start automatically from the next system boot –
sudo systemctl enable isc-dhcp-server.service
Adjust your firewall
Modify firewall settings on your system to allow DHCPD to listen to service on port 67/UDP.
sudo ufw allow 67/udp
Now reload firewall using –
sudo ufw reload
Configuring DHCP client machine
Now we need to configure the client computer so that it can obtain an IP address from a DHCP server. Login to the client computer and edit the ethernet interface configuration file as follows.
sudo vi /etc/network/interfaces
Enter the following lines in this file
auto  eth0
iface eth0 inet dhcp
Once it gets done save this file and exit. Now restart the network services on the client computer to make the changes effective.
This will configure the ethernet to receive the IP automatically from the DHCP server. Similarly, you can configure another network interface so that it can take IP on lease from the DHCP server.
Alternatively, you can configure your client machine from GUI. Go to Settings>Network this will display the given window.
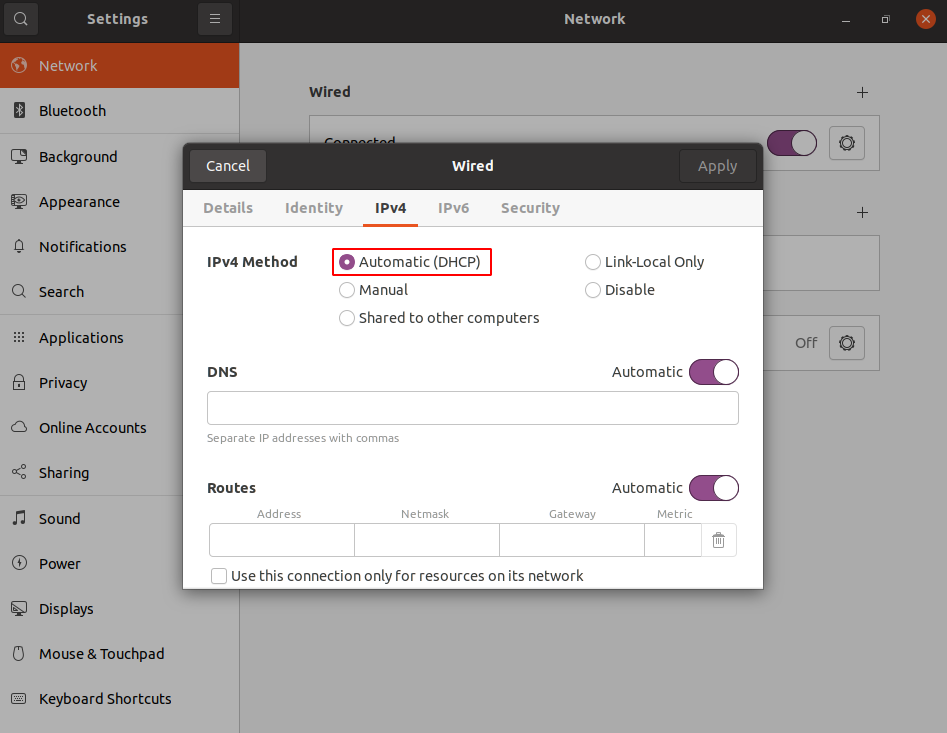
Here select the Automatic (DHCP) and click on Apply. If still client is not getting IP automatically then you should restart the system.
Conclusion
Thats how you can set up a DHCP server on your system. Now If you have a query then write us in the comments below.