DD command is used to create a bootable disk from an existing image as it clones data from one disk or partition (or a disk image) to others at the byte or block level. When I said clone, I mean dd command copies the whole partitioning information, filesystem data, and every bit of information as well, which is not possible to copy using file system copy.
To make a USB bootable generally, we use GUI applications such as Linux Live USB creator and other applications that are available for Linux, FreeBSD, and Windows. A bootable USB is required whenever there is a need for the installation of a new operating system or if we want to run an operating system live.
In a Unix-like operating system, dd is a command-line utility that is used to convert and copy files. It is a powerful tool that can be used for various purposes like backing up and restoring a disk, converting data formats, converting the case of a file, etc. The best thing is that it comes preinstalled with many Linux distributions.
In this article, we will discuss how to create a bootable USB drive using this tool in Linux or Unix.
List The Disks
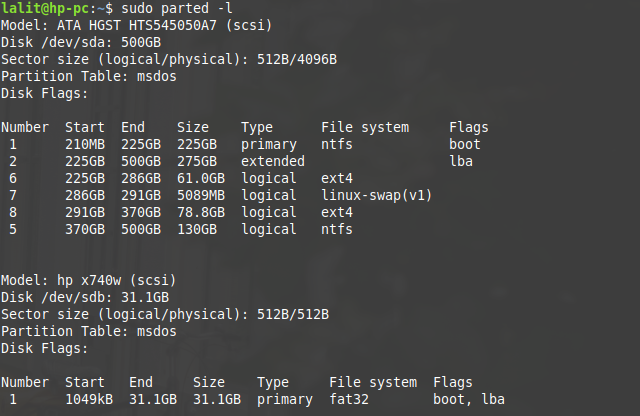
There are various tools like fdisk, parted, sfdisk, cfdisk, df, etc are available for listing and partitioning of a disk in Linux. You can use any one of them to list and identify your USB drive. We are going to use the parted command as given below-
sudo parted -l

From the above list, /dev/sdb is the USB drive that we are going to make bootable.
Format The USB Drive
Linux system does not allow to format a disk that is already mounted. So before formatting the USB, we will have to unmount it. Use the command that is given below to unmount it-
sudo umount /dev/sdb
Now format the drive with FAT file system by using the given command –
sudo mkfs.vfat /dev/sdb
Similarly to format a drive with NTFS file system you can use the given command –
sudo mkfs.ntfs /dev/sdb
How to Create a Bootable USB using dd command?
Now use the following command to make the USB drive bootable
sudo dd if=~/Desktop/kali-linux-2019.3-amd64.iso of=/dev/sdb
Where, if stand for “Input file” which specifies the path of ISO file of an operating system that we are going to install. And of stands for “Output file” which specifies the location where ISO file is to be written.
In our case, the ISO file of the operating system image (Kali Linux) is located on the desktop and it will be written on /dev/sdb which is our pen drive.
Now once you type the above command and press the enter. The process of writing will be started. It does not show the progress of copying the file you should wait until the process is not completed it can take a few minutes to complete it. But we can monitor the progress by using the following method.
How To Monitor Progress?
You can monitor the progress of the copying file by adding the status=progress option to the command that is given above. Use it as given below-
sudo dd if=~/Desktop/kali-linux-2019.3-amd64.iso of=/dev/sdb status=progress
Please note that while creating the USB bootable, the dd tool makes several partitions in it. So it will be best to format it before using it to make another ISO bootable. For other usages of dd tool, you can check its manual page by using the command that is given below-
man dd
Now I hope this article is useful to you. If you have a query or suggestion regarding the topic you can put it in the comments below.
