The firmware interface is a way by which firmware interacts with the operating system. The BIOS is the usual firmware interface while UEFI is the newer one that has some additional features.
MBR uses the standard BIOS partition table while GPT uses Unified Extensible Firmware Interface (UEFI). Using a GPT disk has various advantages over MBR disk, for instance, you can create more than four primary partitions on a GPT disk. Also, the GPT disk is required if the size of a disk is greater than 2 TB.
But in the older systems that come with BIOS only, you can not boot using GPT disk directly instead first you need to convert the GPT disk into MBR only then you can use it.
Ahead in this article, steps are given to convert a disk from GPT to MBR on Linux.
Steps to convert a disk from GPT to MBR
For converting a disk from GPT to MBR we will use gdisk tool. If it is not in your system then first you need to install it. Use the following command to install gdisk in your system-
sudo apt install gdisk
And then follow the steps given below-
Note: Before converting a disk from GPT to MBR backup any data on it.
Step 1: List and identify the disk
Use the command that is given below to list the disk available in your system –
sudo fdisk -l
Scroll and identify the disk that is to be converted from GPT to MBR in the output of this command.
Step 2: Run the gdisk tool
Now run the following command in the terminal –
sudo gdisk /dev/sda1

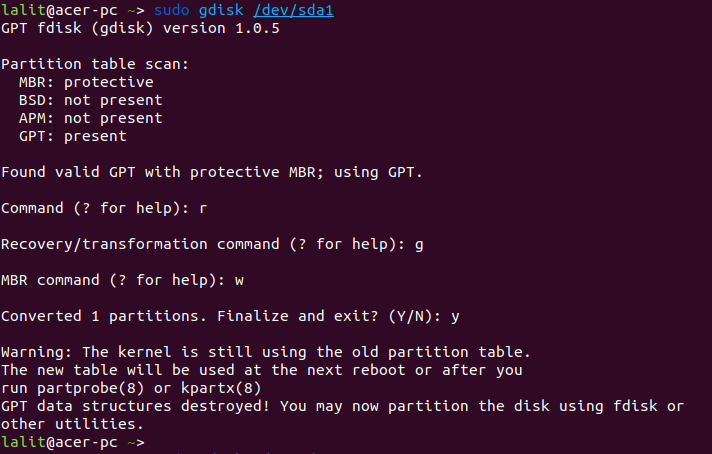
Where sda1 is the disk to convert from GPT to MBR. You can see the result of the partition table scan on this disk GPT is present on it.
or use –
sudo gdisk
This will ask you to enter the name of the disk, enter the disk name and then press the return key. It also displays the partitioning scheme available on the disk.
Note:- Here /dev/sda1 is not a partition it is a separate disk, replace /dev/sda1 with the correct drive name on your system for example it could be /dev/sda on your system.
Step 3: Use the recovery and transformation options
Now enter r and then press the return key. Enter the g to convert the disk from GPT to MBR. Next, use the w to write the partition table.
Press the y if asked to accept.

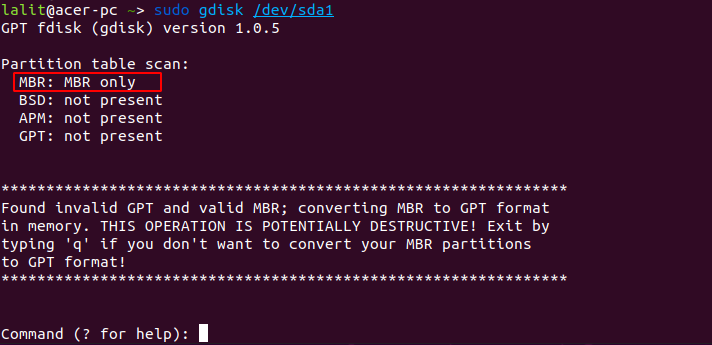
Now the conversion is successful you can verify this by running the following command in the terminal –

As you can see the partition table on this disk is MBR only.
Conclusion
By following this you successfully converted the GPT disk into MBR. Now if you have a query on this then write us in the comments section.

muy confuso
Does not work with gdisk 1.0.8
I have still
MBR: protective
BSD: not present
APM: not present
GPT: present
This saved me SOOOOO much time. Thank you so much for this. I had a terabyte of data on a drive that was GPT formatted in linux to NTFS that then would not read in Windows. Converting it to MBR let it now work in both without spending hours copying then re-copying back.
hawa diha
This is wrong and actively harmful. You need to gdisk /dev/sda, not sda1 – in other words, you need to give it the block device for the entire disk, not a single partition.
Thanks reinderien for pointing this out.
Actually, I demonstrated this guide on a virtual machine with a USB drive which is listed as sda1 on it. I did not know that it could confuse many readers.
By the way I added a separate note for this.