FreeBSD is the operating system used to power modern servers, desktops, and embedded platforms. By default, it utilizes the GENERIC kernel to support a wide range of hardware. Building a custom kernel has its own advantages such as enhanced functionality, better performance, etc.
This article describes how to compile, build, and install a custom kernel on FreeBSD 12.1.
Why build a FreeBSD custom kernel?
Building and installing a custom kernel has various benefits –
- Faster boot time because it has to probe only hardware on the system.
- A custom kernel is useful on the system which has a small amount of RAM. It omits the unused features and drivers of the
GENERICkernel and prevents them from loading into physical memory. - It can add support to the devices that are not present in the
GENERICkernel.
Prerequisites
You should have a running instance of FreeBSD 12.1 x64
Obtaining the FreeBSD source code
In order to create a custom configuration file and build a custom kernel, you need to download the FreeBSD source code. If /usr/src/ is empty that means the source has not been installed on your system. FreeBSD uses subversion as the only version control system for storing source code, ports collection, documentation, etc.
To download the source code we first need to download the subversion, as root or with superuser privilege run the following command in your terminal –
# pkg install -y subversion
Now subversion is installed, to check out the latest stable branch of FreeBSD to /usr/src/ directory use –
# svn co https://svn0.us-east.freebsd.org/base/stable/12/ /usr/src
You may be promoted to accept a server certificate as given in the image below. Enter p to accept it.

This will take a few minutes to download depending on your internet speed and system performance.
Creating a custom configuration
If you review the content of /usr/src/sys, you will find there are various subdirectories including those which represent the supported architecture such as amd64, i386, PowerPC, and sparc64. Each of these supported architecture has conf subdirectory which contains the GENERIC kernel configuration file for that architecture.
Here we will create a custom configuration file for amd64 architecture. The standard kernel configuration file naming convention is to use a name in capital letters. Instead of directly editing GENERIC, create and copy the content of GENERIC to a different file. We will create and copy it to the CUSTOM file.
First, move to the directory which contains the GENERIC file –
# cd /usr/src/sys/amd64/conf
And then use –
# cp GENERIC CUSTOM
Now edit the CUSTOM file by using a text editor you can use vi or nano –
# nano CUSTOM
Please note that if you are going to use nano then you first need to install nano in your system.
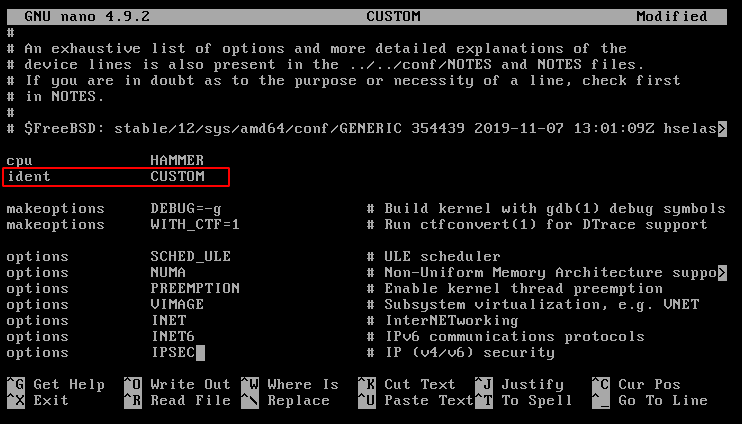
When this file opens, scroll and find ident and change the value from GENERIC to CUSTOM as given in the image below. You can also see the format of this file in the image.

The format of this file is simple, each line contains a keyword that represents a device or subsystem, an argument, and the description about it.
To remove the kernel support for a device or subsystem put a # at the beginning of the line representing that device. Or if you want to enable a feature or the support for a device then remove the # from the beginning of the line representing that device.
Using include directive
The other way to add a new feature or device support to the system is to use include directive. This allows other configuration files to include in the GENERIC configuration file. For example, the CUSTOM is a configuration file as given below which brings new features to the kernel –
include GENERIC
ident CUSTOM

options         IPFIREWALL
options         TCP_SIGNATURE
options         IPFIREWALL_DEFAULT_TO_ACCEPT
You can add a new feature or support for a device by adding lines as given above in this file. Finally, save this file and exit from the editor.
Compile and build your custom kernel
Once you are done with editing kernel configuration file now use the following command to compile and build the custom kernel.
First, change the current working directory to /usr/src/ by using –
# cd /usr/src/
And then use the following command –
# make buildkernel KERNCONF=CUSTOM
This will start compiling the kernel with new configurations. This will take some time once done it will display the following message.
----------------------------------------------------------------------
>>> Kernel build for CUSTOM completed on Thu July 23 09:24:38 IST 2020
----------------------------------------------------------------------
Install custom kernel in your system
Now you finished building kernel use the following command to install it in your system.
# make installkernel KERNCONF=CUSTOM
It will also take a few minutes to complete. Once it finished you will see the following message –
-----------------------------------------------------------------------
>>> Installing kernel CUSTOM completed on Thu July 23 10:07:38 IST 2020
-----------------------------------------------------------------------
Now reboot your system to boot into the custom kernel by executing –
# reboot
