Kernel-based virtual machine or KVM is a virtualization module in the Linux Kernel which turns the Linux kernel into a hypervisor. By using KVM you can easily create, manage and deploy virtual machines.
Sometimes you may need to extend or add disk space to the existing VM (guest) to satisfy the user’s requirements. So in this article, we will discuss the steps to increase the disk size of a virtual machine on KVM.
Steps to resize the disk size of a VM on KVM
Generally, you need to follow the given steps to extend the size of a running KVM virtual machine.
- Shutdown the VM
- Locate the VM disk
- Extend the size of the VM
Shutdown the virtual machine on KVM
Open terminal on your host computer by pressing ctrl+alt+t and then use the following command to list all the running virtual machines.
sudo virsh list
As you can see in the image currently one VM is running with the name KaliLinux and id 1. We will increase the disk space of this virtual machine.

Now use the following command on your system to shut down the running VM –
sudo virsh shutdown KaliLinux

You can verify the state of the virtual machine by running the VM listing command again –
sudo virsh list
Locate the virtual machine disk
Execute the given command to find the disk space path.
sudo virsh domblklist KaliLinux
You will get output like this –

By using the given command view the settings of this VM –
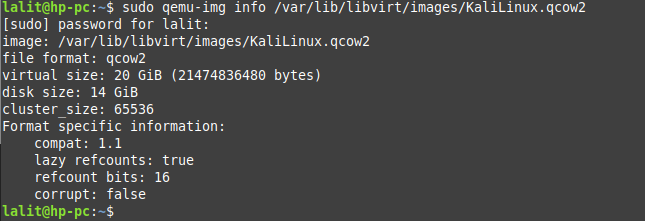
sudo qemu-img info /var/lib/libvirt/images/KaliLinux.qcow2
You will see output like this –

Where,
virtual size – The virtual size is the max size of the disk allotted to VM when it was created
disk size – It is the size of the disk which is occupied on the server
Increase the disk size of VM on KVM
To increase the disk size you can use the qemu-img resize command. This command will not resize the VM that has snapshots so to resize the disk size of the VM that has snapshots either delete the snapshots or use a different command.
Use the following command to see a snapshot list of a virtual machine –
sudo virsh snapshot-list KaliLinuxIf you see a snapshot then first delete it using –
sudo virsh snapshot-delete --domain KaliLinux --snapshotname snapshot1Now use the following command to increase the size of disk –
sudo qemu-img resize /var/lib/libvirt/images/KaliLinux.qcow2 +5GThis will resize the image –
![]()
You can verify the size by running –
sudo qemu-img info /var/lib/libvirt/images/KaliLinux.qcow2

Alternatively, you can resize the disk size by using the virsh command –
sudo virsh start KaliLinuxAnd then run –
sudo virsh blockresize rhel8 /var/lib/libvirt/images/KaliLinux.qcow2 25GYou can check new disk size and layout by login into your VM and use –
lsblk
Conclusion
I hope now you know how to increase the disk size of a virtual machine. If you have any query then write us in the comments below.
